Data Tab – Rearing
Query
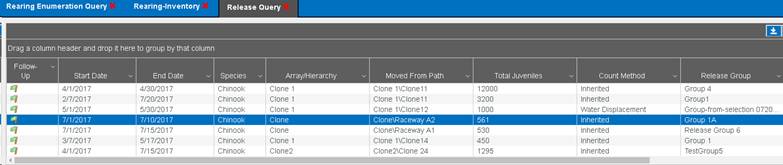
The Rearing Query provides records that have been moved into and from
Rearing Containers. Use the Filter Tool provided to limit Query results to a
specific data set. Rearing records can be filtered using the Filter Tool, by
the Facility/Location and Species. The Start and End Date default to a one-year
time span, but are customizable to any date range you prefer. Data may be
downloaded to Excel ‘filtered’ by clicking on the Download Excel file link or
unfiltered by clicking on the ‘everything’ link.
The Rearing Query also allows you to look at data for multiple Record
Types, they are:
·
Move: Record Type
created when a Juvenile is moved in or out of a Rearing Container to any other
Location Type, including another Rearing Container
·
Mort: Record Types
created when Morts are entered as being Picked from a Rearing Container
·
Enumeration: Record
Types created when Enumerations are made on a Rearing Container
·
Identifier: Record
Types created when Identifiers are Applied/Edited/Deleted from Juveniles in a
Rearing Container
The
Columns in the Rearing Move Query are:
|
Finalize
|
Moved From Array
|
Release Type
|
|
Verify
|
Moved From Path
|
Release Type Description
|
|
Follow-Up
|
Moved From
|
Release Type Facility
|
|
Current Record
|
Moved To Facility
|
Release Type Agency
|
|
Action Location
|
Moved To Array
|
Enumerated On Move
|
|
Move Type
|
Moved To Path
|
Identified On Move
|
|
Date
|
Moved To
|
Total Temperature Units
|
|
Time
|
Release Site Latitude
|
Notes
|
|
Species
|
Release Site Longitude
|
Group Notes
|
|
Stock
|
Disposition
|
|
|
Stock Description
|
Purpose
|
|
|
Stock Facility
|
Release Strategy
|
|
|
Stock Agency
|
Release Strategy Description
|
|
|
Program
|
Release Strategy Facility
|
|
|
Moved From Facility
|
Release Strategy Agency
|
|
The
Columns in the Rearing Mort Query are:
|
Finalize
|
Program
|
Marks Quantity
|
|
Verify
|
Stock
|
Tags
|
|
Follow-Up
|
Stock Description
|
Tags Quantity
|
|
Date
|
Stock Facility
|
CWT
|
|
Time
|
Stock Agency
|
CWT Quantity
|
|
Facility
|
Mort Count
|
PIT
|
|
Array
|
Juvenile Count
|
PIT Quantity
|
|
Container Path
|
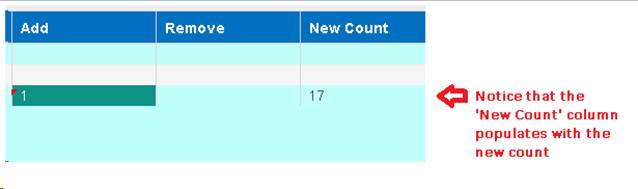
New Count
|
Notes
|
|
Container
|
Identifier Removal Method
|
Group Notes
|
|
Species
|
Marks
|
|
The
Columns in the Rearing Enumeration Query are:
|
Finalize
|
Program
|
Marks Quantity
|
|
Verify
|
Container
|
Stock
|
|
Follow-Up
|
Array
|
Stock Description
|
|
Current Record
|
Container Path
|
Stock Facility
|
|
Date
|
Container
|
Stock Agency
|
|
Time
|
Enumeration Method
|
Program
|
|
Facility
|
Inventory Juvenile Count
|
Group Notes
|
|
Array
|
Justification
|
Move Type
|
|
Container Path
|
Species
|
Enumeration Type
|
The
Columns in the Rearing Identifier Query are:
|
Action
|
Moved From Array
|
Simultaneous Applied
|
|
Date
|
Moved From
|
Excluded Marks
|
|
Time
|
Applied Marks
|
Excluded Tags
|
|
Action Location Facility
|
Applied Tags
|
Excluded CWT
|
|
Action Location Path
|
Applied CWT
|
Excluded PIT
|
|
Action Location Array
|
CWT Quantity
|
Description
|
|
Action Location
|
Applied PIT
|
|
|
Moved From Path
|
PIT Quantity
|
|
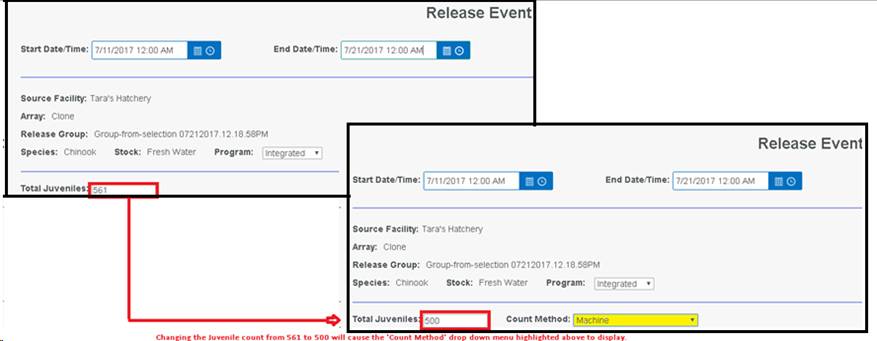
View Release Summary data –
Data input in
the Release Summary tab of the Release Event form is displayed in the FINS Data
Tab Release Query in the Column labeled ‘Release Summary’.
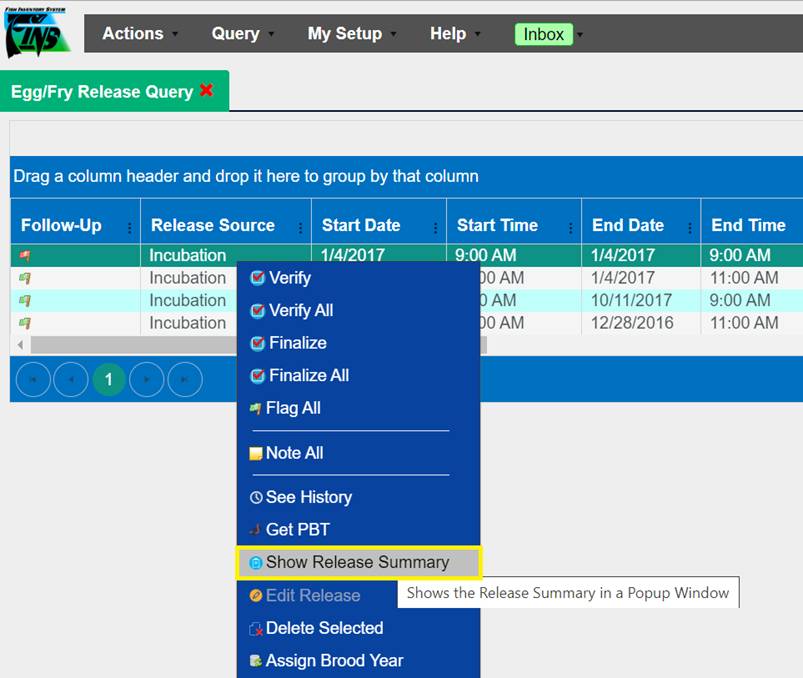
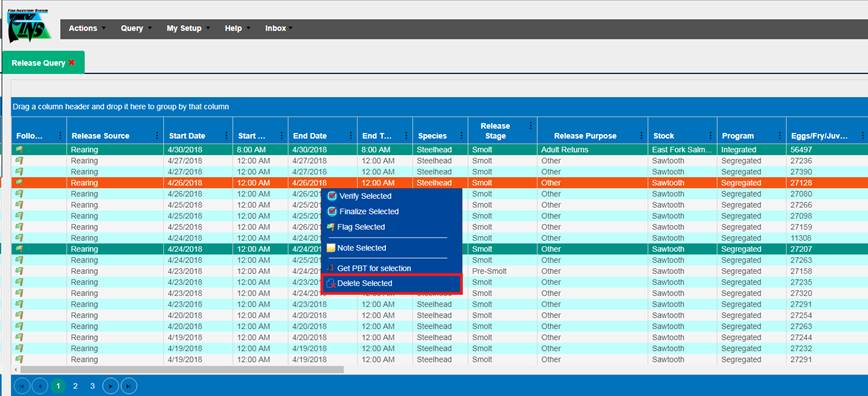
To view the
Release Summary data from FINSNet.org > Data Tab > Query Tool >
Release Query, follow the steps below:
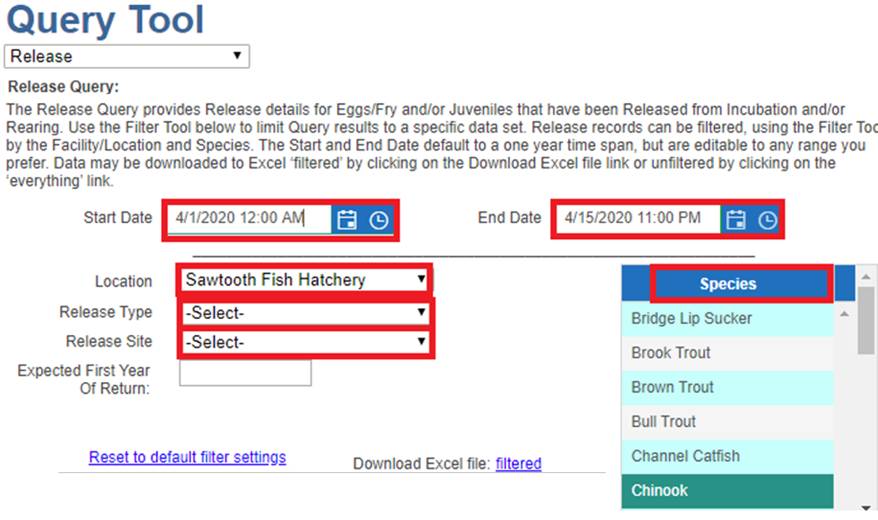
1. Using
the Query Tool, select Query > Release from the dropdown menu
2. Set
the Release Query Filters:
a. Start Date and End
Date (Required filter)
b. Location (Required
filter)
c. Release Type
(Egg/Fry or Juveniles) (Required filter)
d. Release Site
(Optional filter)
e. Expected First
Year of Return (Optional filter)
f. Species
(Defaults to Chinook; Optional filter but recommended)
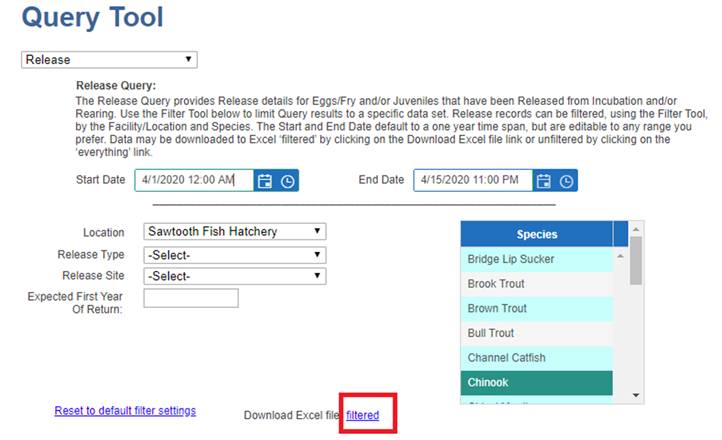
3. Click
on ‘filtered’ to download the Release Query with the filters applied.
4.
Once the Excel Sheet is downloaded, refer to column BH to view the
Release Summary data entered for each Release in the Release Query. Release
Summary data will display as it was typed from the Release Form in FINS Online.

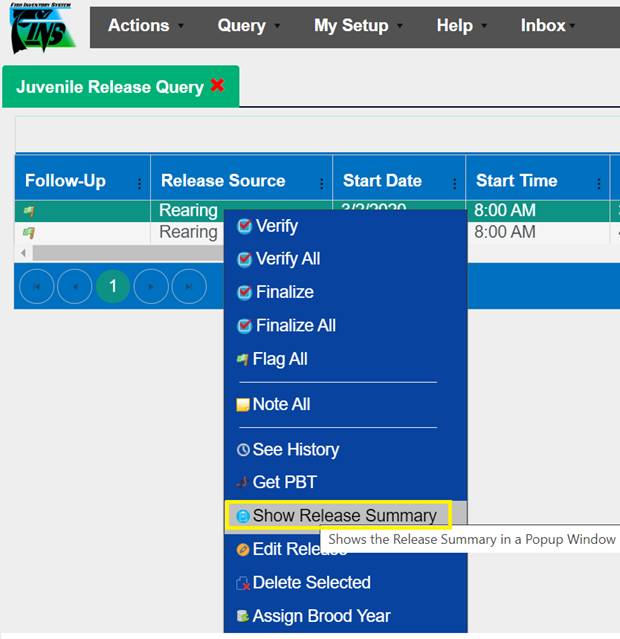
FINS Online > Release Query
Data displayed in the Release
Summary column in the Release Query can also be viewed from FINS Online.
Click
Here to learn how to view the Release Summary column data
from FINS Online.
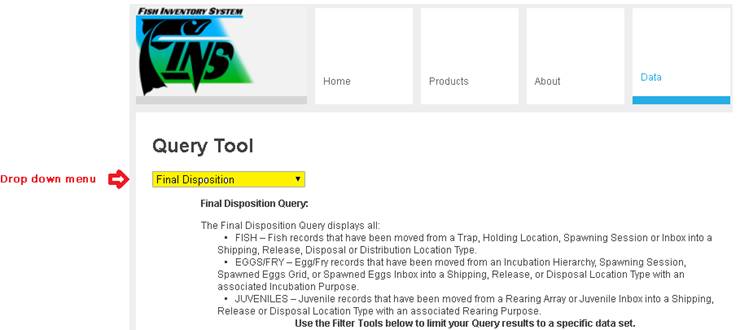
FINSNet.org>Data Tab>Query
Tool>Query>Final Disposition
The Final
Disposition Query displays records that have been moved to a Final Disposition:
Fish- Fish records that have been moved from a Trap,
Holding Location, Spawning Session or Fish Inbox into a Shipping, Release,
Disposal or Distribution Location Type.
Eggs/Fry- Egg/Fry records that have been moved
from an Incubation Hierarchy, Spawning Session, Spawned Eggs grid or Egg Inbox
into a Shipping, Release or Disposal Location Type with an associated
Incubation Purpose.
Juveniles- Juvenile records that have been moved from a Rearing
Array or Egg or Juvenile Inbox, into a Shipping, Release or Disposal Location
Type with an associated Rearing Purpose.
Use Case
The Final
Disposition Query allows users to view the Final Disposition of Fish, Eggs/Fry,
and/or Juveniles from FINS Traps, Holding Locations, Spawning Sessions, and
from Incubation and/or Rearing containers.
Users are
able to filter out Final Disposition Data by Date, Record Type, Location:
Facility/Program, Location: Spawning/Hierarchy/Array and Species.
Steps
1. Go
to the Data tab and click on the Query Tool drop down menu located to the left
of your screen, then select the ‘Final Disposition’ Query.
2.
Set the ‘Start Date’ & ‘End Date’ with the dates you want to
query for moves into Final Dispositions.
Start and End
Date default to a one-year time span, unless set otherwise.

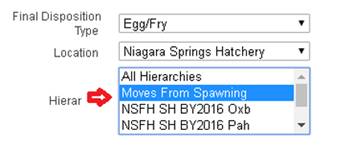
3.
Select your preferred ‘Final Disposition Type’.
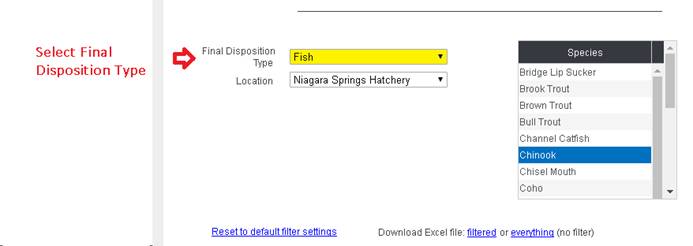
Options include:
a) Fish – For Fish records that have been moved from a Trap,
Holding Location, Spawning Session or Fish Inbox into a Shipping, Release,
Disposal, or Distribution Location Type.
b) Egg/Fry – For Egg/Fry
records that have been moved from an Incubation Hierarchy, Spawning Session,
Spawned Eggs grid or Egg Inbox into a Shipping, Release, or Disposal Location
Type with an associated Incubation Purpose.
c) Juvenile – For
Juvenile records that have been moved from a Rearing Array or Egg or Juvenile
Inbox into a Shipping, Release, or Disposal Location Type with an associated
Rearing Purpose.
If ‘Fish’ is selected; the dataset will provide all
Final Disposition records for Fish:
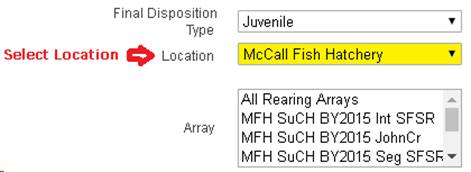
4.
Select the Location: Facility/Program of interest.
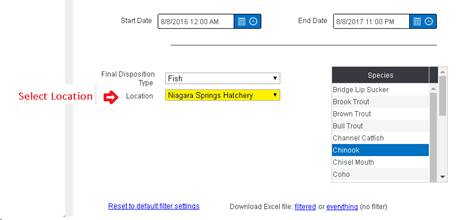
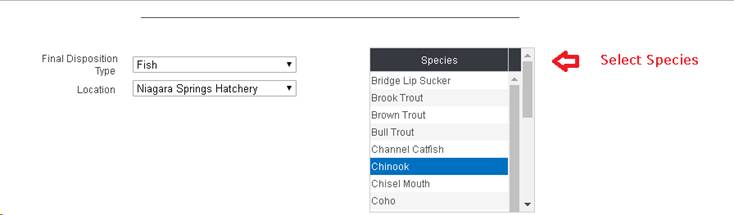
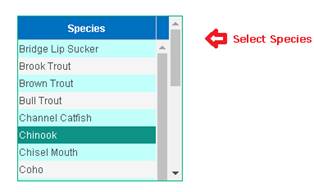
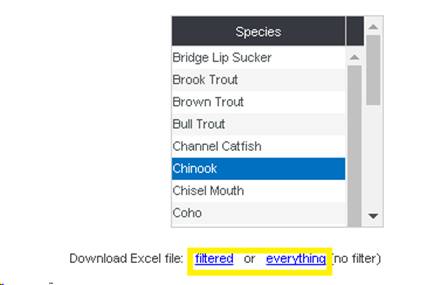
5.
Select the Species of interest.
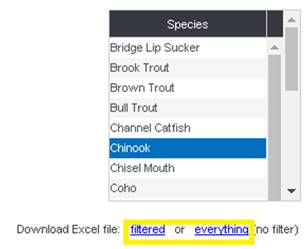
6.
Click on ‘filtered’ to have the filter settings apply to the
download, or ‘everything’ to get all data regardless of the filter setting
applied, depending on the data desired.

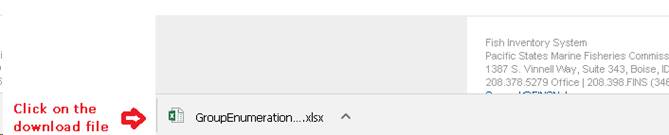
7. A file will download and appear on the bottom left of
the browser. Click on the downloaded file to Open.

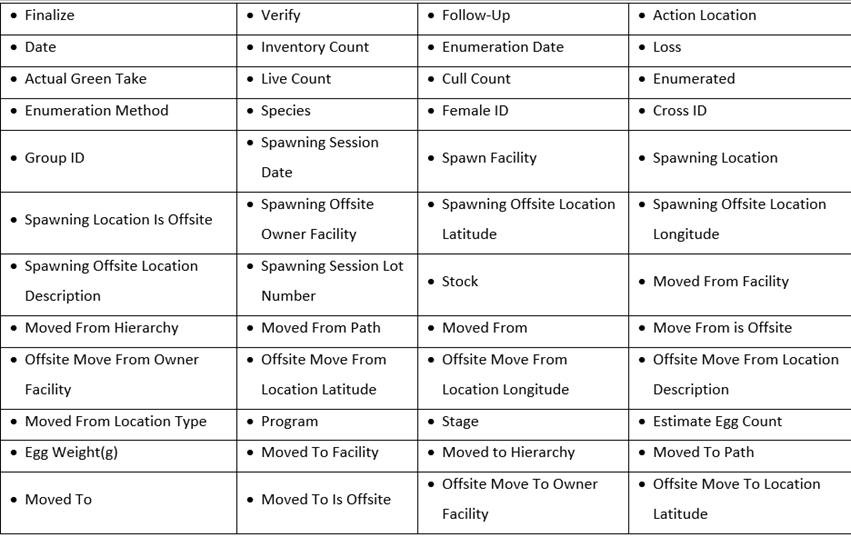
8.
An Excel file will download
with the following columns with data where applicable:
|
· Follow Up
|
· Species
|
· Age Calculated
|
· Age Criteria End Length
|
|
· Record Type
|
· Sex
|
· Age Criteria Start Date
|
· Age Designation
|
|
· Date
|
· Count
|
· Age Criteria End Date
|
· Trap
|
|
· ID
|
· Length
|
· Age Criteria Start Length
|
· Source Trap Facility
|
|
· Source Trap
|
· Origin
|
· Origin Expression
|
· Origin Description
|
|
· Origin Creator
|
· Origin Creation Date
|
· Moved From Facility
|
· Moved From
|
|
· Moved From Location Type
|
· Moved From Is Offsite
|
· Offsite Moved From Owner Facility
|
· Offsite Moved From Location
Latitude
|
|
· Offsite Moved From Location
Longitude
|
· Offsite Moved From Location
Description
|
· Moved to Facility
|
· Moved To
|
|
· Living State
|
· Disposition
|
· Purpose
|
· Existing Marks
|
|
· Existing Marks Quantity
|
· Applied Marks
|
· Applied Marks Quantity
|
· Existing Tags
|
|
· Applied Tags
|
· Existing CWT
|
· Existing CWT Value
|
· Applied CWT
|
|
· Applied CWT Value
|
· Existing PIT
|
· Applied PIT
|
· Samples
|
|
· Conditions
|
· Notes
|
|
|
If
‘Egg/Fry’ is selected; the dataset will provide all Final Disposition records
for Egg/Fry:
1.
Select the Location: Facility/Program of interest.
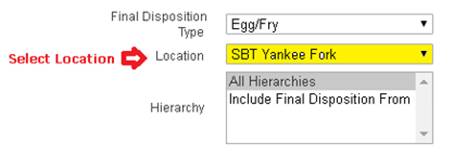
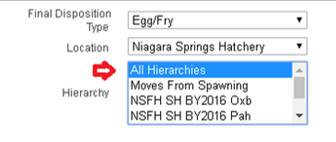
2. Select
the Incubation Hierarchy, All Hierarchies and/or No Hierarchy.
a) Set
the Hierarchy of interest
·
to ‘All Hierarchies’ to retrieve data for all Hierarchies of that
Facility/Program
·
or select a single Hierarchy form the list
·
and/or multiple Hierarchies of interest from the list
To select
multiple Hierarchies, hold down the ‘Ctrl’ key and select all the Hierarchies
of interest
b) Set
the Hierarchy to ‘Moves From Spawning’.
If you are interested in acquiring Moves to Final
Dispositions that were never placed into an Incubation Hierarchy, but were
instead moved directly from a Spawning Session and/or Spawned Eggs grid to a
Final Disposition.
3.
Select the Species of interest.
4.
Click on ‘filtered’ to have the filter settings apply to the
download, or ‘everything’ to get all data regardless of the filter setting
applied, depending on the data desired.
5.
A file will download and appear on the bottom left of the browser.
Click on the downloaded file to Open.
6.
An Excel file will download with the following columns with data
where applicable:

If
‘Juvenile’ gets selected; the dataset will provide all Final Disposition
records for Juveniles:
4.
Select Location: Facility/Program of interest.
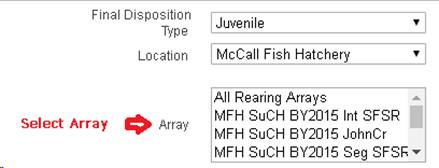
5.
Select Location: Rearing Array of interest.
To select multiple Arrays, hold down the ‘Ctrl’ key and
select all the Arrays of interest
6.
Select Species of interest.

7.
Click on ‘filtered’ or ‘everything’ depending on the data that you want
to download.
8.
A file will download and appear on the
bottom left of the browser. Click on the downloaded file to Open.
9.
An Excel file will download with the following columns with data where
applicable:

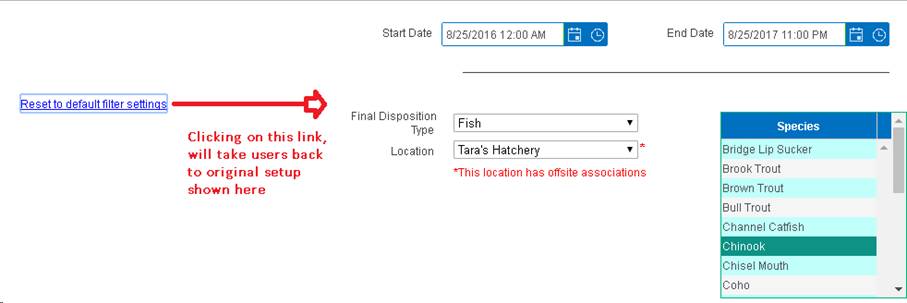
10. To
reset filter settings back to default, click on the ‘Reset to default filter
settings’ link. Clicking on the link will reset all fields in the ‘Final
Disposition’ query back to their original state shown below.
Use Case:
The Search FINS Query Tool gives
users the capability to search FINS Data and generate tailored Summaries so
that users can download and share the data they are trying to retrieve with
other users within their Domain/Agency/Facility.
The Search FINS Query Tool dynamically updates based off the
query selections made by the user, and every selection made in the Search
Filters will further filter the FINS Data Searched.
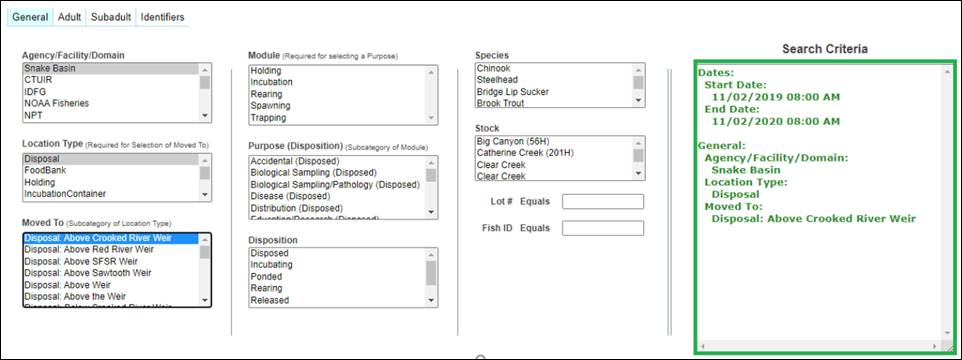
Search FINS
>Search>General>Filter Selections
Business Logic/Validation
·
Search Criteria
o
The Search Criteria field will display the selections of the User
as selections are being made so that users have clear visibility of the filter
selections made.
·
*Date/Time
o
Selecting a Date Range or selecting All Dates/Times is required
if a Brood Year is not selected. This could be done by selecting or manually
entering a date range or checking the all dates/times box shown below.

o
The Default dates link will reset the Start Date to the present
date and the End Date to one year in the future from the present date.

o
To search by All Dates/Times click on the ‘All Dates/Times’
checkbox.
*Note-Filtering
by ‘All Dates/Times’ without further filtering by other filter selections is
NOT recommended as this will cause excessive load/waiting times.
·
Brood Year
o
Selecting a Brood Year is required if a Date/Time or All
Dates/Times checkbox is not selected.
o
Select zero or more Brood Years from the list.
o
Selecting a Brood Year will disable Start and End Date
selections.
o
Hold down ‘Ctrl’ key to select multiple Brood Years or to
unselect Brood Years.
o
Unselecting all Brood Years will re-enable Start/End Date.
o
Selecting a Brood Year will search data from Spawning,
Incubation, Rearing and Release Modules; Selecting a Brood Year excludes
searching Trapping/Holding Module data since Brood Year is assigned to data
beginning at Spawning.
·
Agency/Facility/Domain
o
Is limited to user’s associated Domain.
o
Selecting an Agency/Facility/Domain is required to filter the
data search by the selection made.
o
Agency/Facility/Domain does not default to a specific
Agency/Facility/Domain and requires user to make a selection.
o
Location Type, Moved To and Stock filter selections will load
based off Agency/Facility/Domain selections made.
§
Location Type/Moved To filter selections load based off
Agency/Facility/Domain selections made.
§
Stock filter selections load upon initial selection of
Agency/Facility/Domain selection.
o
To select/unselect multiple filter selections, hold down ‘Ctrl’
key and make your selections.
·
Location Type (Refines Selections For Moved To)
o
Location Type is a function of Agency/Facility/Domain selection.
o
Select the location type(s) of locations to include in the
search.
o
Selecting a Location Type is required to further filter the Moved
To filter selections.
o
Selecting a Location Type without selecting a Moved To location,
will NOT return data specific to the Location Type selected unless both a
Location Type and Moved To location filter selection is made.
o
Select multiple Location Types by holding down the ‘Ctrl’ key.
·
Moved To (Subcategory of Location Type)
o
Select the move to location(s) to include in the search.
o
Selecting a Moved To Location is optional.
o
Moved To Location filter selections are dependent on
Agency/Facility/Domain selection and Location Type selection.
o
Moved To filter is a subcategory of Location Type.
§
If a Location Type is not selected, FINS will provide users with
all Moved To filter selections associated to the Agency/Facility/Domain
selected.
o
Hovering over a filter selection will display the Facility,
Location Type and Full Name of the Location to provide users with additional
information.
o
Select multiple Moved To Locations by holding down the ‘Ctrl’
key.
·
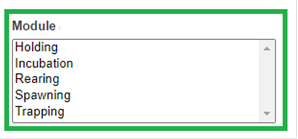
Module (Refines Selections For Purpose)
o
Select the module(s) to filter the Purpose list by the module(s)
selected.
§
Selecting a Module is not required for selecting a Purpose
§
However, selecting a Module without selecting a Purpose will NOT
return data specific to Module selected unless both a Module and Purpose filter
selection is made.
o
Module Selections will further filter Purposes filter selections.
§
Trapping/Holding/Spawning will filter for Fish Purposes.
§
Incubation will filter for Egg/Fry Purposes.
§
Rearing will filter for Juvenile Purposes.
o
Select multiple Modules by holding down the ‘Ctrl’ key.
·
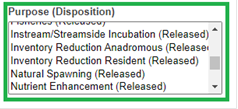
Purpose (Subcategory of Module)
o
Purpose list will be further filtered if a specific Module is
selected.
o
Disposition associated to the Purpose is displayed in parenthesis
for each Purpose
§
For Example - Purpose: Accidental (Disposed)
§
Purpose is Accidental which is available for data with the
Disposed Disposition
o
Purpose list will be further filtered if a specific Module has
been selected.
§
Selecting a Module is not required to select a Purpose.
§
However, if a Module is NOT selected, the Purpose list will
provide users with Fish, Egg/Fry, and Juvenile Purposes list.
o
FINS provides users with a brief definition of the Purpose
selected by hovering over selected Purpose(s).
o
Select multiple Purposes by holding down the ‘Ctrl’ key.
·
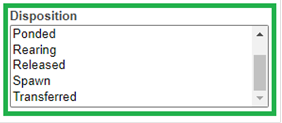
Disposition
o
Selection filters search data by Disposition of Adult/Sub-adults.
o
FINS provides users with a brief definition of the Disposition
selected by hovering over selected Disposition(s).
o
Selecting a Disposition is optional.
o
Select multiple Dispositions by holding down the ‘Ctrl’ key.
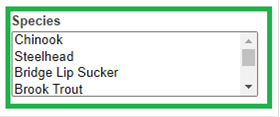
·
Species
o
Select the species to filter by in the search.
o
Selecting a Species will allow users to filter by specific
Species selected.
o
Selecting a Species is optional.
o
To select multiple Species selections, hold down ‘Ctrl’ key and
make your selections.
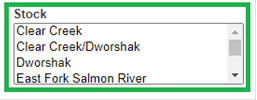
·
Stock
o
Selecting a Stock is optional.
o
Selecting a Stock only applies to Adult Spawning & Subadult
records.
o
The filter selection options are limited by the
Agency/Facility/Domain selections.
§
Hovering over a Stock filter selection will display the
Agency/Facility associated to it
o
To select multiple Stock selections, hold down ‘Ctrl’ key and
make your selections.
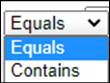
·
Lot #
o
Lot # search criteria will further filter search by Lot #
entered.
o
Equals/Contains Searches.
§
Defaults to ‘Equals’ Search.
·
Select ‘Equals’ when looking for a specific Lot # (i.e. Lot # 4).
§
Click on the (Equals) label to change to ‘Contains’ Search.
·
Select ‘Contains’ when looking for a specific range of Lot #s.
(i.e. all Lot #’s that contain the number 4)
o
Lot # only applies to Adult Spawning & Subadult data.
o
Entering a Lot # is not a required search filter.
·
Fish ID
o
ID assigned to each Trapping record within a Trapping Session.
o
Equals/Contains Searches.
§
Defaults to ‘Equals’ Search.
·
Select ‘Equals’ when looking for a specific Fish ID. (i.e. Fish
ID 4).
§
Click on the (Equals) label to change to ‘Contains’ Search.
·
Select ‘Contains’ when looking for a specific range of Fish IDs
(i.e. all Fish IDs that contain the number 4).
o
Fish ID search criteria will further filter search by Fish ID
entered.
o
Entering a Fish ID is not a required search filter.
·
Spawn ID
o
Spawn ID is the Female or Male ID assigned to a Spawning Session
record (for both Spawned and/or Not Spawned spawn status fish).
o
Equals/Contains Searches.
§
Defaults to ‘Equals’ Search.
·
Select ‘Equals’ when looking for a specific Spawn ID. (i.e. Spawn
ID OtsRAPH10)
§
Click on the (Equals) label to change to ‘Contains’ Search.
·
Select ‘Contains’ when looking for a specific range of Spawn IDs
(i.e. all Spawn IDs that contain ‘RAPH’.)
o
Spawn ID search criteria will further filter Adult Spawn records
by Spawn ID entered.
o
Entering a Spawn ID is not a required search filter.
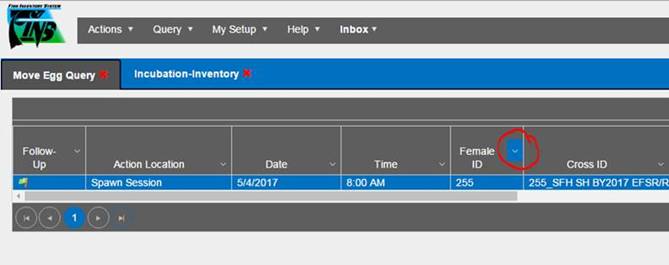
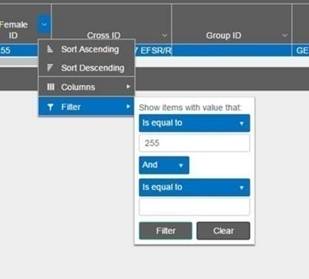
·
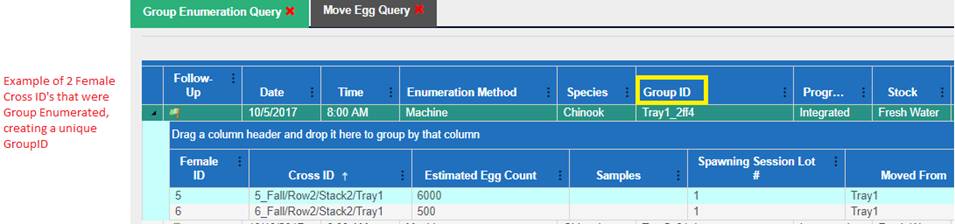
Cross/Group ID
o
Cross ID is the Female Spawn ID & Immediate Container name
where Eggs were placed for a Spawn Cross. Combined to create a Unique ID for
each Cross within a Spawn Session.
o
Group ID is a Unique ID assigned by the database for a combined
egg group after Group Enumeration.
o
Click on the (Equals) label to change.
§
Equals is default selection.
§
User can change selection to Contains.
§
Select ‘Equals’ when looking for a specific Cross/Group ID. (i.e.
Cross/Group ID number 4).
§
Select ‘Contains’ when looking for a specific range of
Cross/Group ID’s #s.
o
Entering a Cross/Group ID is not required.
o
Cross/Group ID will further filter records by Egg records
associated with the Cross/Group ID entered.
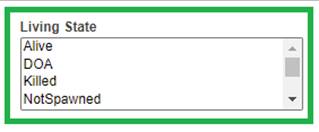
·
Living State
o
Living State refers to the Living State of Adult Fish at
Trapping/Holding/Spawning.
o
Selecting a Living State will further filter Adult data by Living
State(s) selected.
o
There is no connection between selections made in the Living
State/Sex/Origin fields in the Adult Tab (i.e. all selections in the Sex &
Origin fields will display regardless of what is selected in the Living State
field).
o
Multiple Living States can be selected by holding down the ‘Ctrl’
key and making your selections.
o
Selecting a Living State is optional.
o
If a Living State is not selected, FINS will include all Living
States available based off filter selections made and displaying in Search
Criteria.
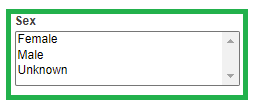
·
Sex
o
Sex refers to Adult Sexed Fish at Trapping/Holding/Spawning.
o
Selecting a Sex will further filter Adult data by Sex selected.
o
There is no connection between selections made in the Living
State/Sex/Origin fields in the Adult Tab (i.e. all selections in the Living
State & Origin fields will display regardless of what is selected in the
Sex field).
o
To multi select, hold down the ‘Ctrl’ key and make your
selections.
o
Selecting a Sex is optional.
o
If a Sex is not selected, FINS will include all Sexed Fish
(Male/Female/Unknown) data available, based off all other filter selections
made.
·
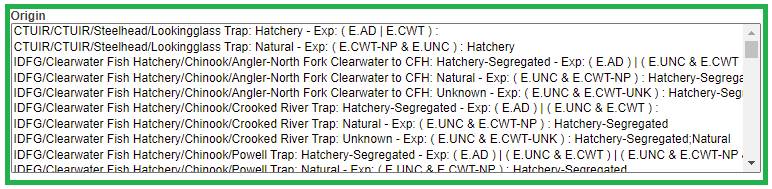
Origin
o
Origin refers to Origin of the Trapped Fish in the Trapping
record, as calculated from the Marks and Tags present when the fish was
trapped.
o
Origin selections display by Agency/Facility/Species/Trap/Origin
Name/Origin IDs.
o
Selecting an Origin will further filter Adult data by Origin(s)
selected.
o
There is no connection between selections made in the Living
State/Sex/Origin fields in the Adult Tab (i.e. All selections in the Sex &
Living State fields will display regardless of what is selected in the Origin
field).
o
To multi select, hold down the ‘Ctrl’ key and make your
selections.
o
Selecting an Origin is optional.
o
If an Origin is not selected, FINS will include all Origins data
available, based off all other filter selections made.
o
When Fish are transferred between facilities, the Original
Hatchery's Origin information (where the Fish were moved from) is transferred
to the destination location. This allows for accurate tracking when Fish are
transferred to another Facility with no defined Origins.
§
This also applies when the Fish transferred to another FINS
facility have the same Identifiers but different Origins. In this situation,
the Original Hatchery's Origin information (where the Fish were transferred
from) is transferred to the destination location, even if the receiving
Hatchery has different Origins for Fish with the same Identifiers applied.
·
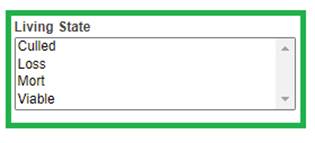
Living State
o
Living State refers to the Living State of Sub Adults
(Egg/Fry/Juveniles).
o
Selecting a Living State will further filter Sub Adult data by
Living State(s) selected.
o
There is no connection between selections made between the Living
State & Stage in the Sub Adult Tab. (i.e. All selections in the Stage field
will display regardless of what is selected in the Living State field)
o
To multi select, hold down the ‘Ctrl’ key and make your
selections.
o
Selecting a Living State is optional.
o
If a Living State is not selected, FINS will include all Living
States available, based off all other filter selections made.
·
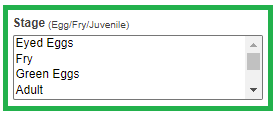
Stage (Egg/Fry/Juvenile)
o
Stage refers to the stage of Sub Adults.
o
Selecting a Stage will further filter selections made by the
Stage(s) selected.
o
There is no connection between selections made between the Stage
& Living State in the Sub Adult Tab. (i.e. All selections in the Living
State field will display regardless of what is selected in the Stage field).
o
To multi select, hold down the ‘Ctrl’ key and make your
selections.
o
Selecting a Stage is optional.
o
If a Stage is not selected, FINS will include all Stages
available, based off all other filter selections made.
·
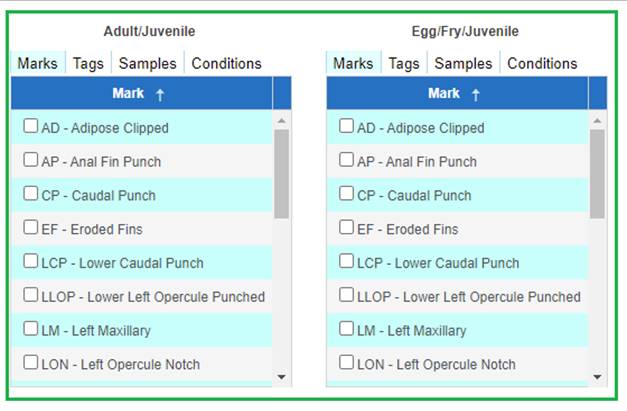
Adult/Juvenile Identifiers
o
Selecting an Identifier from the Adult/Juvenile Identifier grid
will return Trapping/Holding/Adult Spawning/Rearing/Release modules if any data
exists for the filter parameters selected and displaying in the Search Criteria
display box.
o
Users can multi select Identifiers
(Marks/Tags/Samples/Conditions) by clicking on the checkbox of the Identifier
they want to search for. Users can navigate between tabs to select the
different Identifier types.
o
Tag and Sample Identifiers allow users to search for a specific
Tag/Sample value by entering the value in the Value field.
·
Egg/Fry/Juvenile Identifiers
o
Selecting an Identifier from the Egg/Fry/Juvenile Identifier grid
will return PBT data for Incubation/Rearing/Juvenile Release modules if any
data exists for the filter parameters selected and displaying in the Search
Criteria display box.
o
Users can multi select Identifiers
(Marks/Tags/Samples/Conditions) by clicking on the checkbox of the Identifier
they want to search for. Users can navigate between tabs to select the
different Identifier types.
o
Tag and Sample Identifiers allow users to search for a specific
Tag/Sample value by entering the value in the Value field.
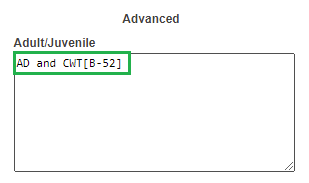
·
Advanced – The Advanced section allows users to search for
Identifiers/Identifier combinations that cannot be searched for within the
Identifiers grid list.
o
The functionality is the same in both the Advanced Adult/Juvenile
and Egg/Fry/Juvenile sections. Examples of this include but are not limited to
the examples shown below:
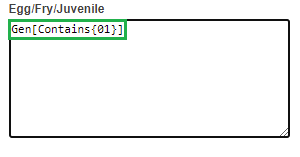
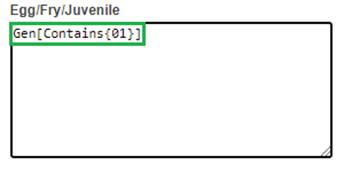
§
Searching for Juveniles that contain a CWT Identifier value of
‘01’. Example below:
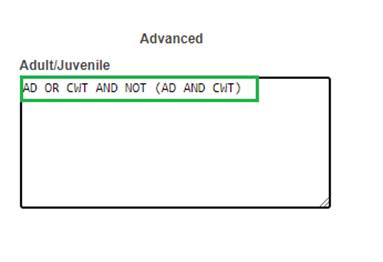
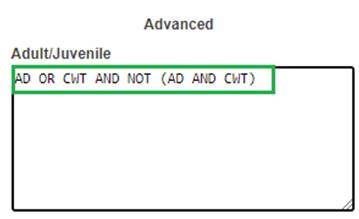
§
Searching for Adult Fish that contain an AD or CWT, but not both.
Example below:
§
Searching for Adult Fish that contain AD and a CWT value of B-52.
Example below:
o
Typing an Identifier value/combination in the Advanced
Adult/Juvenile Identifier grid will return Trapping/Holding/Adult
Spawning/Rearing/Release data if any data exists for the value/combination
entered and displaying in the Search Criteria display box.
o
Typing an Identifier value/combination in the Advanced
Egg/Fry/Juvenile Identifier grid will return Incubation/Rearing/Juvenile
Release data if any data exists for the value/combination entered and
displaying in the Search Criteria display box.
o
Additional syntax examples can be found by hovering over one of
the advanced ID input fields.
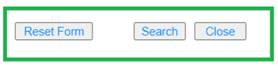
·
Reset Form
o
The Reset Form button allows users to reset the filter parameters
selected and start over with their search. I.e. Searching for Trapping/Spawning
data, and then resetting form to search for Incubation data.
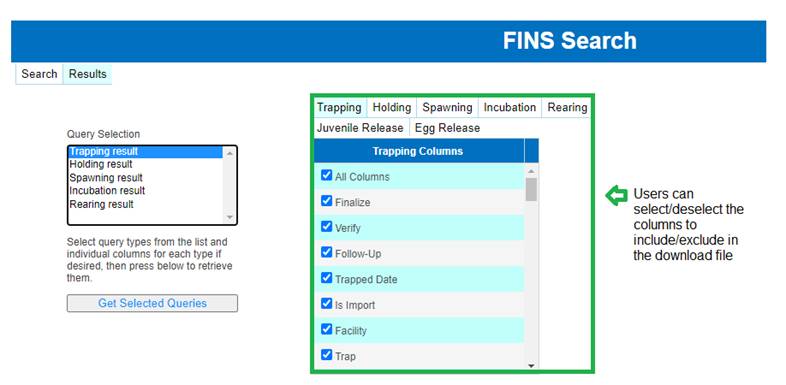
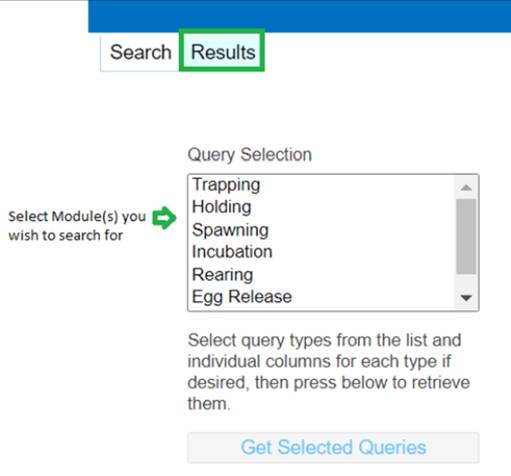
·
The Results Tab lets Users select the Columns to include in their
Queries for Trapping, Holding, Spawning, Incubation, Rearing and Egg/Juvenile
Releases.
o By
default, all columns will be selected but users can modify the columns to
include in the download.
·
Users can download Trapping, Holding, Spawning, Incubation,
Rearing & Egg/Juvenile Release Queries.
·
A Module will only display in the Query Filter Selection field if
there is data for that Module based off the filter selections made in the
Search Tab.
·
Users are required to click on the ‘Get Selected Queries’ button
to download the Queries & columns selected in the Query Selection &
Columns Selections Filter.
·
Users can download multiple Queries by multi-selecting the
Modules by holding down the ‘Ctrl’ key and making their selections.
·
Every Module selected will download to one Excel File with a
Query for every Module displaying in a separate sheet within the downloaded
Excel File.
·
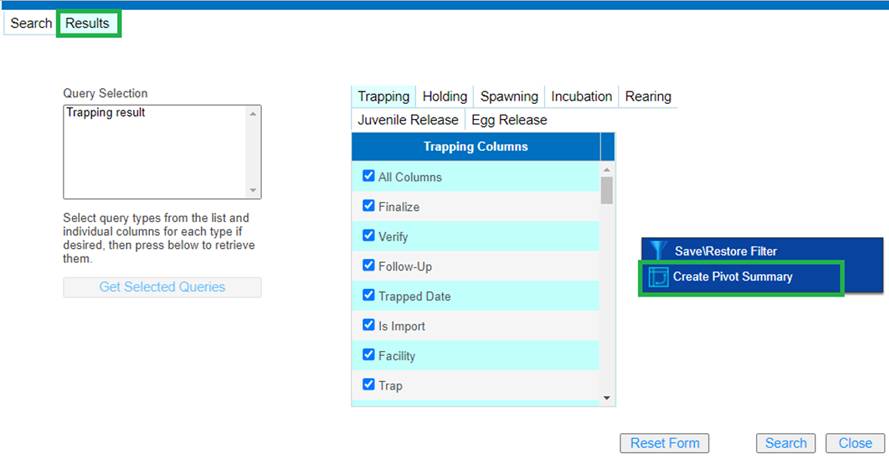
Users can create a Pivot Summary by right clicking from with the
Results tab and selecting ‘Create Pivot Summary’.
·
If a user gets results for a particular module (i.e.
trapping/holding/spawning/etc.), if they want to re-run their search and get
results for a different module that did not appear in the first search they
will have to select “reset form” first, in order to get all possible module
results to appear again.
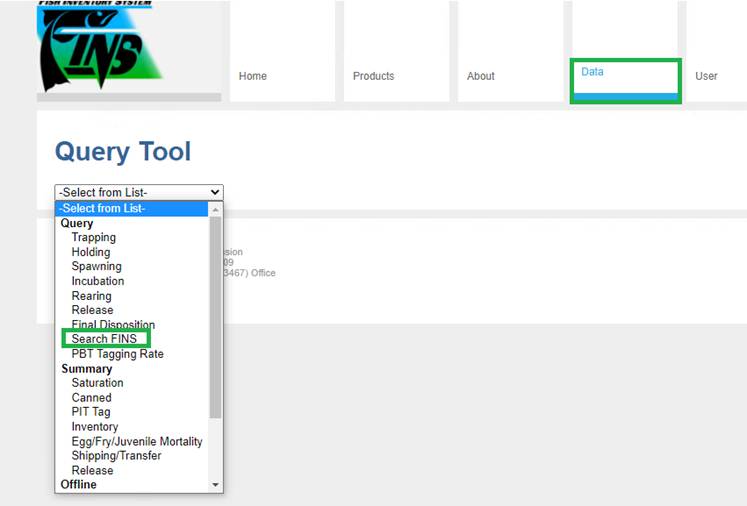
Steps
1.
From the Data Tab, click on the drop-down menu and select ‘Search FINS’.
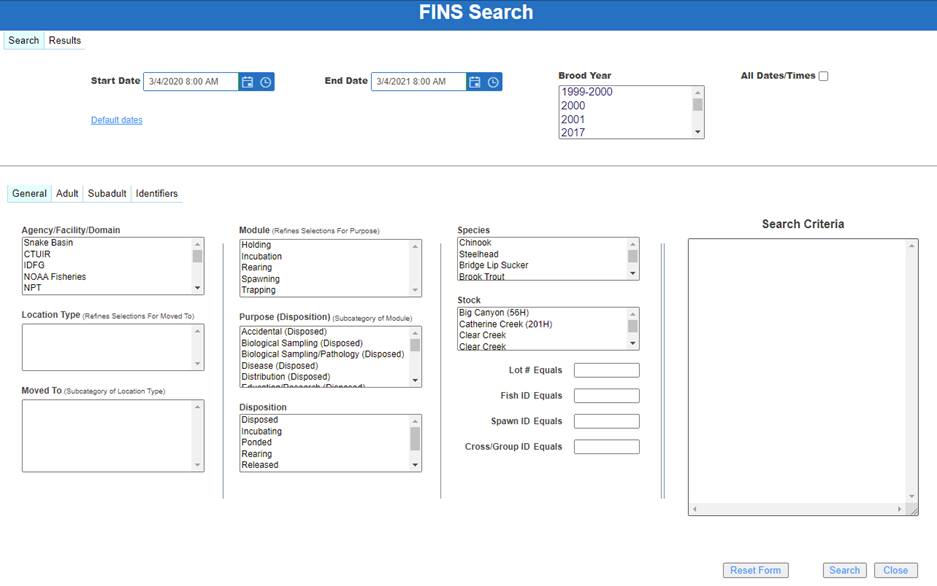
2.
Search Tab
By default, FINS will open the FINS Search
dialogue box Detail Tab as shown below.
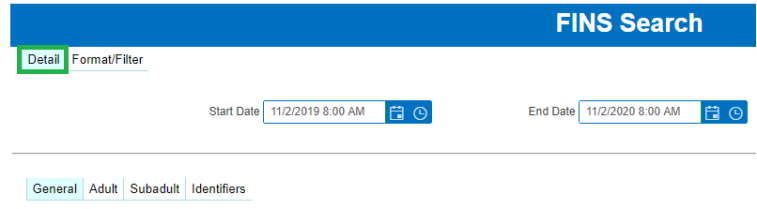
3.
Select whether you wish to filter by Date or by Brood Year:
·
If filtering by Date:
o
* Enter the ‘Start Date’ &
‘End Date’ you wish to filter by. If you wish to Filter by ‘All Dates/Times,
click on the ‘All Dates/Times’ checkbox.
o
Start Date- Select the first date to filter the data by.
o
End Date- Select the last date to filter the data by.
o
All Dates/Times- Clicking on the checkbox will get all data for
the parameters selected below.

·
If filtering by Brood Year:
o
Select the Brood Year(s) you wish to filter by.
o
Selecting Brood Year(s) will disable the Start/End Date
selections.
o
Hold down the ‘Ctrl’ key to select multiple Brood Years.

4.
The Search Criteria box will allow users to see the filters they have
selected.
·
Search Criteria dynamically updates as filter selections are
being made by user.
General Tab
5.
Select the Agency/Facility/Domain to filter your data for.

·
Selecting an Agency/Facility/Domain is required
o
To search by Domain, users can select all the hatcheries or all
agency’s in the list by holding down the ‘Ctrl’ key and making their
selections.
o
Stock updates based off the Agency/Facility/Domain selected.
Note * Filter selections made in General Tab will depend on
the data the user is searching for. Users are not required to make selections
on every field in the FINS Search Tool.
6.
Select the Location Type(s) to include in the Search.
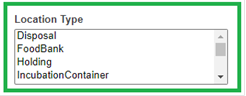
·
Location Type- Selecting the Location Type will further filter by
the type of locations the user wants to see.
·
To select multiple Location types, hold down the ‘Ctrl’ key and
make your selections.
·
The Location Type list is dependent on the Agency/Facility/Domain
selections made.
7.
Select the Move To Location Type(s) to filter by.
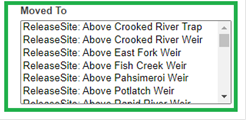
·
Moved To- Location where Adults/Eggs/Juveniles were moved to.
·
The Moved To list is dependent on the Location Type(s) selected
in the Location Type list.
·
Hovering over a Moved To type within the list, will give users
the Facility the Moved To location is tied to.
·
To select multiple Move To types, hold down the ‘Ctrl’ key and
make your selections.
Note*- Selecting
a Module/Purpose/Disposition will further filter your search results.
8.
Select a Module Data Type to filter your Search Parameters list
available in the Purposes Search Filter below.
·
Trapping/Holding/Spawning will filter for Fish Purposes.
·
Selecting a Module without further filtering by Purpose or
Disposition will not return data for the Modules selected.
·
Incubation will filter for Egg/Fry Purposes.
·
Rearing will filter for Juvenile Purposes.
·
Not required for selecting a Purpose.
·
To select multiple modules, hold down the ‘Ctrl’ key and select
the Modules to filter by.
9.
Select the Purpose to filter your Search Parameters list by.
·
Hover over purpose selected to get additional information.
·
Refer to Disposition/Purposes file to get definitions for Purpose
selected.
·
To select multiple Purposes, hold down the ‘Ctrl’ key and select
the Purposes to filter by.
10.
Select the Disposition to filter your Search Parameters list by.
·
Selecting a Purpose or Module is NOT required
·
Selecting a Disposition is not required but will further filter
your search results by Disposition selected.
·
To select multiple Dispositions, hold down the ‘Ctrl’ key and
select the Dispositions to filter by.
11.
Select the Species to filter your Search Parameters list by.
·
Selecting a Species is not required and FINS will provide all
Species in search file.
·
Selecting a Species will further filter your search results by
the Species selected.
·
To select multiple Species, hold down, the ‘Ctrl’ key and select
the Species to filter by.
12.
Select the Stock to filter your search Parameters list by.
·
Selecting a Stock is not required.
·
Selecting a Stock applies to all Modules excluding Trapping since
a Stock is applied at Spawning.
·
The Stocks provided by FINS Search depend on the
Agency/Facility/Domain selected.
·
Hovering over a Stock will give user the Facility associated to
that Stock.
·
To select multiple Stocks, hold down the ‘Ctrl’ key and select
the Stock(s) to filter by.
13.
Enter the Lot # to further filter Search Results.

·
Click on the ‘Equals’ label to switch from ‘Equals’ to
‘Contains’.
o
Select ‘Equals’ when searching for a specific Lot #.
o
Select ‘Contains’ when looking for a specific range of Lot #s. (i.e.
All lot numbers that contain the number 1.)
14.
Enter the Fish ID to further filter Search Results.

·
Click on the ‘Fish ID’ label to switch from ‘Equals’ to
‘Contains’.
o
Select ‘Equals’ when searching for a specific Fish ID.
o
Select ‘Contains’ when searching for a range of Fish ID’s (i.e.
all fish IDs that start with the number 1.)
Adult Tab
*Note that selecting filter
selections from the Adult tab is NOT required. Filter selections from the Adult
Tab will further filter data based off selections made from the General and
Identifier Tabs. Steps from the Adult Tab can be skipped if user doesn’t need
to filter by Living State, Sex or Origin.
15. Select
the Living State to further filter Search Results by Living State selected. To
multi select, hold down the ‘Ctrl’ key and make your selections.
16. Select
the Sex to further filter the Search Results by Sex selected. To multi select,
hold down the ‘Ctrl’ key and make your selections.
17. Select
the Origin to further filter the Search Results. To multi select, hold down the
‘Ctrl’ key and make your selections.
·
Selecting Origins will filter for Trapping, Holding and Spawning
data.
Subadult
Tab
*Note that selecting filter
selections from the Subadult Tab is NOT required. Filter selections made from
the Subadult Tab will further filter data based off selections made from the
General and Identifier Tabs. Steps from the Subadult Tab can be skipped if user
doesn’t need to filter by Living State or Stage.
18. Select
the Living State to further filter Search Results by Living State selected.
19.
Select the Stage to further filter Search Results by the Stage selected
(Egg/Fry/Juvenile).
Identifiers
Tab
*Note that selecting filter
selections from the Identifiers Tab is NOT required. Filter selections made
from the Identifiers Tab will further filter data based off selections made
from the General and Adult/Sub-adult Tabs. Steps from the Subadult Tab can be
skipped if user doesn’t need to filter by a specific Identifier.
20. Click
on the checkbox of the Adult/Juvenile Identifier(s) or Egg/Fry/Juvenile
Identifiers that you wish to search for. FINS will return
·
If selections are made from the Adult/Juvenile Identifiers grid
FINS will return Trapping/Holding/Spawning/Rearing/Release data, if data exists
for the Identifiers selected.
·
If selections are made from the Egg/Fry/Juvenile Identifiers grid
FINS will return Incubation/Rearing/Release data, if data exists for the
Identifiers selected.
21.
If searching for records that contain a specific combination that cannot
be selected from the Adult/Juvenile or Egg/Fry/Juvenile grid, use the Advanced
section to enter the combination of Identifiers to search for.
Examples of this can include:
·
Searching for Juveniles that contain a CWT Identifier value of
‘01’.
·
Searching for Adult Fish that contain an AD or CWT, but not both.
·
Searching for Adult Fish that contain AD and a CWT value of B-52.
22.
Users can search for all Modules or search for a specific Module. To
search for all Modules, proceed to Step 23. To search for specific Modules, do
the following:
·
Prior to clicking ‘Search’, click on the ‘Results’ tab and select
the Modules to search for as shown below.
23. Click
‘Search’ to search by the filter options you have selected.
·
Clicking Search will take user to the ‘Results tab where user can
select the Queries to download to an Excel File.
·
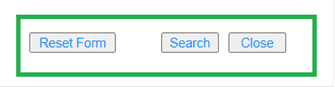
Click ‘Reset Form’ if you want to reset the filter parameters
selected and start over.
·
Click ‘Close’ to close out of Search FINS.
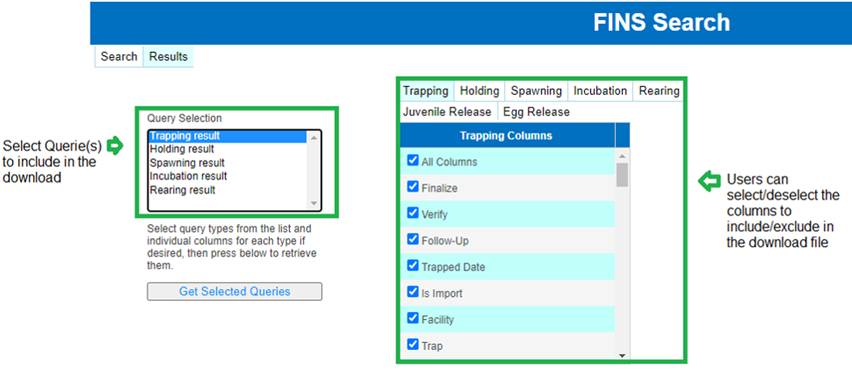
- Select the Queries and columns you wish to include
& download to Excel.
·
To multi select multiple queries, hold down the ‘ctrl’ key and
make your selections.
·
To select/deselect columns, click on the checkbox for the columns
to include/exclude.
- Click on ‘Get Selected Queries’ to download the
Queries & columns selected in the Query Selection & Columns
Selections Filters.
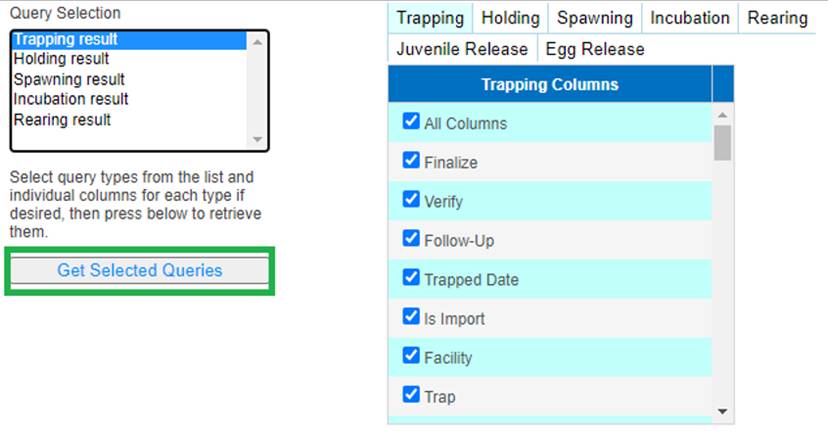
- FINS will download the data to Excel with Modules
and Trapping columns selected.
FINS tool that can operate
on the result dataset of a FINS Search to directly create 'Pivot' tables.
Simple
Use Case Examples:
·
Finding the Average Fish Lengths
at a specific Trap week to week/month to month/run over run
·
FPP high/low release sites/years…
·
Max, Minimum, Sum, Standard
Deviation…etc.
Use Case
The Pivot Summary within the FINS
Search Tool is a tool that users can use to easily analyze and summarize their
data from within the Search Tool. Users are able to create a Pivot Summary for
all the Modules in FINS provided there is data based off Filter Parameters
selected.
Business Logic/Validation
- Performing a FINS Search is required before users
are able to create a Pivot Summary. To create a Pivot Summary, users are
required to first create a data set by either:
o Selecting
and searching a search criterion.
o Users
can then:
§ Download
the result set and then create a Pivot Summary or
§ Create
a pivot summary.
*Downloading and
creating a data set that does not currently exist will take longer to create a
Pivot Summary since the data set has not yet been created.
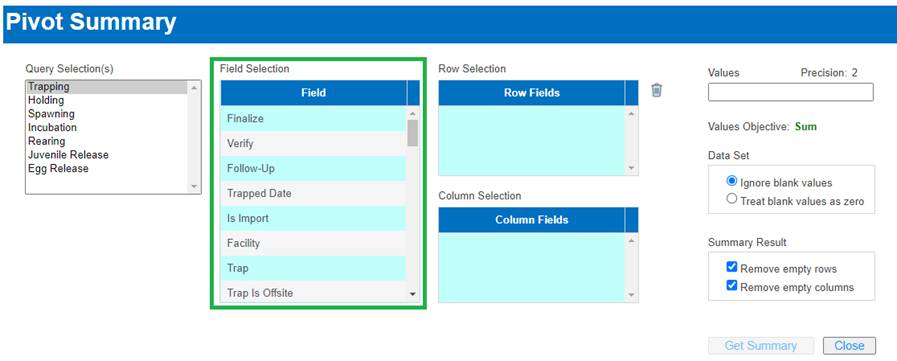
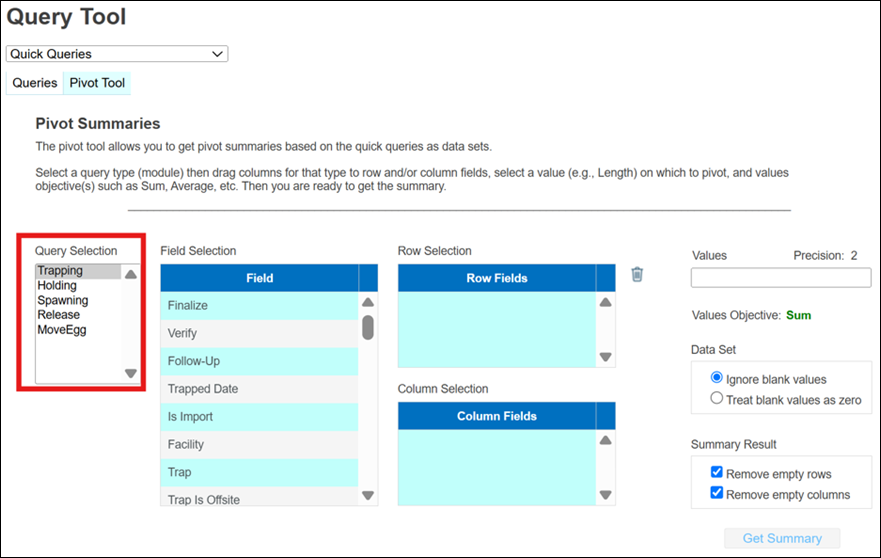
- The Query Selection(s) Filter selection box lets the
user select the Search Result dataset for the Pivot Summary that will be
created.
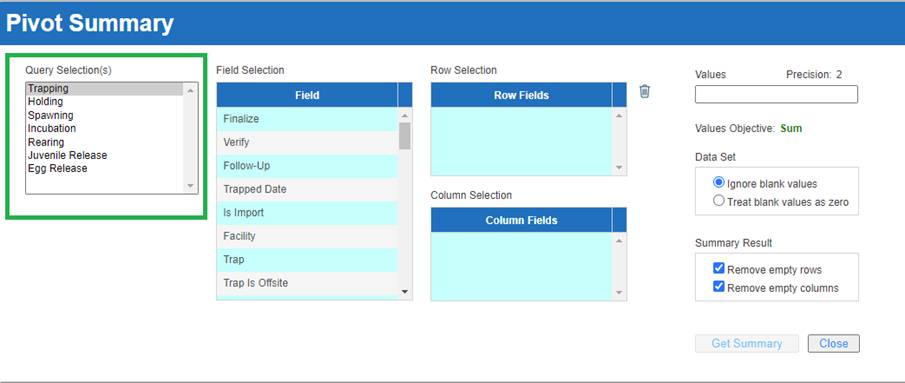
o Only
1 dataset can be selected per Pivot Summary created. Users can create a Pivot
Summary for:
§ Trapping
§ Holding
§ Spawning
§ Incubation
§ Rearing
§ Juvenile
Release
§ Egg
Release
o Ensure
that data exists for the dataset selected.
o Selecting
a dataset will load all available columns for the Query selected in the Field
Selection grid.
o Selecting
a Module is required.
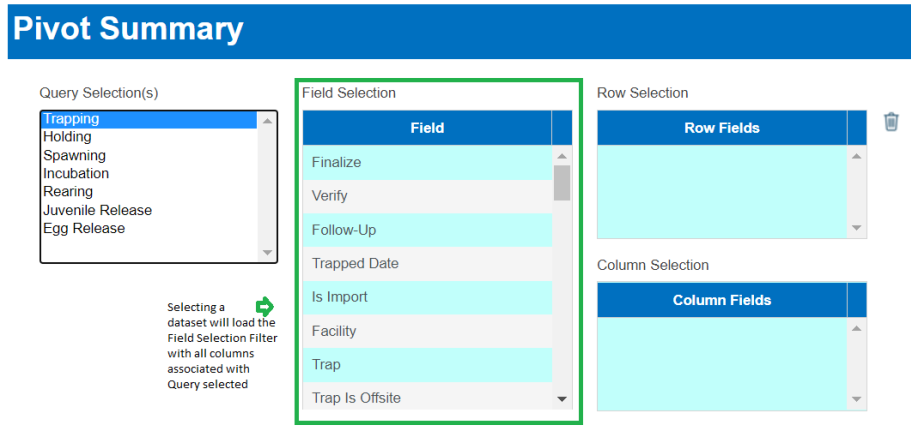
- Field Selection- The Field Selection filter tool
allows users to select and drag the Fields they want to include in their
Pivot Summary. Users can drag their Field Selections to the Row Fields or
Columns Fields section depending on how they want to format their data.
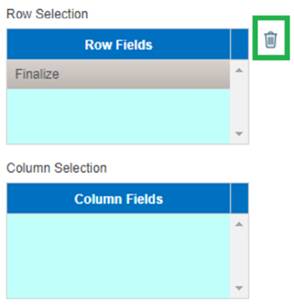
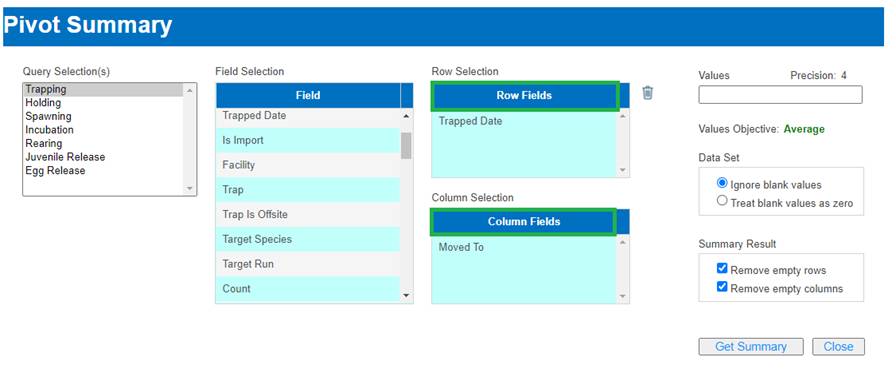
- Row Selection
o The
Row Selection tool will display the Field selections that were dragged from the
Field Selection grid.
o If
a Date field is dragged to the Row Selection grid, FINS will require user to:
§
Enter a Start Date
§ Enter
an End Date
§ Enter
a time Increment (i.e. days, weeks, months)
§ Force
Interval checkbox will Force the displayed result to have intervals with two
endpoints instead of single values.
·
Clicking the ‘Force Interval’ checkbox is not required and will
only enable if a Value Increment of 1 day is entered.
o If
a Numerical field is dragged to the Row Selection grid, FINS will require user
to:
§ Enter
a Start Value
§ Enter
an End Value
§ Enter
a Value Increment (i.e. Grouping Length data by Increments of 100 mm)
§ Force
Interval checkbox will Force the displayed result to have intervals with two
endpoints instead of single values.
·
Clicking the ‘Force Interval’ checkbox is not required and will
only enable if a Value Increment of 1 is entered.
o Fields
selected will display as Rows when downloading the Pivot Summary.
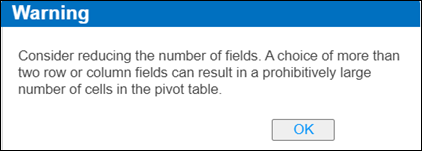
o Selecting
more than two Fields will trigger a warning notifying the user that a large
number of cells in the pivot table can potentially display and to consider
reducing the number of fields.
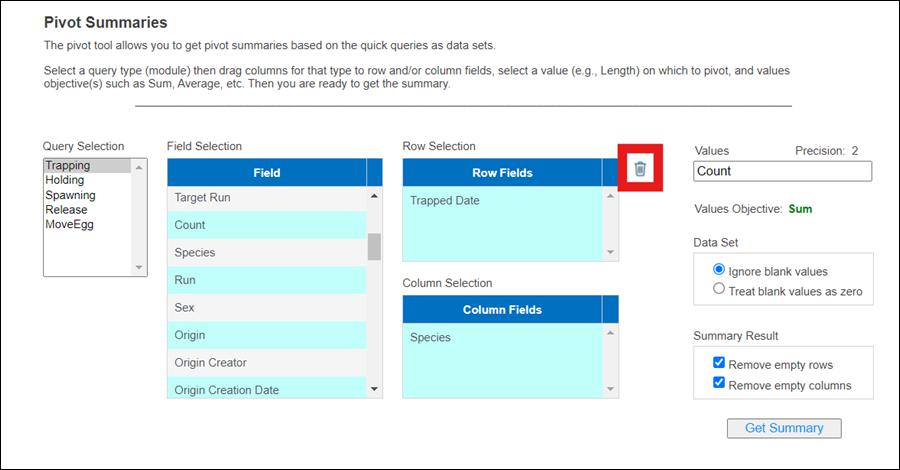
o To
remove a selection from the Row Fields section, drag the selected field to the
trash can icon highlighted below:

·
Column Selection
o The
Column Selection tool will display the Field selections that were dragged from
the Field Selection grid.
o If
a Date field is dragged to the Row Selection grid, FINS will require user to:
§ Enter
a Start Date
§ Enter
an End Date
§ Enter
a time Increment (i.e. days, weeks, months)
§ Force
Interval checkbox will Force the displayed result to have intervals with two
endpoints instead of single values.
·
Clicking the ‘Force Interval’ checkbox is not required and will
only enable if a Value Increment of 1 day is entered.
o If
a Numerical field is dragged to the Column Selection grid, FINS will require
user to:
§ Enter
a Start Value
§ Enter
an End Value
§ Enter
a Value Increment (i.e. Grouping Length data by Increments of 100 mm)
§ Force
Interval checkbox will Force the displayed result to have intervals with two
endpoints instead of single values.
·
Clicking the ‘Force Interval’ checkbox is not required and will
only enable if a Value Increment of 1 is entered.
o Fields
selected will display as Columns when downloading the Pivot Summary.
o Selecting
more than two Fields will trigger a warning notifying the user that a large
number of cells in the pivot table can potentially display and to consider
reducing the number of fields.
o To
remove a selection from the Columns Field section, drag the selected field to
the trashcan icon highlighted below:
·
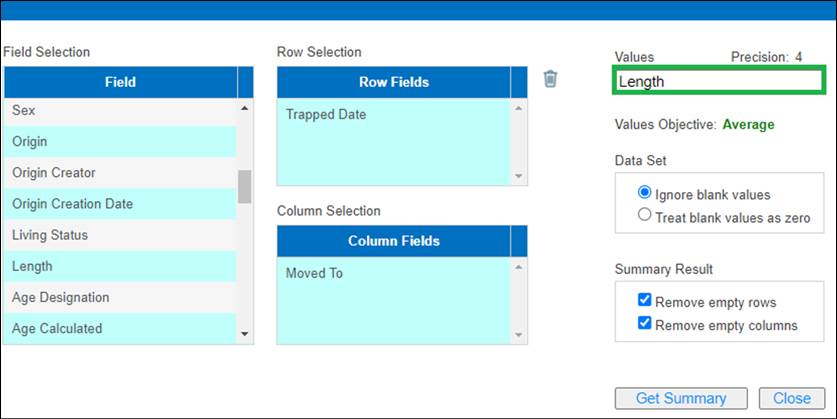
Values
o The
Values field allows users to drag a Value field from the Field Grid for
calculations.
o Only
Fields that have numerical values can be dragged and added to the Values field.
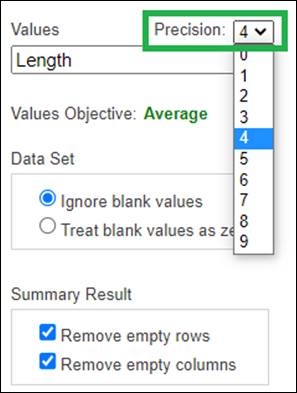
o The
Values field allows users to select how many decimal points to display their
numerical data to.
o Users
can choose to display numerical data up to 9 decimal points.
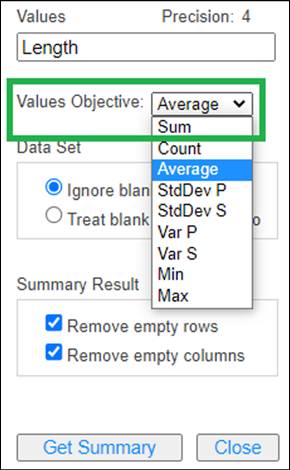
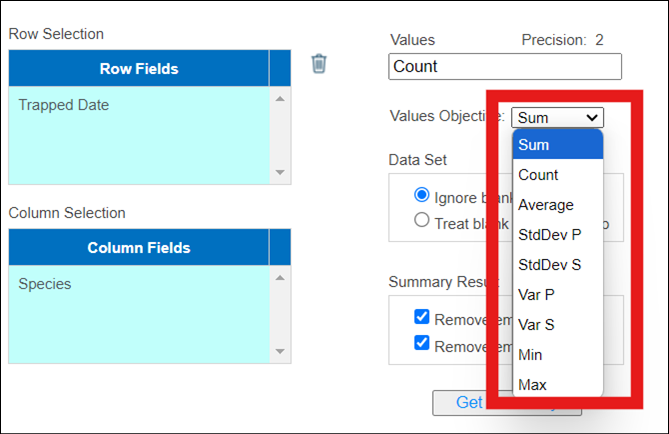
·
Values Objective- Users can select one of the following Value
Objectives:
o Sum
o Count
o Average
o Var
P
o Var
S
o Min
o Max
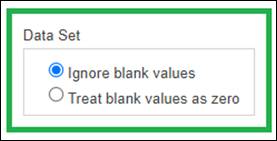
·
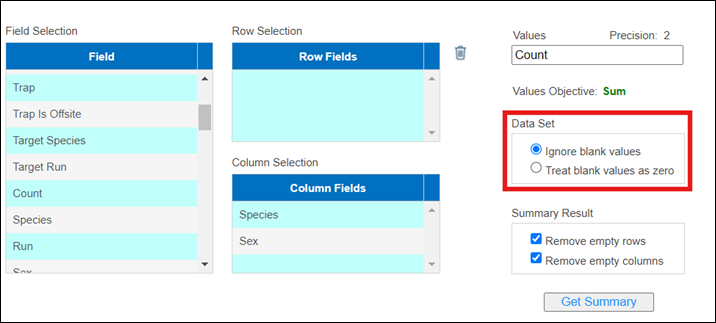
Data Set
o Ignore
blank values:
§ If
checked, FINS will
·
Exclude any records that don’t have any values entered for the
Row/Fields selected.
§ If
unchecked, FINS will
·
Display a value of 0 if field is numeric but blank.
·
Display a value of False if field is logical but blank.
o Treat
blank values as zero:
§ If
checked, FINS will
·
Ignore if field is a logical but blank.
·
Ignore if field is a text field but blank.
·
Summary Result
o Remove
empty rows- Checking this option will remove any records that don’t contain any
data for the Row Fields selected.
o If
‘Remove empty rows’ is unchecked, FINS will notify the user how many nonempty
rows are part of the data set and will recommend user to check the ‘Remove
empty rows’ checkbox in order for user to get the records that contain data.
o Remove
empty columns- Checking this option will remove any records that don’t contain
any data for the Column Fields selected.
o If
‘Remove empty columns’ is unchecked, FINS will notify the user how many
nonempty columns are part of the data set and will recommend user to check the
‘Remove empty columns’ checkbox in order for user to get the records that
contain data. If there are too many columns total (such as in the thousands)
FINS will refuse to do the summary unless the option is once again checked.
·
Get Summary
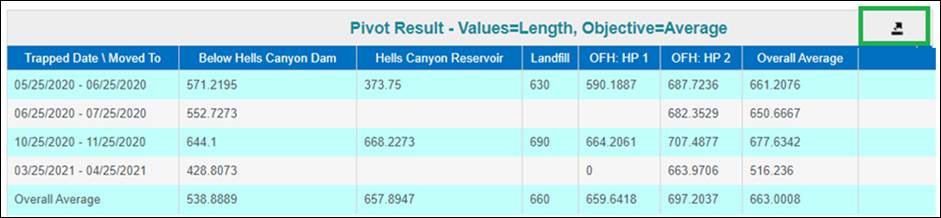
o The
Get Summary button will display the Pivot Summary within FINS.
o Users
can export a paper copy of this Summary to Excel by clicking on the Export
button highlighted below.
Steps
- To create a Pivot Summary, right click from either
the Search or Results tab and click on ‘Create Pivot Summary’ to open
Pivot Summary dialogue box.
- From the Pivot Summary select the Search Result
dataset that you want to create your Pivot Summary from. All Queries will
be available for selection but ensure that the Query you select contains
data retrieved from Search Results. Selecting a result dataset will
populate the Field Selection grid with all columns associated to Query
selected.
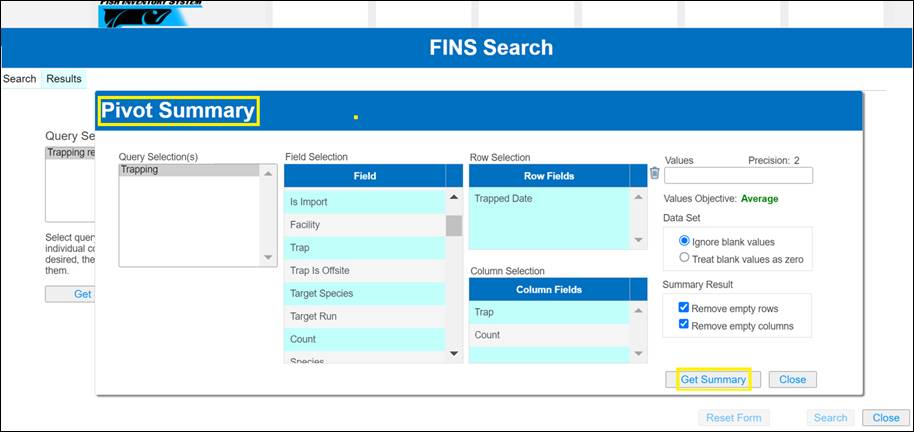
- Drag the Fields by left clicking and holding down
mouse and moving the columns you wish to include in your Pivot Summary to
the Row and Column fields as shown below.
- In the Values field, determine the Field that you
wish to include for calculation by dragging the field from the Field grid
over to the Values grid. Only numerical fields can be dragged over.
Example below:
- Select the number of decimals to display data by
clicking on the numerical value highlighted below and selecting the number
of decimal points to display.
- In the Values objective field, select how you want
FINS to calculate the data field selected in the Values field.
- From the Data Set section, select whether to ignore
blank values or treat blank values as zero. Ignoring blank values will
exclude blank values from results. Treating blank values as zero will
include the blank records and give the selected values a value of 0.
- In the Summary Result section, select whether to
remove empty rows or empty columns or include them. We highly recommend
that empty rows and columns are excluded from the data set.
- Click on ‘Get Summary’ to create the Pivot Summary
based off parameters selected.
- FINS will display Pivot Summary on a grid as shown
below. Pivot Summary can be exported to excel by clicking on the export
button highlighted below:
·
Currently Beta Version being actively tested for final scope
determination.
If you would like
Training and/or a Review of the Beta PBT Tagging Tracking Tool, please
contact Support@FINSNet.org
·
Production version released 9.2025
o Beta Version was
actively tested/passed by FINS Team members, TAC members, Snake Basin Query
Users and specific IDFG Query Testers for final dataset parameters/scope
determination.
If you would like Training or a Review of
Quick Queries capabilities, please watch the training videos available and
review the below documentation or for one-on-one custom training/review please contact Support@FINSNet.org
Use
Case/Business Logic
The Quick Query tool allows
users to retrieve data at exceptionally high speeds, limited only by your own
network’s speed for download. This rapid access is achieved using read-only
data prepared and optimized overnight.
Each night, FINS processes and
stores data in a read-only format, optimized for quick access. When you run a
query, you're accessing this pre-generated data, allowing the system to deliver
results almost instantaneously.
The main trade-off between Quick
Queries and the existing real-time Queries that are available in FINS lies in
how current the data result is. Quick Queries offer high-speed access to data
that's current up to the previous day's end. Real-time Queries, while much
slower, provide real-time data up to the moment of your request. For instance,
if you run a Quick Query on a Wednesday, you'll rapidly receive data reflecting
that Tuesday's end-of-day state. In contrast, a real-time Query executed on a
Wednesday would include all data entered up to the very moment that you
requested it, but with a longer processing time, since the Query is being built
and requested in real-time.
The Quick Query
tool allows you to get an immediate download of data for any of the featured
modules (Trapping, Holding, Spawning, Incubation, Release). Selecting a Module
is required. Quick Queries for each Module are pre-composed and are not
compiled on demand as are the available dynamic queries of each. For this
reason, the data can be minutes to hours old, which is the tradeoff for speed
of access.
It's important to note that further filtering by Date Range,
Facility or Species will actually slow down the data retrieval process, because
the pre-prepared data then has to be filtered before being available for
download rather than accepting the pre-prepared data as is for download. For
optimal speed, it's recommended to retrieve all data for all time from all
Facilities, then further filter your data result using the powerful features
available in MS Excel.
Quick Queries significantly
reduce wait times and enhance your overall FINS Query experience when you need
large volumes of data and can work with information that's current as of the
previous day.
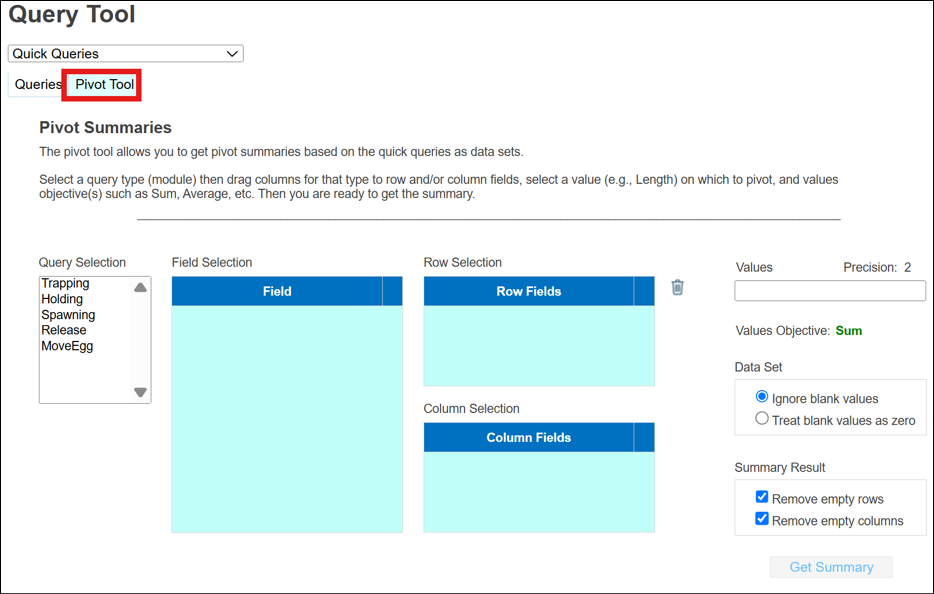
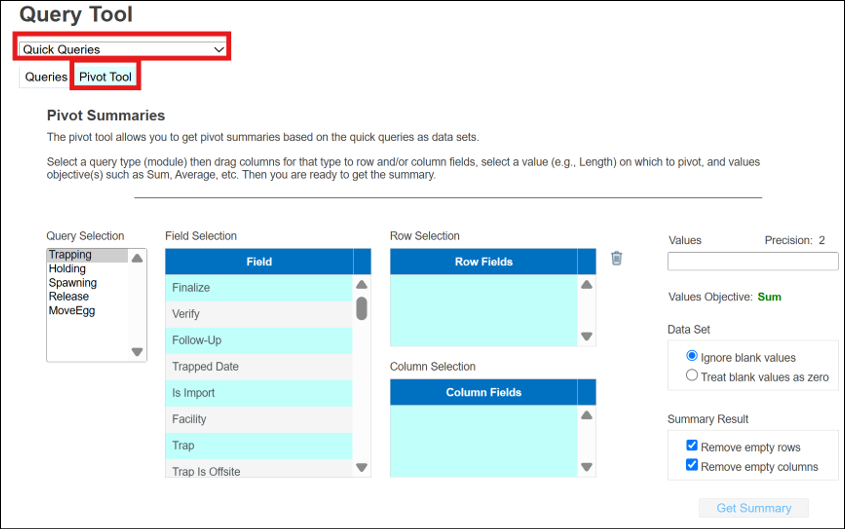
Quick Queries > Steps:
1)
Navigate to https://www.finsnet.org/#!/Login
and login using your FINS credentials
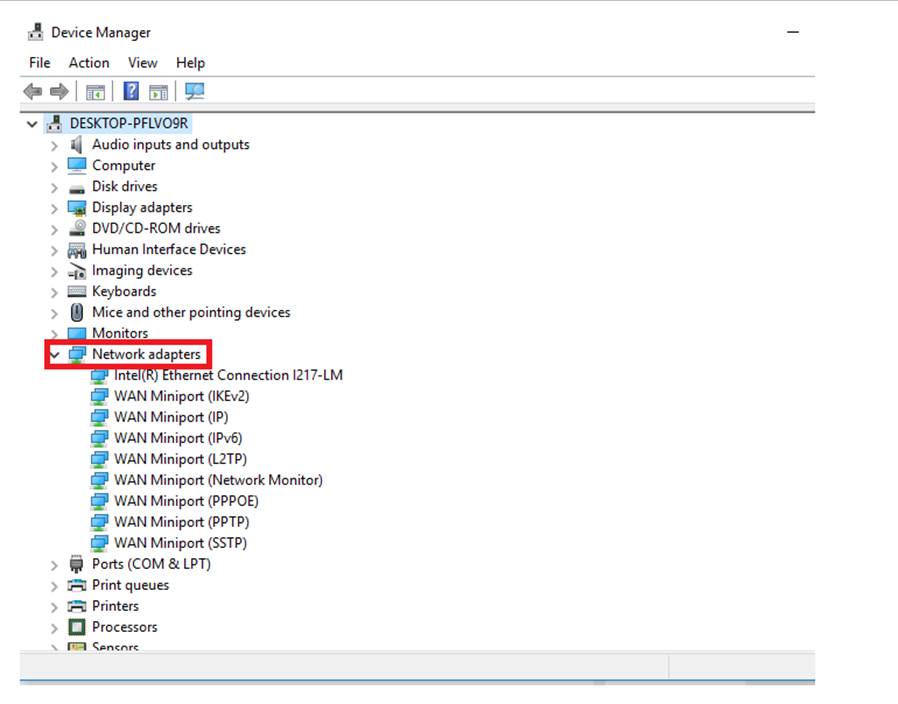
2)
Click on the ‘Data’ tab (highlighted in red in the screenshot below)
to access the FINSNet.org Query Tool Menu
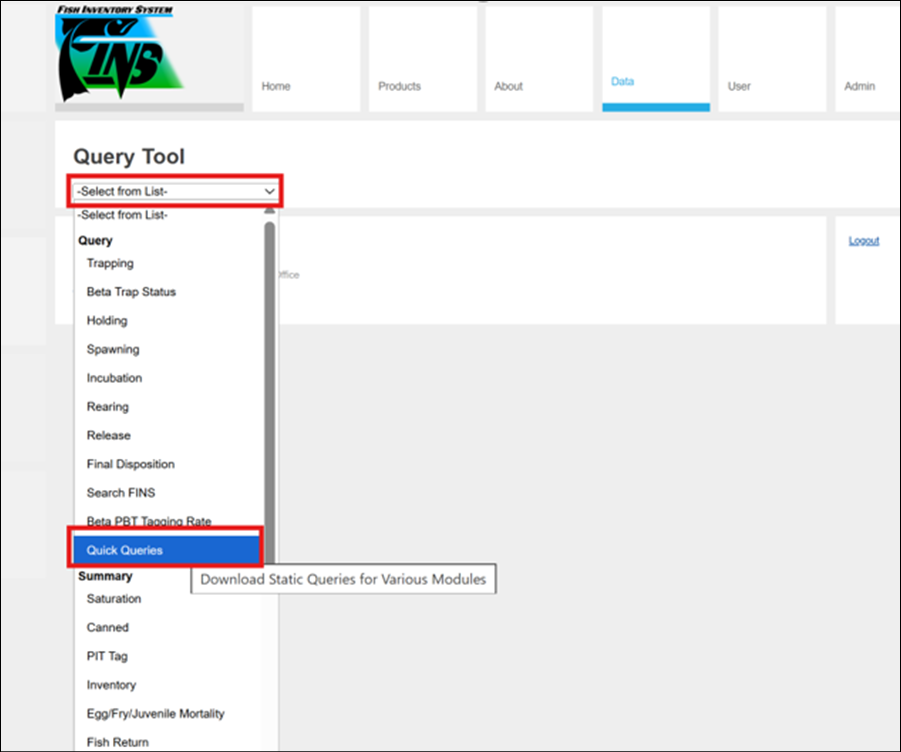
3)
From within the Data Tab > Query Tool > Drop-Down Menu select
‘Quick Queries’
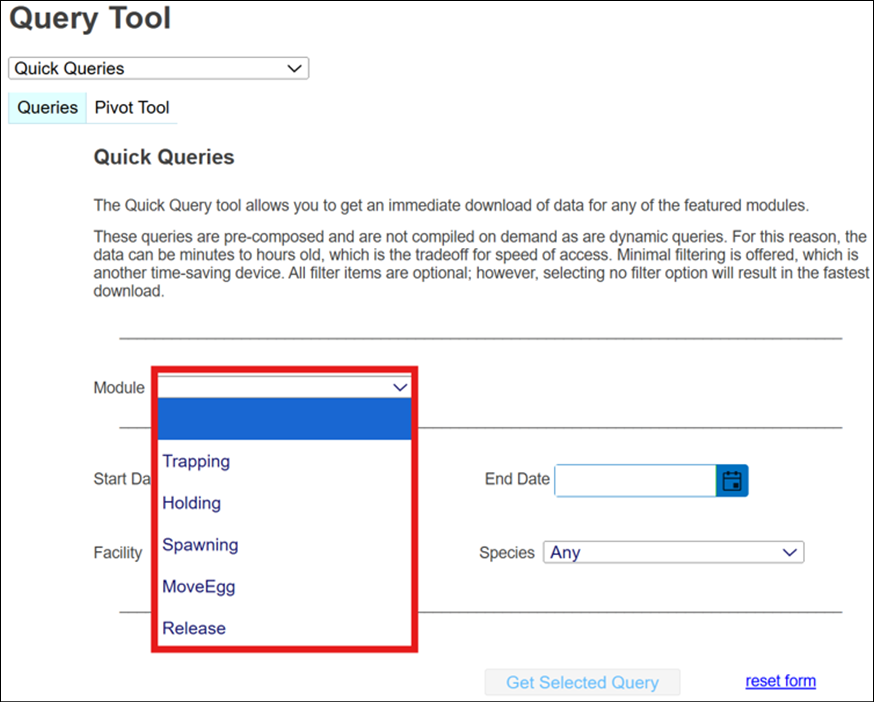
4)
Within the Quick Queries, take a top to bottom, left to right
approach to apply the minimum number of filters to the data you wish to
retrieve, for the fastest download option. *The ONLY required filter selection
is Module (Trapping, Holding, Spawning, Move Egg, Release).
a) Select
the Module for the type of data you would like to download
*Selecting a Module is required
·
Trapping - (Trapped
Alive/DOA/TrapMort/Killed transactional records from Trapping Sessions)
·
Holding - (Move
Fish, Count Correction and Receipt records)
·
Spawning - (Spawn
Cross and Not Spawned records from Spawning Sessions)
·
Move Egg - (Incubation Move/Enumeration
transactional records)
·
Release – (Eggs/Fry/Juvenile
Release events)
Selecting no further filter option results in the fastest
download of data for the selected module
b) Click
on ‘Get Selected Query’ –
FINS will immediately retrieve the stored data
requested and allow for download and additional post download filtering to be
done using Excel advanced filtering tools
Again, the most efficient way to use Quick Queries, and also
the fastest way to download a stored Quick Query is to only select the required
Module filter and nothing additional, to immediately begin downloading all of
the selected dataset for the entire Snake Basin.
5)
The following Steps/Filters are all OPTIONAL:
Minimal additional
filtering is offered as an additional option, but please note that it will
extend the amount of time it takes to get the Quick Query download. 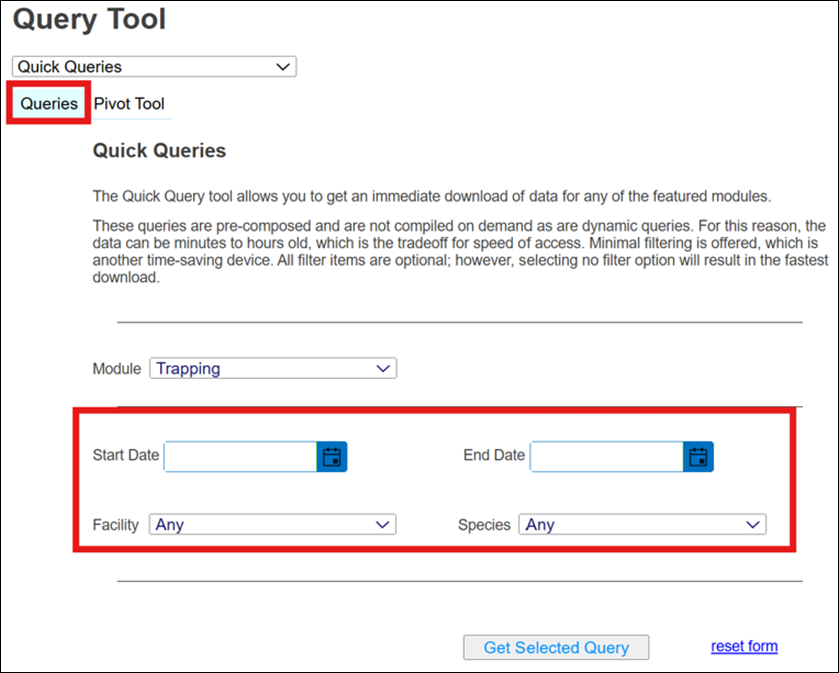
Start Date – End Date
Select the Date range you wish to download data for.
*End Date - Selecting today’s date is the same as
not entering an End Date since the data is prepared overnight.
*You can specify either a start date or an end date
or both or neither.
If neither a Start/End Date is set, FINS provides all
historical data for the selected Module.
·
Facility
Select the Facility you wish to download data for.
Not selecting a Facility provides data for all Snake
Basin Facilities for the selected Module.
·
Species
Select the Species you wish to download data for. *Defaults
to ‘Any’
If no Species selected, FINS provides data for all
Species of the selected Module.
Once done selecting additional/optional pre-download
filters >
6)
Click on ‘Get Selected Query’ –
FINS will immediately
retrieve the stored data requested and allow for download and additional post
download filtering to be done using Excel advanced filtering tools
Use
Case/Business Logic
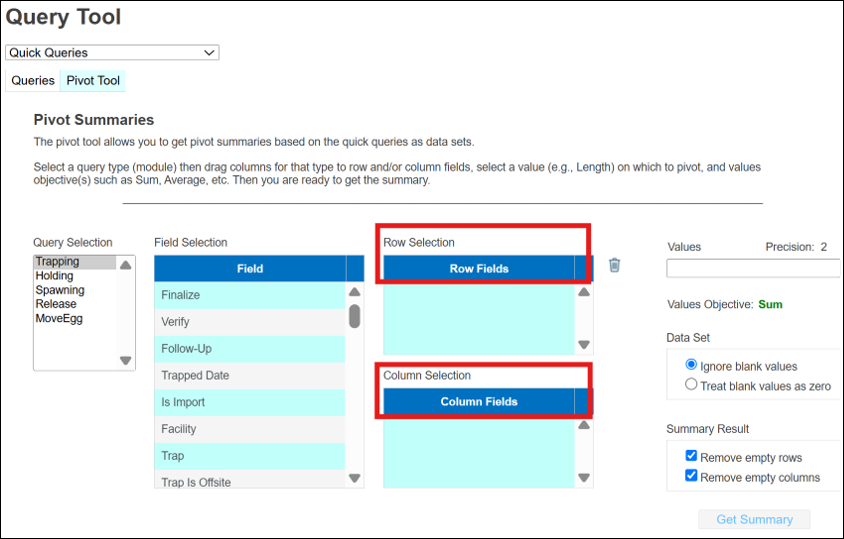
The ‘Pivot Tool’ within FINS Quick
Queries allows users to build pivot summaries based on the Quick Queries data
sets from the other Quick Queries Tab ‘Queries’.
Using the Pivot Tool users can quickly summarize data based on
selected columns, rows, and values. It provides a flexible way for FINS users
to analyze and export data from various Modules featured in the Quick Queries
(Trapping, Holding, Spawning, Incubation and Release data).
Users must ensure that the selected columns, rows, and fields
make logical sense for meaningful data summarization and once the columns, rows
and fields are selected, users can then do various things within the Pivot
Tool, which include but are not limited to:
·
Adding, averaging, finding minimum and maximum values for
selected fields
·
Filtering data by year, month, week, or day after field selection
·
Filtering data by Species, Sex, Facility, etc.
·
By selecting a query type (module)
then dragging columns for that type to row and/or column fields, selecting a
value (e.g., Length) on which to pivot, and values objective(s) such as Sum,
Average, etc.
·
This is a powerful integrated
summarization tool built in to FINS for the quick query results to look at data
year over year
·
For Example – Average Length of Fish Trapped/Spawned/Released at all Facilities within
Snake Basin Domain by Brood Year, Species and Origin
·
Average/Actual Estimated Egg
Counts (Fecundity) vs Actual Enumeration Inventory Counts at all Snake Basin
Facilities by Species/Brood Year and/or Stock year to year to determine
high/low/averages
·
Total FPP Release per Snake Basin
Domain Facility by Brood Year and Release Site
Validation
·
Columns/Rows- FINS notifies users if too many fields are added to
the rows/columns section after more than 2 fields from module selected are
dragged over, as shown below
·
Value Field Restriction: Only numerical fields can be added to
the values section. FINS will NOT allow you to drag over Non-Numerical fields
from the ‘Field Selection’ menu
·
To delete Fields that are in the Row or Column Menu, use the drag
functionality to drag from either the Row or Column field and drag to the
highlighted trashcan icon shown below
·
By default, the Sum Value objective will display first. However,
this can be changed by clicking on the ‘Sum’ label and switching to another
Values Objective as shown below:
Pivot
Tool > Steps:
While the Pivot Summary Tool is
capable of handling various complex data analyses, we'll use a straightforward
example for our step-by-step guide:
Analyzing fish trapping data for Snake Basin in 2023:
·
Count of fish trapped
·
Grouped by species and sex
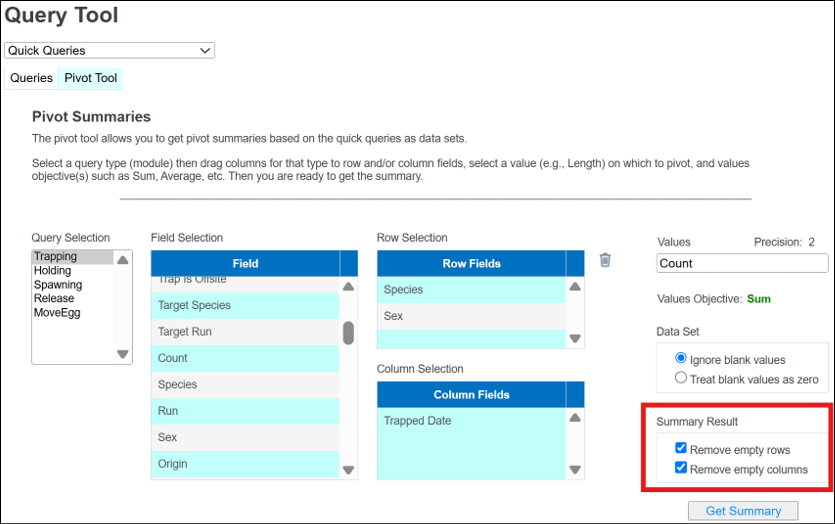
1) From
within the Quick Queries, click on the Pivot Tool tab
2) Select
the Module that you wish to get summarized data for. After you click on the
Module, the ‘Field Selection’ menu will update with the fields for the module
you selected:
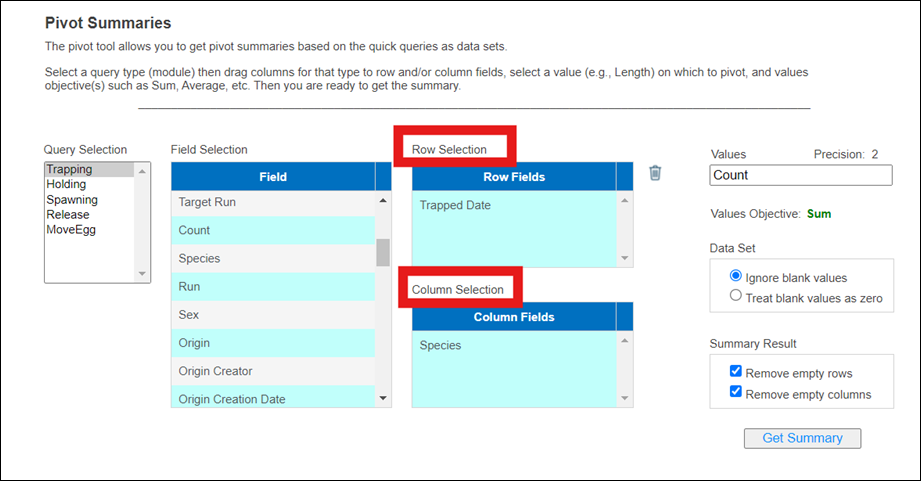
3) Select
the Fields for the Row Selection section and the Column Fields section. Drag
each field to its respective Row or Column area to organize your report layout.
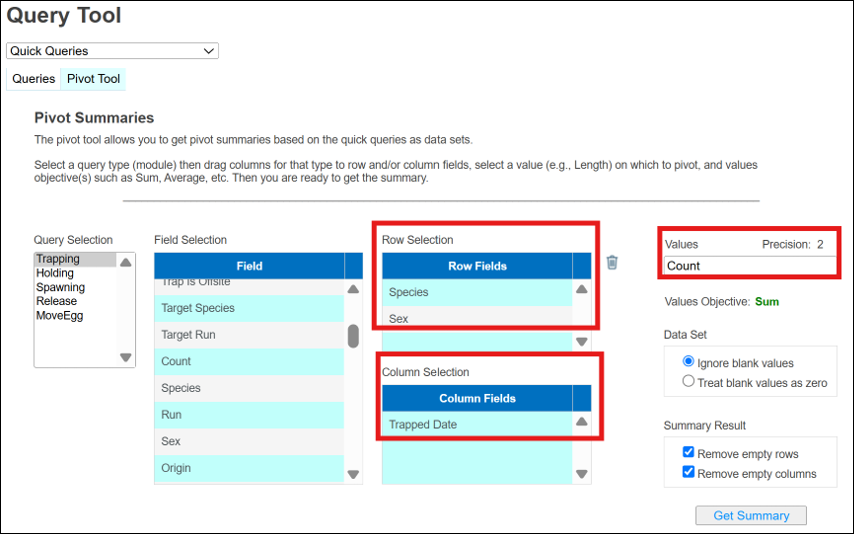
4) For
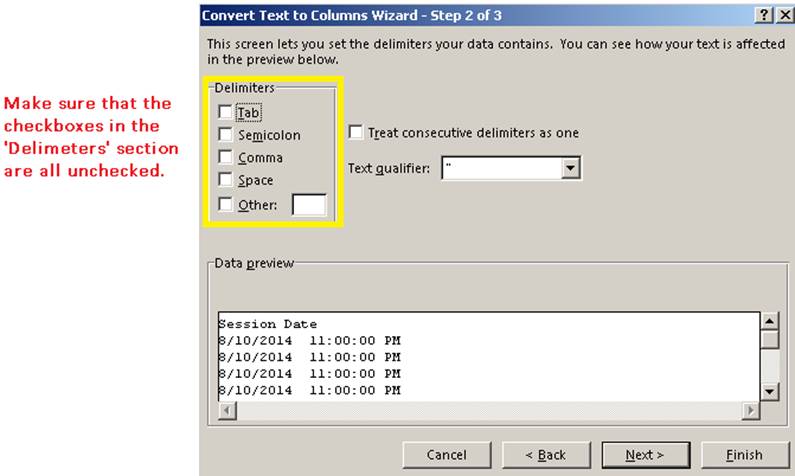
our example, we will select ‘Trapped Date’ for our Column selection and
‘Species’ and ‘Sex’ for our Row selection
5) Dragging
over ‘Trapped Date’ to the Column Selection section will automatically pop up
an interval menu that will allow you to select the Date range and Intervals for
your Trapped Date. Date Increment will default to 1 year but this can be
changed by clicking on the ‘Year’ label shown below and changing Increment to
Year, Month, Week or Day.
6) Update
Start and End Date from 1/1/2023 – 1/1/2024 since we are trying to get trapping
data for 1 year
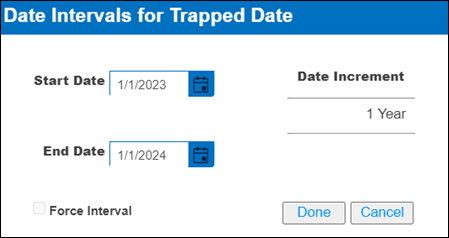
7) Once
selected, click on ‘Done’ to go back to the main menu
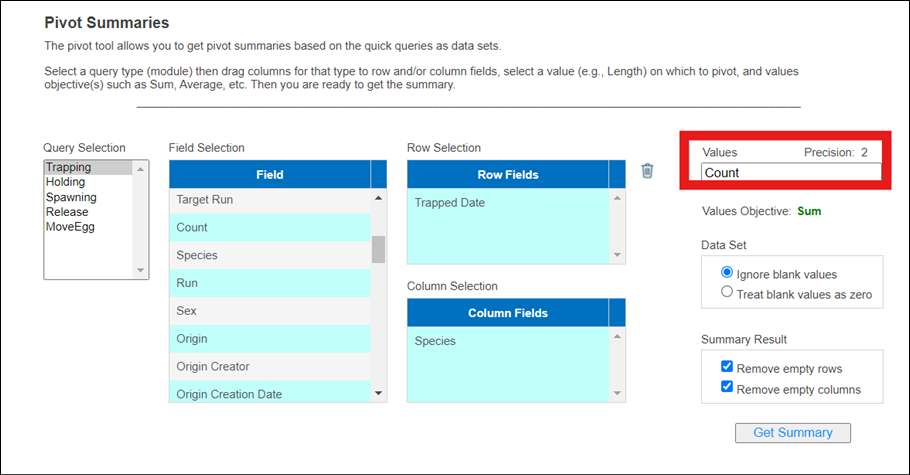
8) Select
‘Species’ and ‘Sex’ for Row selection and ‘Count’ Field for the Values section
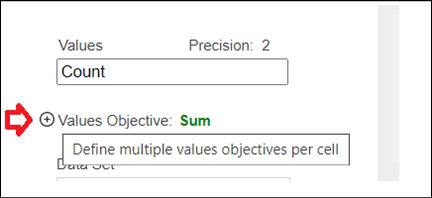
9) Click
on ‘Sum’ for values objective since we are trying to sum the total number of
Fish that were trapped for year 2023. However, be aware that you can select
multiple Value Objective’s by hovering over to the ‘V’ in Values and clicking
on the plus sign shown below.
10) FINS gives you the
option to Ignore blank values or treat blank values as zero. By default,
‘Ignore blank values’ will be selected. We will leave ‘Ignore blank values’ as
our selection for this example.
11) For Summary Result, FINS
by default will have ‘Remove empty rows’ and ‘Remove empty columns’ checked. We
will leave both options checked for this example
12) Click on ‘Get Summary’
to retrieve your data
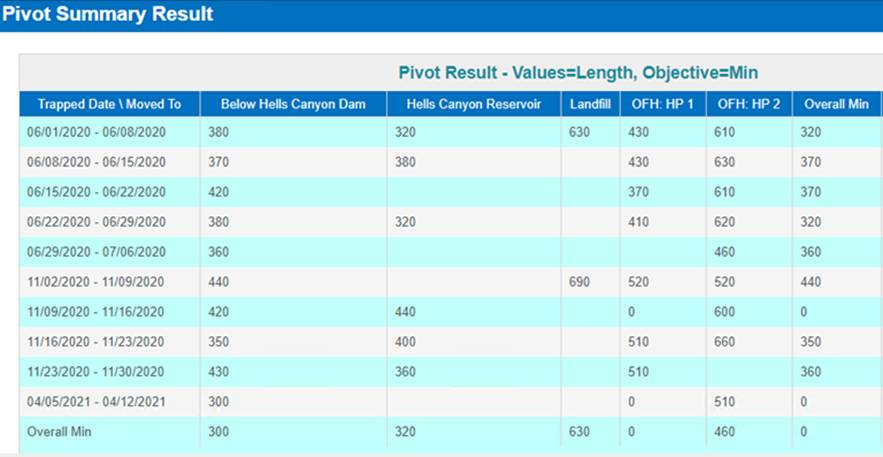
13) FINS will then provide
you with your Pivot Summary Result which can be viewed from within FINS as
shown below or can be exported to Excel by clicking on the icon highlighted on
the right hand corner highlighted in red below
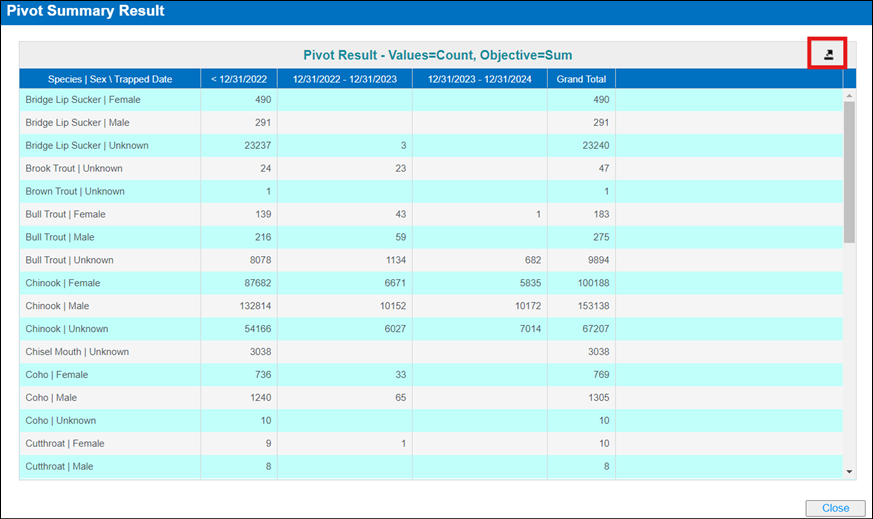
14) Click ‘Close’ button to
click out of this view
Why don’t I
see Rearing as an option?
Rearing
data consists of far too many components (Array Containers, Enumerations,
Moves, Morts, Identifiers, PBT etc.) to facilitate ‘all data ever’ which is the
main read-only use case, purpose and business value behind data pre-prepared
for Quick Queries.
How up to date is this data?
Quick
Query data is prepared and optimized overnight. Meaning that if you download a
quick query on Wednesday morning, you are getting data updated as of the night
before (Tuesday night in this example).
I just
entered Trapping data but I don’t see it reflected in the Quick Query I just
downloaded?
The Quick Query
download is considered a ‘read only’ query, in that the data is not necessarily
‘current’ but may be up to a day old depending on when you are requesting the
data. This is by design and was part of the Steering Committee scope request
for providing a read only query. The data
can be minutes to hours old, which is the tradeoff for speed of access.
How do you recommend that I retrieve data using the
Quick Queries?
For
optimal speed, it's recommended to retrieve all data for all time from all
Facilities, then further filter your data result using the powerful features
available in MS Excel.
Why did it take Jim 20 seconds to download the Quick
Query but Kathy’s Query took 3 minutes to load?
Since
Quick Queries provide users with pre-prepared data, the system can deliver
results almost instantaneously. Further filtering (like Kathy did) by Date
Range, Facility or Species will actually slow down the data retrieval process,
because the pre-prepared data then has to be filtered before being available
for download rather than accepting the pre-prepared data as is for immediate
download (like Jim did).
·
The Quick Query
pre-prepared data download is only limited by your own network capacity.
Quick
Query - The Quick Query is a tool in the FINSNet.org Data Tab that allows
an immediate download of data for any of the featured modules (as of 10.20.25
the final production modules available are Trapping, Holding, Spawning, Move
Egg and Release). Quick Queries are pre-composed and for this reason, the data
can be minutes to hours old, which is the tradeoff for speed of access.
Pre-defined Summaries available in
FINS
Saturation Download provides percent
saturation values by Time and Rearing Container or Rearing Array per Domain
and/or Facility.
Percent Saturation values are input by authorized users at a
Facility and include Total Dissolved Gasses Percent Saturation (TDG %
Saturation), Dissolved Oxygen Percent Saturation (O2 % Saturation) and Dissolved
Nitrogen Percent Saturation (N % Saturation)
|
Saturation
Query Columns
|
|
Facility
|
|
Rearing
Array/Path
|
|
Date And Time
|
|
Total
Dissolved Gasses % Saturation
|
|
Dissolved
Oxygen % Saturation
|
|
Dissolved
Nitrogen % Saturation
|
Use Case:
The Canned Query provides summary data
relative to current Inventory and Release Dispositions by Facility and where
applicable, by Trap. The Query is based upon both Trapping and Holding data and
is a Summary for either an entire year or for year-to-date for the current
year, depending on the Date selected. The query returns data for all of Snake
Basin, currently unrestricted by user location. The query is restricted to
species Chinook, and is only viewable in a downloaded Excel file.
Canned Query Column Definitions


Use Case:
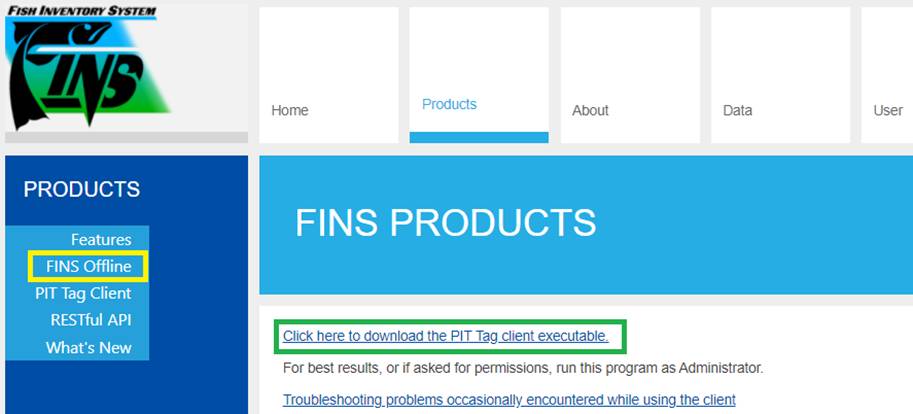
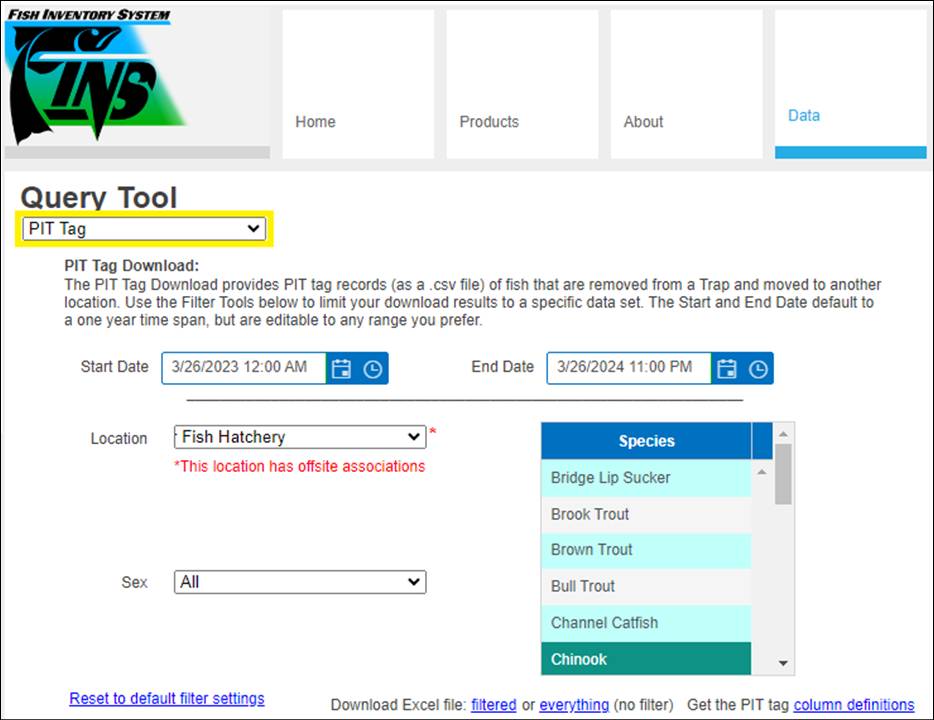
The PIT Tag Download
summary provides PIT tag records (as a .csv file) of Fish that are removed from
a Trap and moved to another Location, by Facility – Queryable by Date Range,
Facility, Sex and one or many Species. This summary allows for FINS Trapped Fish data to be easily integrated with
PTAGIS P4. FINS PIT Tag Download
allows immediate upload into P4, no editing required, from existing FINS
Trapping data input – avoiding double data entry.
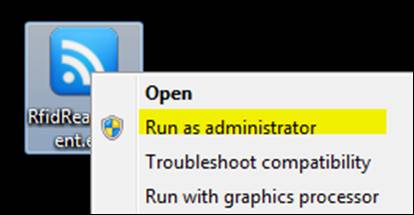
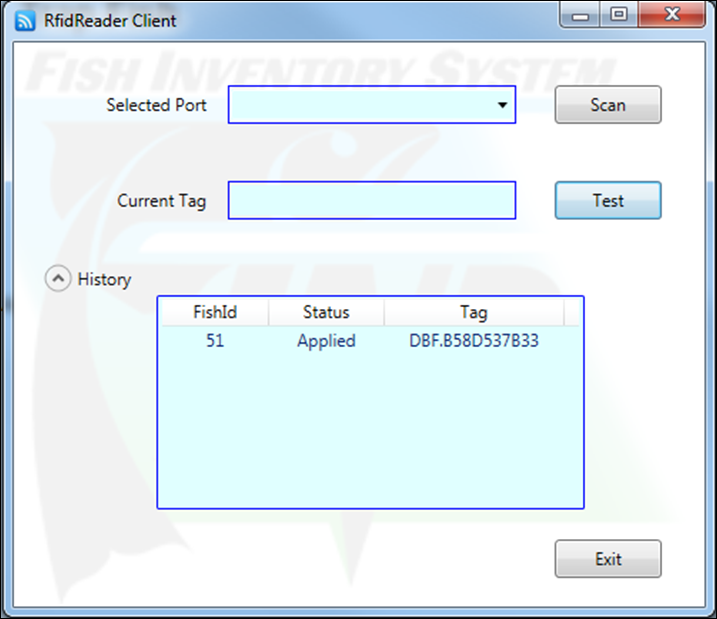
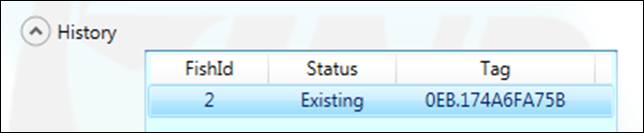
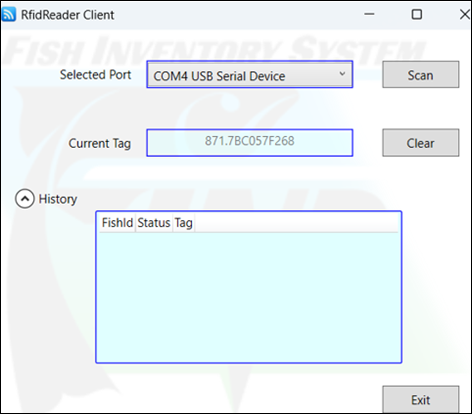
PIT Tag
data in FINS can be collected via the FINS Auto PIT Tag Reader – A Windows desktop application that can read serial,
usb and/or bluetooth data (such as that from a Biomark RFID Reader)
and send the data (PIT Tag values) to an open FINS dialog, such as the
FINS Trap Fish form.
Simple
Use Case Examples Supported -
1.
Allows real-time auto data capture
of PIT Tag values, preventing transcription data entry errors
2.
Increased speed of data entry
3.
Allow immediate upload into P4, no
editing required, from existing FINS Trapping data input – avoiding double data
entry
PIT Tag download file includes a Column Definition sheet.
There is also a quick link to the Column Definitions for query user reference,
without downloading a PIT Tag summary.
PIT
Tag Summary (.csv) Column Definitions
|
COLUMN NAME:
|
COLUMN DEFINITION:
|
|
Record#
|
Unique number used in Download to identify the
record; *Not referring to FINS Fish ID#
|
|
PIT Tag
|
The Existing PIT Tag Value associated with the
Trapped fish; unless the only associated PIT Tag is Applied, then the Applied
PIT Tag Value associated with the Trapped fish displays. If there is both,
an Existing and an Applied PIT Tag, only the Existing PIT Tag will be
provided.
|
|
SRR Code
|
A P4 Code that contains the Species, Origin, and Run
of the Trapped fish
|
|
Length
|
Length in mm, associated with the Trapped fish
|
|
Weight
|
Weight in grams, associated with the Trapped fish
|
|
Conditional Comments
|
P4 Column that is only populated when there is an
Existing PIT Tag on the Trapped fish also known as ‘Recap’ in P4; Displays as
‘RE’
|
|
Trap Name
|
Name of the Trap in FINS, where the fish was Trapped
|
|
Event Date
|
Trapping Session Date, that the fish was Trapped in
|
|
Release Site
|
Name of the Release Location in FINS, where the fish
was Released
|
|
CWT (Existing)
|
Coded Wire Tag status of Trapped fish;
|
|
PRESENT = has an Existing Coded Wire Tag
|
|
NOT PRESENT = Confirmed that there no Coded Wire Tag
present in the fish
|
|
UNKNOWN = Unknown if there is or isn’t a Coded Wire
Tag present in the fish
|
|
Marks (Existing)
|
Abbreviation of Mark Type Existing on fish at Trap
|
|
Marks (Applied)
|
Abbreviation of Mark Type Applied to fish at Trap
|
|
Genetic ID
|
Genetic Sample Type Abbreviation (GEN) followed by
the Sample Value(Data) associated with the Trapped fish
|
|
Text Comments
|
Notes entered on Trapped fish
|
|
Facility
|
Name of the Facility in FINS that owns the Trap
where the fish was Trapped
|
|
Recap
|
TRUE - if Trapped fish has an Existing PIT Tag
|
|
FALSE - if no Existing PIT Tag on Trapped fish
|
|
Tags (Existing)
|
Abbreviation of Tag Type Existing on fish at Trap,
followed by the Sample Value (Data) associated with the Trapped fish *Not
including Coded Wire Tag; This is a separate column
|
|
Tags (Applied)
|
Abbreviation of Tag Type Applied to fish at Trap,
followed by the Sample Value (Data) associated with the Trapped fish *Not
including Coded Wire Tag; This is a separate column
|
|
Samples
|
Abbreviation of Sample Type taken on fish at Trap,
followed by the Sample Value (Data) associated with the Trapped fish *Genetic
Samples are included here and in their own separate column 'Genetic ID'
|
|
Conditions
|
Abbreviation of Condition Type observed on fish at
Trap
|
Use Case
Inventory
Summary Queries – provide the current on-hand counts for Holding, Spawned,
Incubating and Rearing Inventory as well as Enumerated Inventory Details and
Historical To Date Rearing Metric details.
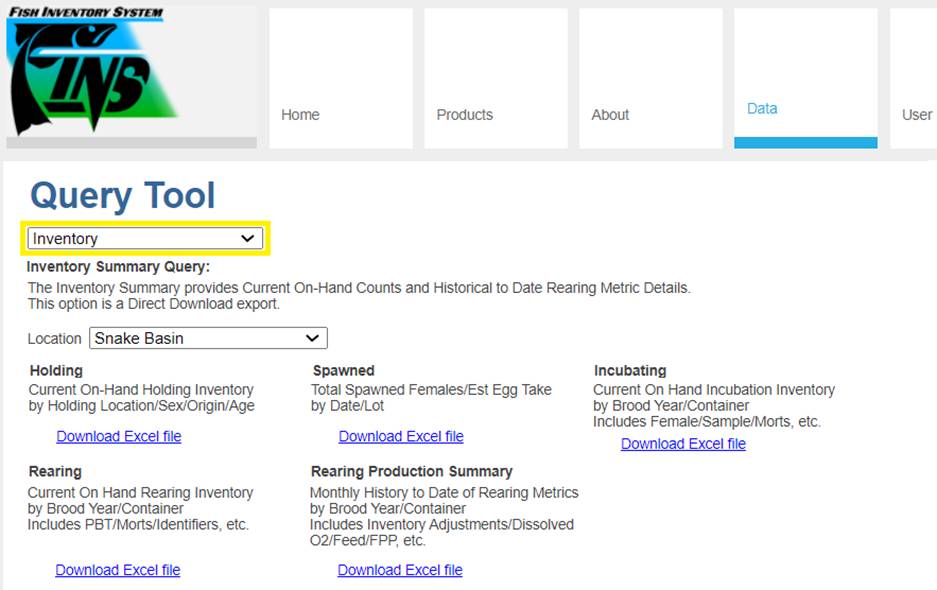
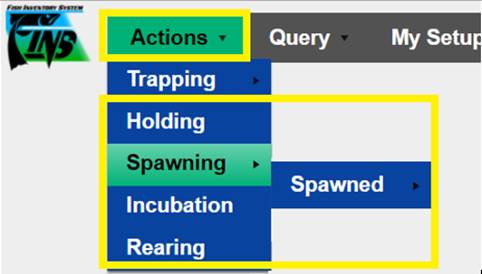
The FINSNet.org Data Tab Query Tool
Inventory Menu, above, are the Data Tab versions of the same Inventory reports
available to FINS Online Inventory Data Entry Users via FINS Online >
Actions > Holding, Spawning > Spawned, Incubation, Rearing and Rearing
Production Summary, below
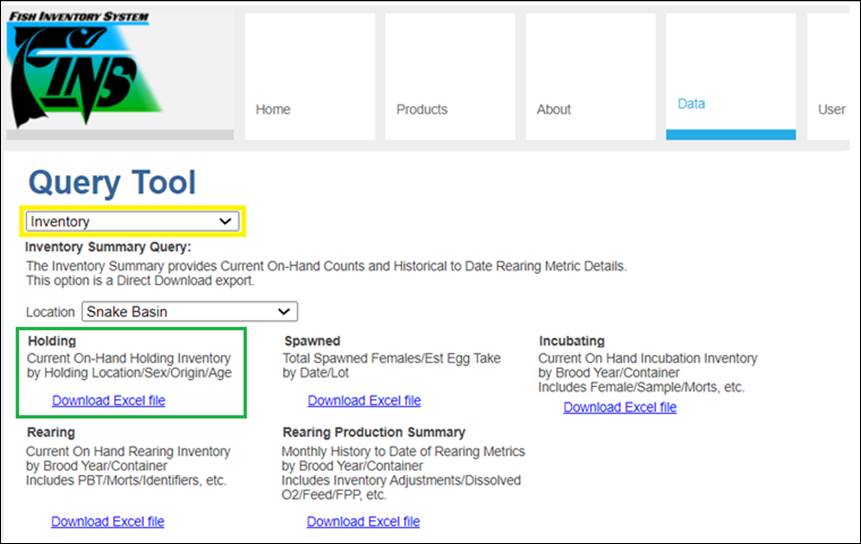
Use Case
The Holding Inventory Summary
provides current on-hand brood stock and general holding inventory by Holding
Location.
This means that you will only see what is currently in
Holding containers and not any historical inventory data or transaction records
for moves made in/out – those are found in other Holding Queries, like the Move
Fish Query, Count Correction Query…etc. Holding Inventory will also show
Holding containers that are empty. For the containers that have on-hand Fish
data present you can also see the Current Fish Count, by Facility, Species,
Run, Sex, Origin and their Source Trap. Data Query users may also be
interested in seeing if there are any Fish that are currently sitting in a
specific Holding Location.
Columns in Download
|
Holding Inventory Sheet 1 = Holding Inventory
|
|
Facility
|
|
Holding Locations
|
|
Current Fish Count
|
|
Sex
|
|
Species
|
|
Age
|
|
Origins
|
|
Source Traps
|
|
Holding
Inventory Sheet 2 = Identifiers
|
|
Facility
|
|
Holding Locations
|
|
Sex
|
|
Species
|
|
Identifier Group Count
|
|
Origins
|
|
Run
|
|
Source Trap
|
|
Source Trap Facility
|
|
Existing Marks
|
|
Existing Marks Quantity
|
|
Applied Marks
|
|
Applied Marks Quantity
|
|
Existing Tags
|
|
Applied Tags
|
Steps
1. Select
the Location (Domain and/or Facility) that you want to export Summary data for
2. Select
which Inventory you want to view Summary data for
·
Holding:
This summary displays current on-hand
(Disposition) Ponded inventory, by Holding Location, Species, Sex, visual Age and
Origin (as applicable)

Use Case
The Spawning Inventory Summary displays Total Spawned
Females/Estimated Egg Take by Date and Lot # for all existing Spawning
Sessions, so that a summary of what has been Spawned to date is available to
further filter. Users can then take advantage of Excel filter capabilities to
further filter a Facility’s Spawned Inventory by Brood Year, Species etc.
Columns in Download
|
Facility
|
|
Session Date
|
|
Spawning Location
|
|
Is Offsite
|
|
Session Lot#
|
|
Stock
|
|
Stock Agency
|
|
Stock Facility
|
|
Stock Description
|
|
Session Progeny
|
|
Session Species
|
|
Session Run
|
|
Female Count
|
|
Estimated Egg Count
Brood Year
|
Steps
1. Select
the Location (Domain and/or Facility) that you want to export Summary data for
2. Select
which Inventory you want to view Summary data for
·
Spawned:
This summary displays a rolled-up total of
each Spawning Session for Total Females Spawned, Total Estimated Egg Count by Facility,
Brood Year, Stock, Run, Progeny… All Spawning Sessions ever created for the
selected Location in FINS display in the FINSNet.org Data Tab version of this
Summary export.
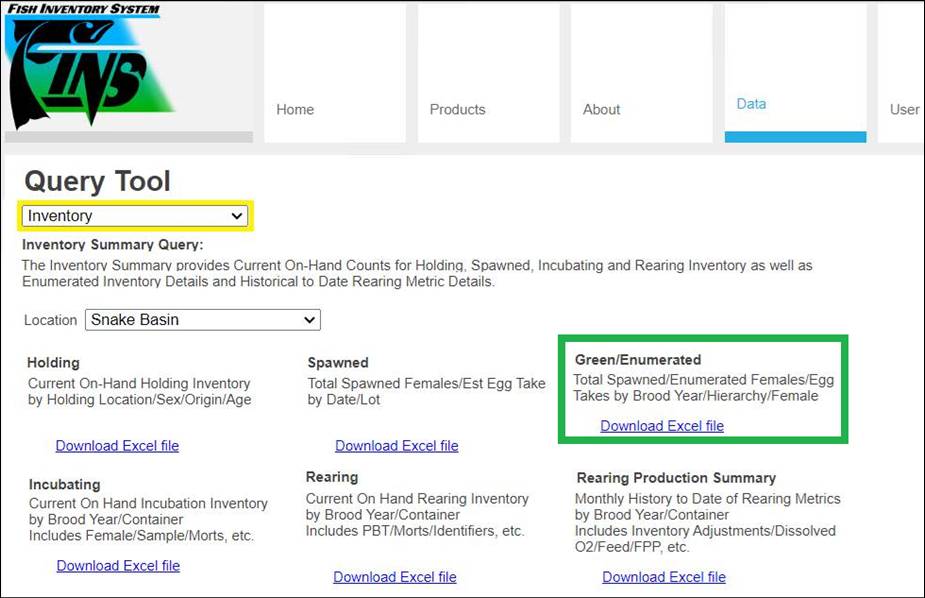
Use Case
The Green/Enumerated Inventory Summary report provides a
summarized view of Enumerated Egg data by Brood Year, Facility, Species, Incubation
Hierarchy and Female ID of all Spawning Sessions by Date and Lot # for viewing
Egg Enumeration status and associated details when creating Run Reports to
determine ‘How many Green and Eyed Eggs were produced at each Hatchery’. Run
Report being the time in which a Facility’s Trap was open through the time
their Eggs are Eyed.
Business Logic
·
Egg Take Enumeration
details are visible to/as Parent/Offsite Owner of the Spawning Location
·
FINS will, by default,
display the Enumerated Inventory by Brood Year
·
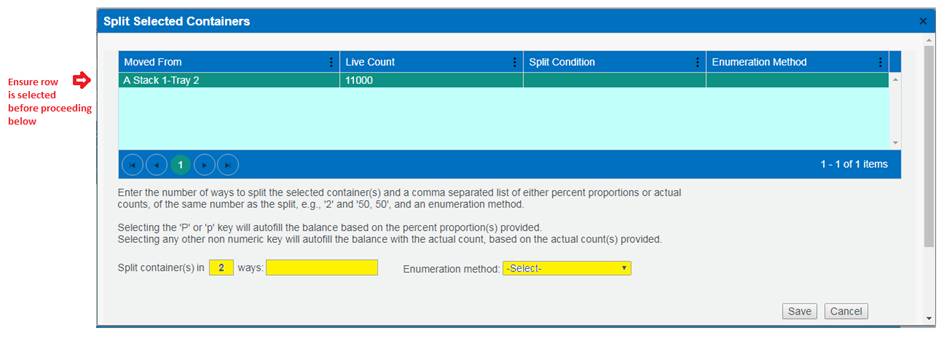
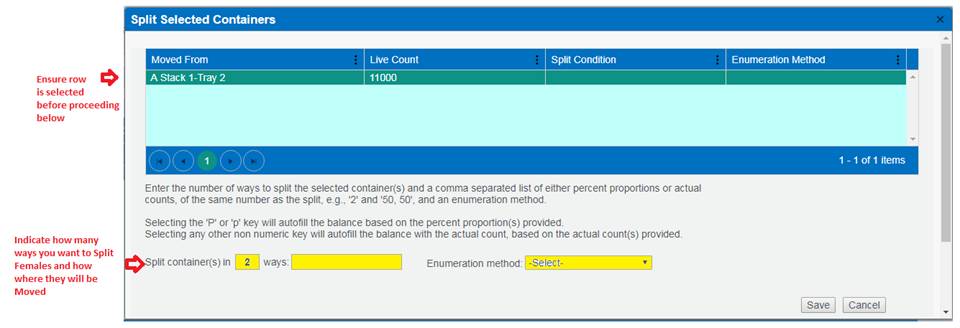
Splitting of Female
Eggs
o
Splitting a Females Eggs into
multiple Containers will also split the Estimated Egg Count into the number of
Containers those eggs are being split into
o
Splitting a Females Eggs into
multiple Containers will NOT double the number of eggs in each of the
Containers that Female Eggs are being split to
·
Female Egg Takes that have been Group Enumerated, will display
correctly as unique Enumerated Female Counts
o COLUMN:
Enumerated Female Count
When
a container is Group Enumerated, FINS will uniquely count each Female in a
Group Enumeration rather than count each Group Enumeration as an Enumerated
Female Count
- For example – A
Group Enumeration of 3 Female Egg Takes across 10 Incubation containers
will accurately calculate as 3 ‘Enumerated Females’, not 10
·
Incubation Hierarchy Column
o ‘N/A’
will display if Eggs are currently sitting in a Temporary Container or
o If
Eggs were transferred to another FINS Facility and the Eggs are sitting in that
Facility’s Inbox
·
Empty Columns – Users will see empty columns in the Enumerated
Inventory Summary when there is no data present to display; either:
o
The Spawning Session associated to the Brood Year has No Spawned
Females
o
The Eggs of the associated Brood Year Spawning Sessions are still
Green (not yet Enumerated)
Columns in Download
·
Brood Year Level
Columns
o
Brood Year – Brood
Year assigned the Egg Takes/Females are associated to
o
Facility – Facility Females
were Spawned at
o
Session Date Range –
Date Range of Spawning Sessions in Brood Year
o
Lot Number – Lot # of Spawning Sessions
in Brood Year
o
Species – Species Spawned in this
Brood Year
o Spawned Female Count – Number
of Females Spawned in this Brood Year
o
Enumerated Female
Count – Total Number of Female Egg Takes Enumerated by Brood Year
o
Estimated Egg Count – Total Estimated Egg Count of all Females Spawned for Brood
Year
o
Actual Green Take – Total Inventory Count plus Loss at Enumeration for Brood
Year
o
Average Actual Green
Take – FINS Calculated; Actual Green Take of Brood Year divided by the number
of Enumerated unique Females
o
Inventory Count – Total number of Viable Eggs at Enumeration of Brood Year
o
Loss – Total number of Dead Eggs at Enumeration for Brood Year
o
Eye Up Rate – FINS
Calculated; Inventory Count divided by Actual Green Take for Brood Year
·
Hierarchy Level
Columns
o
Hierarchy Facility – Facility of the
Incubation Hierarchy the Eggs were Enumerated in; Current Location if Green
o
Hierarchy – Incubation Hierarchy the
Eggs were Enumerated in; Current Location if Green
o
Lot Number – Lot # of Spawning Sessions
in Hierarchy
o
Egg Stage – Green (Unenumerated) or
Eyed (at Enumeration)
o
Enumerated Female Count – Total Number
of Female Egg Takes Enumerated by Hierarchy
o
Estimated Egg Count – Total Estimated
Egg Count of Eggs in this Hierarchy as designated in Spawning
o
Actual Green Take – Total
Inventory Count plus Loss at Enumeration of Hierarchy
o
Average Actual Green
Take – FINS Calculated; Actual Green Take of Hierarchy divided by the number of
Enumerated unique Females in Hierarchy
o
Inventory Count – Total number of
Viable Eggs at Enumeration for Hierarchy
o
Loss – Total number of Dead Eggs at
Enumeration for Hierarchy
o
Eye Up Rate – FINS
Calculated; Inventory Count divided by Actual Green Take in Hierarchy
·
Female Level Columns
o
Female ID – ID assigned at Spawning to
the Female from which the Egg Group came from
o
Cross ID – Unique ID for each Cross
within a Spawn Session (Female ID # and Name of Immediate Container Eggs were
placed in)
o Group ID – A Unique ID assigned by the database for
combined Egg Groups via Group Enumeration. Group Enumerations represent
multiple Females/Egg Takes that are mixed together at Enumeration.
o Session Date – of Female Spawned as designated in Spawning
Session
o Lot # – of Female as designated in Spawning Session
o Run – Female Run as designated in Spawning Session
o Stock – Female Stock as designated in Spawning Session
o Program – Female Egg Program designation (Integrated or
Segregated) at the time of Enumeration; Current Program designation of Female
Eggs if Green
o Egg Stage – Green (Unenumerated) or Eyed (at Enumeration)
o Estimated Egg Count – Estimated Egg Count of Female as
designated in Spawning Session
o Actual Green Take – Inventory Count plus Loss at
Enumeration
o Inventory Count – Viable Eggs at Enumeration; 2nd
count assigned to an Egg Group
o Loss – Number of Dead Eggs at Enumeration
o Eye Up Rate – FINS
Calculated; Inventory Count divided by Actual Green Take
Steps
This summary displays current
Green/Enumerated status of Incubation Egg/Fry inventory, by Brood Year, by
Incubation Hierarchy and/or by Female
1. Select
the Location (Domain and/or Facility) that you want to export Summary data for
2. Select
which Inventory you want to view Summary data for
·
Green/Enumerated:
3. Select
the Brood Year and Species to view Green/Enumerated Inventory Summary data for
and click Export
a. The
Brood Year and Species dropdown menus only display available data for the
selected Location (Facility/Program)
Exported File: Includes 4 different Sheets for
preferred viewing options
·
‘Summary Everything’
Sheet – Displays all Exported Session Data with Enumerated details by Brood
Year, Incubation Hierarchy and Female ID/Cross ID/Group ID
·
‘Brood Year Totals’
Sheet – Displays all Exported Session Data with
Enumerated Totals by Brood Year
·
‘Totals by Hierarchy’ Sheet – Displays
all Exported Session Data with Enumerated Totals by Incubation Hierarchy
· ‘Totals by Female’ Sheet – Displays all
Exported Session Data with Enumerated Totals by Female ID/Cross ID/Group ID
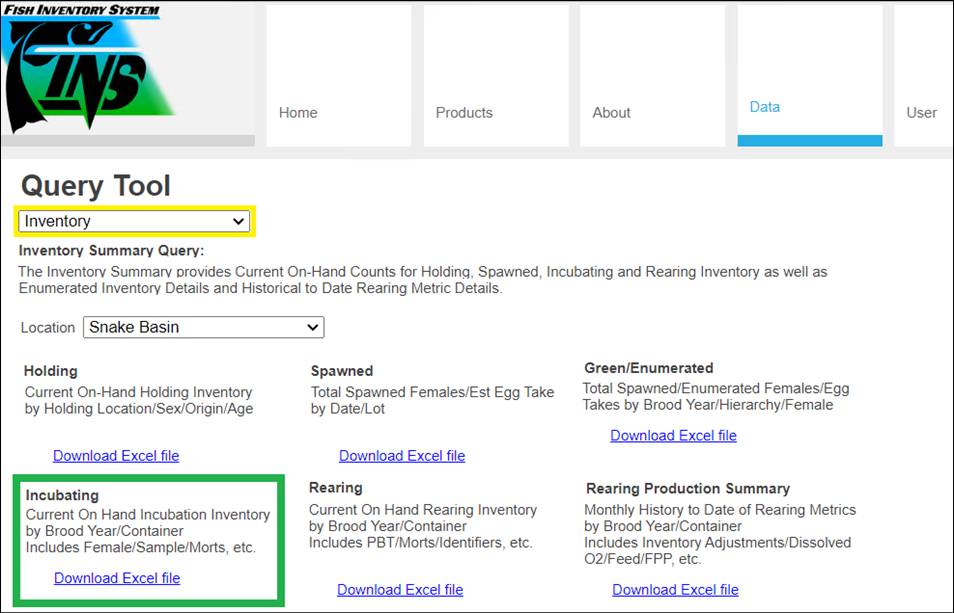
Use Case
The Incubation Inventory Summary displays current on-hand
incubating inventory by Incubation Hierarchy.
This means that you will only see what is currently in
incubation containers and not any historical inventory data or transaction
records for moves made in/out – those are found in other Incubation Queries,
like the Move Egg Query. Incubation Inventory will also show containers
that are empty. For the containers that have on-hand egg data present you
can also see the Enumeration status, if there are current Morts/Loss for the
container and what the Eye Up Rate/Survival Rate is for each as well as PBT
details for the Females the Egg Takes came from. Data Query users may
also be interested in seeing if there are any eggs that are currently sitting
in a specific location/container, or if there are any green eggs yet to be
enumerated via this summary.
Columns in Download
|
o Hierarchy
|
|
o Facility
|
|
o Path
|
|
o Container
|
|
o Female ID
|
|
o Cross/Group ID
|
|
o Lot #
|
|
o Estimated Egg Count
|
|
o Inventory Count
|
|
o Loss
|
|
o Actual Green Take
|
|
o Live Count
|
|
o Enumerated
|
|
o Species
|
|
o Program
|
|
o Stock
|
|
o Stock Agency
|
|
o Stock Facility
|
|
o Stock Description
|
|
o Stage
|
|
o Samples
|
|
o Eye Up Rate (Inventory Count/Actual Green Take)
|
|
o Survival Rate (Live Count/Actual Green Take)
|
Steps
4. Select
the Location (Domain and/or Facility) that you want to export Summary data for
5. Select
which Inventory you want to view Summary data for
·
Incubating:
This summary displays current on-hand
(Disposition) Incubation Egg/Fry inventory, by Incubation Hierarchy
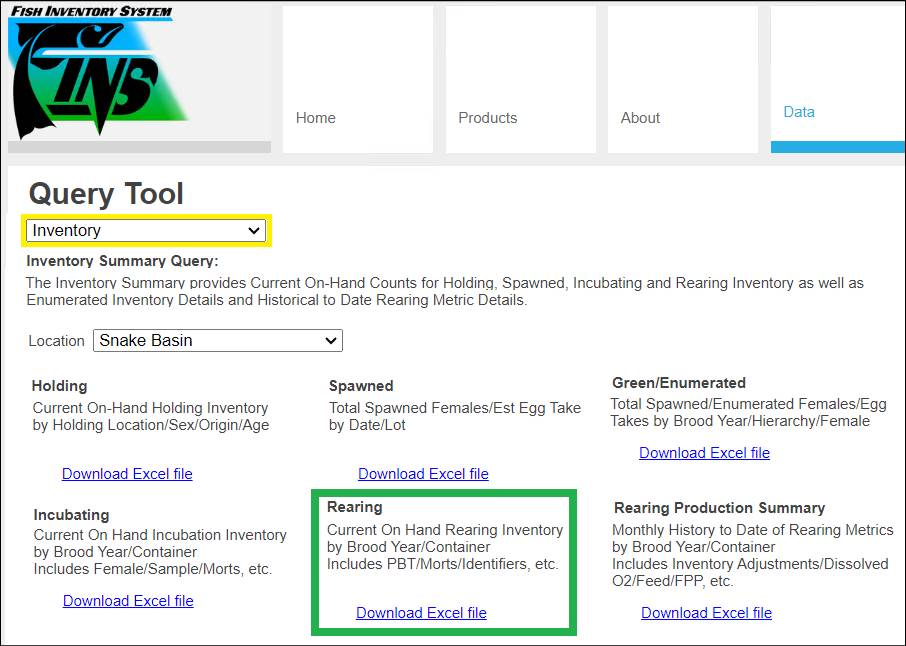
Use Case
The Rearing Inventory provides current on-hand rearing
inventory counts by Rearing Array for managing Juveniles.
This means that you will only see what is currently in
Rearing containers and not any historical inventory data or transaction records
for moves made in/out – those are found in other Rearing Queries, like the
Rearing Move Query, Release Query…etc. Rearing Inventory will also show
containers that are empty. For the containers that have on-hand Juvenile
data present you can also see the current Live Count, current Morts/Loss for
the container, Marks/Tags, Mark/Tag Rates, associated Shed Rate data, Rearing Metrics
by Container as well as PBT details for the Females the Juveniles came
from. Data Query users may also be interested in seeing if there are any
Juveniles that are currently sitting in a specific location/container, or if
there are any containers not yet Marked.
Columns in Download
|
Rolled Up Total; First Row Columns =
o Array
|
|
o Facility
|
|
o Targeted Release Date Range
|
|
o Array Release Goal
|
|
o Species
|
|
o Stock
|
|
o Stock Agency
|
|
o Stock Facility
|
|
o Stock Description
|
|
o Program
|
|
o Shed Rate %
|
|
o Retention Rate %
|
|
o Original CWT Total
|
|
o Adjusted CWT Total
|
|
o Original Mark/Tag Rate
|
|
o Adjusted Mark/Tag Rate
|
|
o Incubation Live Count Total
|
|
o Juvenile Count Total
|
|
o Auto Enumeration Count Total
|
Second Row Columns =
|
o Incubation Live Count
|
|
o Juvenile Count
|
|
o Auto Generated Count
|
|
o Species
|
|
o Program
|
|
o Fish Length(in by Fork)
|
|
o Length Type
|
|
o Fish Per Pound
|
|
o Average Fish Weight(lb)
|
|
o Pounds Fed
|
|
o Feed Size
|
|
o Feed Cost (per Pound)
|
|
o Temperature
|
|
o Temperature Unit
|
|
o Total Weight(lb)
|
|
o Flow
|
|
o Volume
|
|
o Stock
|
|
o Stock Agency
|
|
o Stock Facility
|
|
o Stock Description
|
|
o Morts/Loss
|
|
o Mark
|
|
o Mark Quantity
|
|
o Mark Rate
|
|
o Tag
|
|
o Tag Quantity
|
|
o Tag Rate
|
|
o PIT
|
|
o Shed Rate %
|
|
o Retention Rate %
|
|
o Sample Date/Time
|
|
o Sample Size
|
|
o Sample Retention
|
|
o Rate Notes
|
|
o Original CWT Total
|
|
o Adjusted CWT Total
|
|
o Original Mark/Tag Rate
|
|
o Adjusted Mark/Tag Rate
|
Steps
1. Select
the Location (Domain and/or Facility) that you want to export Summary data for
2. Select
which Inventory you want to view Summary data for
·
Rearing:
This summary displays current on-hand
(Disposition) Rearing Juvenile inventory, by Rearing Array
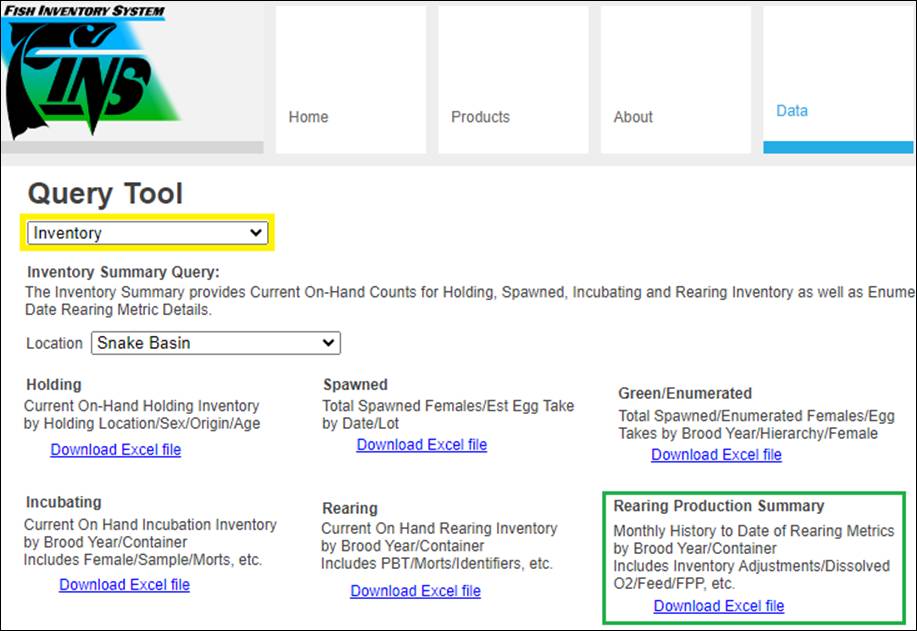
Use Case
The Rearing Production
Summary provides Monthly History to Date of Rearing Metrics by Brood Year/Container.
Metrics include Inventory Adjustments/Dissolved O2/Feed/Fish Per Pound…etc.
Rearing Metrics only need to be entered once a month, which
is typically done at the end for the month.
Columns in Download
|
Rearing Array Name and Rearing Array
Container Names (Vertically or Horizontally)
|
|
INVENTORY SECTION COLUMNS =
|
|
Starting Inventory – The inventory you are starting
the month with; per Enumeration date
|
|
Mortality
|
|
Ending Inventory
|
|
Inventory Increase/Decrease
|
|
Inventory Difference Justification
|
|
Mortality Rate
|
|
WEIGHT
SECTION COLUMNS =
|
|
Starting
Fish Per Pound (FPP) - The FPP you are
starting the month with per the last month’s ending FPP. *The last input
before this month or the first input of the month if no prior month has this
input. Based off the previous
month’s ‘Ending’ Fish per (Weight) value that was entered in the ‘Fish per
(Weight)’ Field for the Rearing Container.
|
|
Total Starting Weight(lb)
|
|
Ending Fish Per Pound
|
|
Total Ending Weight(lb)
|
|
Weight Gain(lb)
|
|
LENGTH SECTION COLUMNS =
|
|
Starting Length(in) - The Length (measured in Inches) your inventory is starting the month
with per the last month’s ending Length. *The last input before this month
or the first input of the month if no prior month has this input.
|
|
Ending Length(in)
|
|
Monthly Growth(in)
|
|
in/Day
|
|
Starting CFactor
|
|
Starting KFactor
|
|
Ending CFactor
|
|
Ending KFactor
|
|
FEED SECTION COLUMNS =
|
|
Pounds Fed
|
|
Starting Feed Size
|
|
Ending Feed Size
|
|
Starting Feed Cost (Per lb)
|
|
Ending Feed Cost (Per lb)
|
|
Total Cost for Month
|
|
Feed Cost Per Day
|
|
Days On Feed
|
|
Feed Conversion Rate (Pounds Fed/Weight
Gain (lb)
|
|
DISSOLVED OXYGEN SECTION COLUMNS =
|
|
Head(Max) Dissolved Oxygen PPM
|
|
Tail(Min) Dissolved Oxygen PPM
|
|
Average Dissolved Oxygen PPM
|
|
Head(Max) Dissolved Oxygen %Sat
|
|
Tail(Min) Dissolved Oxygen %Sat
|
|
Average Dissolved Oxygen %Sat
|
|
MGMT OPTIONS SECTION COLUMNS =
|
|
Starting Biomass (lb) (Starting
Inventory Count / Starting Fish per Pound (lb))
|
|
Ending Biomass (lb) (Ending Inventory
Count / Ending Fish per Pound (lb))
|
|
Starting Volume (cubic feet)
|
|
Ending Volume (cubic feet)
|
|
Starting Volume (cubic meters)
|
|
Ending Volume (cubic meters)
|
|
Starting Flow (gallons per minute)
|
|
Ending Flow (gallons per minute)
|
|
Starting Flow (cubic feet per second)
|
|
Ending Flow (cubic feet per second)
|
|
Starting Flow (liters per minute)
|
|
Ending Flow (liters per minute)
|
|
Starting Turnover/Hour ((gpm * 60)/(
volume * 7.481))
|
|
Ending Turnover/Hour ((gpm * 60)/(
volume * 7.481))
|
|
Starting Density (Biomass lbs/Volume
cubic feet)
|
|
Ending Density (Biomass lbs/Volume cubic
feet)
|
|
Starting Density (Biomass kg/Volume
cubic meters)
|
|
Ending Density (Biomass kg/Volume cubic
meters)
|
|
Starting Density Index
(Biomass/(Length(in)*Volume))
|
|
Ending Density Index
(Biomass/(Length(in)*Volume))
|
|
Starting Flow Index (Biomass
lbs/(Length(in)*Flow gpm))
|
|
Ending Flow Index(Biomass
lbs/(Length(in)*Flow gpm))
|
|
Min Temperature F
|
|
MaxTemperature F
|
|
Average Temperature F
|
|
Min Temperature C
|
|
Max Temperature C
|
|
Average Temperature C
|
|
Starting Total TU
|
|
Ending Total TU
|
Section 1- Rearing Production Summary Export Options
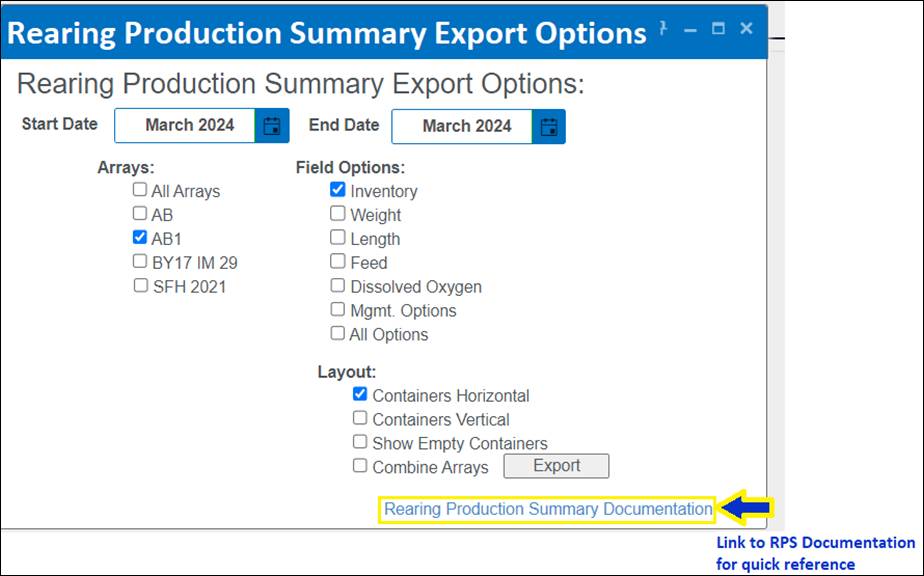
Summary/Description:
The ‘Production Summary Export Options’ menu
allows users the ability to select what rearing metric information to include
in the output as well as the formatting of the Rearing Production Summary Excel
file download. Users have the ability to select the Date Range, one or many
Rearing Arrays, and different Rearing Inventory and Metric Input types and determine
their preferred Layout of the Excel spreadsheet for the selected Summary.
Use Cases:
· To view Facility in season summarized
rearing data inventory and associated rearing container metrics by Month per
Array pre-Release for Hatchery Management Reporting
· To view Facility post season summarized
rearing data inventory and associated rearing container metrics by Month per
Array pre-Release for Management quality control
Validation:
·
Selecting a ‘Start Date’ Month is required. ‘Start Date’ will
always default to 1st day of the current Month selected
§
The data displayed for the ‘Starting’ Values are what you are
“starting” the month with per the last month’s ending data input. *The last
input before this month or the first input of the month if no prior month has
this input.
·
Selecting an ‘End Date’ Month is required. ‘End Date’ will always
default to the last day of the current Month selected
§
The data displayed for the ‘Ending’ Values are what you are
“ending” the month with per this month’s last data input.
·
Selecting at least one ‘Array’ is required. If no Arrays are
selected an error will display that reads ‘No Arrays selected’, preventing an
Export
·
Selecting an option from the ‘Field Options’ menu is required
·
‘Layout’ selection is required. If no option is selected,
‘Layout’ will default to ‘Containers Horizontal’
·
‘Export’ will succeed once all Export Options have been set:
§
Start Date – Defaults to current month
§
End Date – Defaults to current month
§
Arrays – Defaults as unselected or last selection
§
Field Options – Defaults to only Inventory
§
Layout – Defaults to ‘Containers Horizontal’ checked
Steps
1.
Select the ‘Start
Date’ MONTH for the First Month of Rearing Data that you would like
included
Validation:
‘Start Date’ is required, defaults to current Month or last selected and will
always start with 1st day of each Month selected (For Example:
March 1, even if it lands on a Sunday or Saturday)
§
The data displayed for the ‘Starting’ Values are what you are
“starting” the month with per the last month’s ending data input. *The last
input before this month or the first input of the month if no prior month has
this input.

2.
Select the ‘End Date’
MONTH for the Last Month of Rearing Data that you would like included
Validation: ‘End
Date’ is required, defaults to current Month or last selected and will always
end on the last day of the Month that is selected (For Example: The 31st
in March and the 30th in June…etc.)
§
The data displayed for the ‘Ending’ Values are what you are
“ending” the month with per this month’s last data input.

3.
Select the Rearing ‘Array’
and/or Arrays that you want data to be exported for
Validation: One or many Arrays may be selected for output. Selecting an
Array is required. If no Array is checked a ‘No Array selected’ error will
display.
4.
Select the ‘Field
Options’ that need to be exported. Available options include:
Validation: Selecting at least one ‘Field Option’ is required and
defaults with ‘Inventory’ checked
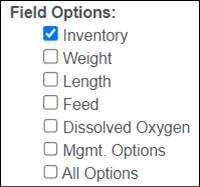
·
Inventory – Selecting will include Inventory Metrics (Starting/Ending
Inventory and Mortality Rate)
·
Weight – Selecting will include Weight Rearing Metrics (Start/End
Weight and Fish Per Pound)
·
Length – Selecting will include Length Rearing Metrics (Start/End
Length, Growth per Day and Condition Factor)
·
Feed – Selecting will include Feed Rearing Metrics (Pounds Fed,
Feed Size/Cost and Days on Feed)
·
Dissolved Oxygen – Selecting will include Dissolved O2 Rearing
Metrics (Parts per Million, Percent Saturation)
·
Mgmt. Options – Selecting will include Management Rearing Metrics
(Turnover, Density, Density Index, Flow Index, Temperature and Temperature
Units)
·
All Options – Selecting will include All available Inventory and Rearing
Metrics
5.
Select your preferred
‘Layout’ for the Summary export
Validation: Selecting a ‘Layout’ is required and defaults to ‘Containers
Horizontal’, which will display the Containers for an Array horizontally and
the Inventory/Metrics data vertically
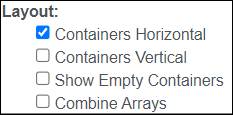
·
Containers Horizontal – Check to display Containers for Array horizontally
and the Inventory/Metrics data vertically
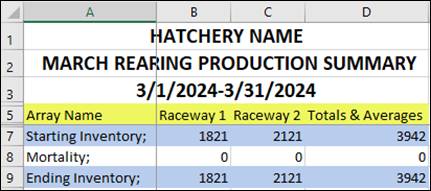
·
Containers Vertical – Check to display Containers for Array vertically and
the Inventory/Metrics data horizontally
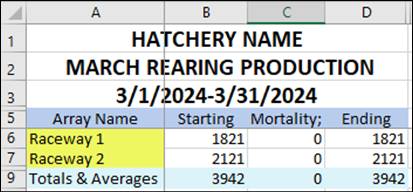
·
Show Empty Containers – Selecting, will include Rearing Containers that have no
data for the selected Date Range in the export. Defaults unselected –
preventing empty containers from being displayed in the download.
·
Combine Arrays – Selecting, will combine multiple Rearing Arrays, each
displayed with a different color, in each Monthly Sheet for viewing rather than
exporting each Rearing Array separately in their own Excel File download. Defaults
unselected.

6.
Click on the ‘Export’
button to generate and download an Excel spreadsheet with the data per your
selections
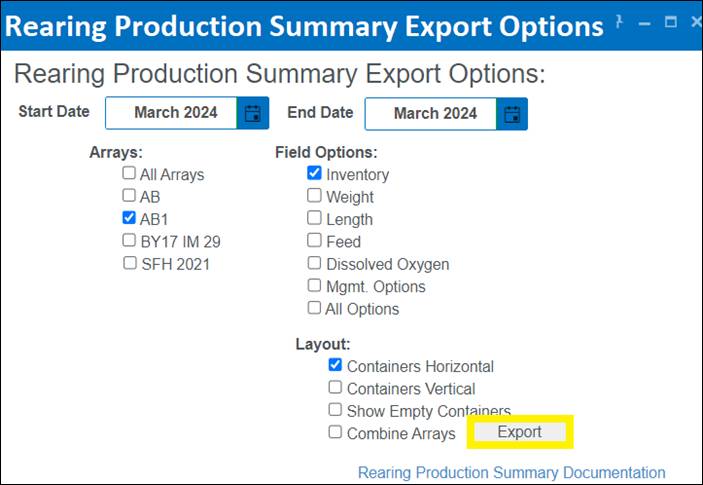
Business Logic:
Depending on the options selected in the ‘Rearing
Production Summary Export Options’ menu, an Excel file will download with the
selected data as preferred. Below are a few examples of the multiple ways that
data can display in the Excel file depending on the ‘Field Options’ that
were checked.
·
Inventory – If Checked, ‘Inventory’ related information will be included in download to
Excel:
§ Starting Inventory – The
inventory you are starting the month with; per Enumeration date
§ Mortality
§ Ending Inventory
§ Inventory Increase/Decrease
§ Inventory Difference Justification
§ Mortality Rate

·
Weight – If Checked, ‘Weight’ related information will be
included in download to Excel:
§
Starting Fish Per Pound – (FPP) the FPP
you are starting the month with per the last month’s ending FPP. *The last
input before this month or the first input of the month if no prior month has
this input. Based off
the previous month’s ‘Ending’ Fish per (Weight) value that was entered in the
‘Fish per (Weight)’ Field for the Rearing Container.
§
Total Starting Weight (lb)
§
Ending Fish Per Pound
§
Total Ending Weight (lb)
§
Weight Gain (lb)

*Note:
Example above is displaying the Default Unit of Measurement (Pounds). If you
prefer to display a different Unit of Measurement, this can be done in the ‘Set
Display Options’ dialogue box located in the ‘Rearing-Inventory tab’ of FINS
Online.
·
Length – If Checked, ‘Length’ related information will be
included in download to Excel:
§
Starting Length (in) - The Length (measured in Inches) your inventory is
starting the month with per the last month’s ending Length. *The last input
before this month or the first input of the month if no prior month has this
input.
§ Ending Length (in)
§ Monthly Growth (in)
§ Inches/Day
§ Starting Condition Factor
§ Starting K Factor
§ Ending Condition Factor
§ Ending K Factor

*Note: Example above is displaying the Default Unit of
Measurement (Inches). If you prefer to display a different Unit of Measurement,
this can be done in the ‘Set Display Options’ dialogue box located in the
‘Rearing-Inventory tab’ of FINS Online.
·
Feed – If Checked, ‘Feed’ related information will be included in download to
Excel:
§ Pounds Fed
§ Starting Feed Size
§ Ending Feed Size
§ Starting Feed Cost (Per lb)
§ Ending Feed Cost (Per lb)
§ Total Cost for Month
§ Feed Cost Per Day
§ Days On Feed
§ Feed Conversion Rate (Pounds Fed/Weight
Gain) (lb)
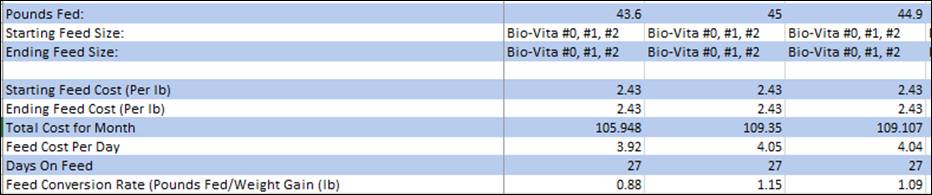
·
Dissolved Oxygen – If Checked, ‘Dissolved Oxygen’ related information will be
included in download to Excel:
§ Head (Max) Dissolved Oxygen PPM
§ Tail (Min) Dissolved Oxygen PPM
§ Average Dissolved Oxygen PPM
§ Head (Max) Dissolved Oxygen % Saturation
§ Tail (Min) Dissolved Oxygen % Saturation
§ Average Dissolved Oxygen % Saturation

·
Mgmt. Options – If Checked, Management Rearing Metrics
related information will be included in download to Excel:
§ Head (Max) Dissolved Oxygen PPM
§ Tail (Min) Dissolved Oxygen PPM
§ Average Dissolved Oxygen PPM
§ Head (Max) Dissolved Oxygen % Saturation
§ Tail (Min) Dissolved Oxygen % Saturation
§ Average Dissolved Oxygen % Saturation
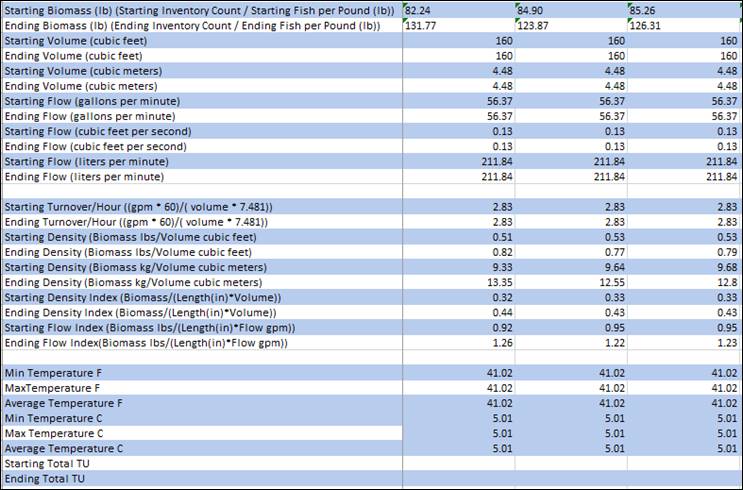
·
All Options- If Checked, all above
related rearing inventory and metric information will download to Excel:
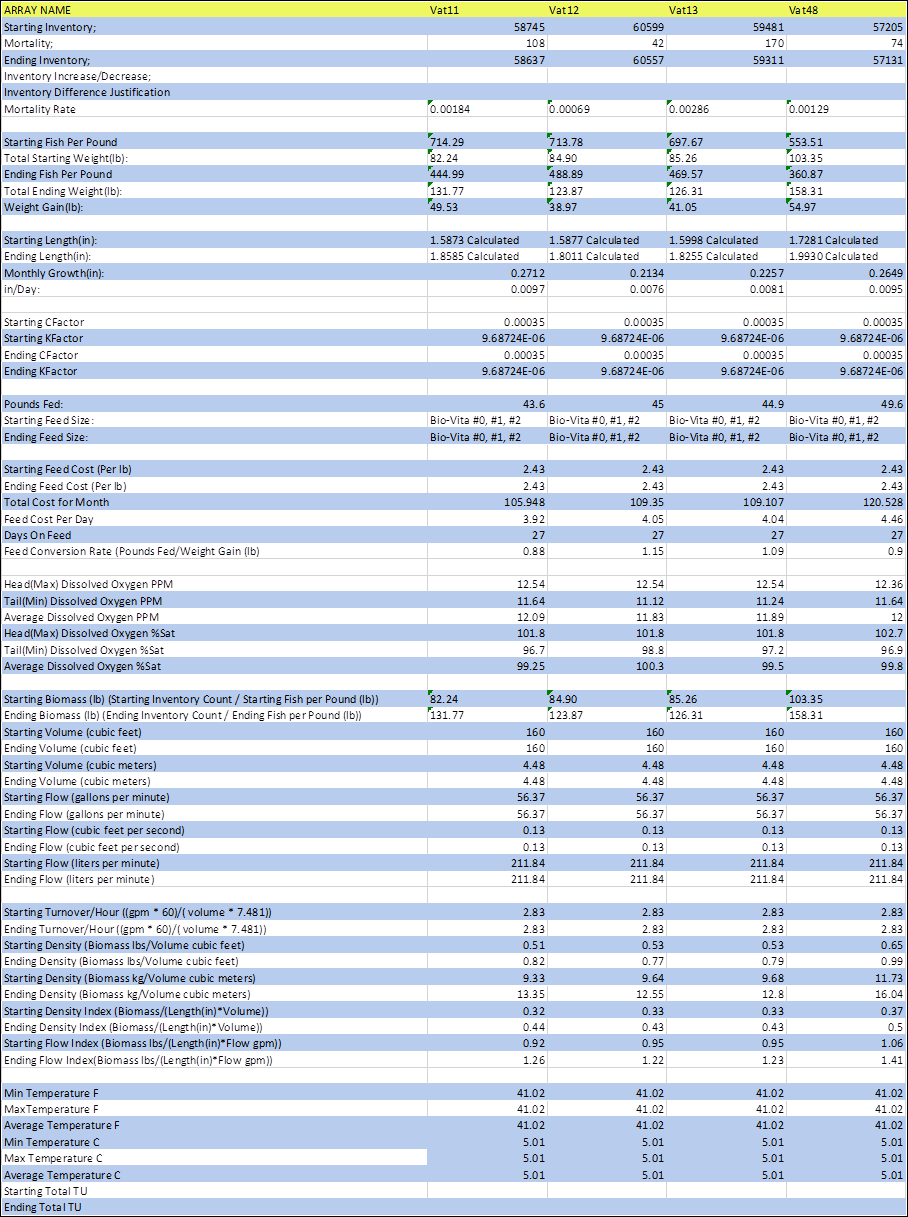
Section 2- Rearing Production Summary File
Summary/Description:
The ‘Rearing
Production Summary Export File’ is derived from the ‘Rearing Production Summary
Export Options’ menu in FINS. Depending on the Dates, Arrays, and Field Options
that the user selects, a report is then created and exported to Excel.
The ‘Rearing
Production Summary Export File’ will display complete months ranging from the 1st
of the month to the end of the month. If multiple months are selected,
multiple sheets will be presented with each sheet displaying a separate month.
Just as if multiple Arrays are selected, multiple files will be exported with
each sheet displaying a different Array’s data.
The ‘Rearing
Production Summary Export File’ can contain multiple months, with each month
being displayed in a different Excel sheet.
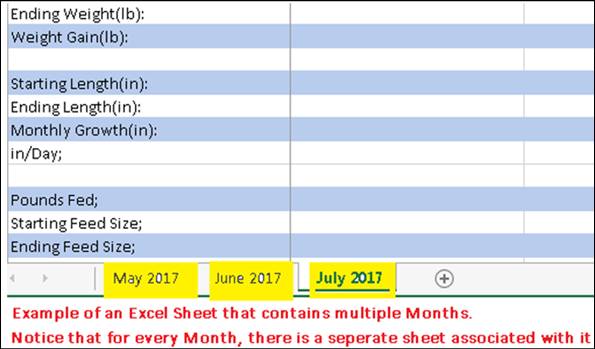
The ‘Rearing
Production Summary Export File’ can contain multiple Arrays. For every Array
that you select, there will be a separate Excel file that downloads. Rearing
Metrics are typically entered once a month, at the end for the month.
Business Logic
Inventory
Starting Inventory:
The ‘Starting Inventory’ number is based on
the 1st Enumeration for the month(s) set
for the sheet(s), as selected on Export via the Export Filter.
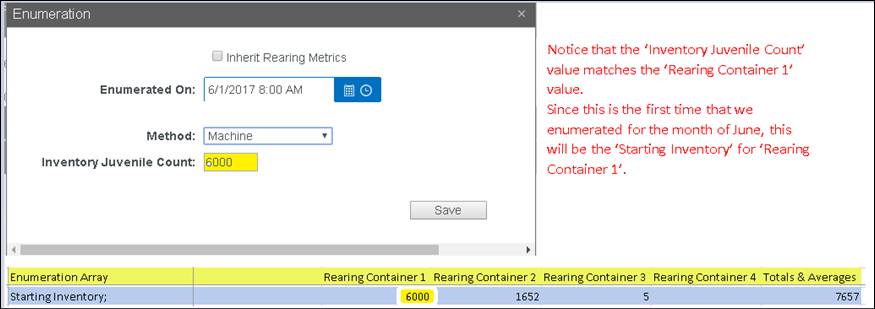
If an Enumeration
is NOT performed during the month, consider the following scenarios:
·
If the Rearing Container is NOT
enumerated during the month and has had no Juveniles moved into it during that
month, then the ‘Ending Inventory’ from the previous month is used as the
‘Starting Inventory’.
·
If the Rearing Container is NOT enumerated during the month and
‘Ending Inventory’ from previous month is 0, then the ‘Starting Inventory’ will
be blank.
·
If during the given month, Juveniles are moved to another
container before 1st Enumeration, the ‘Starting Inventory’ number
will be:
Formula:
‘Starting
Inventory’ for current Month= Previous month ‘Ending Inventory’ +- Juveniles
Moved
Totals &
Averages > Starting Inventory: The end of the ‘Starting Inventory’ row will
display the total number of Juveniles for all Rearing Containers during the
given month.

Formula:
Total
Starting Inventory = Rearing_Container1+ Rearing_Container2+…+
Rearing_Container4
Mortality:
The ‘Mortality’
number is based off the Total Morts picked from the Rearing Container during
the month set for the sheet, as selected on Export via the Export Filter.
·
If there are 0 ‘Morts’ for the given
Month, the ‘Mortality’ value will be 0.
·
This field cannot be blank.

Totals &
Averages > Mortality: The end of the ‘Mortality’ row will display the total
number of Morts picked from all Rearing Containers from the 1st of
the month to the end of the month.

Formula:
Total
Mortalities = Rearing_Container1+ Rearing_Container2+…+ Rearing_Container4
Ending
Inventory:
The ‘Ending
Inventory’ number is based off the number of Juveniles in the Rearing Container
at the end of the month set for the sheet, as selected on Export via the Export
Filter.
Formula:
Ending
Inventory= Starting Inventory – Mortality + Increase/-Decrease of Juveniles
If there are
less than 2 Enumerations during a given month, consider the following
scenarios:
·
If there is only one Enumeration during
a given month, then the ‘Starting Inventory’ & ‘Ending Inventory’ number
will be the difference between the Morts picked.
·
If the Rearing Container is emptied on
or before the end of the month and no new Juveniles are put in, then the
‘Ending Inventory’ will display as 0.
·
If the Rearing Container is not
enumerated during the current month, and there is no ‘Ending Inventory’ from
previous month, then the ‘Ending Inventory’ for current month will be blank.
Totals &
Averages > Ending Inventory: The end of the ‘Ending Inventory’ row will
display the total number of Juveniles remaining at the end of the month for all
Rearing Containers.

Formula:
Total
Ending Inventory = Rearing_Container1+ Rearing_Container2+…+ Rearing_Container4
Inventory
Increase / Decrease:
The ‘Inventory
Increase/Decrease’ number is calculated by subtracting the ‘Starting Inventory’
from the ‘Ending Inventory’ & ‘Mortality’ number.
Formula:
Inventory
Increase/Decrease = Ending Inventory + Mortality – Starting Inventory
The number in the
Inventory Increase/Decrease Row for each container will give you the number of
Juveniles that were moved in or out of the Rearing Container in addition to any
Mort’s that were picked for the given month:
·
If the value is positive on a given
container, then more Juveniles were moved in than moved out for the given
Month.
·
If the value is negative on a given
container, then more Juveniles were moved out that moved in for the given
Month.
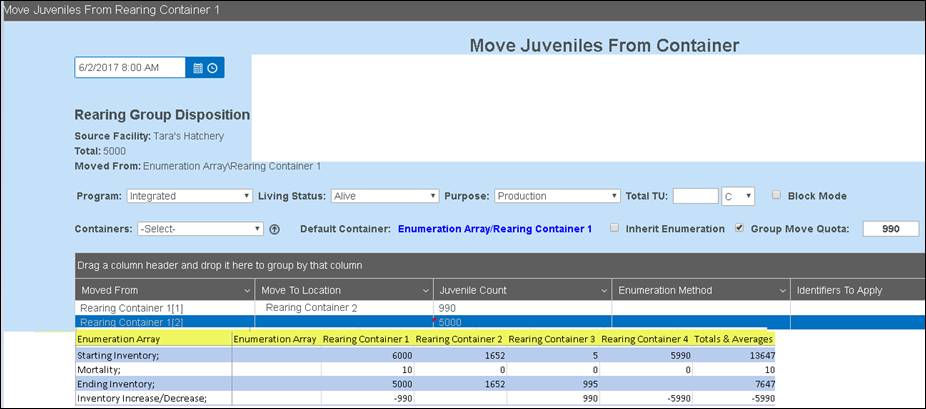
Inventory
Increase/Decrease Justification:
Allows a user to
enter a reason for the adjustment of an Enumeration. There will be times when
as a user, you will want to edit the Enumeration of a container. The reason
will display in the Excel sheet in the ‘Inventory Difference Justification’
row.
Mortality
Rate:
Displays the Rate
in which Mort’s have been taken from the Inventory count of the Rearing
Container, as a pure decimal value. To get the value as a percentage simply use
the following formula:
Formula:
Mortality
Rate Percent= Mortality Rate *100
Totals &
Averages > Mortality Rate - The end of the ‘Mortality Rate’ row will display
the Average Mortality Rate of Juveniles for all Rearing Containers for that
given month.
If no
Juveniles have been moved out of the container for the given month:
Formula:
Morts/(Ending
Inventory + Morts)
If
Juveniles have been moved out of the container during the given month:
Formula:
Morts/Beginning
Inventory
Weight
Starting
Fish per (Weight):
(FPP) The FPP your inventory is starting
the month with per the last month’s ending FPP. *The last input before this
month or the first input of the month if no prior month has this input. Based off the previous month’s ‘Ending’ Fish per (Weight)
value that was entered in the ‘Fish per (Weight)’ Field for the Rearing
Container. Displays the number of Fish (per
set Measurement) i.e. Starting Fish (per Pound) is the number of Fish per Pound;
The number of Fish that it takes to reach 1 pound.
·
If no value was entered in the
‘Starting Fish per (Weight)’ field for this or prior months, this field will be
empty.
Weight
measurements available include:
·
Pounds
·
Ounces
·
Grams
·
Kilograms
Starting
Weight (Weight Measurement):
Calculated by
acquiring the ‘Starting Inventory’ and dividing it by the ‘Starting Fish per
(Weight Measurement)’.
Formula:
Starting
Weight = Starting Inventory/Starting Fish per (Weight Measurement)
Totals &
Averages Starting Weight: The end of the ‘Starting Weight’ row displays the
Total Weight of all Rearing Containers at the end of the month(s) selected on
Export via the Export Filter.
Formula:
Total
Starting Weight = Rearing_Container1+ Rearing_Container2+…+ Rearing_Container4
Ending Fish
per (Weight):
The ‘Ending Fish
per (Weight)’ number is based off the number entered in the Rearing Metrics
dialogue set for the sheet, as selected on Export via the Export Filter.
Ending Fish per
(Weight) displays the number of Fish per set Measurement. i.e. Ending Fish per
Pound is the number of Fish per Pound; The number of Fish that it takes to
reach 1 pound.
·
If no value was entered in the
‘Starting Fish per (Weight)’ field in the ‘Rearing Metrics per container’
dialogue box, for this or prior months, this field will be empty.
Weight
measurements available include:
·
Pounds
·
Ounces
·
Grams
·
Kilograms
Ending
Weight (Weight Measurement):
Calculated by
acquiring the ‘Ending Inventory’ and dividing it by the ‘Ending Fish per
(Weight Measurement)’.
Formula:
Ending
Weight = Ending Inventory/Ending Fish per (Weight Measurement)
Totals &
Averages Ending Weight: The end of the ‘Ending Weight’ row displays the Total
Weight of all Rearing Containers at the end of the month(s) selected on Export
via the Export Filter.
Formula:
Total
Ending Weight = Rearing_Container1+ Rearing_Container2+…+ Rearing_Container4
Weight Gain
(per Measurement):
The ‘Weight Gain’
number is based off the difference between the ‘Starting Weight’ and the
‘Ending Weight’.
·
If a ‘Starting Weight’ or ‘Ending
Weight’ is not entered, the ‘Weight Gain’ field will be blank.
·
If ‘Starting Weight’ is entered &
‘Ending Weight’ is not entered, the ‘Weight Gain’ will be 0.
·
If Weight Gain is positive, then there
was a weight gain for the given Month.
·
If Weight Gain is negative, then there
was a weight loss for the given Month.
Formula:
Weight Gain
= Ending Weight – Starting Weight
Length
Fish Length
can be determined either by manual Length inputs and/or using inputs from
Weight (1/Fish Per Pound) and Condition Factor (aka C-Factor and/or CFactor)
Length
determined by FPP and C-Factor:
When Length
is calculated in FINS using the Weight and Condition Factor inputs, the
following Formula applies: Formula: Length = (Weight/Condition Factor)^(1/3)
Length
determined by Length Inputs:
Starting Length:
The
‘Starting Length’ is based off the previous month’s ‘Ending Length’ value that
was entered in the ‘Fish Length’ field in the ‘Rearing Metrics per container’
dialogue box
·
If a ‘Fish Length’ value was not
entered, but a Weight and C-Factor were entered for a Container, FINS will
automatically calculate the Length based on the following formula:
§
Formula: L = (Weight/Condition
Factor)^(1/3)
·
If there is no data input (FPP and
CFactor) to calculate a ‘Fish Length’ value or ‘0’ was entered as a value in
the ‘Fish Length’ field, the ‘Starting Length’ will be blank
§
If a ‘Fish Length’ value was not
entered for the previous month, then the ‘Starting Length’ value will be based
off the first entered value for the given month
Total
& Averages > Starting Length: The end of the ‘Starting Length’ row will
display the ‘Starting Length’ average of all the raceways available.
·
The formula used for this
calculation is:
Formula:
Average Starting Length = Vat1+Vat2+…+Vat4/Number of Vats that are NOT blank
Ending
Length:
The ‘Ending
Length’ is based off the last value that was entered in the ‘Fish Length’ field
in the ‘Rearing Metrics per container’ dialogue box.
·
If a ‘Fish Length’ value was not
entered, but a Weight and C-Factor were entered for a Container, FINS will
automatically calculate the Length based on the following formula:
§
Formula: L = (Weight/Condition
Factor)^(1/3)
·
If there is no data input (FPP and
CFactor) to calculate a ‘Fish Length’ value or ‘0’ was entered as a value in
the ‘Fish Length’ field, the ‘Ending Length’ will be blank
§
If a ‘Fish Length’ value was not
entered for the previous month, then the ‘Ending Length’ value will be based
off the first entered value for the given month
·
If a ‘Fish Length’ is only entered
once in the ‘Fish Length’ field for the Month, then the ‘Ending Length’ number
will be the same as the ‘Starting Length’ number
Total
& Averages > Ending Length: The end of the ‘Ending Length’ row will
display the ‘Ending Length’ average of all the raceways available.
·
The formula used for this
calculation is:
Formula: Average Ending Length =
Vat1+Vat2+…+Vat4/Number of Vats that are NOT blank
Monthly
Growth:
The ‘Monthly
Growth’ number is based off the difference between the ‘Ending Length’ &
‘Starting Length’.
·
If the ‘Starting Length’ and ‘Ending
Length’ values are the same, the ‘Monthly Growth’ field will display as 0.
·
If the ‘Starting Length’ value is
greater than the ‘Ending Length’ value, the ‘Monthly Growth’ value will be
negative.
·
If the ‘Starting Length’ value is less
than the ‘Ending Length’ value, the ‘Monthly Growth’ value will be positive.
·
If there are no values in both
‘Starting Length’ and ‘Ending Length’, the ‘Monthly Growth’ field will be
blank.
Formula:
Monthly
Growth= Ending Length – Starting Length
Total &
Averages > Monthly Growth: The end of the ‘Monthly Growth’ row will display
the ‘Monthly Growth’ average of all the raceways available.
Formula:
Average
Monthly Growth= Vat1_Growth+Vat2_Growth+…+Vat4_Growth/Number of Vats that are
NOT blank
Length/Day:
The ‘Length/Day’
is based off the ‘Monthly Growth’ number divided by the number of days in a
month.
·
If ‘Monthly Growth’ is empty on a
specific Rearing Container, then ‘Length/Day’ will be empty for that Rearing
Container.
·
If ‘Monthly Growth’ is 0 on a specific
Rearing Container, then ‘Length/Day’ will be 0 for that Rearing Container.
Formula
Average
Length/Day= Monthly Growth / # of days in Month
Total &
Averages Length/Day: The end of the ‘Length/Day’ row will display the
‘Length/Day’ average of all the raceways available.
Formula:
Average
Length Day Growth= Vat1_LD_Growth+Vat2_LD_Growth+…+Vat4_LD_Growth/Number of
Vats that are NOT empty
Weight Fed:
The ‘Weight Fed’
figure is based off the value that was entered in the ‘Measurement Fed’ field.
·
If no value was entered, this field
will be empty.
Starting
Feed Size:
The ‘Starting
Feed Size’ is based off the size of the food that fish get fed.
Ending Feed
Size:
The ‘Ending Feed
Size’ is based off the size of the food that fish were last fed for the given
month.
Entering Pounds Fed for multiple
Feed Sizes –
This is done in multiple entries.
As an example, you fed a Container,
twice during the month with different Feed Sizes.
The entry would look something like
this:
o
First Entry- 40 Pounds Fed, size 0
o
Second Entry- 30 Pounds Fed, size 1.
If you look at the example below, you
will see Raceway 7 has two separate entries (for different dates), for
Feed (Size/Cost).
*Note Feed Conversion is blank
for both containers in example below because no WEIGHT Rearing Metrics were
input for either Container; Otherwise this would be calculated.

The Egg Fry/Juvenile Mortality Summary provides users with
Survival and/or Mortality Rates for Eggs, Fry and Juveniles as well as Mort
Summary data for Rearing Containers.
Data
includes:
·
Incubation Data – Provides the Count from Incubation into
Rearing, along with Incubation Survival and Mortality Rates
·
Receipt Enumeration Data – Provides expected egg data
along with Re Enumeration Count if you Re Enumerated once Eggs were Received
from Inbox
·
Rearing Enumeration Data – Provides current Juvenile
Count, Total Juvenile Count, along with Morts, Mortality Rate and Survival Rate
Select a Rearing Survival/Mortality Rate
Summary by Location (Facility) and Incubation Hierarchy (one or many) from the
dropdown menus provided.
Provides the following data:
·
Incubation Data- Will provide you with Count from Incubation into
Rearing, along with Incubation Survival and Mortality Rates
·
Receipt Enumeration Data-Will provide you with expected egg data
along with Re Enumeration Count if you Re Enumerated once Eggs were Received
from Inbox
·
Rearing Enumeration Data-Will provide you with current Juvenile
Count, Total Juvenile Count, along with Morts, Mortality Rate and Survival Rate
*Example of Incubation, Receipt and Rearing Enumeration
Data below – both as a file preview and each section for detail

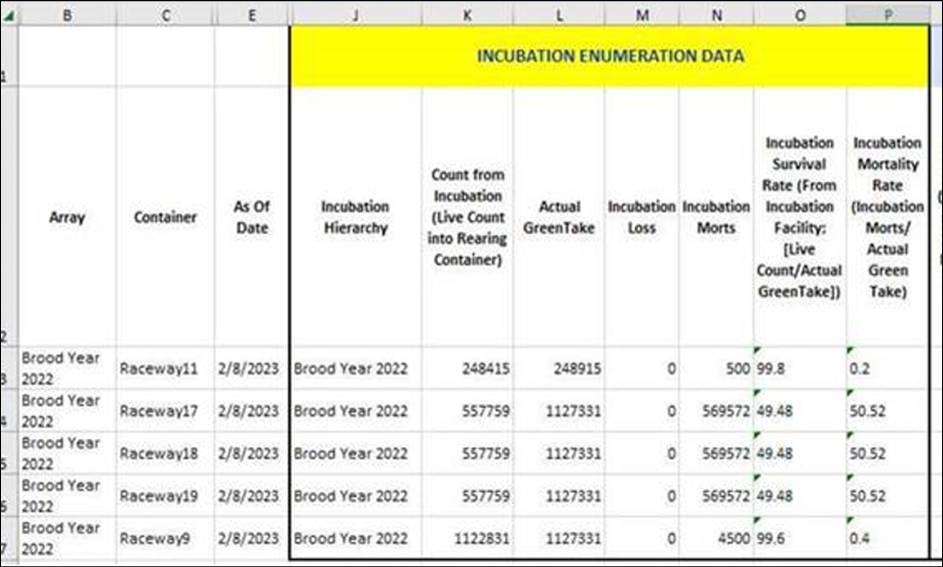
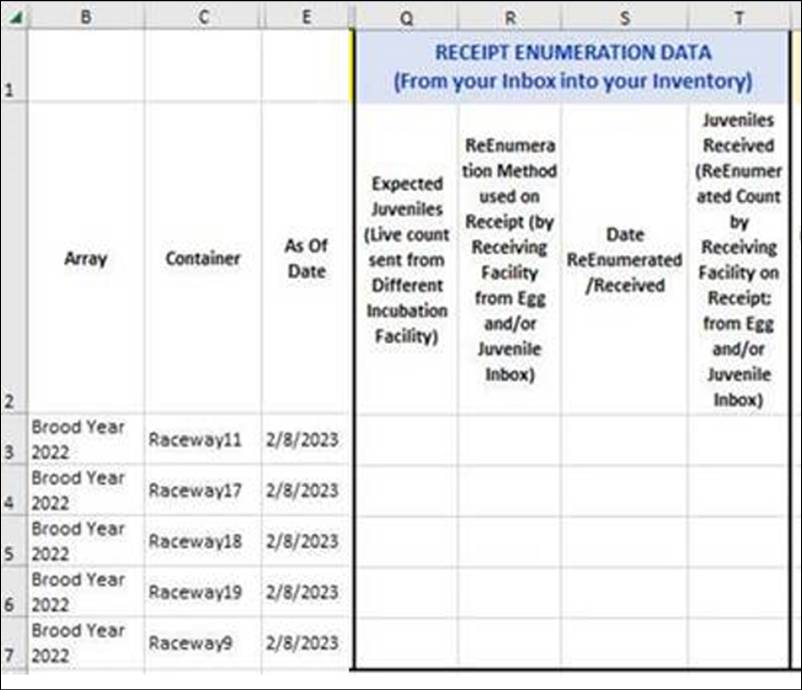
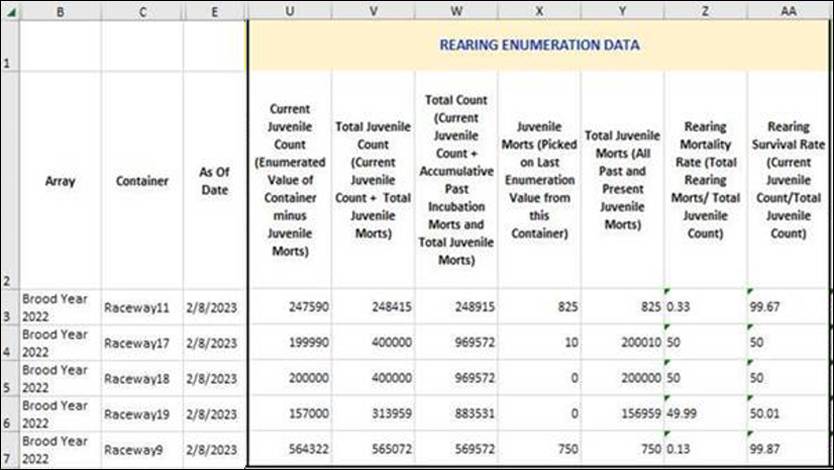

Select Incubation Survival/Mortality Rate Summary by
Location (Facility) and Incubation Hierarchy (one or many) from the dropdown
menus provided. If there is no data for the selected Facility/Hierarchy
combination, red text will display under the Incubation Hierarchy menu stating:
‘This Hierarchy does not contain any data’. If the Download link is selected
on an empty Hierarchy, a notify will pop-up that says ‘There is no data to
build an export.’
Data Includes:
Container
Female ID
Samples
Spawning Session Lot #
Estimated Egg Count
Actual Green Take
Loss
Inventory Count
Morts by Date (picked)
Live Count
% Survival (Live Count/Actual Green Take) - Percent Survival
- Formula: (Live Count divided by Actual Green Take)
% Mortality ((Loss + Total Morts)/Actual Green Take) -
Percent Mortality - Formula: ((Loss + Total Morts) divided by Actual Green
Take)
Select a Rearing Survival/Mortality Rate Summary by Location
(Facility) and Incubation Hierarchy (one or many) from the dropdown menus
provided. *If there is no data for the selected Facility/Array combination,
red text will display under the Rearing Array menu stating: ‘This Array does
not contain any data’
Provides the
following data:
·
Incubation Data- Will provide you with Count from Incubation into
Rearing, along with Incubation Survival and Mortality Rates
·
Receipt Enumeration Data-Will provide you with expected egg data
along with Re Enumeration Count if you Re Enumerated once Eggs were Received
from Inbox
·
Rearing Enumeration Data-Will provide you with current Juvenile
Count, Total Juvenile Count, along with Morts, Mortality Rate and Survival Rate
*Example of Incubation, Receipt and Rearing Enumeration
Data below – both as a file preview and each section for detail
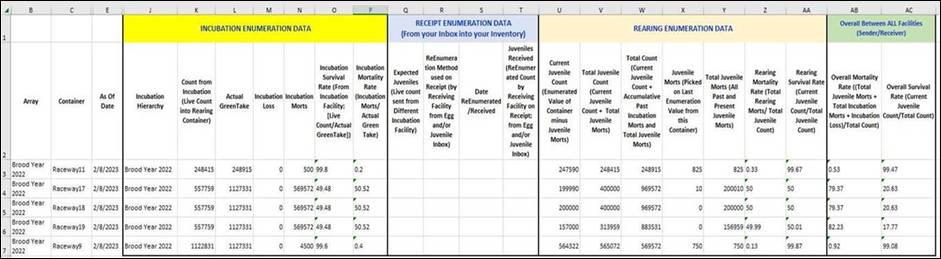


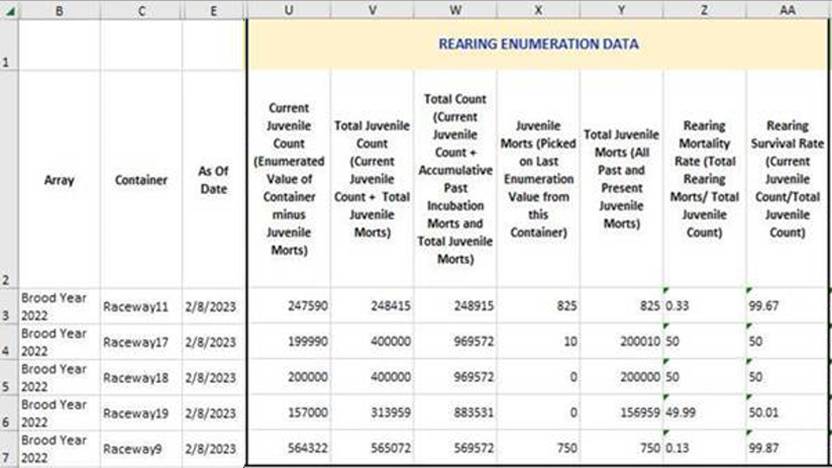
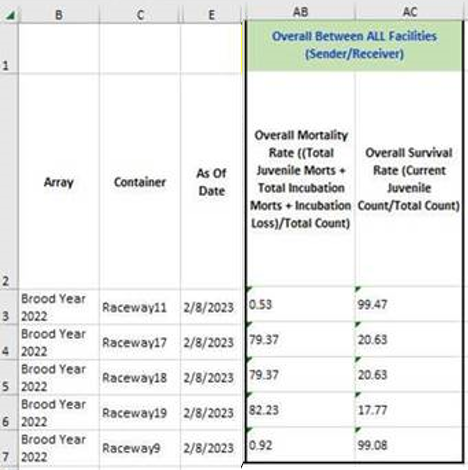
Useful Hatchery Monthly Mortality Summary that provides the
total Juvenile Morts picked for each Month of the selected Facility/Rearing Array/Date
Range. The information presented was formatted and requested by FINS Hatchery
Management Staff and has been determine valuable to fisheries managers,
researchers and can be quickly used when completing annual hatchery reports.
Summary download includes the following data columns (for
example):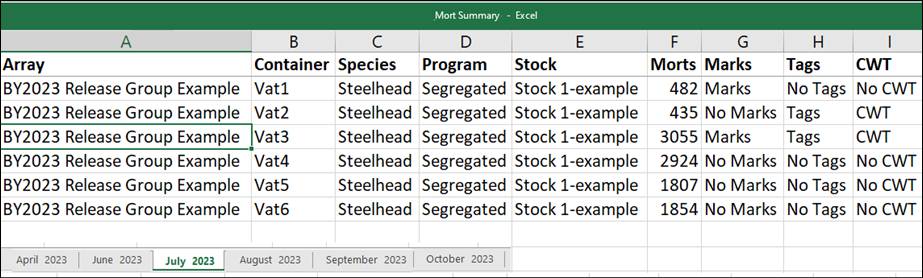
Definitions of data columns included in the Monthly Sheets
for selected Array: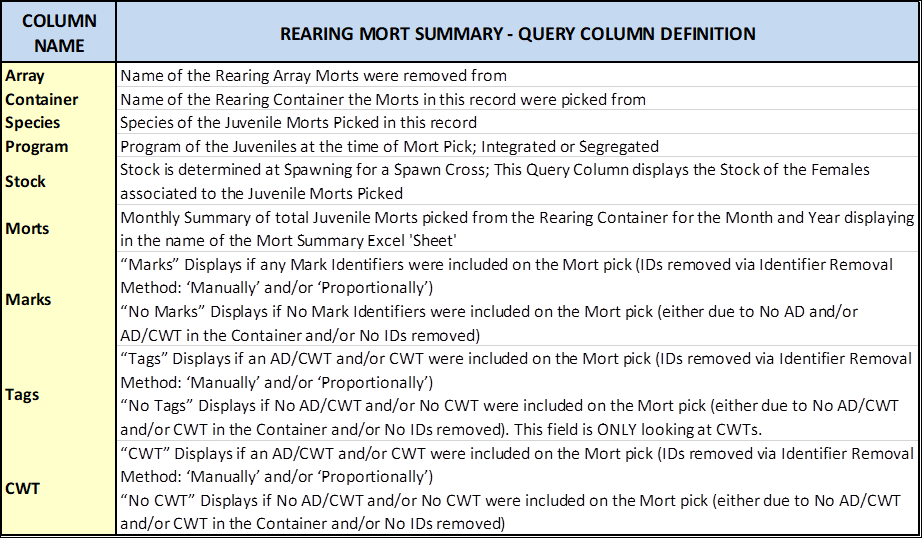
*If there is no data for the selected Facility/Array
combination, red text will display under the Rearing Array menu stating: ‘This
Array does not contain any data’. If the Download link is selected on an empty
Rearing Array, a notify will pop-up that says ‘There is no data to build an
export.’
Use Case
The Fish Return Summary provides a summarized view of
Trapped Fish and Current On-Hand Fish Totals of General Holding and Brood Stock
along with Final Dispositions for a combined view of Fish Trapped and Received,
Fish On-Hand, Fish Spawned and Fish Out, per the Query Filter selections.
To assist Query Users with the available data in FINS,
the Fish Return Summary dynamically updates the possible selections available
for each Filter Field as selections are made, from left to right in a top down
approach.
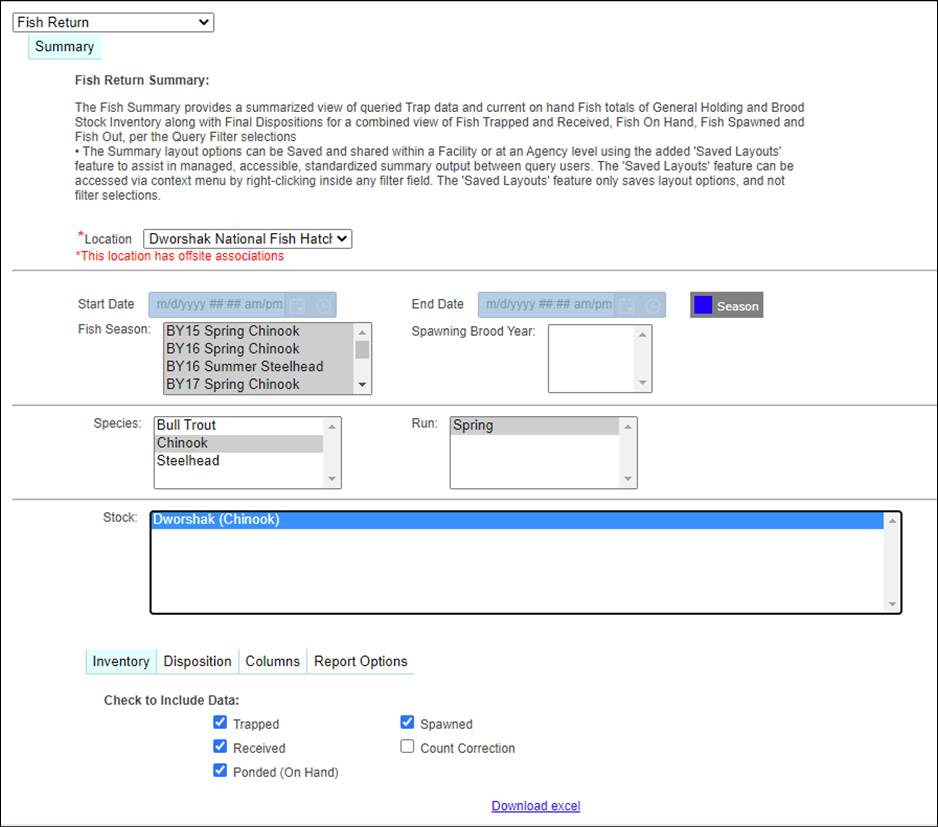
Business
Logic
·
*Location selection will default
to the user’s Facility but is selectable to any Facility within the Domain the
user is associated with
·
*Query by either a manually input
Start/End Date Range or by available Queryable Fish Season(s) and/or
Spawning Brood Year(s)
o
Date Toggle - If Filtering by Start and End Date (Date Toggle),
selecting a Fish Season and/or Spawning Brood Year is not permitted
o
Season Toggle - If Filtering by Fish Season and/or Spawning Brood
Year (Season Toggle), selecting a Date Range is not permitted
·
*Dynamic Query Filtering – Loads
after each section selection, displaying available data to Query; Each Section
requires a Selection to Download a file
o
*Selected Location > Determines
available Fish Season and Spawning Brood Years
o
*Selected Date Range and/or Fish
Season and/or Spawning Brood Year > Determines available Species
o
*Selected Species > Determines
available Run(s)
o
*Selected Run(s) > Determines
available Stock(s)
·
Multi Select is available on any Filter Field by clicking and
holding the ‘Ctrl’ key while making additional selections
·
Layouts can be Saved at the Private, Agency and/or Facility level
o
Saving a Layout only saves the selected Layout Options
(Inventory/Disposition/Columns/Report Options), not the Query Filter selections
(Date/Season Toggle; Species; Run(s); Stock(s))
o
Access and/or Create Saved Layouts by Right Clicking inside any
Layout Option menu item and click on ‘Save\Restore Layout’
·
Spawned (to Date) Section:
o
Times Used - The Male Reuses Column will indicate to the query user
the number of times a Male contributed to a unique Spawn Cross
§
If a Male is Used 0 Times (representing a Not Spawned Male)
·
The ‘Male Reuses’ column will have 0 added to the existing count
·
The ‘Male’ column will have 0 added to the existing count
·
The ‘Total Unique Fish’ column will have 0 added to the existing
counts
§
If a Male is Used 1 Time with 1 Female (representing a 1:1
Cross; F:M)
·
The ‘Male Reuses’ column will have 0 added to the existing count
·
The ‘Male’ column will add 1 to the existing count
·
The ‘Total Unique Fish’ column will add 1 to the existing count
·
The ‘Female’ column will add 1 to the existing count
·
The Total Unique Fish column will add 1 to the existing count
§
If a Male is Used more than 1 Time (representing a Male
with Times Used more than 1 in a 1:1 Cross; F:M)
·
The ‘Male Reuses’ column will have 1 added to the existing count
·
The ‘Male’ column will have 0 added to the existing count
·
The ‘Total Unique Fish’ column will have 0 added to the existing
count
·
The ‘Female’ column will add 1 to the existing count
·
The Total Unique Fish column will add 1 to the existing count

Validation
Filter Selection Options
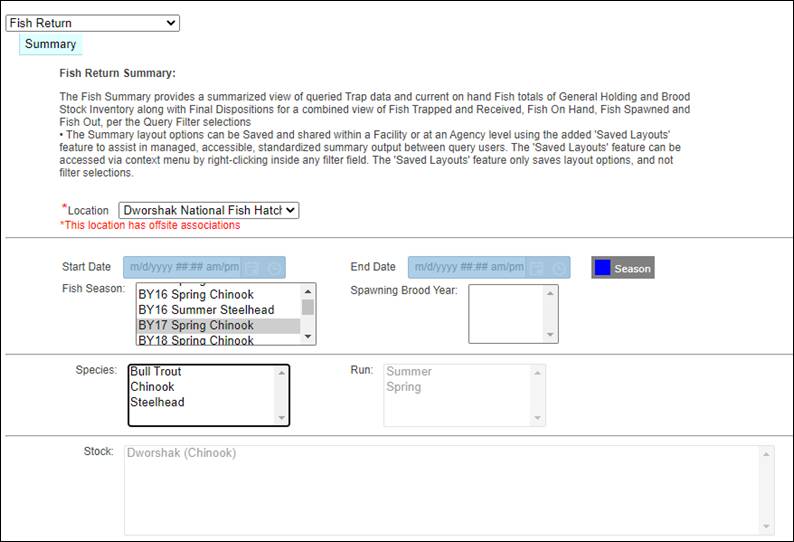
·
*Location
o
Selecting a Location is required
o
FINS will default to the Location the
user is tied to
o
User can change the Location from the drop-down
menu
o
*Offsite Notify- FINS
will notify users if the Location selected has offsite locations.
§
Hovering over the notification will notify users of the Offsite
associations to the Location selected.
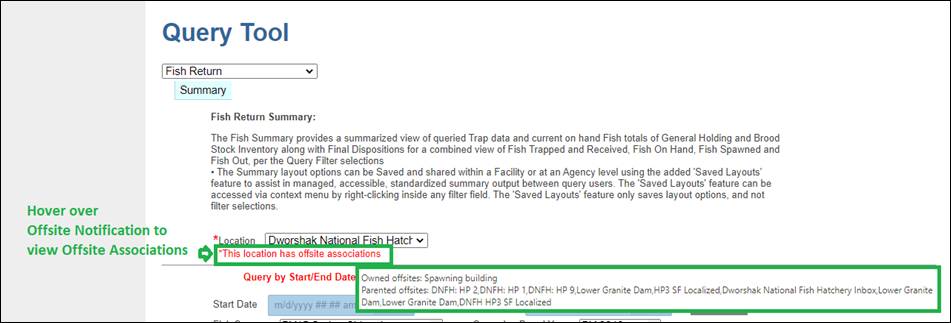
·
*Selecting a Season or a Date
Range is required.
o
Date Toggle
§
Selecting a Fish Season is disabled if filtering by Date Range
§
Selecting a Spawning Brood Year is disabled if filtering by Date
Range
o
Season Toggle
§
Selecting a Start Date is disabled if filtering by Fish Season
and/or Spawning Brood Year
§
Selecting an End Date is disabled if filtering by Fish Season
and/or Spawning Brood Year
·
*Selecting at least one Species is
required > to allow further filtering by
o
To select multiple species, hold down
the ‘Ctrl’ key and click on the Species to include in your summary
·
Run(s)
o
* Selecting a Run is required for
Species that have a Run associated to them, which currently applies to Species
below:
§
Chinook- Fall, Spring, Summer
§
Steelhead-Summer, Winter
o
Selecting at least one Run is required > which allows further
filtering by Stock(s)
o
To select multiple runs, hold down the
‘Ctrl’ key and click on the runs to include in your summary
·
*Selecting at least one Stock is
required > for Egg and Juvenile Data
o
To select multiple stocks, hold down
the ‘Ctrl’ key and click on the stocks to include in your summary
Summary Layout Options
·
*Inventory Layout Menu
o
Default selections may be edited
o
No Inventory Data section is required
§
However, not selecting an Inventory Data type will prevent the
Trap Total, Total Received, Total In and On-Hand Inventory sections from being
included in the Download
o
*If neither an Inventory or
Disposition Data type is Selected, the Download will be empty
·
*Disposition Layout Menu
o
Default selections may be edited
o
No Disposition Data types are required
§
However, not selecting a Disposition Data type will prevent the
Final Disposition Total Disposed, Total Out data from being included in the
Download
o
*If neither an Inventory or
Disposition Data type is Selected, the Download will be empty
·
Columns Layout Menu
o
Default selections may be edited
o
Which Columns to include in Download is optional
§
However, unselecting all Column Layout Options will include only
Sex Columns in the Download
o
Columns menu includes the ability to add the following additional
Columns:
§
Living Status and Disposition
§
Purpose
§
Source Trap Facility
§
Origin
§
Moved From Location
§
Source Trap
§
Age
·
Report Options Menu
o
*One of the Two Query Filter
Selections is required
o
Default selections may be edited
§
Un Checking ‘Hide Empty Rows’ will include Rows for selected Data
types that have no data to display, in the Download
o
Report Breakdown:
§
Select Weekly if you want to view Fish Return Summary numbers by
Weekly sheets
§
Select Daily if you want to view Fish Return Summary numbers by
Daily sheets
Summary Layout Options
Menu
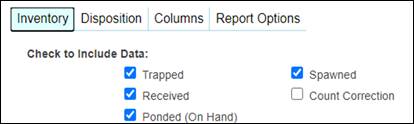
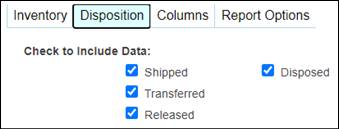
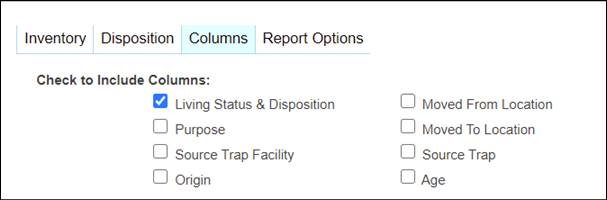

Steps > Filter
Selection Fields
1.
FINSNet.org > from the Data Tab > Click on the Query Tool drop
down list and select Summary > ‘Fish Return’
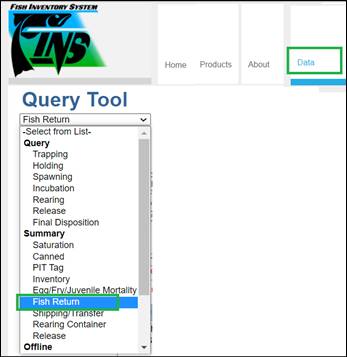
2.
Location will default to the Location the Query User is associated
with
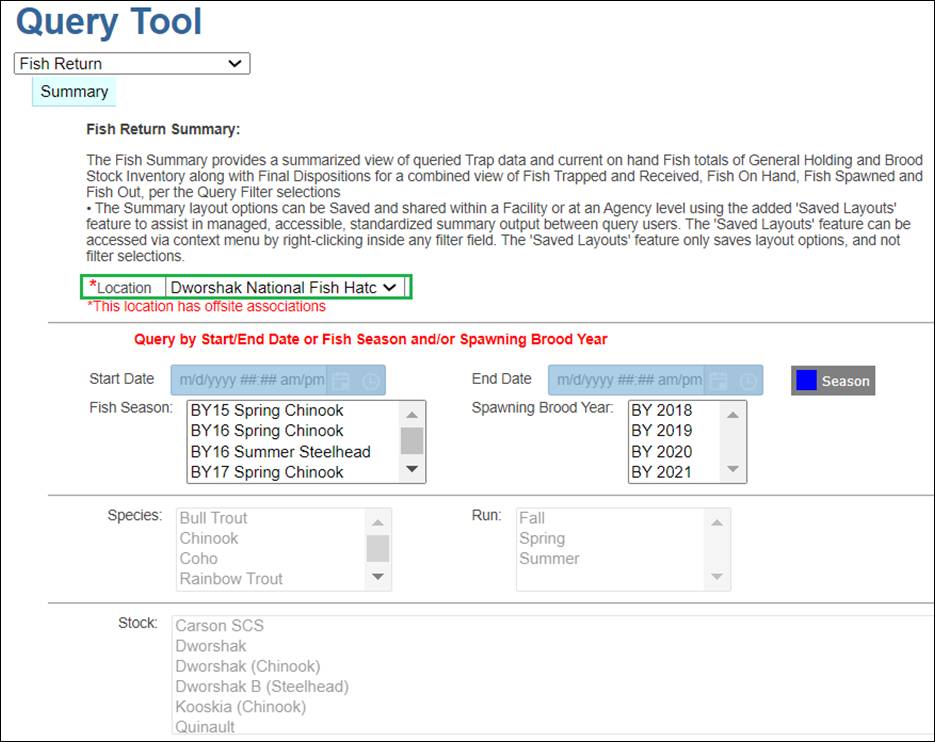
3. Season/Date
Toggle

a. Season
Toggle is the Default Query Setting – so that Query Users don’t have to
know the exact Date Range their sought dataset occurred
i.
Select the available Fish Season(s) you wish to filter the dataset
by instead of using a Start/End Date Range
ii.
To further filter the Spawning dataset by Brood Year – Select the
available Spawning Brood Year(s) you wish to filter by
b. Date
Toggle Option – Select if prefer to filter the dataset by a manual input
Date Range instead of a Queryable Fish Season
i.
Spawning Brood Year –Restricts Fish data result set to only return
Spawning data (when not filtering by Fish Season)
4. Select
the Species with Data Available for your set Season/Date Range
a. To
filter by multiple Species, hold down the ‘Ctrl’ button and select multiple
Species
b. Available
Species list to filter by is determined by Location and Season/Date Range
Filters set
c. Note
the Selected Species will then filter the available Run(s) to select from
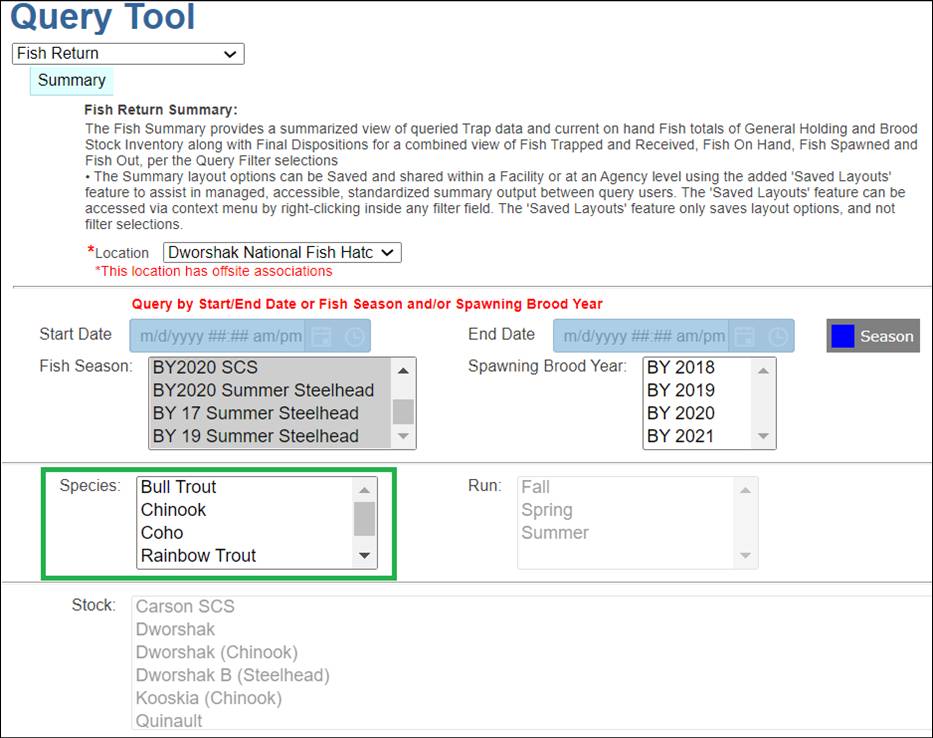
5. Select
the Run(s) to filter by
a. To
filter by multiple Runs, hold down the ‘Ctrl’ button and select multiple Runs
b. Available
Run list to filter by is determined by Species Filter selected
c. Note
the Run selected will then filter the available Stock(s) to select from
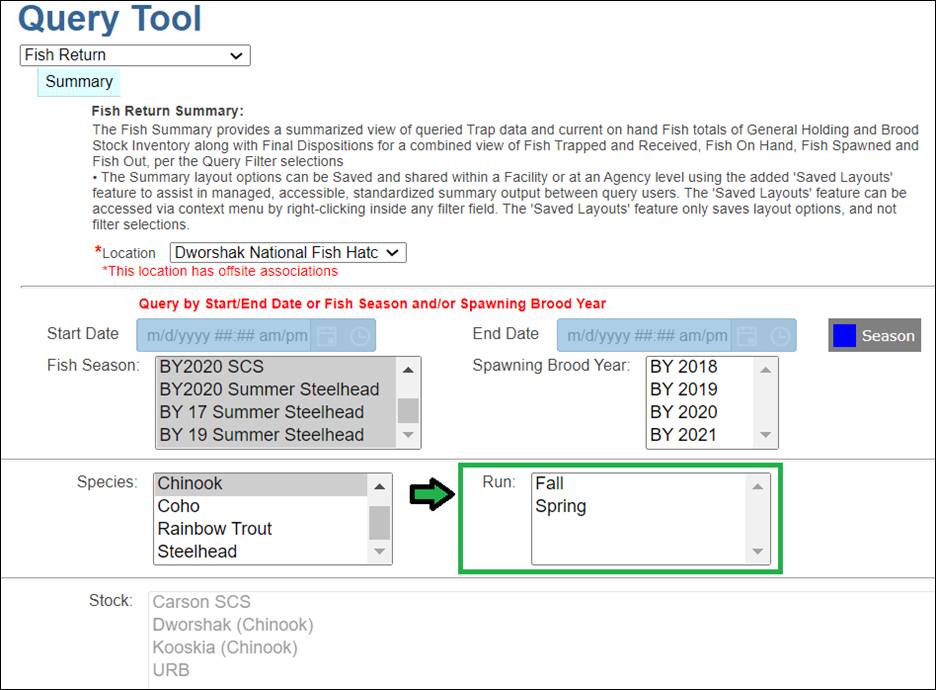
6. Select
the Stock(s) to filter by
a. To
filter by multiple Stocks, hold down the ‘Ctrl’ button and select multiple
Stocks
b. Available
Stock list to filter by is determined by Run Filter selected
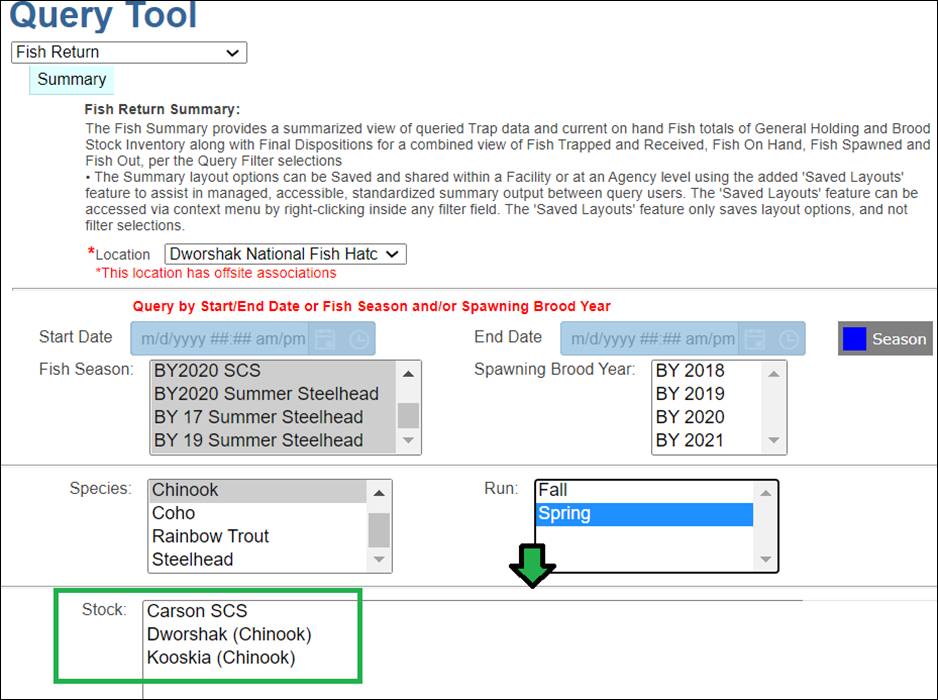
Steps > Summary Layout Options
7.
Inventory – Select the Inventory data to include in the Summary
Download by checking/unchecking Inventory Data boxes
a. Default
Checked Inventory Data to include in Summary Downloads:
i.
Trapped – summary of Fish Trapped (to Date)
ii.
Spawned – summary of Spawned Fish
iii.
Received – summary of Fish Received from Inbox
iv.
Count Correction – summary of Count Corrections
v.
Ponded (On Hand) – summary of On Hand Ponded Inventory
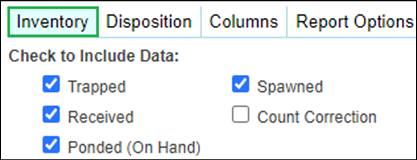
8.
Disposition – Select the Disposition Data Types to include in the
Summary Download by checking/unchecking Disposition Data boxes
a. Default
Checked Disposition Data Types to include in Summary Downloads:
i.
Shipped – summary of records with Final Disposition of Shipped
·
Trapping/Holding/Spawning ‘Shipped’ Disposition Definition: Live
fish that are relocated to a location or Facility outside of FINS
ii.
Disposed – summary of records with Final Disposition of Disposed
·
Trapping/Holding/Spawning ‘Disposed’ Disposition Definition:
Disposal of Dead Fish
iii.
Transferred – summary of records with Final Disposition of
Transferred
·
Trapping/Holding/Spawning ‘Transferred’ Disposition Definition:
Live fish that are relocated to a Facility that is not within your location
taxonomy but are within FINS
·
Transferred will give users the name of the Facility the Fish
Were Transferred to within FINS.
iv.
Released – summary of records with Final Disposition of Released
·
Trapping/Holding/Spawning ‘Released’ Disposition Definition: Live
fish released back into the environment

9.
Columns – Select the Columns to include in the Summary Download by
checking/unchecking Column options
a. Default
Checked Columns to include in Summary Downloads:
i.
Living Status & Disposition
b. Optional
Columns to include in Summary Downloads:
i.
Moved From Location
·
This column will provide users with location where Fish were
moved from.
ii.
Purpose
·
Will provide users with the Purpose selected when moving the
Fish.
iii.
Moved To Location
·
Will provide users with the Location Fish were moved to
iv.
Source Trap Facility
·
Will provide users with the Facility the Fish in the Fish Return
Summary were trapped.
v.
Source Trap
·
Will provide users with the Source Trap the Fish in the Return
Summary were trapped.
vi.
Origin
·
Will provide users with the Origin the Fish in the Return Summary
were applied.
vii.
Age
·
Will provide users with the Age the Fish in the Return Summary
were applied.
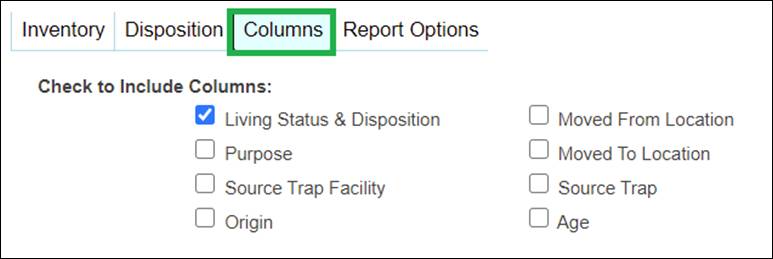
10. Report
Options – Select the Report Options for the Summary Download by
checking/unchecking Report Option checkboxes
a. Default
Checked Report Options for Summary Downloads:
i.
Query Filter Selections on Same Sheet as Data Summary
ii.
Hide Empty Rows
b. Optional
Report Option for Summary Downloads:
i.
Query Filter Selections on Separate Sheet as Data Summary
c. Report
Breakdown
i. Select
Weekly to view data by week
ii. Select
Daily to view data by day
Note*(if
a date range of data in the download is too large you will not be able to
download via the Daily selection)

11. Once
all required Filter options have been selected, the ‘Download excel’ link will
become visible and all red validation notifications at the bottom of the Fish
Return Summary page will clear
12. To
download the Summary File to Excel, Click the ‘Download excel’ link

The Release Summary
provides Release details for Egg/Fry/Juveniles that have been Released from
Incubation and/or Rearing. Query Users can use the Filter Tool provided to
limit Query results to a specific data set. Release Records can be filtered
using the Filter Tool, by the Facility/Location, Hierarchy/Array, and Species.
The Start and End Date in the Filter Tool default to a one-year timespan but
are editable to any range the Query User prefers. Data results are then
downloaded to Excel ‘filtered’ by clicking on the Download Excel file link
provided.
Options provide
different parameters for a Query User to apply to the Release Data results
included to be summarized (by Hierarchy and/or Array)
o
The Filter Tool selection
options are detailed below:
·
Start Date – First date you want your dataset to include;
Defaults to one year prior to current date at 12AM (local time)
·
End Date – Last date you want your dataset to include;
Defaults to current date at 11PM (local time)
·
Location – Facility or Domain for which you want Release
Summary data for
o
*Offsite Designation
Notify – this red asterisk on the Selected Location and red text ‘*This Location has offsite associations’ is to notify the Query user that the selected
Location either Parents Offsite Locations Owned by a different Facility(ies) or
is an Owner of Offsite Locations Parented by a different Facility(ies).
§
Hovering over the Red Text will provide a tooltip that displays
all current Parented/Owned Offsite Locations
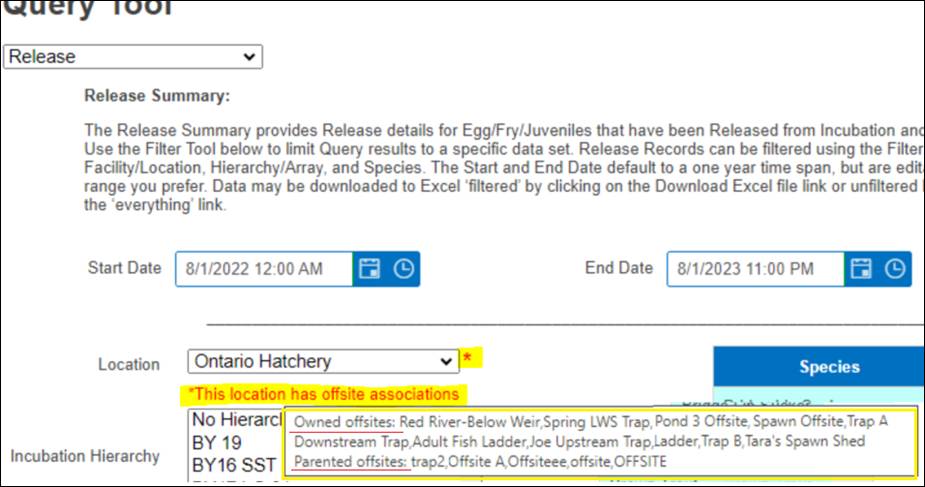
§
Releases made from an Offsite Parented and/or Owned Facility
Location will be included, as expected, when Querying by the Offsite Parent
Facility and/or Offsite Owner Facility
-
(i.e…If Clearwater FH Owned Incubation Hierarchies and/or
Rearing Arrays that Dworshak NFH Parents – Releases made from those Offsite
Incubation Hierarchies and/or Rearing Arrays would be included for either
Location selected, Clearwater FH and/or Dworshak NFH)
·
Incubation Hierarchy – Hierarchy options are based on the selected
Location/Facility; Select the Incubation Hierarchy for the Eggs/Fry you want to
filter your data results by; Selecting multiple Hierarchies is allowed, by
holding Ctrl on selection
·
Rearing Array – Rearing Array options are based on the selected
Location/Facility; Select the Rearing Array for the Juveniles you want to
filter your data results by; Selecting multiple Arrays is allowed, by holding
Ctrl on selection
·
Species – Species for which you want to filter your
results by. Selecting multiple Species is allowed, by holding Ctrl on
selection
·
Include PBT Data – select this checkbox option to include
associated release PBT data by Release Group in a separate sheet of the Release
Summary Download file; One Sheet is provided for each Release Group in the
filtered Release Summary
·
Reset to default filter settings – Click this link to
reset the Filter Tool selections back to the default settings
·
Download Excel file: filtered – Click this link to apply the
filter settings selected and download an Excel file with requested filtered
Release Summary results
FINS Release Summary includes the ‘Container Note’
Column for each Container included in the Release
This Column displays the ‘Rearing Container Notes’ for
each Container as input in the Release form
o
The new field defaults with the
Release Event form Start and End Date/Time as the ‘Note’ and will display in
the Release Summary Column AB as ‘BLANK’ if not ‘Edited’ on Release
·
When Edited on or post Release, the Container Note will display
in the Release Summary as input
·
If an individual containers actual Release Date is different,
then the span of the Release Event date range, the Release Event Data Entry
user can input a Date or Date Range for the actual release date of an
individual container, so that IDFG can capture individual Release Dates for
each Container that is included in the Release Event, instead of making
individual Releases for each Container with their associated actual Release
Date
§
For Example: If release container note for row 1 rcwy 1 should
be 3/4/2022 instead of the Release Event forms Start Date of 3/1/2022 and End
Date of 3/8/2022, the Release Event form data entry user can simply Edit the
auto populated default Date Range value in the newly added ‘Container Note’
field of 3/1-3/8/2022 to instead read 3/4/2022…etc.
o
This enhancement allows Agencies/Facilities
to input a separate Release Event for
each Stock and then capture the unique Dates for each Container within the
Release Event rather than entering a different Release Event for each Container
by actual Release Date.
·
Allowing an Agency/Facility to see Releases made as a Group of
Containers for a Date Range (Release Event Start/End Date) in the Release
Summary, but then track the individual containers included in a Release Event
for timing (i.e.… estimating the juvenile travel timing to Lower Granite Dam)
·
*Use Case Example - specifically Magic Valley FH enters all
DworB and USRB Stock containers as a single Release Event in FINS with a
Start-End Date Range; However, they also then provide a separate document
internally to IDFG M&E Staff with the individual Start-End Dates of all
containers included in the Release Event that reflects the actual Release Dates
of each container during that Release Event input date range. This Actual
Release Date data is able to be captured within FINS via the Release Event form
Container Note.
In a continued effort to provide the Release Summary
Identifier data ins FINS to M&E staff for streamlined RMIS reporting requirements
– The FINSNet.org Query Users can, with minimal reformatting and
interpretation, download the Release Summary which includes a ‘Pivot’
Identifier Summary Sheet built in to the exported results that summarize the
Identifiers per Release Group to provide the necessary fields for RMIS
reporting from existing FINS Release Data
o
Brood Year and Release Start/End
Date columns are included per RMIS Reporting Data
o
The ‘Identifier Summary’ Sheet
includes a Mark-Tag Column clearly reporting/illustrating/displaying the AD and
CWT Status of each Container per Release Group
For
Example:
·
AD and CWT
·
AD Only
·
CWT Only
·
No AD No CWT
o
Shed Rate Coverage Column >
FALSE – is displayed when any
Container in the Release that had CWT doesn’t have a Shed Rate Applied, as
expected, instead of TRUE because One of Many Containers with CWT have a Shed
Rate Applied
Release Summary Download >
Column Definitions
FINS Release Summary includes up to three types of
Sheets in the Downloaded file.
o
Release Summary Sheet– a summary of Releases per selections made in the
Query Filter Tool, grouped by Hierarchy/Array
o
Identifier Summary Sheet – Pivot Sheet built in of the exported Release Summary
results that summarize the Identifiers per Release Group to provide the
necessary fields for RMIS reporting from Existing FINS Release data
o
PBT Sheet(s) - for and labeled with each Release Group in the Release
Summary results downloaded that details the Female and Male Cross Fish details
for the Egg Takes/Groups in the Release
Release
Summary Sheet > Columns – Defined
|
Release Summary - Columns
|
Release Summary - Column Definitions
|
|
Moved From Agency
|
Name of the Agency associated to the Facility that made
this Release
|
|
Moved From Facility
|
Name of the Facility that made this Release
|
|
Moved From Hierarchy/Array
|
Name of the Hierarchy/Array from which the eggs/juveniles
were Released
|
|
Release Source
|
Source from which the Release took place (i.e.
Incubation/Rearing)
|
|
Release Stage
|
Stage of the Juveniles when they were Released
|
|
Release Group
|
Custom name
of the Group of Eggs/Fry/Juveniles that make up the Release. If the Facility
hasn't Created a custom Release Group Name for the Release Event, FINS auto
generated unique Release Group name is displayed (Date/Time of Release Event
Data Entry)
|
|
Brood Year
|
Parent's
Spawn year of Eggs/Fry/Juveniles in Release
|
|
Moved From Path
|
Path of the location that the Juveniles were moved from.
The path will include the Hierarchy-Array Name/Container Name path.
|
|
Moved From
|
Container Name that the Juveniles in Release were moved
from
|
|
Moved From Is Offsite
|
If the Location that the eggs/Juveniles are moved from is
Offsite, FINS will display this field as True, otherwise False
|
|
Offsite Moved From Owner Facility
|
If there is an Offsite Location associated, FINS will
display the Offsite Owner Facility; otherwise blank
|
|
Offsite Moved From Location Latitude
|
If there is an Offsite Location associated, FINS will
display the Location Latitude; otherwise blank
|
|
Offsite Moved From Location Longitude
|
If there is an Offsite Location associated, FINS will
display the Location Longitude; otherwise blank
|
|
Offsite Moved From Location Description
|
If there is an Offsite Location associated, FINS will
display the Location Description; otherwise blank
|
|
Release To
|
Name of the Location that the Eggs/Juveniles were
Released to
|
|
Release To Latitude
|
Latitude of the Release Location Eggs/Juveniles were
Released to
|
|
Release To Longitude
|
Longitude of the Release Location Eggs/Juveniles were
Released to
|
|
Username
|
Name of the user that made this Release in FINS
|
|
Species
|
Species that were Released for the Release Group
|
|
Release Purpose
|
Purpose of the Release (i.e... Adult Returns, Inventory
Reduction, etc.)
|
|
Stock
|
Name of the Stock of the Eggs/Juveniles in this Release
|
|
Stock Description
|
Description of the Stock of the Eggs/Juveniles in this
Release
|
|
Stock Facility
|
Name of the Facility Stock is associated to
|
|
Stock Agency
|
Name of the Agency associated to the Facility that this
Stock is associated to
|
|
Program
|
Name of the Program that these Juveniles are associated
to (Segregated/Integrated)
|
|
Start Date
|
First Date of
the Release
|
|
End Date
|
Last Date of
the Release
|
|
Container Note
|
Notes added by data entry user specific to this Release
|
|
Eggs/Fry/Juveniles Released
|
Number of Eggs/Fry/Juveniles Released
|
|
Count Method
|
Count method used to count the number of
Egg/Fry/Juveniles Released. If Egg/Fry/Juveniles were NOT enumerated at
Release, Count Method will display as 'Inherited'
|
|
Group Release Goal
|
Goal for number of Egg/Fry/Juveniles that will need to be
Released
|
|
Release Strategy
|
Release Strategy used in this Release
|
|
Release Strategy Description
|
Release Strategy description associated to the Release
Strategy
|
|
Release Strategy Facility
|
Name of the Facility that created this Release Strategy
|
|
Release Strategy Agency
|
Name of the Agency associated to the Facility that
created this Release Strategy
|
|
Release Type
|
Name of the Release Type used in this Release
|
|
Release Type Description
|
Release Type description associated to the Release
Strategy
|
|
Release Type Facility
|
Name of the Facility that created this Release Type
|
|
Release Type Agency
|
Name of the Agency associated to the Facility that
created this Release Agency
|
|
Fish Weight (Pounds)
|
Total Weight for Juveniles being Released
|
|
Fish per Pound (Fish/Pound)
|
Number of Fish that make up 1 pound for this Release
|
|
Fish Length (in)
|
Average Fish Length of Fish being Released
|
|
Source Temperature
|
Temperature of Location that Egg/Fry/Juveniles are being
Released from
|
|
Destination Temperature
|
Temperature of Location that Egg/Fry/Juveniles are being
Released to
|
|
Expected First Year Of Return
|
Expected First Year of Return for Juveniles being
Released
|
|
Expected Survival
|
Expected Survival of Fish being Released
|
|
Expected Survival Detail
|
If Warning is selected for Expected Survival, FINS
requires users to enter a note here
|
|
Identifiers
(Marks & Tags on Juveniles Released)
|
Identifiers
applied to the Juveniles that make this Release Group
|
|
Identifiers
Total Quantity
|
Total number
of Identifiers applied to the Juveniles that make the Release Group
|
|
AD Total
Quantity
|
Total number
of ADs applied to the Juveniles that make the Release Group. This includes
Juveniles that have AD Only along with Juveniles that were applied a CWT Tag
simultaneously with an AD. [AD + AD/CWT = AD Total Quantity]
|
|
CWT Total
Quantity
|
Total number
of CWTs applied to the Juveniles that make this Release Group. This includes
Juveniles that have a CWT Only Tag along with Juveniles that were applied a
CWT Tag simultaneously with an AD. [CWT + AD/CWT = CWT Total Quantity]
|
|
AD Only
Quantity
|
Number of
Juveniles that have only an AD (no CWT) associated to them. If the number is
0, then the cell will be empty. [AD = AD Only Quantity]
|
|
CWT Only
Quantity
|
Number of
Juveniles that have only a CWT Tag (no AD) associated to them. If the number
is 0, then the cell is empty. [CWT = CWT Only Quantity]
|
|
AD/CWT
Quantity
|
Number of
Juveniles that have been applied AD/CWT simultaneously via the Marking
Trailer [AD/CWT = AD/CWT Quantity]
|
|
AD and CWT
Quantity (Includes AD/CWT)
|
AD and CWT
displays containers that have an AD/CWT that were applied simultaneously with
appropriate exclusions and/or AD and CWT associated to them (Applied), within
the Release Group. If the number is 0, then the cell is empty. [AD, CWT +
AD/CWT = AD and CWT Quantity]
|
|
Neither AD
nor CWT Quantity
|
Number of
Juveniles within the Release Group that don’t have an AD or CWT associated
with them
[No AD, No CWT, No AD/CWT = Neither AD nor CWT Quantity]
|
|
Tag Values
|
Value of the
CWT Tag associated with the Juveniles that have a CWT Tag within the Release
Group
|
|
PIT
|
Displays as
True if Juveniles within the Release Group have PIT Tags associated to them.
Displays as False if there are no PIT Tags attached to the Juveniles within
the Release Group.
|
|
PIT
Quantity
|
Number of PIT
Tags applied to Juveniles within the Release Group
|
|
NON Shed
Rate Container
|
Containers
that fed the Release without a Shed Rate
|
|
Shed Rate
Container
|
Containers
that fed the Release with Shed Rate
|
|
Shed Rate
Applied
|
True/False;
Specifies whether a Shed Rate was Applied to Inventory when Saved
|
|
Shed Rate
%
|
Rate at which
CWT Shed
|
|
Retention
Rate %
|
Rate at which
CWT Retained
|
|
Sample
Date/Time
|
Date/Time of
Rate Sampling
|
|
Sample
Size
|
Number of
Juveniles Sampled
|
|
Sample
Retention
|
Number of
Juveniles Sampled that retained their CWT
|
|
Rate Notes
|
Note of
Rate/Sampling
|
|
Original
CWT Total
|
Original
Number of CWTs applied at Marking
|
|
Adjusted
CWT Total
|
Number of
CWTs after Applying Rate
|
|
Original
Mark/Tag Rate
|
Mark/Tag Rate
of Original Marking
|
|
Adjusted
Mark/Tag Rate
|
Mark/Tag Rate
after Rate Applied
|
|
Shed Rate
Coverage
|
True (T) if
all containers associated with Release have a Shed Rate that was Applied to
Inventory on Save, otherwise False; *Shed Rate Coverage Column > FALSE
– is displayed when any Container in the Release that had CWT doesn’t have a
Shed Rate Applied, as expected, instead of TRUE because One of Many
Containers with CWT have a Shed Rate Applied
|
|
Notes
|
Notes
associated with all the records in the Release; Input at time of Release
and/or after Release via Editing, via 'Notes' tab of Release Form
|
|
Release
Summary
|
Additional
information captured about the Release in the Release Form; Up to 4MB data
Limit (for example AOP and other Release Information important to the Release
added for Query purposes)
|
|
Group
Notes
|
Notes created
for multiple Releases at the same time, Post Release, via Release Query >
'Note All' feature
|
*This disclaimer applies to the following Release Summary
Query Columns [AD Only Quantity, CWT Only Quantity, AD/CWT Quantity, AD and CWT
Quantity (includes AD/CWT)] especially as it applies to number of Juveniles:
Applied Identifiers only indicate an accurate number of Juveniles provided the
Identifiers were applied using exclusions and/or simultaneous application where
necessary.
*For example, if you apply 100
AD and 100 CWT to a container of 1000 juveniles without applying them
simultaneously, then some fish will have only AD, some will have only CWT, some
will have both and some will have neither -- on average 90 fish will have AD
only, 90 will have CWT only, 10 fish will have both and 810 fish will have
neither. The same applies to a single identifier -- if in one session you apply
100 AD and on a later session you apply another 100 AD, without exclusions,
then the result will be that 180 fish will have a single AD, 10 fish will have
TWO AD (which is not physically possible) and again 810 will have neither. To
prevent this situation you would apply the AD in the second session excluding
AD (which will prevent AD from being applied to fish that already have them).
The result in this case is that 200 fish will each have a single AD and 1800
will have no AD.
Release
Summary > Identifier Summary Sheet > Columns - Defined
|
Identifier Summary Sheet - Columns
|
Identifier Summary Sheet - Column Definitions
|
|
Moved From
Agency
|
Name of the
Agency associated to the Facility that made this Release; Agency
Eggs/Fry/Juveniles Released From
|
|
Moved From
Facility
|
Name of the
Facility associated to the Release Location of this Release; Facility
Eggs/Fry/Juveniles Released From
|
|
Release To
|
Name of the
Release Location Type that the Eggs/Fry/Juveniles were Released to; Location
Eggs/Fry/Juveniles Released To
|
|
Brood Year
|
Parent's
Spawn year of Eggs/Fry/Juveniles in Release
|
|
Start Date
|
First Date of
the Release
|
|
End Date
|
Last Date of
the Release
|
|
Release
Group
|
Custom name
of the Group of Eggs/Fry/Juveniles that make up the Release. If the Facility
hasn't Created a custom Release Group Name for the Release Event, FINS auto
generated unique Release Group name is displayed (Date/Time of Release Event
Data Entry)
|
|
Marks
|
Consists of
the following options
• AD
• AD Only
• No Mark
|
|
Tags
|
Consists of
the following options
• CWT
• No Tag
• CWT Only
|
|
Mark-Tag
|
Clearly
reporting/illustrating/displaying the AD and CWT Status of each Container per
Release Group:
• AD and CWT – The quantity column for this row will display the number of
Juveniles that have an AD and CWT associated to the them, within the Release
Group. If the number is 0, then the cell is empty
• AD Only – The quantity column for this row will display display the number
of Juveniles that have only an AD (no CWT) associated to them. If the number
is 0, then the cell is empty
• CWT Only – The quantity column for this row will display the number of
Juveniles that have only a CWT Tag ( no AD) associated to them. If the number
is 0, then the cell is empty
• No AD No CWT – The quantity column for this row will display the number of
Juveniles that don’t have an AD or CWT associated to them, for the Release
Group. If the number is 0, then the cell is empty
|
|
Quantity
|
Quantity of
Marks/Tags applied for the Mark-Tag combination in the 'Mark-Tag' Column
|
|
Shed Rate
Coverage
|
True(T); True
if all containers associated with Release have a Shed Rate that was Applied
to Inventory on Save, otherwise False; *Shed Rate Coverage Column >
FALSE – is displayed when any Container in the Release that had CWT doesn’t
have a Shed Rate Applied, as expected, instead of TRUE because One of Many
Containers with CWT have a Shed Rate Applied
|
Release
Summary > PBT Sheet(s) > Columns - Defined
|
PBT Sheet - Columns
|
PBT Sheet - Column Definitions
|
|
Female ID
|
Spawned ID of
Female Parent for Egg Take in Release
|
|
Male ID
|
Spawned ID of
Male Parent for Egg Take in Release
|
|
Species
|
Species of
Spawned Parent
|
|
Cross ID
|
The Female
Spawn ID & Immediate Container name where the Egg Take were placed for
the Spawn Cross. Combined to create a Unique ID for each Cross within a
Spawn Session
|
|
Group ID
|
Unique ID
assigned by FINS for an Egg Group that has been combined via Group
Enumeration
|
|
Spawning
Lot #
|
Lot # of
Spawning Session
|
|
Stock
|
Stock of
Spawning Session
|
|
Program
|
Session
Progeny of Spawning Session
|
|
Spawning
Session Date
|
Date of
Spawning Session
|
|
Spawning
Facility
|
Name of
Facility Spawning Session occurred
|
|
Spawning
Location
|
Location
Spawning Session occurred
|
|
Spawning
Session Progeny
|
Session
Progeny of Spawning Session
|
|
Spawning
Session Ratio
|
Intended
Spawn Ratio of Spawning Session; Female:Male
|
|
Spawning
Session Comments
|
Comments on
Spawning Session
|
|
Female
Length
|
Measurment of
Spawned Female, in Millimeters (mm)
|
|
Female
Times Used
|
Number of
Times Fish was part of a unique Spawn Cross; Auto assigned max value for a
Female is 1
|
|
Male
Length
|
Measurment of
Spawned Male, in Millimeters (mm)
|
|
Male Times
Used
|
Number of
Times Fish was part of a unique Spawn Cross
|
|
Female
Source Trap
|
Name of Trap
where the Spawned Female was originally Trapped
|
|
Female
Source Trap Facility
|
Name of
Facility the Source Trap is located
|
|
Female
Origin
|
Origin
assigned to Spawned Female based off Origin Workflow Identifier Expression
per Species/Facility/Trap; If none then 'Uncategorized'
|
|
Female
Marks
|
Marks that
were Existing when Female was Spawned; Marks Applied to Female during Spawn
Event
|
|
Female
Tags
|
Tags that
were Existing when Female was Spawned; Tags Applied to Female during Spawn
Event
|
|
Female
Samples
|
Samples taken
on Female at Spawning
|
|
Female
Conditions
|
Conditions
present on Female at Spawning
|
|
Male
Source Trap
|
Name of Trap
where the Spawned Male was originally Trapped
|
|
Male
Source Trap Facility
|
Name of
Facility the Source Trap is located
|
|
Male
Origin
|
Origin
assigned to Spawned Male based off Origin Workflow Identifier Expression per
Species/Facility/Trap; If none then 'Uncategorized'
|
|
Male Marks
|
Marks that
were Existing when Male was Spawned; Marks Applied to Male during Spawn Event
|
|
Male Tags
|
Tags that
were Existing when Male was Spawned; Tags Applied to Male during Spawn Event
|
|
Male
Samples
|
Samples taken
on Male at Spawning
|
|
Male
Conditions
|
Conditions
present on Male at Spawning
|
|
Estimated
Egg Count
|
Estimated
count of Female’s Eggs for the Spawning Session/Cross. First count assigned
to an Egg Take
|
|
Incubation
Inventory Count
|
Number of
Viable (Alive) Eggs at Enumeration in Incubation. Second count assigned to
an Egg Take/Group
|
|
Incubation
Loss
|
Number of
Dead Eggs at Enumeration in Incubation
|
|
Actual
Green Take
|
Incubation
Inventory Count plus Incubation Loss at Enumeration
|
|
Incubation
Live Count
|
Number of
Viable (Alive) Eggs/Fry in Incubation when moved into Rearing (Incubation
Inventory Count minus any Mortalities picked in Incubation)
|
|
Eye Up
Rate (Incubation Inventory Count/Actual Green Take)
|
Quotient of
Incubation Inventory Count divided by Actual Green Take
|
|
Incubation
Survival Rate (Incubation Live Count/Actual GreenTake)
|
Quotient of
Incubation Live Count divided by Actual Green Take
|
|
Incubation
Mortality Rate (Morts/ Actual Green Take)
|
Quotient of
Morts picked at Incubation divided by Actual Green Take
|
The Upload dialog provides a method for
users to upload trapping or spawning data that has been collected using the
FINS Offline application into the online FINS database.
To begin, locate on your system the excel (.xlsx) file(s)
you want to upload, and select the upload type.
Either - upload trapping sessions or upload spawning
sessions
FINS Import Tool – A number of mechanisms, for each of several modules (Trapping,
Spawning, Incubation, Rearing) that take as input an Excel spreadsheet
containing standardized and non-standardized data. The import tool commits
import file data into FINS for immediate storage, backup and queries. The
tool allows for the addition to FINS of 'batch' data in lieu of an extended
session of manual entry.
Use Case
The Trapping Import Tool allows users the ability to
import their Trapping data from an Excel file into the FINS database. All
relevant Trapping data is imported to FINS.
FINS Trapping Import Columns
|
Column Name
*Required Columns in Red Text
|
Column
Definition/Description
|
Validation
|
Example Data
|
|
Session Data
Associated to each Trapping Record within Session
|
Trapped Date
|
Date
or Date and Time the Trapping Session occurred
|
Date is Required; Accepted Date
Formats (m/d/yyyy; m-d-yyyy); Time is Optional; Accepted Time Formats (h:mm am or pm); If no Time input
and this Date Column is formatted as 'Date or Text’ with input format of
m-d-yyyy or m/d/yyyy the time will default to 8AM on Import; If no Time input
and this Date Column is formatted as 'Date' with input format of m/d/yyyy the
time will default to 8AM on Import. If Time of 12:00AM is desired, Time must
be formatted as 12:00:01 in order for the time imported to be
stored/displayed as 12:00AM; Required Value for each Session-if
fish are part of the same session, then only required for first Trapping
Record of Session (Date input would separate 'Sessions' when select row
Trapped Date fields are left blank)
|
8/23/2017 8:00
|
|
Facility
|
Name
of Facility the Trap belongs
|
Required;
FINS Database Location; Type: Facility; Required Value for each Session-if
fish are part of the same session, then only required for first Trapping
Record of Session
|
Lookingglass Fish Hatchery
|
|
Trap
|
Name
of the Trap where the Trapping Session occurred
|
Required;
FINS Database Location; Type: Trap; Required Value for each Session-if fish
are part of the same session, then only required for first Trapping Record of
Session
|
Lookingglass Trap
|
|
Target Species
|
Fish
Species identified as the primary species of interest for collection of
Trapping Session
|
Required;
FINS Database Species; Abbreviations Not Accepted (Additional Species that
are available in FINS Database but not displayed in Example Data List below
are: Brook Trout, Brown Trout, White Fish); Required Value for each
Session-if fish are part of the same session, then only required for first
Trapping Record of Session
|
Chinook
|
|
Target Run
|
Run
Type of Target Species for Trapping Session
|
Required
if Species = Chinook and/or Steelhead; FINS Database Run Name; by Species;
Required Value for each Session-if fish are part of the same session, then
only required for first Trapping Record of Session
|
Spring
|
|
Fish Data
Unique to each Trapping Record within Session
|
Fish ID
|
ID
assigned to each Trapping Record within a Trapping Session
|
Required
for each Trapping Record; User Defined Field
|
1
|
|
Count
|
The
amount of fish in Trapping Record
|
Required
for each Trapping Record; User Defined Value, Number
|
1
|
|
Species
|
Species
of Trap Record; May be different from the 'Target Species' of Session
|
Required;
FINS Database Species; Abbreviations Not Accepted (Additional Species that
are available in FINS Database but not displayed in Example Data List below
are: Brook Trout, Brown Trout, White Fish)
|
Chinook
|
|
Run
|
Run
Type of Trapped Species
|
Required
if Trapped Species = Chinook and/or Steelhead; FINS Database Run Name; by
Species;
|
Spring
|
|
Sex
|
The
biological sex of the species captured as determined at the Trap: Male,
Female or Unknown
|
Required
for each Trapping Record; FINS Database Sex; Male, Female, Unknown
|
Unknown
|
|
Living Status
|
Living
status of Trapped Fish as determined at the Trap
|
Required;
FINS Database Trapping Living State; Alive, Killed, Trap Mort, DOA
|
Alive
|
|
Trapping
Session Comments
|
Comments
specific to the Trapping Session
|
Optional;
User Defined Value; 100 Character Limit
|
First Fish
|
|
Length
|
Fork
Length of the Trapped Fish in mm
|
Optional;
Fork Length Measurement expected/displayed in millimeters; Max accepted value
= 1500
|
810
|
|
Age
Designation
|
Visual
Determination of Age of Trapped Fish; Not allowed if Length is present (which
would instead allow a calculation to be made once imported based on
Agency/Facility/Trap/Date/Length specific Workflow criteria; Only applicable
on Chinook
|
Optional;
Only allowed for Chinook; Not allowed if Length value present; FINS Database
Age Designation: Adult, Jack/Jill, Mini-Jack
|
Jack/Jill
|
|
Moved To Facility
|
Name
of the Facility the Moved To Location belongs
|
Required;
FINS Database Location; Type: Facility
|
Lookingglass Fish Hatchery
|
|
Moved To
|
Location
Name the Trapped Fish was placed from the Trap
|
Required;
FINS Database Location; Type: Holding, Spawning, Release, Disposal, Shipping,
Transfer; FINS Move To Workflows are Ignored
|
Circular 21
|
|
Disposition
|
Disposition
of Trapped Fish
|
Required;
FINS Database Trapping Disposition; Disposed, Ponded, Released, Spawn,
Transferred, Shipped
|
Ponded
|
|
Purpose
|
Purpose
of Trapped Fish
|
Required;
FINS Database Trapping Purpose; (Tied to and Limited by Disposition);
DISPOSED: Biological Sampling, Distribution, Education/Research, General
Disposal, Health Concern, Nutrient Enhancement, Other, Stray Removal; PONDED:
Brood Stock, General Holding; RELEASED: Fisheries, Natural Spawning, Other,
Recycled, Stray Relocation; SPAWN: Spawn; TRANSFERRED: Within FINS Facility;
SHIPPED: Outside FINS Facility
|
Brood Stock
|
|
Existing
Marks
|
Mark(s)
that were Existing on the Trapped Fish when removed from the Trap
|
Optional;
FINS Database Mark Identifier; Format: Mark Abbreviation; Comma Separated
from subsequent Existing Marks (AD, LM)
|
AD, LM
|
|
Existing
Marks Quantity
|
Number
of Existing Mark(s) on Trapped Fish when removed from the Trap
|
Required
for each Existing Mark Present; Corresponding Mark Quantity; Comma Separated
from subsequent Existing Mark Quantities (1, 2)
|
1, 2
|
|
Applied
Marks
|
Mark(s)
that were Applied to the Trapped Fish at the Trap
|
Optional;
FINS Database Mark Identifier; Format: Mark Abbreviation; Comma Separated
from subsequent Applied Marks (CP, ROP)
|
CP, ROP
|
|
Applied
Marks Quantity
|
Number
of Marks Applied to Trapped Fish at the Trap
|
Required
for each Applied Mark Present; Corresponding Mark Quantity; Comma Separated
from subsequent Applied Mark Quantities (1, 2)
|
1, 1
|
|
Existing
Tags
|
Tag(s)
that were Existing on the Trapped Fish when removed from the Trap
|
Optional;
FINS Database Tag Identifier; Format: Tag Abbreviation_Tag Value; PIT Tag
Value Format: three dot ten or three dot eleven hexadecimal; xxx.xxxxxxxxxxx;
all hexadecimal digits; Comma Separated from subsequent Tags and Tag Values
(CWT-NP, PIT XXX.XXXXXXXXXX)
|
JT, CWT-NP, PIT 3DD.0077AF30BD
|
|
Applied
Tags
|
Tag(s)
that were Applied to the Trapped Fish at the Trap
|
Optional;
FINS Database Tag Identifier; Format: Tag Abbreviation_Tag Value; PIT Tag
Value Format: three dot ten or three dot eleven hexadecimal; xxx.xxxxxxxxxxx;
all hexadecimal digits; Comma Separated from subsequent Tags and Tag Values
(PIT XXX.XXXXXXXXXXX, ZIP zipvalue)
|
PIT 385.349EA742A52, ZIP 1001
|
|
Samples
|
Sample
Type(s) and Sample Value(s)taken from the Trapped Fish at the Trap
|
Optional;
FINS Database Sample Type and User Defined Value if applicable; Format:
Sample Abbreviation; Comma Separated from subsequent Samples (GEN
geneticvalue, SCALE whatman#); Abbreviations Required for acceptance (Sample
Name and accepted Abbreviations accepted are: Fin Rays=FR, Genetics=GEN;
Others=OTHER, Otoliths=OTL, Pathology=PATH, Pathology-Core Sample=PATH-CS,
Pathology-Head Wedge=PATH-HW, Pathology-Kidney=PATH-K,
Pathology-Kidney/Spleen=PATH-KS, Pathology-Ovarian=PATH-OV, Snout=SNOUT,
Scale=SCALE)
|
GEN 1234, SCALE 1234
|
|
Conditions
|
Specific
injuries or abnormalities observed on Trapped Fish at the Trap
|
Optional;
FINS Database Condition Identifier; Format: Condition Abbreviation; Comma
Separated from subsequent Conditions (ED, BI)
|
ED, BI
|
|
Recap
|
In
FINS, a Trapped Fish is identified as a Recap if it was caught more than
once, in the same Trap the same year. Recap is a Trapping specific field
|
Optional;
FINS Database Recap; True or False
|
TRUE
|
|
Injected
|
A
true or false value that indicates if the Trapped Fish was given any sort of
drug treatment using a needle at Trapping. (True if checked)
|
Optional;
FINS Database Injected; True or False
|
FALSE
|
|
Weight
|
Weight
in grams of Trapped Fish
|
Optional;
Unit of Measurement in grams; User Defined Value; Number
|
680
|
|
Notes
|
Optional
field used to capture notes applicable to Trapped Fish
|
Optional;
User Defined Value
|
Note for Trapped Fish of Trapping Session
|
To Import
Trapping Data to FINS, follow the steps below:
1.
Log in with your FINS credentials on www.finsnet.org
2.
Click on the ‘Data’ tab
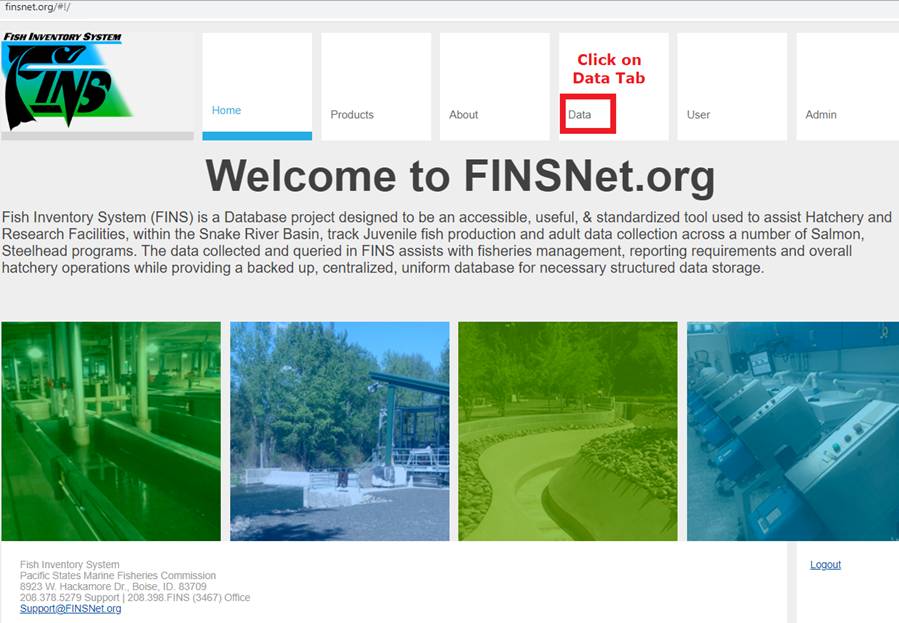
3.
Clicking on the ‘Data’ tab will take you to the FINS Query Tool
4.
Click on the Query Tool drop down menu and select ‘Import Trapping Data’
5.
To Import your Trapping data, click on the ‘begin import session.’ link
highlighted below
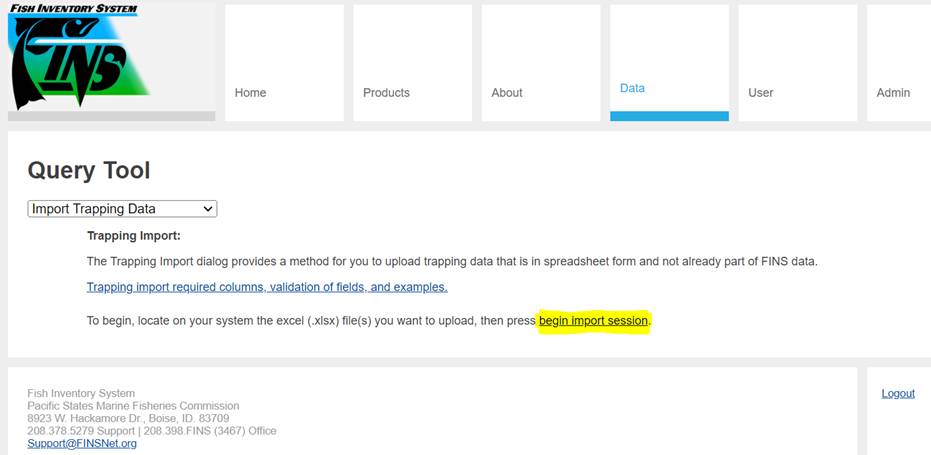
6.
Choose a Trapping data file for import by clicking on the ‘Choose File’
icon highlighted below
Validation:
Trapping data files for import must be
spreadsheet (.xlsx) files, limited to 100mb or less in size. Note however that
files of any appreciable size will take a very long time to process, due
to the extensive validation that will take place.
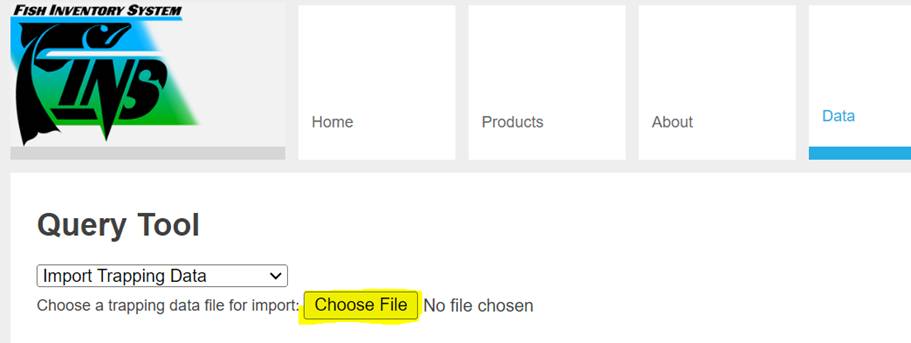
If
the required .xlsx Excel file is not imported:
·
The user will be presented with a message notifying them that the
file being imported is a non .xlsx file (Reference below)
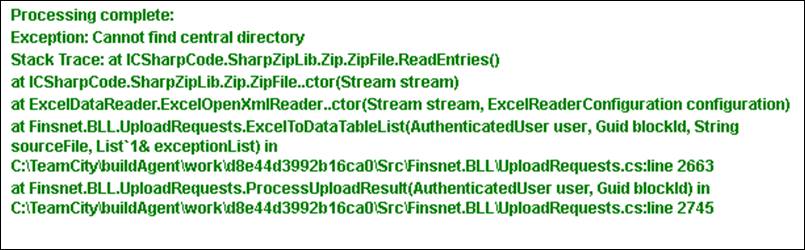
To correct this error, the user would
need to convert the Excel file to a non .xlsx file
·
Once the file gets updated as an .xlsx file, retry uploading the
file in its new .xlsx file format
7. When
the import is complete, FINS will enter a validation phase consisting of
several parts
Validation:
Initially FINS will examine the file to ensure that required columns for
the FINS Trapping database exist in the document
·
If the required columns exist:
o
A second and more thorough validation takes place to ensure that
all required data can be interpreted correctly. Validation continues until a
maximum of 10 errors, or none at all, are discovered.
o
If errors are found, a list of them will be returned to the page,
to assist the user in correcting the file for upload. If no validation errors
are found, a list of trapping sessions will be returned for user review and
user may proceed to step (8) below.
·
If the required columns do NOT exist:
§
The user will be notified of the missing column(s) that need to
be added in order to import the file (Reference below)
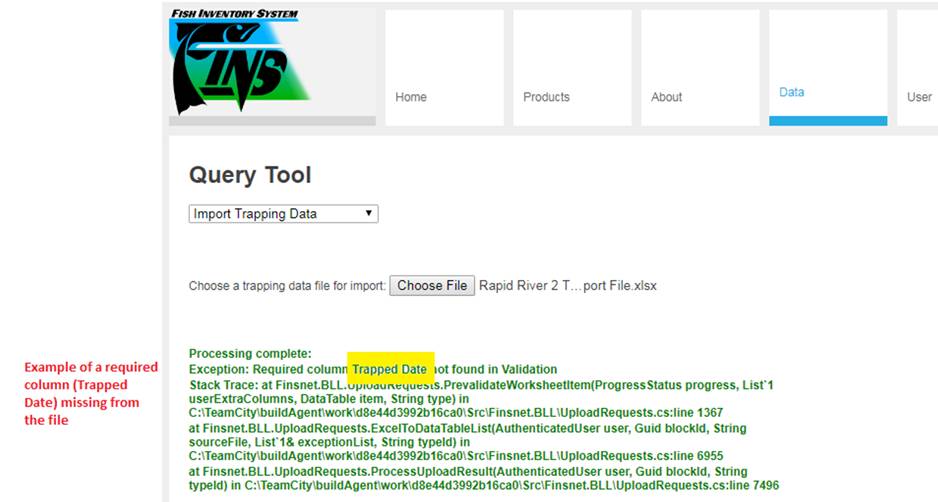
§
To view the required columns for your Trapping Import File, refer
to the ‘FINS Trapping Import Columns’ section
in the User Manual. Once the file gets updated with the required columns, refer
to step (1) above.
8.
Upon successfully completing the validation check, FINSNet.org will
display each Trapping Session and associated Trapping Records ready for Import
as a User Confirmation. The user may, after reviewing this display, either
accept and commit the import to the FINS database or simply browse away from
the page and not commit the upload.
To commit the import, click on the
‘Commit To Fins’ button highlighted below. 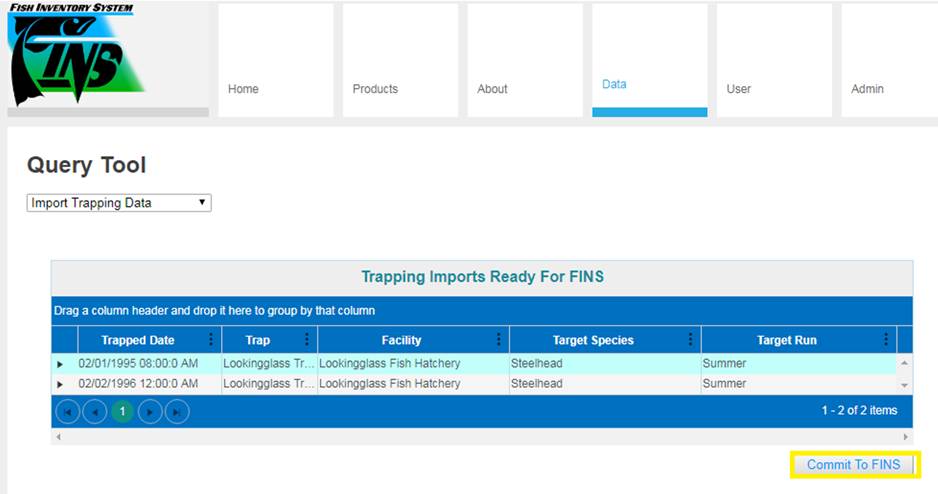
If the file you are attempting to
import has been previously imported, FINS will notify you via a warning prompt
that a duplicate file is being imported. (Reference below)
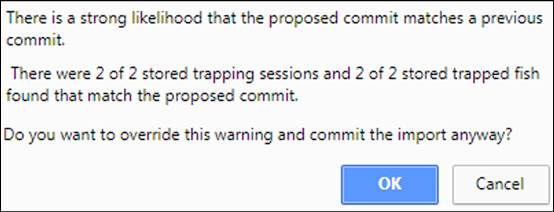
i. Select
‘OK’ if you want to override the warning and commit and import the duplicate
file to FINS
ii. Select
‘Cancel’ to cancel the import
9. When
Commit to FINS is completed, FINS will display the following message:

10. The
imported data can now be viewed in the FINS Trapping Query
Use Case
The Spawning Import Tool allows users the ability to
import their Spawning data from an Excel file into the FINS database. All
relevant Spawning data is imported to FINS. Users also have the ability to
import additional Spawning data into a separate area for display in a Spawning
query in FINS.
FINS
Spawning Import Columns
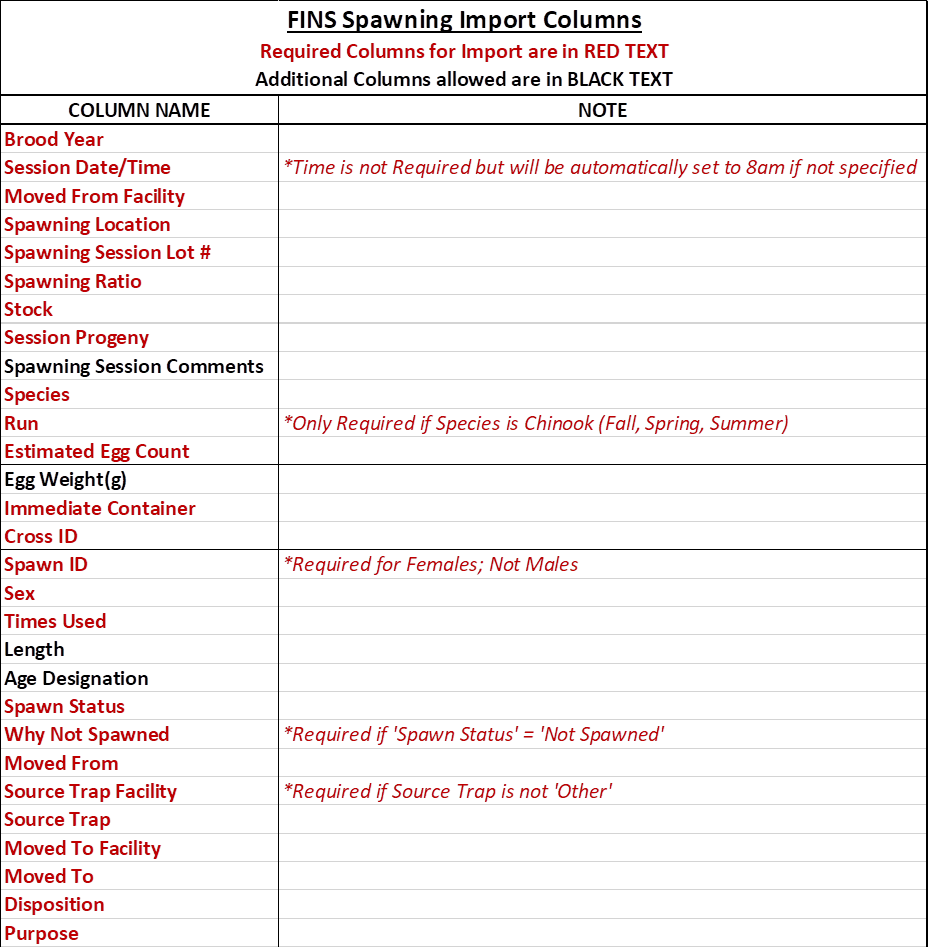
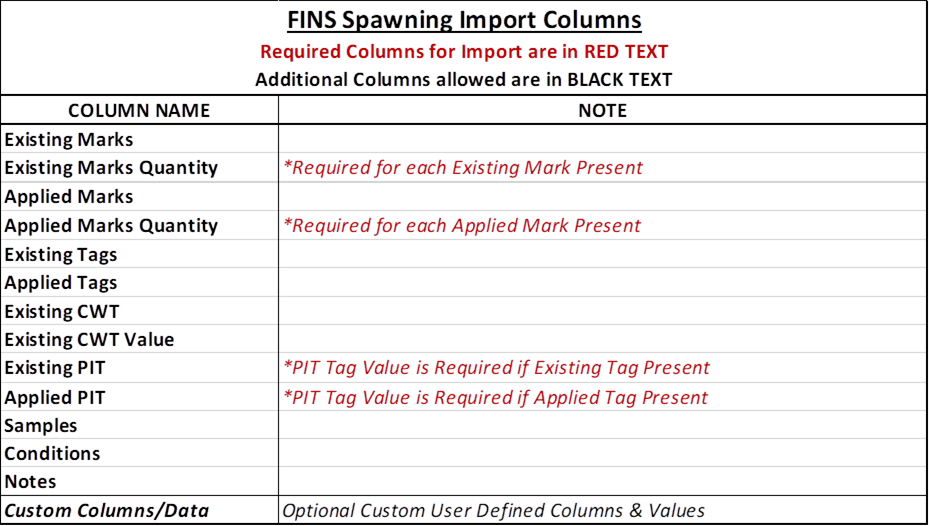
Column Validation Definitions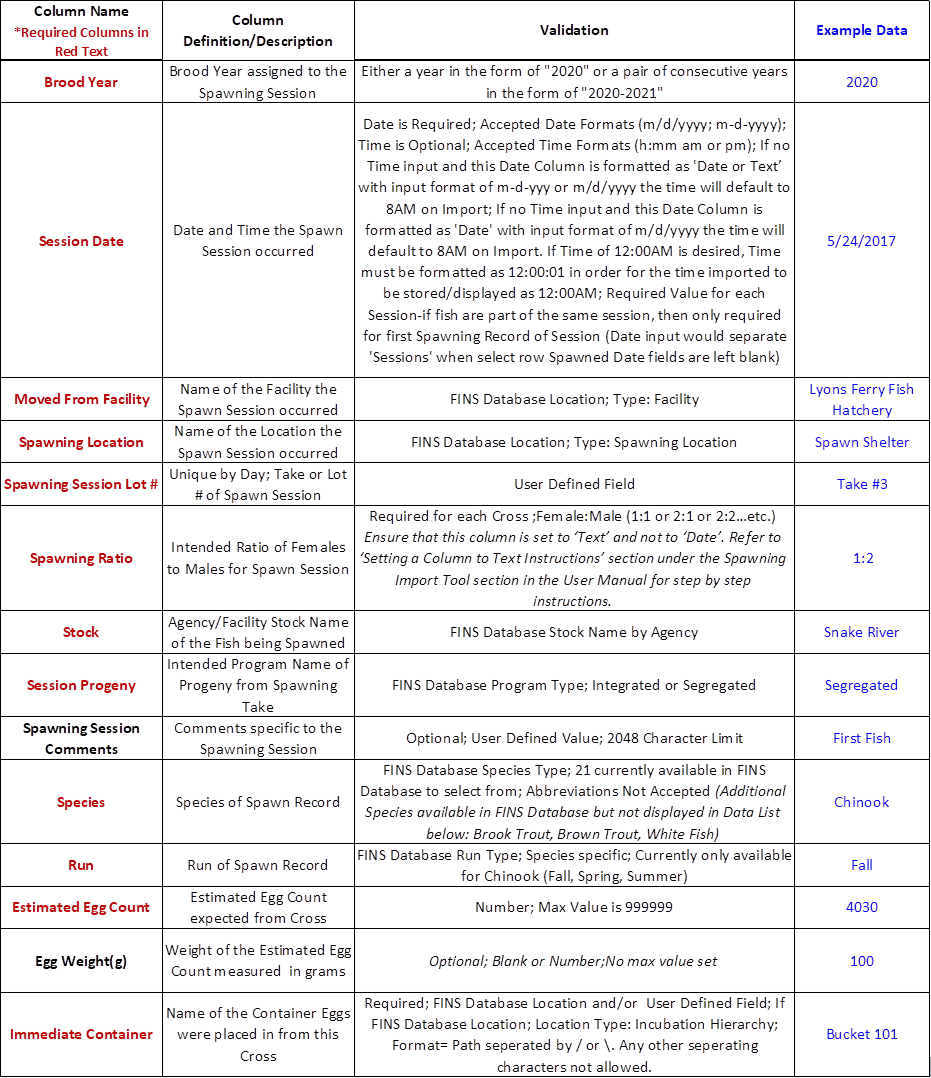
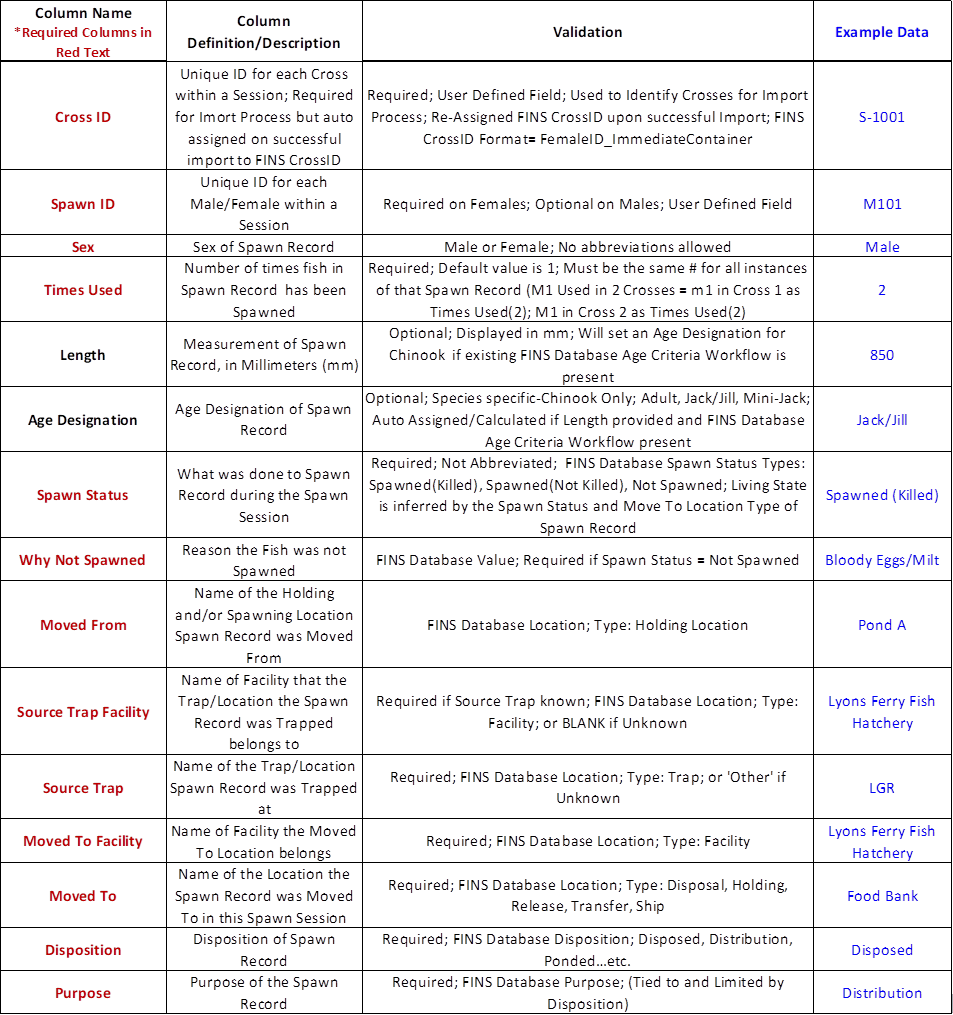

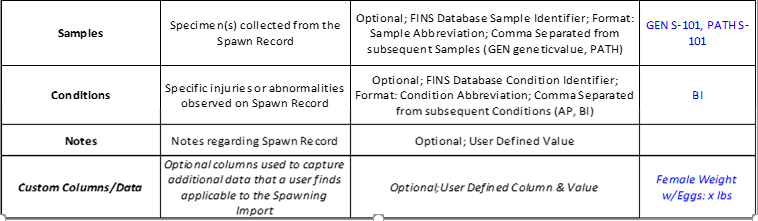
To Import
Spawning Data to FINS, follow the steps below:
1.
Log in with your FINS credentials on www.finsnet.org.
2.
Click on the ‘Data’ tab.

3.
Clicking on the ‘Data’ tab will take you to the FINS Query Tool.
4.
Click on the Query Tool drop down menu and select ‘Import Spawning
Data’.
5.
To Import your Spawning data, click on the ‘begin import session.’ link
highlighted below.
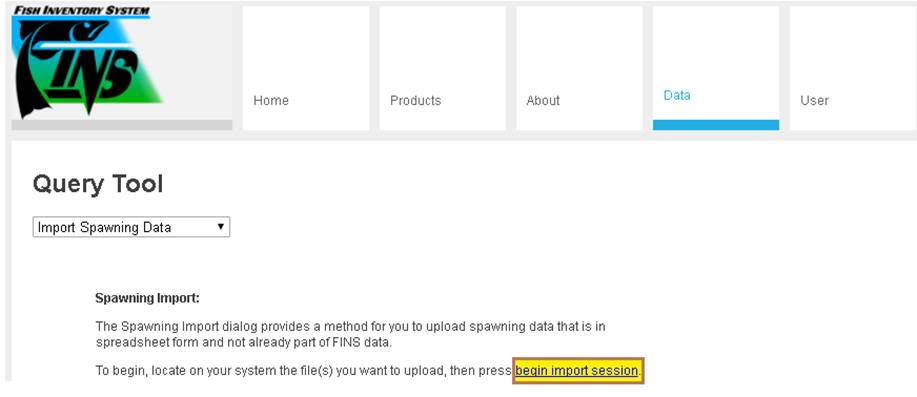
6.
Choose a Spawning data file for import by clicking on the ‘Choose File’
icon highlighted below.
Validation:
Spawning data files for import must be
spreadsheet (.xlsx) files, limited to 100mb or less in size. Note however that
files of any appreciable size will take a very long time to process, due
to the extensive validation that will take place.
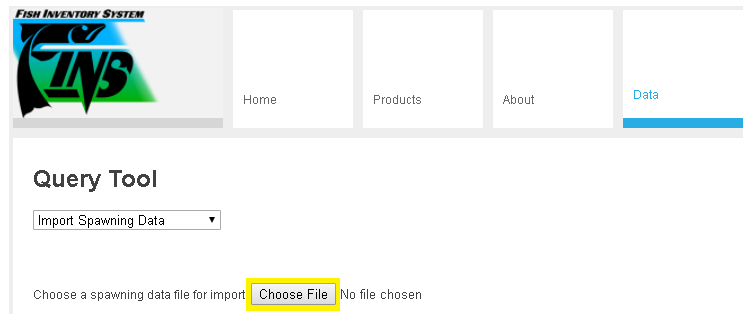
If
the required .xlsx Excel file is not imported:
·
The user will be presented with a message notifying them that the
file being imported is a non .xlsx file. (Reference below)

To correct this error, the user would need
to convert the Excel file to a non .xlsx file.
·
Once the file gets updated as an .xlsx file, retry uploading the
file in its new .xlsx file format.
7.
When the import is complete, FINS will enter a validation phase
consisting of several parts.
Validation:
Initially FINS will examine the file to ensure that required columns for
the FINS Spawning database exist in the document.
·
If the required columns exist:
o
A second and more thorough validation takes place to ensure that
all required data can be interpreted correctly. Validation continues until a
maximum of 10 errors, or none at all, are discovered.
o
If errors are found, a list of them will be returned to the page,
to assist the user in correcting the file for upload. If no validation errors
are found, a list of spawning sessions will be returned for user review and
user may proceed to step (8) below. (Refer to the ‘Common Spawning Import Errors’ section
for a list of potential errors when the required columns exist)
·
If the required columns do NOT exist:
§
The user will be notified of the missing column(s) that need to
be added in order to import the file. (Reference below)
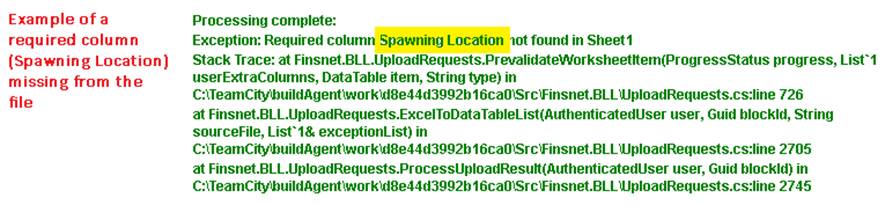
§
To view the required columns for your Spawning Import File, refer
to the ‘FINS Spawning Import Columns’
section in the User Manual. Once the file gets updated with the required
columns, refer to step (1) above.
8.
Upon successfully completing the validation check, FINSNet.org will
display each Spawning Session and associated Spawning Records ready for Import
as a User Confirmation. Each session can be expanded to display the spawn
crosses that comprise the session, and each spawn cross can be expanded to
display the spawned fish that make up the spawn cross. The user may, after
reviewing this display, either accept and commit the import to the FINS
database or simply browse away from the page and not commit the upload.
To
commit the import, click on the ‘Commit To Fins’ button highlighted below.
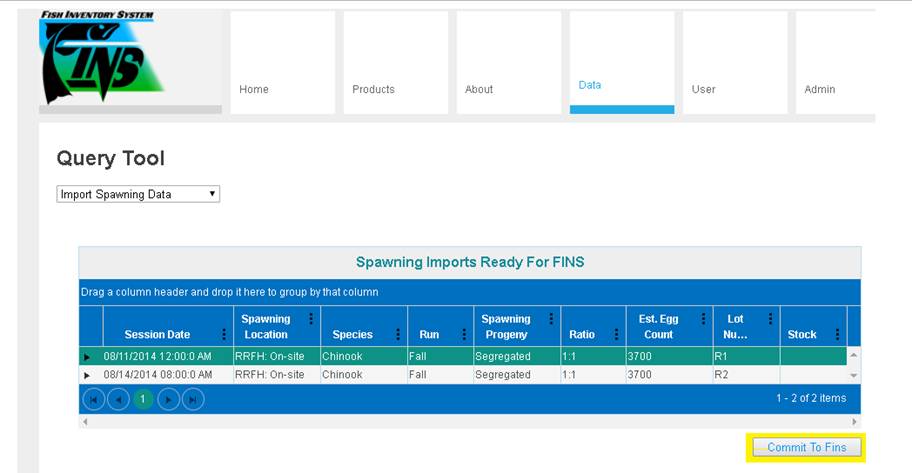
If the
file you are attempting to import has been previously imported, FINS will
notify you via a warning prompt that a duplicate file is being imported.
(Reference below).
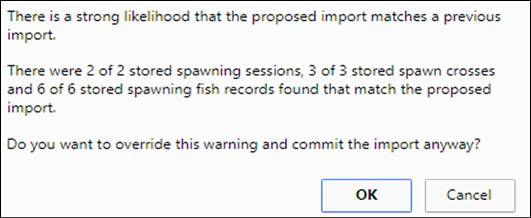
·
Select ‘OK’ if you want to override the warning and commit and
import the duplicate file to FINS.
·
Select ‘Cancel’ to cancel the import.
9.
When Commit to FINS is completed, FINS will display the following
message:

10. The
imported data can now be viewed in the FINS Spawning Query.
Uploading a file that is not in the current user’s
hierarchy:
This error will
appear when a user attempts to import a file with a different location name not
in the current user’s location hierarchy. The following locations need to match
the location hierarchy in FINS:
·
Spawn location
·
Origin location
·
Destination location
If one or more
locations in your Excel file do not match the location hierarchy in FINS, the
error below will display

Uploading a file that has one or more empty fields on
one or more columns:
This error will
provide the user with the Row(s) that have missing or invalid data that needs
to be addressed (Reference below)
Note * The Spawning Import Tool ignores any empty rows in the Excel
file and proceeds to the next row with data.
For example, for the error below, the Spawning Import Tool
indicates that the error took place in ‘Column 26’, ‘Row 2’ even though it was
‘Column 26’, ‘Row 4’ that caused the error.
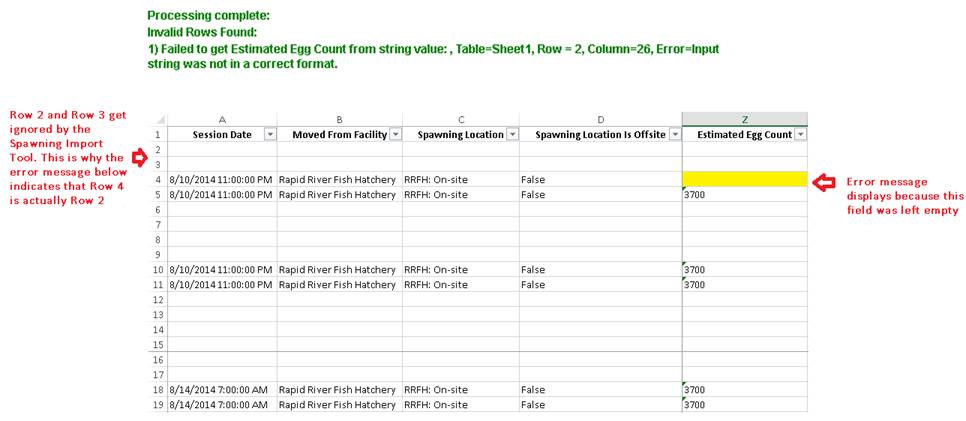
Uploading a non
.xlsx file:
When importing
a non .xlsx file, FINSNet.org will notify you that the file being imported is a
non .xlsx file (See below)
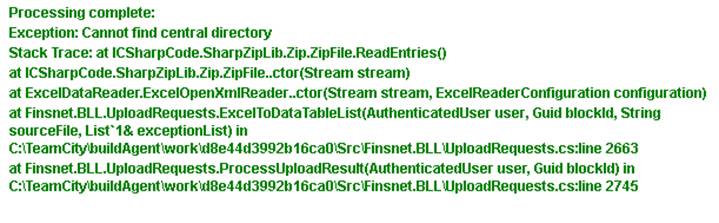
To correct this
error, you will need to convert the file’s current format to an .xlsx file
format
Use Case:
The Incubation
Import Tool allows users the ability to import their Incubation data from an
Excel file into the FINS database.
White
Sturgeon Use Case:
Query Tool > Import > Incubation > Sturgeon Data
FINSNet.org/FINS Online – White
Sturgeon Import & Data Entry Enhancements
FINSNet.org Data tab Query Tool
Incubation Importer accepts Sturgeon data into a FINS Facility Hierarchy that
originated from a Non-FINS Facility for Incubation purposes *per the Sturgeon Incubation Import Validation Template
*Specific
Use Case is for Idaho Power Co Niagara Springs Fish Hatchery White Sturgeon
Special permissions and Admin
Locations required for White Sturgeon data imports need to be coordinated with
FINS Support
FINS Incubation Import
Columns *Last updated 2.9.2022
|
FINS Incubation
Import Columns
Required Columns for Import are in RED
TEXT
*Conditional Required Columns Underlined in Red Text
Additional Columns allowed are in BLACK TEXT
|
|
COLUMN NAME
|
NOTE
|
|
Brood Year
|
|
|
Moved From Facility
|
|
|
Spawning Session Date
|
*Time is not Required but will be automatically set to
8am if not specified
|
|
Spawn Facility
|
|
|
Spawning Location
|
|
|
Species
|
|
|
Run
|
*Only Required if Species is Chinook (Fall, Spring,
Summer)
|
|
Stock
|
|
|
Program-Incubation
|
|
|
Spawn Session Progeny
|
|
|
Spawning Session Lot
Number
|
|
|
Estimated Egg Count
|
|
|
Living Status
|
|
|
Group ID
|
|
|
Cross ID
|
|
|
Female ID
|
|
|
Samples
|
|
|
Stage
|
|
|
Enumerated
|
|
|
Enumeration Date
|
|
|
Enumeration Method
|
|
|
Inventory Count
|
|
|
Loss
|
|
|
Actual Green Take
|
|
|
Live Count
|
|
|
Cull Count
|
|
|
Moved To Facility
|
|
|
Moved To Hierarchy
|
|
|
Moved To Location
|
|
|
Moved To Path
|
|
|
Disposition
|
|
|
Purpose
|
|
|
Egg Weight(g)
|
|
|
Total Temperature Units
|
|
|
Transfer Container
|
|
|
Notes
|
|
|
Custom Columns/Data
|
Optional Custom User Defined Columns & Values
|
Column Validation Definitions
|
*Required
Columns in Red Text
**Conditional Required Columns Underlined in Red Text
|
|
Column Name
|
Column
Definition/Description
|
Validation
|
Example Data
|
|
Brood Year
|
Brood Year assigned to the
Spawning Session
|
Required; Either a year in the form of "2020"
or a pair of consecutive years in the form of "2020-2021"
|
2020
|
|
Moved From Facility
|
Name of Facility the Egg Take was Moved From
|
Required; FINS Database Location; Type: Facility;
*Facility that Parents the Move From is the Facility in which the Import User
must belong to
|
Lookingglass Fish Hatchery
|
|
Spawning Session Date
|
Date and Time the Spawn Session of Egg Take occurred
|
Required; m/d/yyyy h:mm xm (am or pm); Time is Optional;
Accepted Time Formats (h:mm am or pm); If no Time input and this Date Column
is formatted as 'Date or Text’ with input format of m-d-yyyy or m/d/yyyy the
time will default to 8AM on Import; If no Time input and this Date Column is
formatted as 'Date' with input format of m/d/yyyy the time will default to
8AM on Import. If Time of 12:00AM is desired, Time must be formatted as
12:00:01 in order for the time imported to be stored/displayed as 12:00AM
|
8/23/2017 8:00 AM
|
|
Spawn Facility
|
Name of the Facility where the Spawn Session occurred
|
Required; FINS Database Location; Type: Facility
|
Lookingglass Fish Hatchery
|
|
Spawning Location
|
Name of Location within a Facility where Spawn Session
occurred
|
Required; FINS Database Location; Type: Spawning Location
|
Lookingglass Fish Hatchery
|
|
Species
|
Species of Egg Take
|
Required; FINS Database Species; Abbreviations Not
Accepted (Additional Species that are available in FINS Database but not
displayed in Example Data List below are: Brook Trout, Brown Trout, White
Fish)
|
Chinook
|
|
Run
|
Run of Spawn Record
|
Required Column; Can be left blank if Species does not =
Chinook and/or Steelhead; Expected Value must be FINS Database Run Name; by
Species
|
Spring
|
|
Stock
|
Agency Stock Name of the Cross for this Egg Take
|
Required; FINS Database Stock Name; by Agency
|
LGH 81
|
|
Program-Incubation
|
Intended Program Name of Progeny assigned to Egg Take; INTEGRATED:
Integrated: A progeny group that usually consists of eggs resulting from
a Hatchery by Natural spawn cross; SEGREGATED: A progeny group that
usually consists of eggs resulting from a Hatchery by Hatchery spawn cross
|
Conditionally required. If left
empty, this column will receive the value in Spawn Session Progeny Column;
FINS Database Program; Integrated or Segregated.
|
Integrated
|
|
Spawn Session Progeny
|
Progeny of a Cross at Spawning; INTEGRATED: A
progeny group that usually consists of eggs resulting from a Hatchery by
Natural spawn cross; SEGREGATED: A progeny group that usually consists
of eggs resulting from a Hatchery by Hatchery spawn cross
|
Conditionally required. If left
empty, this column will receive the value in Program-Incubation Column; FINS
Database Program; Integrated or Segregated.
|
Segregated
|
|
Spawning Session Lot
Number
|
Lot # of the Spawning Session from which this Egg Take
originated; Unique value, by Date, used to identify each Session; Also
referred to as 'Take'
|
Required; User Defined Value
|
292
|
|
Estimated Egg Count
|
Expected Egg Count from Cross for this Egg Take; This is
the Estimate from the Female at Spawning; This is the 1st count assigned to
an Egg Take in FINS
|
Required; User Defined Value, Number
|
3790
|
|
Living Status
|
Living State of Egg Take
|
Required; FINS Database Incubation Living State; Viable,
Culled, Loss
|
Viable
|
|
Group ID
|
Unique ID for a combined group of Egg Takes within a
Session that may be in the same Container/Location at or after Eyed
Enumeration
|
Required for each Cross; User Defined Field; If multiple
Crosses are Group Enumerated then the Group ID must be the same for each
Cross of the Group
|
GROUP1
|
|
Cross ID
|
Unique ID that is required to designate each Cross within
a Spawn Session; Used during Import but auto re-assigned on successful import
with FINS Database Generated CrossID formatted as (Female ID # and Name of
Immediate Container Eggs were placed in)
|
Required; User Defined Value only used on Import to
identify Crosses with each Session; Cross ID is
Auto Re-Assigned with Database Generated FINS Cross ID upon successful
Import; If the Moved To Container is an incubation container
(i.e., tray), the FINS Auto Generated Cross ID format is (Female ID # _ Path
of Moved To Container). Otherwise, the user supplied Cross ID is interpreted
as an immediate container name and the FINS Cross ID is (Female ID # _ user
supplied Cross ID)
|
8_Tray296
|
|
Female ID
|
ID assigned at Spawning to the Female from which the Egg
Group came from
|
Required for each Female/Egg Take; User Defined Value
|
8
|
|
Samples
|
Sample Type and Sample Value(s)
assigned to the Female from which the Egg Take in this record came from
|
Optional; FINS Database Sample
Type and User Defined Value if applicable; Abbreviations Required for
acceptance (Sample Name and accepted Abbreviations accepted are: Fin Rays=FR,
Genetics=GEN; Others=OTHER, Otoliths=OTL, Pathology=PATH, Pathology-Core
Sample=PATH-CS, Pathology-Head Wedge=PATH-HW, Pathology-Kidney=PATH-K, Pathology-Kidney/Spleen=PATH-KS,
Pathology-Ovarian=PATH-OV, Snout=SNOUT, Scale=SCALE
|
GEN 1234, PATH-OV 1234
|
|
Stage
|
Stage of Egg Take
|
Required; FINS Database Stage: Green Eggs, Eyed Eggs, Fry
|
Fry
|
|
Enumerated
|
Used to determine if Egg Take has been Enumerated
|
Required if Egg Take has been
Enumerated; Accepted input of Y or N; Not Case Sensitive
|
Y
|
|
Enumeration Date
|
Date and Time Egg Take was
Enumerated
|
Required for each Enumerated Egg Take; m/d/yyyy; If No
Time Provided then Time is Auto Assigned; Column in File must be formatted as
'Text’ and not as ‘Date’; Date separated with / or -, any other character not
permitted for successful import
|
1/1/2018
|
|
Enumeration Method
|
Method used to Enumerate Egg
Take
|
Required for each Enumerated Egg Take; FINS Database
Enumeration Method; Machine, Manual, Water Displacement
|
Machine
|
|
Inventory Count
|
Viable Eggs at Eyed Enumeration
of Egg Take; Also referred to as 'Good #' of Eggs at Eyed Enumeration; This
is the 2nd count assigned to an Egg Take in FINS; The 1st count assigned to
an Egg Take is the Estimated Egg Count
|
Required if Enumerated; User
Defined Value; Number
|
3937
|
|
Loss
|
Number of Dead Eggs at Eyed
Enumeration of Egg Take; Also referred to as 'Bad Eggs' and/or 'First Pick'
|
Required if Enumerated; User
Defined Value; Number
|
10
|
|
Actual Green Take
|
Total # of Eggs at Eyed
Enumeration (Inventory Count + Loss) of Egg Take; Also referred to as 'Actual
Fecundity per Female'
|
Required if Enumerated; User
Defined Value; Number
|
3947
|
|
Live Count
|
Number of Viable Eggs in this Egg Take (at the time the
eggs in this record were placed into the designated Move To
Location/Container)
|
Required if Enumerated; User
Defined Value; Number
|
3937
|
|
Cull Count
|
Total Count of Eggs Culled from
this Egg Take (at the time the eggs in this record were placed into the
designated Move To Location)
|
Required if Living Status = Culled; User Defined Value;
Number
|
3947
|
|
Moved To Facility
|
Name of the Facility the Moved To Location belongs
|
Required; FINS Database Location; Type: Facility; If in a
different Domain than the Move From Facility the Location must be prefaced
with the name of the Move From Facility 'Domain Name:'; For example 'Snake
Basin:')
|
Lookingglass Fish Hatchery
|
|
Moved To Hierarchy
|
Name of the Incubation Hierarchy the Egg Take is in
|
Required if Move To = Incubation Container; FINS Database
Location; Type: Incubation Hierarchy
|
LGH 81 BY 2017 ChS
|
|
Moved To Location
|
Location of Egg Take
|
Conditional Requirement: Required if Move To Path not
present; FINS Database Location; Type: Incubation Hierarchy, Disposal,
Shipping, Transfer; 'Moved To Location’ is for the purpose of Locations other
than Incubation Containers; If both 'Moved To Location' and 'Moved To Path’
are supplied they must be the same.
*If Move To belongs to a different Facility than the Move From Facility, the
Move From Facility must be an Offsite Owner of the Move To Location;**Final
Disposition Locations are not allowed to be Offsite; If in a different Domain
than the Move From Facility the Location must be prefaced with the name of
the Move From Facility 'Domain Name:'; For example 'Snake Basin:')
|
Tray 296
|
|
Moved To Path
|
Path of the Incubation Hierarchy/Incubation Containers
that the Egg Take is in
|
Required if Move To = Incubation Location Type; FINS
Database Location; Type: Incubation Hierarchy/Container; Accepted Format =
Hierarchy
Name\IncubationContainerHeight2\IncubationContainerHeight1\IncubationContainerHeight0;
Path Containers need to be separated by \ or /, any other character not
permitted for import
|
LGH 81 BY 2017 ChS\Row1\Stack2\Tray296
|
|
Disposition
|
Disposition of Egg Take
|
Required; FINS Database Incubation Disposition;
Incubating, Disposed, Shipped, Transferred
|
Incubating
|
|
Purpose
|
Purpose of Egg Take
|
Required; FINS Database Incubation Purpose; (Tied to and
Limited by Disposition); DISPOSED: Accidental, Disease, Education/Research,
Genetic, Inventory Reduction, Other, Picking, Poor Quality; INCUBATING:
Equipment Failure, Incubation, Lot Consolidation, Lot Expansion, Other,
Speed/Slow Development; TRANSFERRED: Hatchery Production, Other; SHIPPED:
Captive Brood, Education/Research, Hatchery/Production, Instream/Streamside
Incubation, Sold, Other
|
Incubation
|
|
Egg Weight(g)
|
Egg Weight per Cross in grams of Egg Take
|
Optional; Unit of Measurement in grams; User Defined
Value; Number
|
118.09
|
|
Total Temperature Units
|
F or C; Applied Units above 32
degrees
|
Optional; F or C; User Defined; Number
|
550 F
|
|
Transfer Container
|
Name of the Container Egg Take
was Transferred in
|
Required if Disposition = Transferred; User Defined Value
|
Cooler 1A Tube 101
|
|
Notes
|
Optional field used to capture
notes applicable to Egg Take
|
Optional; User Defined Value
|
Note for Egg Take of Cross
|
|
Custom Columns/ Data
|
Optional - Additional
columns allowed to capture additional data that a user finds applicable to
the Incubation Import
|
Optional; User Defined
Column(s) & Value(s)
|
Male GEN Sample ID 5
|
*Sturgeon Incubation Import Validation Template *Last updated 2.9.2022
|
*ALL
REQUIRED COLUMNS
(Blue Labeled Columns
will have static unique data inputs per Import; Black Labeled Columns will have static
data inputs for all Imports)
|
Column
Definition/Description
|
Validation
|
Example Data
in BLUE and Static
Data used for all Niagara FH White Sturgeon Imports in BLACK
|
|
Brood Year
|
Brood Year;
Assigned to the Spawning Session and Egg Takes through Rearing to Release
|
Either a year in the form
of "2020" or a pair of consecutive years in the form of
"2020-2021"
|
2021
|
|
Moved From
Facility-Incubation
|
Name of VIRTUAL Facility
the Egg Take was Moved From (to represent the Incubation 'Facility')
|
Required; FINS Database
Location; Type: VIRTUAL Facility; *VIRTUAL Facility that Parents the Moved
From is the Facility in which the Import User must
belong to
|
IPC White
Sturgeon
|
|
Spawn Session
Date/Time
|
Date and Time to assign to
the Auto Generated Spawn Session of Egg Take created on Import
|
Required; m/d/yyyy h:mm xm
(am or pm); Time is Optional; Accepted Time Formats (h:mm am or pm); If no
Time input and this Date Column is formatted as 'Date or Text’ with
input format of m-d-yyy or m/d/yyyy the time will default to 8AM on Import;
If no Time input and this Date Column is formatted as 'Date' with input
format of m/d/yyyy the time will default to 8AM on Import. If Time of 12:00AM
is desired, Time must be formatted as 12:00:01 in order for the time imported
to be stored/displayed as 12:00AM;
|
5/25/2021
|
|
Spawn Facility
|
Name of the VIRTUAL
Facility where the Spawn Session occurred
|
Required; FINS Database
Location; Type: VIRTUAL Facility
|
IPC White
Sturgeon
|
|
Spawning Location
|
Name of Location within
VIRTUAL Facility to designate where the Spawn Session occurred
|
Required; FINS Database
Location; Type: Spawning Location
|
Bliss to CJ
Strike
|
|
Species
|
Species of Egg Take
|
Required; FINS Database
Species; 'White Sturgeon'; Abbreviations Not Accepted
|
White
Sturgeon
|
|
Run
|
Run of Spawned
Species Record
|
Column must be
present for successful Import; Required Column; *Must be left blank if
Species does not = Chinook and/or Steelhead; Expected Value must be FINS
Database Run Name; by Species
|
|
|
Stock
|
Agency Stock Name of the
Cross for this Egg Take
|
Required; FINS Database
Stock Name; by Agency
|
IPC Sturgeon
|
|
Spawn Session Progeny
|
FINS Database Program value
for White Sturgeon = Sturgeon
|
Required
Column; *Must be 'Sturgeon' for White Sturgeon Species Imports
|
Sturgeon
|
|
Spawning
Session Lot #
|
Lot # of the Spawning
Session from which this Egg Take originated; Unique value, by Date, used to
identify each Session; Also referred to as 'Take'
|
Required; User Defined
Value
|
10
|
|
Estimated Egg
Count
|
Expected Egg Count from
Cross for this Egg Take; This is the Estimate from the Female at Spawning;
This is the 1st count assigned to an Egg Take in FINS
|
Required; User Defined
Value, Number
|
1391
|
|
Group ID
|
Unique ID for a combined
group of Egg Takes that are Enumerated together that may have been in the
same Incubation Container/Location at or after Eyed Enumeration
|
Required for each
Enumerated Cross; User Defined Value only used on Import to identify Group
Enumerated Crosses from each Session; If multiple Crosses are Group
Enumerated then the Group ID must be the same for each Cross of the Group in
File; Group ID is Auto Re-Assigned with
Database Generated FINS Group ID upon successful Import for each Group
Enumerated Cross and treated as a 'row' for non-Group Enumerated Crosses and
then omitted on successful Import and instead only Cross ID is referenced
|
10 A7
|
|
Cross ID
|
Unique ID that is required
to designate each Cross within a Spawn Session; Used during Import but auto
re-assigned on successful import with FINS Database Generated CrossID
formatted as (Female ID # and Name of Immediate Container Eggs were placed
in)
|
Required; User Defined
Value only used on Import to identify Crosses with each Session; Cross ID is Auto Re-Assigned with Database Generated FINS
Cross ID upon successful Import; The FINS Auto Generated Cross
ID format is (Female ID # _ Path of Moved To Container). Otherwise, the user
supplied Cross ID is interpreted as an immediate container name and the FINS
Cross ID is (Female ID # _ user supplied Cross ID)
|
10
|
|
Female ID
|
ID assigned at Spawning to
the Female from which the Egg Group came from
|
Required for each
Female/Egg Take; User Defined Value
|
10
|
|
Moved To
Facility-Incubation
|
Name of the Facility the
Moved To Location belongs
|
Required; FINS Database
Location; Type: Facility; If in a different Domain than the Moved From
Facility the Location must be prefaced with the name of the Moved From
Facility 'Domain Name:'; For example 'Snake Basin:')
|
Niagara
Springs Hatchery
|
|
Moved To
Location-Incubation
|
Location Egg
Take was Incubated in
|
Column must be
present for successful Import; Required Column; *Can be left BLANK
|
|
|
Living Status-Incubation
|
Living State of
Egg Take
|
Required; FINS Database
Incubation Living State; Viable, Culled, Loss
|
Viable
|
|
Disposition-Incubation
|
Disposition of
Egg Take
|
Required; FINS Database
Incubation Disposition; Incubating, Disposed,
Shipped, Transferred
|
Incubating
|
|
Purpose-Incubation
|
Purpose of Egg
Take
|
Required; FINS Database
Incubation Purpose; (Tied to and Limited by Disposition); DISPOSED:
Accidental, Disease, Education/Research, Genetic, Inventory Reduction, Other,
Picking, Poor Quality; INCUBATING: Equipment Failure, Incubation, Lot
Consolidation, Lot Expansion, Other, Speed/Slow Development; TRANSFERRED:
Hatchery Production, Other; SHIPPED: Captive Brood, Education/Research,
Hatchery/Production, Instream/Streamside Incubation, Sold, Other
|
Incubation
|
|
Stage-Incubation
|
Stage of
Enumerated Egg Take during Incubation
|
Required; FINS Database
Enumerated Egg Stage: Eyed Eggs, Fry
|
Fry
|
|
Program-Incubation
|
FINS Database Program value
for White Sturgeon = Sturgeon
|
Required
Column; *Must be 'Sturgeon' for White Sturgeon Species Imports
|
Sturgeon
|
|
Enumerated
|
Used to determine if Egg
Take has been Enumerated
|
Required;
Accepted input of Y for Rearing Import Data; Not Case Sensitive
|
y
|
|
Enumeration
Date/Time-Incubation
|
Date and Time
Egg Take was Enumerated
|
Required for each Egg Take;
m/d/yyyy; *If No Time Provided then Time is Auto Assigned; Date
separated with / or -, any other character not permitted for successful
import
|
5/25/2021
|
|
Enumeration
Method-Incubation
|
Method used to
Enumerate Egg Take @ Eye
|
Required for each Egg Take
- as all Rearing Import data includes only Enumerated Egg Takes; FINS
Database Enumeration Method; Machine, Manual, Water Displacement
|
Manual
|
|
Inventory
Count-Incubation
|
Viable Eggs at
Eyed Enumeration of Egg Take; Also referred to as 'Good #' of Eggs at Eyed
Enumeration; This is the 2nd count assigned to an Egg Take in FINS; The 1st
count assigned to an Egg Take is the Estimated Egg Count at Spawning
|
Required; User
Defined Value; Enumerated Number
|
1391
|
|
Loss-Incubation
|
Number of Dead
Eggs at Eyed Enumeration of Egg Take; Also referred to as 'Bad Eggs' and/or
'First Pick'
|
Column must be
present for successful Import; Required Column; *Can be left BLANK
|
|
|
Actual Green
Take
|
Total # of Eggs
at Eyed Enumeration (Inventory Count + Loss) of Egg Take; Also referred to as
'Actual Fecundity per Female'
|
Required; User
Defined Value; Number
|
1391
|
|
Live
Count-Incubation
|
Number of Viable Eggs in
this Egg Take (at the time the Eggs in this record were placed into the
designated Moved To Location/Incubation Container)
|
Required; User
Defined Value; Enumerated Number; Can't
be larger that Inventory Count-Incubation Column Value
|
1391
|
|
Notes-Incubation
|
|
|
No Loss
because only Viable Live Egg counts are captured at Incubation;
Spawning/Incubation Enumeration Dates represent Collection Date
|
|
Date/Time-Rearing
|
Date/Time that Juveniles
were sent to Rearing from Incubation
|
Required for each Rearing
Group; M/D/YYYY; *If No Time Provided then Time is Auto Assigned; Date
separated with / or -, any other character not permitted for successful
import
|
5/25/2021
|
|
Enumeration
Count-Rearing
|
Number of
Juveniles Enumerated at Rearing
|
Required for each
Enumerated Rearing Container
|
464
|
|
Enumeration
Method-Rearing
|
Method used to
Enumerate Juveniles
|
Required for each
Enumerated Rearing Container; FINS Database Enumeration Method; Machine,
Manual, Water Displacement
|
Manual
|
|
Moved To
Facility-Rearing
|
Move to
Facility in Rearing
|
Required; FINS Database
Rearing Location
|
Niagara
Springs Hatchery
|
|
Moved To
Array
|
Name of the Rearing Array
the Juveniles are in
|
Required if Juveniles were
moved to a Rearing Container
|
NSWSH BY2021
|
|
Moved To
Array Path
|
Path of the Rearing Array\
Container that the Juveniles are in
|
Required if Move To =
Rearing Location Type; FINS Database Location; Type: Rearing Array/Container;
Accepted Format = Array Name\Rearing Container; Path Containers need to be
separated by \ , any other character not permitted for import
|
A7
|
|
Moved To
Location-Rearing
|
Location of
Juveniles
|
Column must be
present for successful Import; Required Column; *Can be left BLANK
|
|
|
Living Status-Rearing
|
Living State of
Juveniles
|
Required: FINS Database
Rearing Living Status; Alive
|
Alive
|
|
Disposition-Rearing
|
Disposition of
Juveniles
|
Required; FINS Database
Rearing Disposition; Rearing
|
Rearing
|
|
Purpose-Rearing
|
Purpose of
Juveniles
|
Required; FINS Database
Rearing Purpose; (Tied to and Limited by Disposition); REARING: Acclimation, Production,
Other
|
Production
|
|
Program-Rearing
|
FINS Database Program value
for White Sturgeon = Sturgeon
|
Required
Column; *Must be 'Sturgeon' for White Sturgeon Species Imports
|
Sturgeon
|
|
Notes-Rearing
|
|
|
Spawning/Incubation
Enumeration Dates represent Collection Date
|
|
Custom
Columns/Data
|
Optional -
Additional columns allowed to capture additional data that a user finds
applicable to the Rearing Import
|
Optional; User
Defined Column(s) & Value(s)
|
Eggs Sampled
by Username x…
|
Use Case:
The Rearing
Import Tool allows users the ability to import their Rearing data from an Excel
file into the FINS database. All relevant Rearing data is imported into FINS.
FINS Rearing Import Columns *Last updated 2.9.2022
|
FINS Rearing Import
Columns
Required Columns for Import are in RED
TEXT
Additional Columns allowed are in BLACK TEXT
|
|
COLUMN NAME
|
NOTE
|
|
|
Spawn Facility
|
|
|
|
Spawning Location
|
Can’t have the same name as the other Location Names in
the Location Columns of this File (for example: Moved To Hierarchy and/or
Moved To Array)
|
|
|
Brood Year
|
|
|
|
Spawn Session Date/Time
|
*Time is not Required but will be automatically set to
8am if not specified
|
|
|
Spawning Session Lot #
|
|
|
|
Species
|
|
|
|
Run
|
*Only Required if Species is Chinook (Fall, Spring,
Summer) and/or Steelhead (Summer/Winter)
|
|
|
Stock
|
|
|
|
Spawn Session Progeny
|
|
|
|
Program-Incubation
|
|
|
|
Program-Rearing
|
|
|
|
Group ID
|
|
|
|
Cross ID
|
|
|
|
Female ID
|
|
|
|
Female Samples
|
|
|
|
Estimated Egg Count
|
|
|
|
Egg Weight(g)
|
|
|
|
Stage-Incubation
|
|
|
|
Enumerated
|
|
|
|
Enumeration Date/Time-Incubation
|
*Time is not Required but will be automatically set to
8am if not specified
|
|
|
Enumeration Method-Incubation
|
|
|
|
Inventory Count-Incubation
|
|
|
|
Loss-Incubation
|
|
|
|
Actual Green Take
|
|
|
|
Live Count-Incubation
|
|
|
|
Moved From Facility-Incubation
|
|
|
|
Moved To Facility-Incubation
|
|
|
|
Moved To Hierarchy
|
Can’t have the same name as the other Location Names in
the Location Columns of this File (for example: Spawning Location and/or
Moved To Array)
|
|
|
Moved To Hierarchy Path
|
|
|
|
Moved To Location-Incubation
|
|
|
|
Living Status-Incubation
|
|
|
|
Disposition-Incubation
|
|
|
|
Purpose-Incubation
|
|
|
|
Total
Temperature Units
|
|
|
|
Date/Time-Rearing
|
*Time is not Required but will be automatically set to
8am if not specified
|
|
|
Moved To Facility-Rearing
|
|
|
|
Enumeration Count-Rearing
|
|
|
|
Enumeration Method-Rearing
|
|
|
|
Identifiers-Rearing
|
|
|
|
Moved To Array
|
Can’t have the same name as the other Location Names in
the Location Columns of this File (for example: Spawning Location and/or Moved
To Hierarchy)
|
|
|
Moved To Array Path
|
|
|
|
Moved To Location-Rearing
|
|
|
|
Living Status-Rearing
|
|
|
|
Disposition-Rearing
|
|
|
|
Purpose-Rearing
|
|
|
|
Custom
Columns/Data
|
Optional Custom User Defined Columns & Values allowed
|
|
Column Validation Definitions
|
*Required
Columns in Red Text
|
|
Column Name
|
Column
Definition/Description
|
Validation
|
Example Data
|
|
Spawn Facility
|
Name
of the Facility where the Spawn Session occurred
|
Required;
FINS Database Location; Type: Facility
|
Lyons Ferry Fish Hatchery
|
|
Spawning Location
|
Name
of Location within a Facility where Spawn Session occurred
|
Required;
FINS Database Location; Type: Spawning Location
*Can’t be the same name as the other Location Names in
file (for example: Spawn Location and/or Moved To Array)
|
Spawn Shelter
|
|
Brood Year
|
Brood Year assigned to the Spawning Session
|
Either
a year in the form of "2020" or a pair of consecutive years in the
form of "2020-2021"
|
2020
|
|
Spawn Session Date/Time
|
Date
and Time the Spawn Session of Egg Take occurred
|
Required;
m/d/yyyy h:mm xm (am or pm); Time is Optional; Accepted Time Formats (h:mm
am or pm); If no Time input and this Date Column is formatted as 'Date or
Text’ with input format of m-d-yyyy or m/d/yyyy the time will default to
8AM on Import; If no Time input and this Date Column is formatted as 'Date'
with input format of m/d/yyyy the time will default to 8AM on Import. If Time
of 12:00AM is desired, Time must be formatted as 12:00:01 in order for the
time imported to be stored/displayed as 12:00AM
|
8/23/2017 8:00 AM
|
|
Spawning Session Lot #
|
Lot #
of the Spawning Session from which this Egg Take originated; Unique value, by
Date, used to identify each Session; Also referred to as 'Take'
|
Required;
User Defined Value
|
22
|
|
Species
|
Species
of Egg Take
|
Required;
FINS Database Species; Abbreviations Not Accepted (Additional Species that
are available in FINS Database but not displayed in Example Data List below
are: Brook Trout, Brown Trout, White Fish)
|
Chinook
|
|
Run
|
Run
of Spawn Record
|
Required Column; Can be left blank if Species does not =
Chinook and/or Steelhead; Expected Value must be FINS Database Run Name; by
Species
|
Spring
|
|
Stock
|
Agency
Stock Name of the Cross for this Egg Take
|
Required;
FINS Database Stock Name; by Agency
|
LGH 81
|
|
Spawn Session Progeny
|
Program
defined by a specific management purpose and not necessarily by the origin
(hatchery or natural) of the fish used for individual spawn crosses for the
program. Intended Program Name of Progeny per Cross at Spawning that follows
through to Incubation, Rearing and/or Release; INTEGRATED: A hatchery
production program with an explicit purpose to incorporate natural adults
into the hatchery broodstock on a regular basis. Spawn cross combinations
can include any of the following: Hatchery x Hatchery, Hatchery x Natural or
Natural x Natural. SEGREGATED: A hatchery production program with a
management intent to rely on hatchery-origin adults for the broodstock.
Generally speaking, spawn crosses are limited to Hatchery x Hatchery but
could include occasional use of natural-origin adults.
|
Required
|
Segregated
|
|
Program-Incubation
|
Program
defined by a specific management purpose and not necessarily by the origin
(hatchery or natural) of the fish used for individual spawn crosses for the
program. Intended Program Name of Progeny assigned to Egg Take at Incubation
that follows through within Incubation, Rearing and/or Release; INTEGRATED:
A hatchery production program with an explicit purpose to incorporate natural
adults into the hatchery broodstock on a regular basis. Spawn cross
combinations can include any of the following: Hatchery x Hatchery, Hatchery
x Natural or Natural x Natural. SEGREGATED: A hatchery production
program with a management intent to rely on hatchery-origin adults for the
broodstock. Generally speaking, spawn crosses are limited to Hatchery x
Hatchery but could include occasional use of natural-origin adults.
|
Required Column
|
Integrated
|
|
Program-Rearing
|
Program
defined by a specific management purpose and not necessarily by the origin
(hatchery or natural) of the fish used for individual spawn crosses for the
program. Intended Program Name of Progeny assigned to Juveniles at Rearing
that follows through within Rearing and to Release; INTEGRATED: A
hatchery production program with an explicit purpose to incorporate natural
adults into the hatchery broodstock on a regular basis. Spawn cross
combinations can include any of the following: Hatchery x Hatchery, Hatchery
x Natural or Natural x Natural. SEGREGATED: A hatchery production
program with a management intent to rely on hatchery-origin adults for the
broodstock. Generally speaking, spawn crosses are limited to Hatchery x
Hatchery but could include occasional use of natural-origin adults.
|
Required Column
|
Segregated
|
|
Group ID
|
Unique
ID for a combined group of Egg Takes that are Enumerated together that may
have been in the same Incubation Container/Location at or after Eyed
Enumeration
|
Required
for each Enumerated Cross; User Defined Value only used on Import to identify
Group Enumerated Crosses from each Session; If multiple Crosses are Group
Enumerated then the Group ID must be the same for each Cross of the Group in
File; Group ID is Auto Re-Assigned with
Database Generated FINS Group ID upon successful Import for each Group
Enumerated Cross and treated as a 'row' for non-Group Enumerated Crosses and
then omitted on successful Import and instead only Cross ID is referenced
|
1
|
|
Cross ID
|
Unique
ID that is required to designate each Cross within a Spawn Session; Used
during Import but auto re-assigned on successful import with FINS Database
Generated CrossID formatted as (Female ID # and Name of Immediate Container
Eggs were placed in)
|
Required;
User Defined Value only used on Import to identify Crosses with each Session; Cross ID is Auto Re-Assigned with Database Generated FINS
Cross ID upon successful Import; The FINS Auto Generated Cross
ID format is (Female ID # _ Path of Moved To Container). Otherwise, the user
supplied Cross ID is interpreted as an immediate container name and the FINS
Cross ID is (Female ID # _ user supplied Cross ID)
|
Tray296
|
|
Female ID
|
ID
assigned at Spawning to the Female from which the Egg Group came from
|
Required
for each Female/Egg Take; User Defined Value
|
1008
|
|
Female Samples
|
Sample Type and Sample Value(s) assigned to the Female
from which the Egg Take in this record came from
|
Optional; FINS Database Sample Type and User Defined
Value if applicable; Abbreviations Required for acceptance (Sample
Name and accepted Abbreviations accepted are: Fin Rays=FR, Genetics=GEN;
Others=OTHER, Otoliths=OTL, Pathology=PATH, Pathology-Core Sample=PATH-CS,
Pathology-Head Wedge=PATH-HW, Pathology-Kidney=PATH-K, Pathology-Kidney/Spleen=PATH-KS,
Pathology-Ovarian=PATH-OV, Snout=SNOUT, Scale=SCALE
|
GEN 1234, PATH-OV 1234
|
|
Estimated Egg Count
|
Expected
Egg Count from Cross for this Egg Take; This is the Estimate from the Female
at Spawning; This is the 1st count assigned to an Egg Take in FINS
|
Required;
User Defined Value, Number
|
3790
|
|
Egg Weight(g)
|
Egg
Weight per Cross in grams of Egg Take
|
Optional;
Unit of Measurement in grams; User Defined Value; Number
|
118
|
|
Stage-Incubation
|
Stage of Enumerated Egg Take during Incubation
|
Required;
FINS Database Enumerated Egg Stage: Eyed Eggs, Fry
|
Eyed Eggs
|
|
Enumerated
|
Used
to determine if Egg Take has been Enumerated
|
Required; Accepted input of Y for Rearing Import Data;
Not Case Sensitive
|
Y
|
|
Enumeration
Date/Time-Incubation
|
Date and Time Egg Take was Enumerated
|
Required
for each Egg Take; m/d/yyyy; *If No Time Provided then Time is Auto
Assigned; Date separated with / or -, any other character not
permitted for successful import
|
1/1/2018
|
|
Enumeration
Method-Incubation
|
Method used to Enumerate Egg Take @ Eye
|
Required
for each Egg Take - as all Rearing Import data includes only Enumerated Egg
Takes; FINS Database Enumeration Method; Machine, Manual, Water Displacement
|
Machine
|
|
Inventory Count-Incubation
|
Viable Eggs at Eyed Enumeration of Egg Take; Also
referred to as 'Good #' of Eggs at Eyed Enumeration; This is the 2nd count
assigned to an Egg Take in FINS; The 1st count assigned to an Egg Take is the
Estimated Egg Count at Spawning
|
Required; User Defined Value; Enumerated Number
|
3937
|
|
Loss-Incubation
|
Number of Dead Eggs at Eyed Enumeration of Egg Take; Also
referred to as 'Bad Eggs' and/or 'First Pick'
|
Required; User Defined Value; Number
|
10
|
|
Actual Green Take
|
Total # of Eggs at Eyed Enumeration (Inventory Count +
Loss) of Egg Take; Also referred to as 'Actual Fecundity per Female'
|
Required; User Defined Value; Number
|
3947
|
|
Live Count-Incubation
|
Number
of Viable Eggs in this Egg Take (at the time the Eggs in this record were
placed into the designated Moved To Location/Incubation Container)
|
Required; User Defined Value; Enumerated Number;
Can't be larger that Inventory Count-Incubation Column Value
|
3937
|
|
Moved From
Facility-Incubation
|
Name
of Facility the Egg Take was Moved From at Incubation
|
Required;
FINS Database Location; Type: Facility; *Facility that Parents the Moved From
is the Facility in which the Import User must belong to
|
Lyons Ferry Fish Hatchery
|
|
Moved To
Facility-Incubation
|
Name
of the Facility the Moved To Location belongs
|
Required;
FINS Database Location; Type: Facility; If in a different Domain than the
Moved From Facility the Location must be prefaced with the name of the Moved
From Facility 'Domain Name:'; For example 'Snake Basin:')
|
Lookingglass Fish Hatchery
|
|
Moved To Hierarchy
|
Name
of the Incubation Hierarchy the Egg Take was in
|
Required;
FINS Database Location; Type: Incubation Hierarchy
*Can’t
be the same name as the other Location Names in file (for example: Spawn
Location and/or Moved To Array)
|
BY 2017 Release Group
|
|
Moved To Hierarchy Path
|
Path
of the Incubation Hierarchy/Incubation Containers that the Egg Take was
Incubated in
|
Required;
FINS Database Location; Type: Incubation Hierarchy/Container; Accepted Format
= Hierarchy
Name\IncubationContainerHeight2\IncubationContainerHeight1\IncubationContainerHeight0;
Path Containers need to be separated by \ or /, any other character not
permitted for import
|
BY 2017 Release Group\Row1\Stack2\Tray296
|
|
Moved To
Location-Incubation
|
Location
Egg Take was Incubated in
|
*Conditional
Requirement: Only required if Egg Take moved from Incubation into non
Incubation Location Type (i.e....Transferred...etc.) and Moved To Path Column
data is not present; If both 'Moved To Location' and 'Moved To Path’ are
supplied they must be the same.
*Column is always required; *If Moved To belongs to a different Facility than
the Moved From Facility, the Moved From Facility must be an Offsite Owner of
the Moved To Location;**Final Disposition Locations are not allowed to be
Offsite; If in a different Domain than the Moved From Facility the Location
must be prefaced with the name of the Moved From Facility 'Domain Name:'; For
example 'Snake Basin:')
|
Tray 296
|
|
Living Status-Incubation
|
Living State of Egg Take
|
Required;
FINS Database Incubation Living State; Viable, Culled, Loss
|
Viable
|
|
Disposition-Incubation
|
Disposition of Egg Take
|
Required;
FINS Database Incubation Disposition; Incubating, Disposed,
Shipped, Transferred
|
Incubating
|
|
Purpose-Incubation
|
Purpose of Egg Take
|
Required;
FINS Database Incubation Purpose; (Tied to and Limited by Disposition);
DISPOSED: Accidental, Disease, Education/Research, Genetic, Inventory
Reduction, Other, Picking, Poor Quality; INCUBATING: Equipment Failure,
Incubation, Lot Consolidation, Lot Expansion, Other, Speed/Slow Development;
TRANSFERRED: Hatchery Production, Other; SHIPPED: Captive Brood,
Education/Research, Hatchery/Production, Instream/Streamside Incubation,
Sold, Other
|
Incubation
|
|
Total Temperature Units
|
F or C; Applied Units above 32 degrees (of Egg Take in
Incubation)
|
Optional;
F or C; User Defined; Number
|
550 F
|
|
Date/Time-Rearing
|
Date/Time
that Juveniles were sent to Rearing from Incubation
|
Required
for each Rearing Group; M/D/YYYY; *If No Time Provided then Time is Auto
Assigned; Date separated with / or -, any other character not permitted for
successful import
|
6/1/2020
|
|
Moved To Facility-Rearing
|
Move to Facility in Rearing
|
Required;
FINS Database Rearing Location
|
Lyons Ferry Fish Hatchery
|
|
Enumeration Count-Rearing
|
Number of Juveniles Enumerated at Rearing
|
Required
for each Enumerated Rearing Container; Count should be divided by each Female
per ‘Group’ – entry in each row of Female per Group
|
3600
|
|
Enumeration Method-Rearing
|
Method used to Enumerate Juveniles
|
Required
for each Enumerated Rearing Container; FINS Database Enumeration Method;
Machine, Manual, Water Displacement
|
Machine
|
|
Identifiers-Rearing
|
Identifiers Applied to Juveniles at Rearing
|
Optional;
Format: Mark/Tag(Quantity);Comma separate multiple Identifiers; Can be
applied once data has been imported; You cannot import an "applied
simultaneously" and comma separated IDs at the same time
|
AD/CWT(100)
|
|
Moved To Array
|
Name
of the Rearing Array the Juveniles are in
|
Required
if Juveniles were moved to a Rearing Container; Leave Blank if Juveniles are
moved to a Non-Rearing Container
*Can’t
be the same name as the other Location Names in file (for example: Spawn
Location and/or Moved To Array)
|
BY2020
|
|
Moved To Array Path
|
Path
of the Rearing Array\ Container that the Juveniles were moved to.
|
Required
if Move To = Rearing Location Type; FINS Database Location; Type: Rearing
Array/Container; Accepted Format = Array Name\Rearing Container; Path
Containers need to be separated by \ , any other character not permitted for
import; Leave Blank if Juveniles are moved to a Non-Rearing Container
|
BY2020 \Vat1
|
|
Moved To Location-Rearing
|
Location
of Juveniles
|
*Conditional
Requirement: Value is only required if Juveniles moved from Incubation into
non-Rearing Location Type (i.e. Transferred, Disposed.etc.) and Moved To Path
Column data is not present; If both 'Moved To Location' and 'Moved To Path’
are supplied they must be the same.
*Column is always required; *If Moved To belongs to a different Facility than
the Moved From Facility, the Moved From Facility must be an Offsite Owner of
the Moved To Location;**Final Disposition Locations are not allowed to be
Offsite; If in a different Domain than the Moved From Facility the Location
must be prefaced with the name of the Moved From Facility 'Domain Name:'; For
example 'Snake Basin:')
|
Vat1
|
|
Living Status-Rearing
|
Living State of Juveniles
|
Required:
FINS Database Rearing Living Status; Alive, Killed, Mort
|
Alive
|
|
Disposition-Rearing
|
Disposition of Juveniles
|
Required;
FINS Database Rearing Disposition; Disposed, Rearing, Transferred, Shipped
|
Rearing
|
|
Purpose-Rearing
|
Purpose of Juveniles
|
Required;
FINS Database Rearing Purpose; (Tied to and Limited by Disposition);
DISPOSED: Accidental, Education/Research, Biological Sampling/Pathology,
Other; REARING: Acclimation, Production, Other; TRANSFERRED: Continued
Rearing, Other; SHIPPED: Education/Research, Continued Rearing, Sold, Other
|
Production
|
|
Custom Columns/ Data
|
Optional - Additional columns allowed to capture
additional data that a user finds applicable to the Rearing Import
|
Optional; User Defined Column(s) & Value(s)
|
Male GEN Sample ID 5
|
Once you have been assigned
FINSNet.org/FINS Online user credentials, you can access your User Profile by
clicking on the ‘User’ button located at the top of the FINSNet.org Home page.
In your User Profile you can view your user setting. Your user name, account
name, email address, phone number, FINS Role, Domain, Agency and assigned Facility
are displayed for you.
·
Change Password: Click
on the ‘Change Password’ link located at the bottom of the User Profile page.
You will need to know your current password to change your password.
The 'my locations' link
located in the User tab sub-menu displays a hierarchical view of your assigned Facility's
Locations
The
'my offsites' link located in the User tab sub-menu for Users to view their Offsite
Relationships in the FINS Database as well as the Offsite Relationships that
exist for all Locations in their (Snake Basin) Domain, so that the coordination
and dependencies that exist between Offsite Parent and Owner Facilities are
more transparent to all users.
·
Offsite Parent – is the Facility the Location belongs
to/is physically located at, that creates/manages the Offsite Location
designation for the Offsite Owner to use
·
Offsite Owner – is the Facility the Location is used
by/accessible to as Offsite
This menu offers an additional view to the
existing places that Offsite Relationships currently display:
·
User notify in the FINSNet.org > Data Tab > Query Tool
·
Parents Admin Location Menu as a Data Official
‘My Offsites’ menu contains two tabs:
·
My Offsites – Displays ‘My Offsite Relationships’
which include the User’s Parented and Owned Offsite Locations (Inter and Intra
Domain Offsites)
·
Domain Offsites – Displays ‘Domain Name Offsite
Relationships’ which include all Offsite Locations in the Domain the User
belongs to (Inter and Intra Domain Offsites Display)
Each Grid Export Option will always include
all Columns regardless of Show/Hide status
·
Each Tab Grid includes the following columns w/Tooltips:
§
Parent Domain – of the Parent Facility the Offsite Location
physically belongs to/is located at (Default Hidden)
§
Parent Facility – Facility the Offsite Location belongs to/is
physically located at (Default Show)
§
Owner Domain – of the Owner Facility the Offsite Location is used
by/accessible to (Default Hidden)
§
Owner Facility – Facility the Offsite Location is used
by/accessible to (Default Show)
-
per Parent’s designation/managed in the Admin > Locations menu
of the Parent
§
Offsite Location Type – of the database Location for the Offsite
Location (Default Show)
-
Trap, Holding, Spawning, Inbox, Incubation Hierarchy, Rearing
Array
§
Offsite Location Name – of the database Location (Default Show)
-
per Parent’s input/managed in the Admin > Locations menu of
the Parent
§
Location Description – of the database Location (Default Hidden)
-
per Parent’s input/managed in the Admin > Locations menu of
the Parent
§
Offsite Latitude – input on the database Location (Default
Hidden)
-
Displays as 0 if not provided, like it does in the Admin >
Locations menu grid
-
per Parent’s input/managed in the Admin > Locations menu of
the Parent
§
Offsite Longitude – input on the database Location (Default
Hidden)
-
Displays as 0 if not provided, like it does in the Admin >
Locations menu grid
-
per Parent’s input/managed in the Admin > Locations menu of
the Parent
§
Offsite Description – of the Offsite Location per the Parent
(Default Hidden)
-
which is a required input by the Parent Facility when they
designate the Location as Offsite
-
per Parent’s input/managed in the Admin > Locations menu of
the Parent
§
Virtual – indication if the Offsite Location is a Virtual
Location in the Database (Default Hidden)
-
True if Checked/False Unchecked
-
Virtual Locations are managed by the FINS Team, Domain Admin
permission
§
Virtualized Date – If True, Date the Offsite Location was
Virtualized (Default Hidden)
-
Virtual Locations are managed by the FINS Team, Domain Admin
permission
§
Archived – indication if the Offsite Location has been Archived
in the Database (Default Hidden)
-
True if Checked/False Unchecked
-
Archived Locations are managed by Parents that have Data Official
permissions
§
Archived Date – If True, Date the Offsite Location was Archived
(Default Hidden)
-
Archived Locations are managed by Parents that have Data Official
permissions
The 'my seasons' link located in the
User tab sub-menu displays:
·
Universal Seasons
§
All existing ‘Seasons’ associated to your Agency/Facility labeled
as ‘Universal’
§
Any New ‘Seasons’ created by Facility Admins intentionally marked
as ‘Universal’ on creation
·
Private Seasons
§
This feature is available to all users (including Data Query
‘only’ Users)
§
The creation of personal ‘Private’ Seasons that only your login
can view/manage, so that Queries don’t display repetitive excessive ‘Seasons’
in the FINS Online view for Data Entry users
§
Any New Seasons created by Non-Facility Admins are automatically
marked as ‘Private’
User
Tab>Manage/Display
·
Manage – Create/Delete ‘Private’ and/or ‘Universal’
(if Facility Admin+) Seasons
·
Display – Designate types of Seasons to display for each
Event Type (Adults/Eggs/Juveniles) in the FINS Online view
The 'my stocks' link located in the User tab sub-menu is for quick reference, that will display the ‘Stocks’
associated to your Agency/Facility by Species in an exportable grid
The 'my tac' link located
in the User tab sub-menu is the FINS TAC (Technical Advisory Committee)
Membership page that lists the current FINS TAC Members for reference
FINSNet.org > User > Mandatory
Training
The 'mandatory training' link located in the User tab
sub-menu is the menu where all required training videos are listed for users to
view, in their entirety in order to get permissions granted to each module.
FINS
Steering Committee implemented Mandatory FINS Training for all new Data Entry
User permissions.
Completion of FINS user designated
Training Videos, in their entirety, is required before access to data entry
within each module (Trapping/Holding/Spawning/Inbox/Incubation/Rearing/Release)
is approved.
·
All new users are
required to view FINS Mandatory Training Videos before receiving Data Entry
permissions
§ Once all videos have been completed, in
their entirety, for a module, please contact FINS Support for upgrading Data
Query permissions to Data Entry
*FINS Support will verify completion of mandatory training videos
in their entirety via auditing prior to granting Data Entry access
*Please Note that Training is
required for FINS
Please
contact FINS Support (Support@FINSNet.org
or 208.378.5279) to get New User Training scheduled or to verify and grant Data Entry permissions
after your Mandatory per Module Training Videos are completed for the module
that you need to access
Additional Self-paced
non-mandatory training videos and learning resources are also available via
this FINS User Manual and via the Training Library through many Training Videos
which can all be found on the User tab of FINSNet.org. There is also a Training
Calendar which displays dates available that we can schedule you for custom
Training.
To ensure the quickest assistance for FINS,
please always email FINS Support at: Support@FINSNet.org
The
FINS Team provides Technical and User Support as well as Training to FINS
authorized data providers and consumers, and has developed a comprehensive set
of support options to meet user’s needs
Dedicated Support – Authorized users can
call or send an email to request user and/or technical support or to schedule
custom facility and/or one-on-one training
·
Email: support@finsnet.org
·
Phone: (208)378-5279
Any requests for FINS support or trainings
can be sent to the Dedicated FINS Support email at support@finsnet.org or
through the FINS Support phone line at: (208)378-5279. For the quickest
response, please send all emails to the support@finsnet.org address,
in case a team member is out of the office or unavailable.
Dedicated Support Hours:
Mon-Fri: 9am - 5pm MST
Training Library – On-Demand Training
Videos produced by the FINS Team, that provide access to topic specific
training video recordings, grouped by topic in the same menu layout as the FINS
application users are familiar with
·
FAQ - Frequently Asked Questions, organized by
Platform/Module/Section and Topic
·
User Manual - viewable on the web or downloadable The FINS
Team maintains an up-to-date online manual that contains information about FINS
database modules, features, query, data submittal, and products
·
Glossary - FINS user committee defined fisheries
vocabulary and FINS specific terminology. If an authorized user encounters an
unfamiliar term, they can access and download a comprehensive list of terms and
definitions.
A preview of the Training schedule is updated on each
production deployment, so that interested users can determine training
availability. Users are encouraged to call FINS Support at 208.378.5279 or
email Support@FINSNet.org to schedule
Training with the FINS Support Team.
FINS Training Library provides a large selection of recorded
instructional videos available on-demand about FINS, from what FINS is to how
each feature in FINS for all Modules function as well as webinar sessions of
user requested topics being discussed from recorded meetings.
1. Archive
Locations (2021 Webinar)
2. Workflows
1) Age
Criteria
2) Move
To Locations
3) Stock
4) Seasons
5) Seasons
(2021 Webinar)
6) Shed
Rate
·
Data Tab
1. Trapping
Query
2. Holding
Query
3. Spawning
Query
4. Incubation
Query – Moves/Morts
5. Incubation
Query – Group Enumerations
6. Rearing
Query
7. Release
Query
8. Final
Disposition – Fish
9. Final
Disposition – Egg
10. Final Disposition –
Juvenile
11. Search FINS
1) General/Adult
2) SubAdult
3) Identifiers
4) Pivot
Summary
5) Search
FINS (2021 Webinar)
12. Quick Queries
1) Queries
2) Pivot
Tool
§
Summaries
1. Save
Layout
2. Canned
Query
3. PIT
Tag
4. Inventory
1) Holding
2) Spawning
3) Green/Enumerated
Report
i. Split
Females
ii. Group
Enumerations
4) Incubation
5) Rearing
6) Rearing
Production Summary
5. Fish
Return (2021 Webinar)
6. Shipping/Transfer
7. Shipping/Transfer
(2021 Webinar)
8. Rearing
Container (2021 Webinar)
9. Release
·
Online
1. Save/Share
Layout
2. Rearing
Move Query (2022 Webinar)
3. Rearing
Mort Query
4. Rearing
Enumeration Query
5. Rearing
Identifier Query
6. Release
Query
7. Shed
Rate Query
1. Intro
to Trapping
2. Sessions
1) Create
2) Edit/Delete
3. Trap
Fish Form
4. Common
Fish
5. (Beta)
Trap Operations (2021 Webinar)
1. Move
Fish
2. Count
Correction
3. Identifiers
1. New
Session
2. Review
(2021 Webinar)
3. Common
Crosses/Fish
4. Spawned
5. Not
Spawned
6. Into
Incubation (2020 Webinar)
7. Eggs
1) Into
Incubation
2) Into
Immediate Container
3) Spawned
Eggs Grid
i. To
Incubation
ii. To
Transfer/Final Disposition
8. Green/Enumerated
Report
1) Intro
to Green/Enumerated Report
Note: This is
the same video titled ‘Beta Enumerated Inventory’ in the Mandatory and Webinar
Training Video menus
2) Split
Females
3) Group
Enumerations
1. Creating
a (Beta) Group Spawn Session
2. Moving
by Female ID from (Beta) Group Spawning to Incubation
3. Moving
Eggs by Group from (Beta) Group Spawning to Incubation
1. Intro
to (Beta) Green/Enumerated Report
Note: This is
the same video titled ‘Beta Enumerated Inventory’ in the Mandatory and Webinar
Training Video menus
2. Green/Enumerated
Report
1) Split
Females
2) Group
Enumerations
3. Cull
& Loss of Eggs
4. Group
Enumeration (2021 Webinar)
5. Group
Enumeration Data Entry (2022 Webinar)
6. Picking
Morts
7. Moves
from Incubation to Inbox
1. Create/Manage
Arrays
2. Actions
1) Move
from Incubation/Inbox to Rearing
2) Moves
within Rearing
3) Splitting
Containers
4) New
Marking Form (released 3/28/2025 v1.1.167.0)
5) New
PIT Tagging Form (released 3/28/2025 v1.1.167.0)
6) Picking
Rearing Morts
7) Rearing
Metrics Inputs
8) Marking
– Add/Edit/Delete (from 2021 Webinar)
9) (Beta)
Shed Rate (2021 Webinar)
10) Shed Rate Data Entry -
in Rearing
11) IDFG Marking SOP (per
IDFG requirement for all IDFG Facilities as of 2025)
3. Production
Summary
1. Release
from Rearing
2. Container
Start/End Dates
3. Shed
Rate Data Entry – On Release
4. Shed
Rate Data Entry – Post Release
1. Installation
2. Trapping
1) Trapping
2) Trapping
Upload
3. Spawning
1) Create
Session
2) Open
Existing
· 2022
1. Fish
Return Summary – Male Reuses
2. FINSNet.org
Tools
3. Common
Fish – Trapping/Holding
4. Origins
5. Common
Fish/Crosses – Spawning
6. Spawned
Inventory & Spawned Eggs Grid
7. Move
Egg Query – Online
8. Incubation
Mort Query – Online
9. Group
Enumeration Query – Online
10. Group
Enumeration Data Entry – Online
11. Rearing
Move Query - Online
· 2021
1. 2020
Review
2. Fish
Return Summary
3. Search
FINS
4. Seasons
5. Spawning
Review
6. (Beta)
Enumerated Inventory
7. Marking
– Add/Edit/Delete (from 2021 Webinar)
8. (Beta)
Shed Rate
9. Shipping/Transfer
Summary
10. Rearing Container
Summary
11. (Beta) Trap Operations
12. Archive Locations
13. Annual 2021 Review
FINSNet.org
> User > Learning Resources > Documentation > User Manual
Clicking this menu item
will open or download the most current version of the FINS User Manual for
viewing or saving
Identifiers - Marks, Tags,
Samples, and Conditions
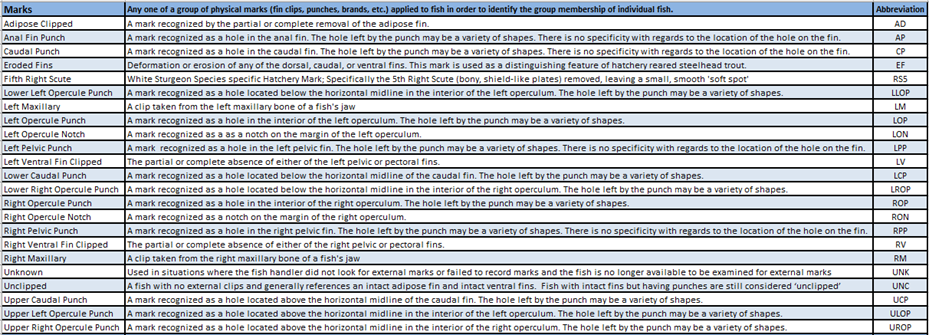
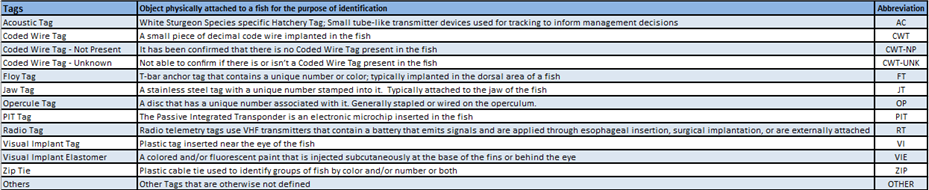
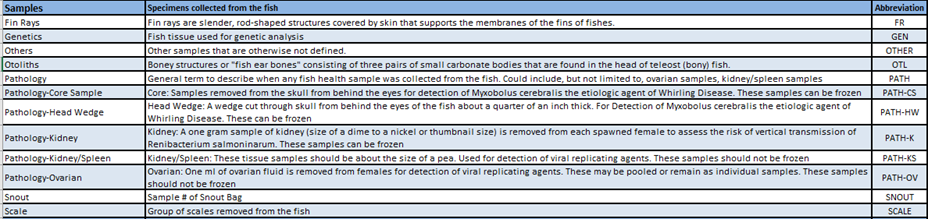
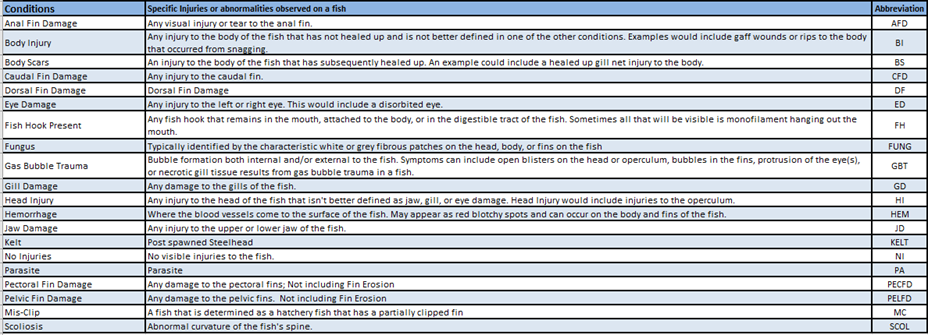
by
Event & Location Type

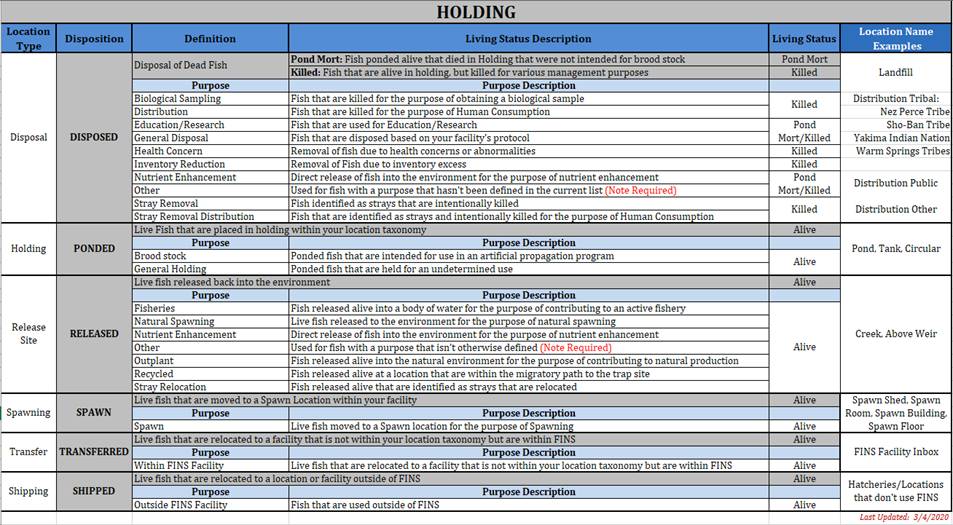
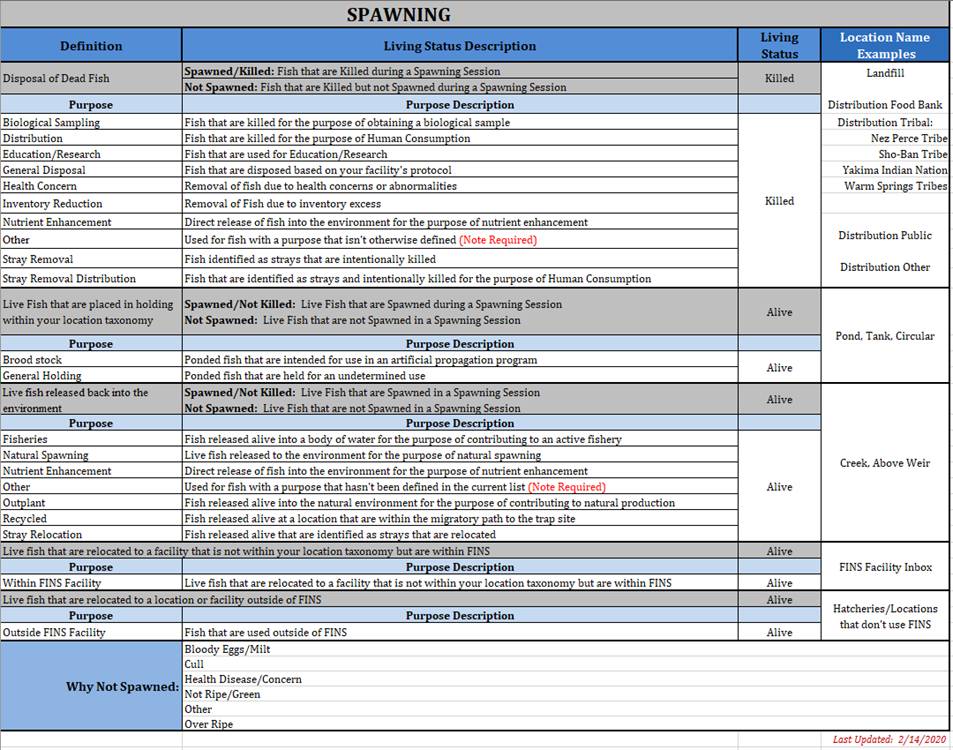
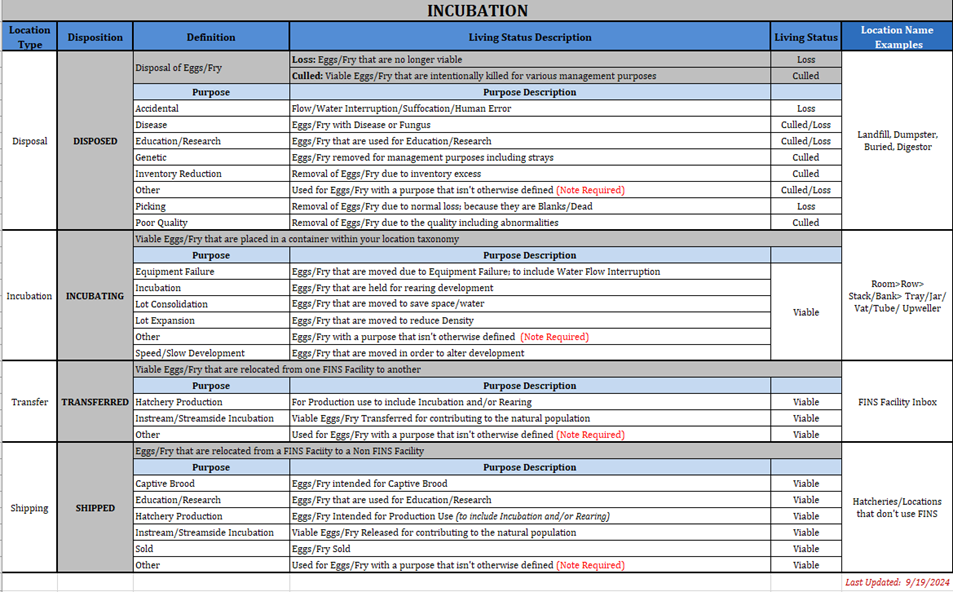
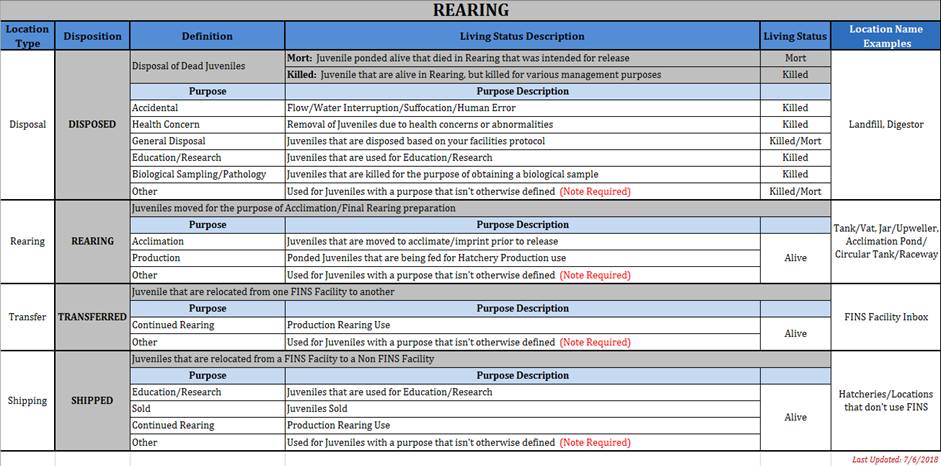
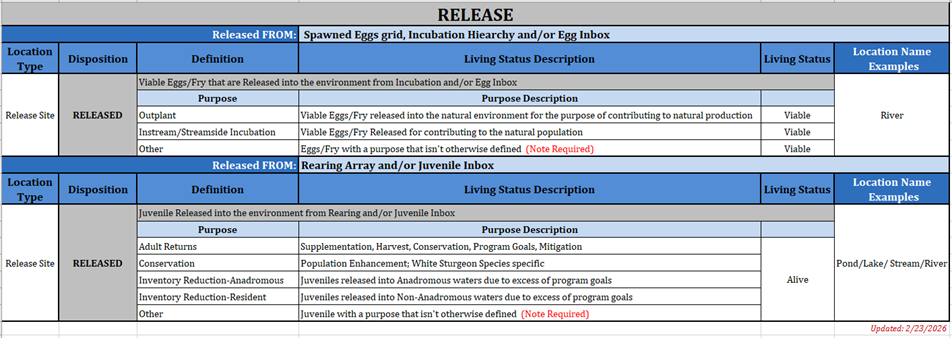
Locations
-
Is there a standardized naming convention that I
have to follow within FINS when creating trapping, holding, spawning, disposal,
incubation, rearing and release locations?
No. Agencies are in control of
preferred naming conventions for those Location Types throughout all of their
Facilities via the Data Official Role
·
FINS does suggest limiting the number of Data Officials at an
Agency/Facility to minimize internal QA/QC efforts
Can the same age criteria workflow be applied to
all location types - trapping, holding, and spawning or do we need to setup
separate workflows for each location?
Yes. In fact, either is available
in the Age Designation Workflow
·
One Age Criteria for all Location Types (Traps/Holding
Locations/Spawning Locations)
·
or different ones for each Trap, Holding Location, Spawning
Location
How do I create a New
Facility?
Only the Domain Admin User Role is able to make
Create/Edit/Delete Facilities in FINS:
·
This is a permission/role restricted to FINS Team PSMFC
Employees
o This
restriction is in place:
§ To prevent
the unnecessary creation of duplicate Facilities
§ As a
Location control in the database
§ To prevent
editing of Facility information by unauthorized personnel
If an Agency/Tribe/Facility expected doesn’t
display in your dropdown menu options, or there are questions as to what
Agency/Tribe/Facility is available to send data to, please contact FINS Support
(Support@FINSNet.org or 208.378.5279) for
assistance in determining if an Agency/Tribe/Facility needs created or just
made visible to your Domain.
When do I Transfer data in FINS and when do I Ship
it?
If a dataset is being sent to an
Agency/Tribe/Facility that is currently using FINS or not, the dataset will be
handled as a Transfer, not a Shipment.
·
This is to:
o Safeguard
against duplicate data if/when an Agency/Tribe/Facility imports Historical Data
into FINS
o Ensure a
standard process for handling data at Domains/Agencies/Tribes/Facilities within
FINS
o Protect
integrity of future data
o Maintain
data consistency
Shipping Locations in FINS are reserved for
Final Disposition Destinations, for example (OR Zoo, MK Nature Center, WSU Bear
Program…) to name a few.
·
*Data Official should not create Shipping Locations to handle
data at an Agency/Tribe/Facility in place of using Transfer Locations for data
entry
If an Agency/Tribe/Facility expected doesn’t
display in your dropdown menu options, or there are questions as to what
Agency/Tribe/Facility is available to send data to, please contact FINS Support
(Support@FINSNet.org or 208.378.5279) for
assistance in determining if an Agency/Tribe/Facility needs created or just
made visible to your Domain.
·
There are several use cases for Transferring Data to another
Agency/Tribe/Facility
(below are some for quick
reference):
o If an
Agency/Tribe/Facility for the Senders Domain is currently NOT in any Domain of
FINS, but Transfers are being made between Senders Domain and the new
Agency/Tribe/Facility, then the Senders Agency Data Official would contact the
FINS Support (Support@FINSNet.org or 208.378.5279) to have that
new Agency/Tribe/Facility created in the FINS database before Transfers can
take place via Data Entry by the Sender Facility (via the Trap Fish, Move
Fish, Spawn Fish, Receive Fish/Egg/Fry/Juvenile, Move Egg, Rearing Move Forms)
o If an
Agency/Tribe/Facility for the Senders Domain IS currently in a different Domain
of FINS, but Transfers are being made between the Senders Domain and the other
Domain’s Agency/Tribe/Facility, then the Senders Agency Data Official would
contact FINS Support (Support@FINSNet.org or 208.378.5279) to have that
existing Agency/Tribe/Facility Inbox marked as an Inter Domain Offsite Inbox so
that Transfer data may be entered (via the Trap Fish, Move Fish, Spawn Fish,
Receive Fish/Egg/Fry/Juvenile, Move Egg, Rearing Move Forms)
§ This
prevents a duplicate version of an existing Agency/Tribe/Facility from being
created in FINS under a different Domain just because the data will be sent to
a Location that falls in the Sender Domain’s footprint.
§ This logic
applies to any Agency/Tribe/Facility that is already IN FINS
*Please be
sure to reference the User Manual and the available training videos located at
FINSNet.org>User>Training Resources>Training Videos to review FINS
business logic, validation and step by step instructions
How do I make a Location Offsite in FINS?
Offsite Location > Validation
Offsite Trap, Holding, Spawning, Incubation and
Rearing Locations can only be designated by users with Data Official permission
(this includes FINS Domain Admins, Facility Admin/Data Officials and/or Agency
Data Officials). Inbox Locations can only be designated as Offsite by a FINS
Domain Admin.
Offsite Location > Agreement
It is imperative that both the Parent and Owner
have a conversation prior to creating any Offsite Relationship in FINS. It is
also important that after the creation of an Offsite Relationship, there is
Testing/Confirmation completed between the Parent and the Owner(s) as to what
they will each now see for the Offsite
Why do I see multiple descriptions in my ‘Offsite
Move From Location Description’ column when I download my data?
When making a
Location Offsite, FINS requires the Parent Location Data Official to enter a
description for every Owner Facility that gets associated with the Parent
Location. If there are multiple Offsite Owners for a given Location, FINS
displays multiple comma separated descriptions in the ‘Offsite Move From/Move
To Location Description’ columns. This does NOT necessarily mean that the
records being viewed were moved from/to these Owned Offsite Locations. To
determine where the records were Moved From/To, refer to the Moved
From/Moved To Location columns in your Query.
*Please be
sure to reference the User Manual and the available training videos located at
FINSNet.org>User>Training Resources>Training Videos to review FINS
business logic, validation and step by step instructions
Can I Edit an Existing Season that I have created
in FINS?
Seasons cannot be Edited because they are so
easily Created. Deleting and creating a New Season will NOT affect any of the
data entered in FINS. Seasons only filter what Data Entry users can view in
FINS Online Queries, based off the filter parameters applied in the Season.
(i.e.…FINS Online Queries > by Date and/or Hierarchy/Array if creating an
Egg/Fry/Juvenile Season).

*Please be sure to reference the Seasons section
of the User Manual for step by step instructions on how to create a New Season.
*Please be
sure to reference the Trapping section of the User Manual and the available
Trapping specific training videos located at FINSNet.org>User>Training
Resources>Training Videos to review Trapping business logic, validation and
step by step instructions
When running a Trapping Query from the Data Tab,
the Download is including Trap Records for Species that I didn’t select in my
Trapping Query Tool Filter parameters?
When Filtering by Species from the Trapping
Query the Download will include:
·
All Trap Records of Trapping Sessions where your selected
Species match the Target Species for the Session
·
All Trapped Records that match your Species selection.
This will include Trapping Sessions for which your Species selection is not the
Target Species
Is there a way to track
Fish after you Trap them?
Absolutely, FINS allows you to track
where you moved your Fish to from Trapping, Holding & Spawning
·
If you want to track where you moved your Trapped Fish to, you
would go to the Trapping Query
·
If you want to track where you moved your Holding Fish to, you
would go to the Holding Query
·
If you want to track where you moved your Spawned and Not
Spawned Fish to after Spawning, you would go to Spawning Query
Can you go back and change
what Trap a Fish came from?
Yes, you can. For instance, if you
incorrectly entered the wrong Trap when creating a Group Trapping Session, all
you have to do is the following:
a. Go to your
Existing Trapping Sessions by going to Actions > Trapping > Existing
Session and select a Season
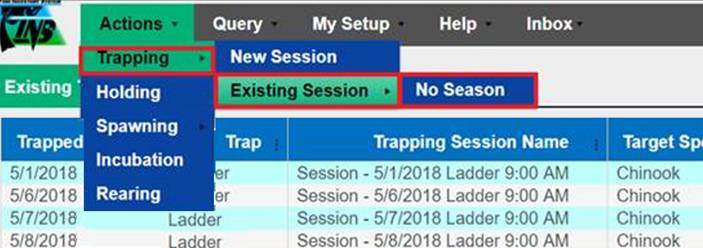
b. Select the
Session that you want to Edit, right click and click ‘Edit’ from the context
menu
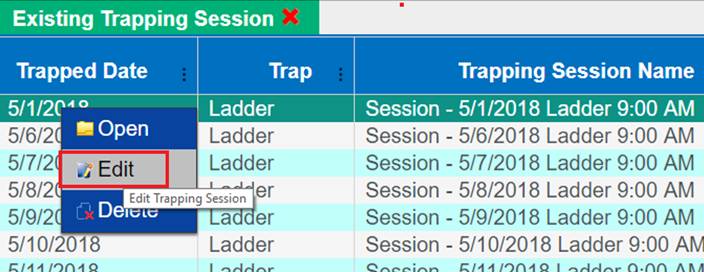
c. From the
‘Edit Trapping Session’ form, you can now edit the Trap as well as the Date,
Target Species, Target Run, and Session Comments
*Please be
sure to reference the Holding section of the User Manual and the available
Holding specific training videos located at FINSNet.org>User>Training
Resources>Training Videos to review FINS Holding business logic, validation
and step by step instructions
How do you edit Holding records?
From FINS Online>Holding>Move
Fish Query>Context Menu>Edit or Edit Selected; depending on the
Validation of Move Fish Record(s) selected to Edit
Can you Undo or Delete Moves made from Holding
containers?
‘Undo’ is not available
·
Yes, you can Delete any Move via FINS Online>Holding>Move
Fish Query>Context Menu>Delete
§ If a Move Fish Transaction needs the
Count of the Move Corrected, the incorrect Move must first be Deleted, a Count
Correction applied, then the correct value/count should be Moved out
§ *Deleting a Fish Move does not ‘clean-up’
the Receiving Locations data so communication is required if a Deleted Move was
sent to another Facility (Transferred) for Final Disposition accounting
How is the Holding-Inventory summary populated?
No mystery behind the scenes on this. The
Holding Inventory combines trapped fish in_to_the_pond counts (via moves), held
fish out_of_the_pond counts (via moves) and count corrections on the pond. So,
the inventory on a pond is Inventory = in_counts – out_counts + sum of all
count corrections. It is the user’s responsibility to manage/keep up their
‘current’ inventory count to be current
How do I determine what trapping year the fish in
my Holding-Inventory grid is displaying?
What Fish have populated Holding Locations can
be retrieved by performing a Trapping Query
·
If Holding Locations/Ponds are not updated at the end of the
season/year and you no longer know where the (non-uniquely identified;
i.e.…with a PIT Tag) fish came from, then we can’t tell you out of all the fish
that were placed into the Pond which are still sitting in the Pond. That’s why
it’s very important to keep your ‘current inventory’ updated as your ‘current
inventory’. i.e.…Emptying your ponds at the end of the season, when they
are ‘actually’ empty/emptied
·
If you move only fish trapped in year Y to pond P from trap T
and don’t add fish from another year or trap, then you know exactly what is in
your pond. If you move fish from years Y1, Y2, Y3 from traps T1,…,T4 into pond
P, then a) that doesn’t fully correspond to reality, and b) there is no way to
tell whether a fish removed from P is Y1, Y2 or Y3 or from which trap
How do you track a change in the sex of a fish
from trapping to holding and how does this affect the Holding-Inventory
summary?
FINS doesn’t ‘Track’ the changes of specific
Trapped Fish. Once Fish are Trapped and placed into Holding, we don’t know
which fish are which, just a total Holding ‘count’ of Fish (Holding has been
described as a group of one or group of many)
·
However, there is Sex validation in FINS, specifically at
Holding. If the Sex of a Fish in a Pond is ‘Unknown’, the user can Sex that
Fish on the Move, in which a Count Correction for the Unknown and added
Male/Female is Auto Generated to document that the Sex was changed. Users can
also manually Count Correct the Sex of Fish in their Ponds whenever sorts occur
to update their Sex and Counts appropriately to match ‘current inventory’
i.e.…if you find out that one of the
16 Fish Trapped as Female is actually a Male during a sort, then you would
enter a Count Correction: Add 1 Male, Remove 1 Female and include a detailed
Note. The Holding Inventory count would change by one for both Female and Male
Is there a way to track Fish after you Move them?
Absolutely, FINS allows you to track
where you moved your Fish to from Trapping, Holding & Spawning
·
If you want to track where you moved your Trapped Fish to, you
would go to the Trapping Query
·
If you want to track where you moved your Holding Fish to, you
would go to the Holding Query
·
If you want to track where you moved your Spawned and Not
Spawned Fish to after Spawning, you would go to Spawning Query
After Saving a Count Correction a window popped up
asking me if I wanted to Remove "Identifiers" associated with those
Fish...what does that mean exactly?
In FINS, ‘Identifiers’ (meaning marks, tags,
samples, etc.) on fish are kept track of separately compared to the number of
fish in your Pond. When you Count Correct either by Adding or Removing Fish
you’re allowed the option to Add/Remove the Identifiers as well. For example,
if you Count Correct a Pond by Removing 4 Fish the Pop Up for Count Correcting
the Identifiers tied to those Fish will be displayed. Identifier Count
Corrections allow you to specify exactly which Fish were removed based off
their recorded Tag or Sample Value or to just simply do a blanket Count
Correction of Identifiers in a Holding Location.
Can an Offsite ‘Owner’
adjust the Origin Designation of Fish in Parent Offsite Holding containers?
No, Origin is calculated off of the
Trap/Source Trap of a Fish
·
Offsite/Non-Offsite Locations – will display
the Origin designation of the Fish from the Facility it was Trapped at
How do I assign or edit
Brood Years to already existing Spawning Sessions?
a. First go to
the Existing Spawning Session list by clicking on
Actions>Spawning>Existing Session
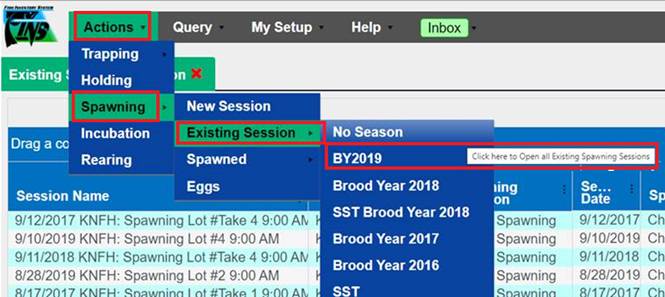
b. From here
you can you can select a session you’d like to add a brood year to, right-click
on it, and select edit from the dropdown
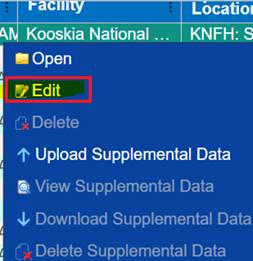
c. This will
bring you to a page where you can edit all of the spawning session header info,
and from here you can assign a brood year by typing into the new Brood Year
field and hitting save. Only numbers are allowed in this field and it is
possible to assign more than one year at a time by using a dash.
Valid inputs: “2018”… “2019”… or
something like “2019-2020” is also accepted. Inputs like “2018a”, “2018-2017”,
“BY2020” or “2016-2018-2020” won’t be accepted.
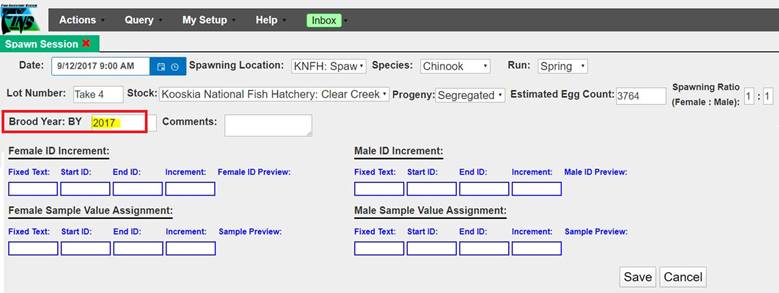
d. Once hitting
save you may get a prompt to open up the session which you can just ‘x’ out of.
You can then reopen your session list to verify that your brood year was saved.
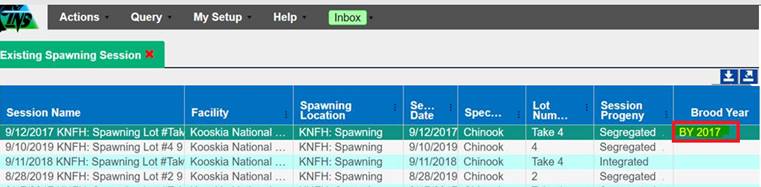
Is
there a way for me to change where I put my Eggs after Spawning?
Yes, this can be done by simply Deleting the
original Move Egg transactions from Spawning into Incubation via the Move Egg
Query. Step by Step instructions on how to best Delete multiple Moves from
Spawning into Incubation are provided in the Incubation section of this FAQ
file, specifically under the ‘Is there a way for me to change where I put my
Eggs after Spawning?’
How do I correct the Immediate Container input
from Spawning?
An ‘Immediate Container’ in the
Spawning Session is used as either:
a. a temporary,
non-Database Location, which is used for the Egg Take to be placed into while
the Database Location/Incubation Container is determined or the Incubation data
set is ready for entry, which is then moved into a Database Location via the
Spawned Eggs grid
b. or a
Database Location/ Incubation Hierarchy Container where the Egg Take is placed
directly via the Spawning Session Cross input fields
An ‘Immediate Container’ value
entered when a Cross is Created, can only be Edited if the Egg Take has not
been Moved From Spawning, in other words is not in a Database Location
(Incubation Hierarchy/Transferred to an Inbox/Shipped outside of FINS…) but is
instead in the Spawned Egg grid, in a ‘temporary’ non-Database Location
If Eggs have been moved out of
Spawning – the All Spawned Crosses grid will display a message instead of a
Button for editing the Cross (example of each below)


* If the Eggs have already been
moved into a Database Location – out of the Spawned Eggs grid - Please refer to
the Incubation section of this FAQ file, specifically under the ‘Is there a way for me
to change where I put my eggs after Spawning?’,
for step by step instructions on how to best
Delete Moves from Spawning into Incubation.
However, if the Eggs have not
been Moved From Spawning - the Immediate Container can be Edited directly from
the All Spawned Crosses grid which can be accessed via the Session Context
Menu by right-clicking in the Spawning Session and selecting the “Show Spawning
Summary” option from the Menu
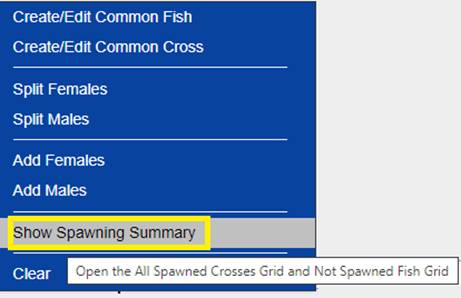
a. With the All
Spawned Crosses Grid opened
b. Click on the
Cross with the Immediate Container that you want to edit
c. Then, click
on the Edit Button located near the top left of the grid (highlighted in Yellow
below)
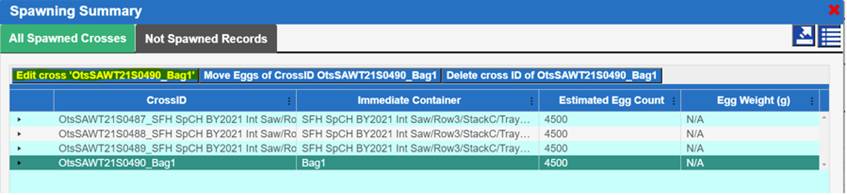
d. This will
open the Edit Spawn Cross form –
Here you can
Edit the original Immediate Container value by
i. Typing
directly into the Immediate Container field
ii. Alternatively,
you can erase any name previously typed in the Immediate Container field and
then select a FINS Incubation Database Location from the dropdown
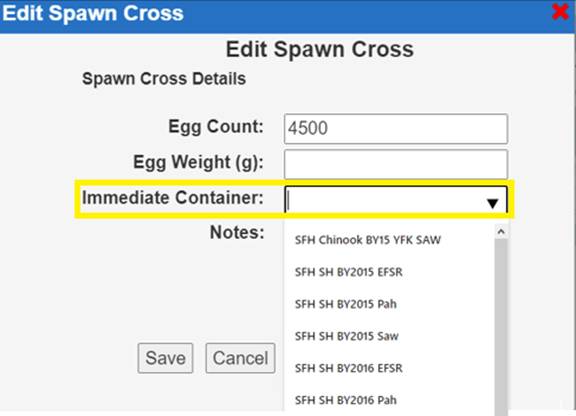
e. Lastly,
click ‘Save’ to save your Edit
*Note: Updating the name of the
Immediate Container will also update the Cross_ID of the Egg Take being Edited
i. Cross ID is
a unique ID for each Cross within a Session (Female ID# & Name of Immediate
Container Eggs were placed)
·
For example,…Cross ID: 101_BY2021/Stack1/Tray1
Represents – Spawned Female ID 101 Egg Take that
was placed into the Immediate Container FINS Database Location ‘Incubation
Hierarchy BY2021/Stack1/ Tray 1’
GROUP SPAWNING –
Can I Edit a Group
Spawning Session?
Yes, specific information, such as
Spawn Location, Species, Stock, Progeny, Lot Number and Group Spawn Session
Comments are all Editable.
Currently, in the limited Beta
Release version of the Group Spawning Session functionality, the number of
Spawned/Not Spawned Females/Males/Jacks in a Group Session is not Editable and
instead requires a Deletion of the Group Session so that it can be re-created
with accurate Spawn data.
Is there a way to track
Fish after you Group Spawn them?
Absolutely,
FINS allows you to track where you moved your Fish to from Trapping, Holding
& Spawning
·
If you want to track where you moved your Trapped Fish to, you
would go to the Trapping Query
·
If you want to track where you moved your Holding Fish to, you
would go to the Holding Query
·
If you want to track where you moved your Group Spawned and
Group Not Spawned Fish to after Group Spawning, you would go to the Group
Spawning Query
Why does the Incubation Hierarchy column show
‘N/A’ instead of the Incubation Hierarchy?
‘N/A’ will display in the Incubation Hierarchy
column whenever there are Eggs that need to be moved from a temporary
container. ‘N/A’ will display if Eggs are currently sitting in the Spawned Eggs
Grid or a Facility’s Inbox.
Why
do I see Sessions in my Enumerated Inventory Report that fall outside the
Season that I selected?
If
you see a Session Date in the ‘Session Date Range’ column outside of a Season
that you selected, this is an indication that the Eggs were moved on a date
that falls within the Season selected.
Below
is an example of this:
·
Spawning
Session was on 1/1/2022
·
Season
selected has a date range of 2/1/2022-2/28/2022
·
Spawning
Session of 1/1/2022 displays in the ‘Session Date Range’ column
·
This
tells the user that the Eggs were moved between 2/1/2022-2/28/2022 even though
the Spawning Session took place on 1/1/2022
INCUBATION –
*Please be
sure to reference the Incubation section of the User Manual and the available
Incubation specific training videos located at FINSNet.org>User>Training
Resources>Training Videos to review FINS Incubation business logic,
validation and step by step instructions
What does ‘Incubation Live Count’ mean?
Incubation Live Count refers to the number of
Viable (Alive) Eggs at the time of Incubation. In reference to the Rearing
Move Query, ‘Incubation Live Count’ refers to the number of Viable Eggs that
were included in a move from an Incubation Container. It is derived from the
term ‘Live Count’ which, at Incubation, is the number of Viable (Alive) Eggs
after Enumeration, aka the ‘Good’ Egg Count determined in Incubation at
Enumeration.
The term
‘Live Count’ is prefaced with the word ‘Incubation’ when that number is carried
forward in the life cycle, to another container, as reference
Is there a way to track
Eggs/Juveniles after you Move them?
Absolutely, FINS allows you to track
where you have moved your Eggs and Juveniles to from Spawning, Incubation,
Rearing and Release
·
If you want to track where you moved your Eggs to from Spawning
and/or Incubation, you would go to the Incubation Move Egg Query
·
If you want to track where you moved your Eggs to from Rearing,
you would go to the Rearing Move Query
·
If you want to track where you moved your Eggs/Juveniles to at
Release, you would go to the Release Query and/or the Release Summary
Is there a way for me to change where I put
my eggs after Spawning?
Yes, simply Delete the Move Egg
transactions from Spawning into Incubation via the Move Egg Query. Step by
Step instructions on how to best Delete multiple Moves from Spawning into
Incubation are provided below.
Example is using records Transferred
from Dworshak National Fish Hatchery to Clearwater Fish Hatchery:
a. From the
Move Egg Query, click on the season that contains the date range your Spawning
Session falls under. If there’s no season you can select ‘No Season’ or Create
an Egg Season for the Hierarchy the Eggs were moved into, from the FINSNet.org
Admin > Seasons menu.
In the example, the 2021 Season is
selected, as highlighted below:
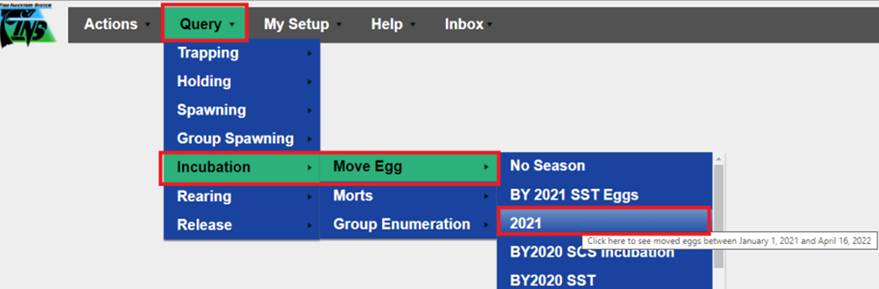
b. Once the
Move Egg Query loads, an easy way to find the exact Egg Takes from your
Spawning Session is by using a Query Filter. For this example, we’ll go to the
Spawning Session Lot# and click on the Query Grid Menu (3 vertical dots)
o Hover down
to the ‘Filter’ menu item and
o Type the
Spawning Session Lot # you are trying to locate Eggs to Delete into the data
entry field
§ i.e.… ‘take
8’ as highlighted below
o Select the
‘Filter’ button or simply press ‘Enter’ on your keyboard
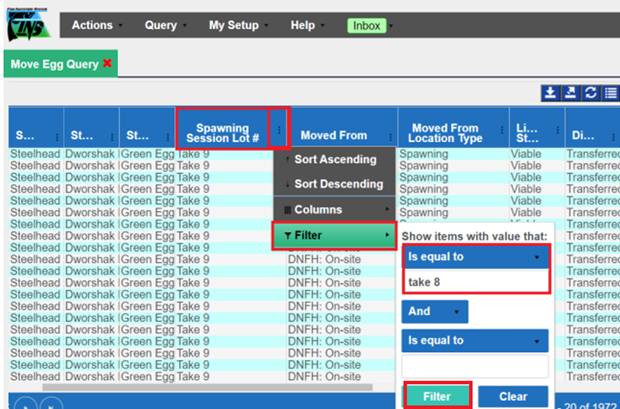
c. This will
filter for Egg Takes that are from Spawning Session Lot # ‘Take 8’, which in
this case, have all been Transferred to Clearwater FH from Dworshak NFH
d. Select the
Move Egg transaction records you wish to Delete
e. Right click
and select ‘Delete Record Selected’

f.
Deleting the selected records will then move the Egg Takes back
into their previous Location, in this case – Spawning
g.
They can then be moved again to the intended Location, from
either the All Spawned Crosses Grid within the Spawning Session, or from the
Spawned Eggs Grid which can be accessed from Actions>Spawning>Eggs
Why am I
getting the implied unmixing error when trying to move eggs to another
Location?
The implied unmixing message in the Move Egg
Form is caused by there being multiple, different Transfer Containers for a
Female’s Eggs that have already been mixed together with another Female in a
single Tray (the Moved From Location).
Since it is not possible to Move Eggs of just
one Female from a Container containing multiple Females into any new
destination. This is because there is no way to determine which Eggs belong to
a particular Female (i.e., to ‘unmix’ them) – it is not something that can
actually happen, so FINS prevents it.
To fix this error you can do the
following:
·
Use the same Transfer Container. This will allow you to send
the Eggs out, together.
If the issue persists, or you
have a different use case, please contact support at 208.378.5279
or Support@FINSNet.org for
additional troubleshooting assistance.
·
The Date, unique Container Names used, and any other relevant
details of the Moved From/Moved To action will need to be supplied for
troubleshooting

REARING
*Please be sure to reference the Rearing section
of the User Manual and the available Rearing specific training videos located
at FINSNet.org>User>Training Resources>Training Videos to review FINS
Rearing business logic, validation and step by step instructions
Why do I see the original Incubation Live Count
value on a Rearing Container that has been split?
In Rearing, the Incubation Live Count column
displays the ‘Number of Viable (Alive) Eggs at the time of Incubation’ that
were included in a move from an Incubation Container into Rearing. Rearing
Inventory grid has many Default Show/Hidden Columns, Incubation Live Count is a
default show column but can be hidden and/or made to be a customized default
hidden column at any time via the Rearing Inventory grid Display Menu. Rearing
Inventory grid includes the Incubation Live Count column by default, as a reference
for Data Entry when Enumerating containers in Rearing. The egg count data that
survives into Rearing is there for reference purposes only. Incubation Live
Count doesn’t get altered from Rearing Inventory Counts/Enumerations.
*Splitting a Rearing group doesn’t Split the
associated Incubation Inventory/Incubation Live Counts
Incubation data is separated from Rearing data
in the FINS Database, as they are different data points
·
Example – Vat 1 had 10,000 Eggs (per my Incubation Eye Up
Enumeration/post Morts) from Incubation when moved into Rearing Container Rcwy
1
The Rearing Group in Rcwy 1 was then
Split into two different Acclimation Ponds – *Splitting a Rearing group doesn’t
Split the associated Incubation Inventory/Incubation Live Counts
Both Acclimation Ponds’ Incubation
Live Count Columns would say 10,000 since the Incubation Inventory Count that
made up the two new Rearing groups are the same and haven’t been altered in Incubation, therefore aren’t
modified from any Rearing actions
(Moves/Splits/Enumerations) – * Incubation data is separated from
Rearing data in the FINS Database, as they are different data points
*Please be
sure to reference the Release section of the User Manual and the available
Release specific training videos located at FINSNet.org>User>Training
Resources>Training Videos to review FINS Release business logic, validation
and step by step instructions
What is the Group Release Goal field and do I need
to fill it out? If so, what is put in there?
The 'Group Release Goal' field is an optional input field
requested by Complex Managers to easily track the number of Juveniles planned
to be Released at a Facility vs. the current on hand Juvenile Live Count being
Reared at a Facility for Release via the Rearing Inventory Summary.
This field also provides a quick comparison providing an idea of
how you did in meeting your Release Goal for a given Release Group to what is
actually Released via the Release Query and Summary.
See the example below:
a.
Notice the Group Release Goal set for ‘Release Group B’ below
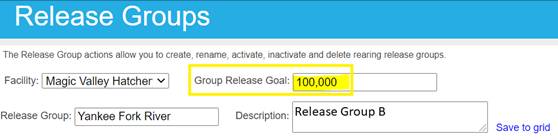
b.
After Associating Containers to this Release Group from Rearing
Inventory and Releasing Juveniles from those Containers you can then see the
actual number of Juveniles that were Released in your Release Query and compare
it to the Group Release Goal that was initially set
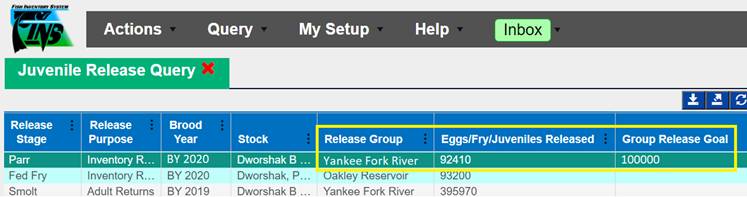
I mistakenly uploaded the same PIT Tag file into
two different raceways/into the same raceway twice…Please help me Deleting the
extra file/upload
This can be easily solved. All you
need to do is Delete the PIT Tag Identifier and re-upload the appropriate PIT
Tag file. Below are the steps on how to do this:
a. From
‘Add/Edit Identifiers’ click on the ‘Delete’ radio button
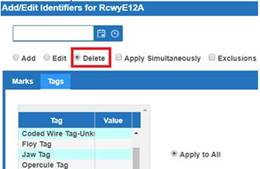
b. Click on the
‘Tags’ tab highlighted below
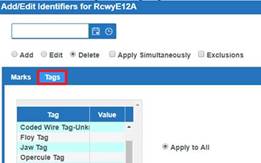
c. Click on the
Tag that you want to delete, which in this case would be the ‘PIT Tag’

d. Click Apply
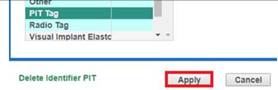
You are all set. All you need to do
now is re-upload the appropriate PIT Tag file.
*QA/QC the upload by expanding the
‘Tag’ column in the Rearing Inventory grid after uploading the selected file
just to ensure that the intended amount of PIT Tags got uploaded
Is there a way to track
Fish, Eggs, Fry and/or Juveniles that have been Released?
Absolutely, FINS allows you to track
where you move your Fish, Eggs, Fry and Juveniles to from within Trapping,
Holding, Spawning, Incubation, Rearing and Release
·
If you want to track where you moved Fish that have been
Released, you would go to the Final Disposition Query
·
If you want to track where your Eggs, Fry and/or Juveniles have
been Release, you would go to the Release Query and/or Release Summary
DATA TAB –
Quick
Query –
Why don’t I see Rearing as an option?
Rearing data consists of far
too many components (Array Containers, Enumerations, Moves, Morts, Identifiers,
PBT etc.) to facilitate ‘all data ever’ which is the main read-only use case,
purpose and business value behind data pre-prepared for Quick Queries.
How up to
date is this data?
Quick Query data is prepared
and optimized overnight. Meaning that if you download a quick query on
Wednesday morning, you are getting data updated as of the night before (Tuesday
night in this example).
I just entered Trapping data but I don’t see
it reflected in the Quick Query I just downloaded?
The Quick Query download is considered a ‘read
only’ query, in that the data is not necessarily ‘current’ but may be up to a
day old depending on when you are requesting the data. This is by design and
was part of the Steering Committee scope request for providing a read only
query. The data can be minutes to hours old, which is
the tradeoff for speed of access.
How do
you recommend that I retrieve data using the Quick Queries?
For optimal speed, it's
recommended to retrieve all data for all time from all Facilities, then further
filter your data result using the powerful features available in MS Excel.
Why did
it take Jim 20 seconds to download the Quick Query but Kathy’s Query took 3
minutes to load?
Since Quick Queries provide
users with pre-prepared data, the system can deliver results almost
instantaneously. Further filtering (like Kathy did) by Date Range, Facility or
Species will actually slow down the data retrieval process, because the pre-prepared
data then has to be filtered before being available for download rather than
accepting the pre-prepared data as is for immediate download (like Jim did).
·
The Quick Query pre-prepared data download is only limited by
your own network capacity.
Fish Return Summary –
What happens when I only filter
by Spawning Brood Year and not a Fish Season?
Filtering by Brood Year only, will produce only
Spawn Data in the Fish Return Summary Download file, since Brood Year is only
applied to Fish at Spawning.
- Download
file will NOT include Fish Trapping or Holding data when filtering by only
Spawning Brood Year
·
The ‘Date Range of Available Data’ in the Download file will
display the date range of actual Spawn Data in FINS, with the first Spawning
Session Date for selected Spawning Brood Year to the last Spawning Session Date
for selected Spawning Brood Year, illustrating that all Spawn data in FINS that
occurred within that date range is in the grid as Fish Return data.
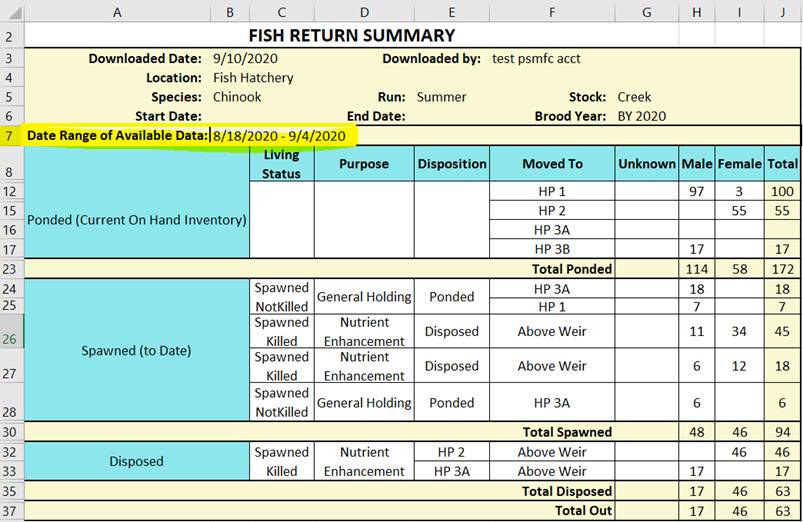
Specifically, the data in the download will be filtered as follows:
·
Trapping Session data and Holding Move records will be omitted
·
Spawning Session data that occurred within the date range of the
Selected Spawning Brood Year for the selected Species, Run and Stock
What happens when I filter by both a Fish Season
and Spawning Brood Year?
Fish Return Trapping and Holding data will be
filtered by the selected Fish Season Date Range to include Trap Sessions, and
Holding Moves that occurred during the selected Fish Season date range. Fish
Return Spawning Brood Year data will be first filtered by selected Fish Season
and then further filtered by selected Spawning Brood Year date range to include
Spawn data from Spawn Sessions that occurred during the selected Spawning Brood
Year date range.
Specifically, the data in the download will be filtered as follows:
·
Trapping Session data and Holding Move records that
occurred
within
the date range of the selected Fish Season for the selected Species, Run and
Stock
·
Spawning Session data that occurred within the date range of the
Selected Spawning Brood Year for the selected Species, Run and Stock
What happens when I filter by Date (Start/End Date
Range)?
- All
Trapping Session, Holding Moves and Spawning Session data that occurred
during the designated Date Range for the selected Species, Run and Stock
will be included in the Download file
Why can’t I filter by Date (Start/End Date Range)
and an available Spawning Brood Year?
- There
are two methods to filter the Fish Return Summary data using date ranges
- The ‘Date’ Filter
option
provides data results within the designated Date Range
- The ‘Season’ Filter
option
which provides data results within the designated Fish Season date range
and/or the selected Spawning Brood Year
- The Spawning Brood
Year is part of the ‘Season’ Filter option – and when selected without a
Fish Season selected, filters only the Spawn data results by the
associated Spawning Session Dates with the selected Spawning Brood Year
Why is the Total In (of fish I Trapped/Received)
not matching the Total Out (Fish I Spawned/Shipped/Released/Disposed)?
Various reasons, such as but not limited to:
·
The date range specified for the filtered Fish Return Summary
data may not include both the date of the Trapped/Received Fish and the Date
Out/Final Disposition/Exit of those same Fish
·
Fish Trapped/Received could still be sitting in the Facilities'
Holding Inventory which is displayed in the Fish Return Summary as ‘Ponded
(Current On-Hand Inventory)’/Row of the Download file
·
Count Corrections were made to correct inventory discrepancies;
Which are displayed in the Fish Return Summary as ‘Count Corrections (to
Date)’/Row of the Download file
Known Count Correction Use Cases Include:
- More or less Fish
Trapped than accounted for
- More or less Fish
Spawned than accounted for
- More or less Fish
sitting in Holding Inventory than accounted for
These known Inventory discrepancy Use Cases can
occur for several reasons, below are a few examples:
- Predation
- Moves
out of Holding not input or accounted for via data entry
- Data
Entry Errors
- New
sort provides a current Inventory for current known count
- Estimates
vs actuals
- Incorrect
Trap Counts resulting in Ponded/Available Inventory adjusted at
Spawning
- Incorrect
Spawned Fish Counts resulting in Ponded/Available Inventory left post
Spawning
How is the data result set impacted by selecting
more than one Fish Season?
·
Filtering by multiple Fish Seasons will
provide Fish Trapping/Holding/Spawning data that occurred
from the first date through the last date of each Fish Season date range selected
·
When there is a gap in Date Ranges between the multiple Fish Seasons
selected, Trapping/Holding/Spawning data entered within that gap, that is not
part of any selected Season Date Range, will not be included in the
Fish Return Summary data download file
*Please be
sure to reference the Import Validation details, available in both the User
Manual Import section and/or the Data>Query Tool>Import section to review
all Required Columns, Validation Fields and Example Data associated with the
available types of Imports
Is it possible to import Holding data? - Move To,
Count Corrections, Receipt records
No. These actions must be done
within FINS Online via the Holding Inventory grid.
· However,
when importing Trapping Data, Final Disposition Locations may be designated for
Historical Data if there is no need to capture interim Holding data
How long should it take to Import my file on
FINSnet.org?
It will vary on the amount of Data
and the type of Import (Trapping, Spawning, Incubation or Rearing)
Is it possible to import all agency data into FINS
without using the import tools?
No. The only way to “Import” Data
into the FINS Database is using the “Import Tool” provided following the
designated Validation/Format
Why can’t I import data to/from another Facility
into my Facility even though we both belong to the same Domain?
Offsite Location Relationships are required at
both Facilities for all relevant Move To/From Locations.
·
FINS allows users to Import data To/From a Facility, provided
there is an Offsite relationship between both Facilities’ pertinent Locations.
The importing Facility and Facility in which the data ‘came from/went to’ would
have to designate the appropriate Location(s) as Offsite so that a Parent-Owner
relationship is formed.
·
The Receiving Facility is the Parent of the Offsite Relationship
and the Sending Facility is the Owner of the Offsite Relationship.
Without this
Offsite Relationship designation, Imports will not be successful.
*Please be
sure to reference the FINS Offline section of the User Manual and the available
FINS Offline specific training videos located at
FINSNet.org>User>Training Resources>Training Videos to review FINS
Offline business logic, validation and step by step instructions
Why am I getting the error shown below when trying
to install FINS Offline?
The reason a network error occurs is because
there already is a downloaded version of FINS on your computer and this is
preventing you from downloading another copy.
Internet Browser
Do I need to ‘Clear my Cache’ when a new version
of FINS is deployed?
No, but you do need to turn it off (close all
instances and any open windows and/or programs running on your internet
browser) and then re-open it.
· FINSNet.org
has a ‘Cache Buster’ implemented that automatically tells your internet browser
to go get the newest version of available web pages/files and/or images as they
are made available on start up.
· *However,
something must still kick this ‘process’ off. The easiest is to restart your
internet browser. Beware that all instances of the browser should be closed, to
guarantee that the changed FINSNet.org ‘Cache Buster’ (forced browser file
search) takes place when your internet browser starts/opens.
· Also note
that when you have restarted your internet browser and it has fetched new
versions of the files, the new version may take a while to load.
What does ‘Cache’ mean?
An internet browser, to efficiently (read
quickly) present content (from/on a website), will typically cache content
(website files and/or images) in a partially rendered form so that the next
time it must be presented to you (the next time you go to that same website),
your internet browser does not have to go all the way back to a distant server
in order to present the content (display the same website) – instead it just
pulls the content (previous version of website files/images) from its local
‘cache’.
· Unfortunately,
this will happen every time, even if there is a newer, better, updated version
of the content that is currently available on that distant server (website),
unless, there is something to cause your internet browser to go look for the
changes available.
· Browsers
will typically look for changes on startup, and not otherwise. Unless you
deliberately ‘Clear your Cache’ (which says to your internet browser “Go back
to the server and get changes for everything that you already have cached”).
How does FINS’ ‘Cache Buster’ work?
FINSNet.org Cache Buster makes changes (to our
website/files/images) easily detected by your internet browser such that any
changes in content are evident to your internet browser when it starts up. The
‘Cache Buster’ is in place to always force your internet browser, at start up,
to go and get new versions of cached content, if available.
· *However,
something must still kick this ‘process’ off. The easiest is to restart your
internet browser. Beware that all instances of your internet browser should be
closed, to guarantee that the changed FINSNet.org ‘Cache Buster’ (forced
browser file search) takes place when your internet browser starts/opens.
· Note that
when you have restarted the browser and it has fetched new versions of the
files, the new version may take a while to load – because it is actually coming
from the distant server to be rendered, and will be in the process of being
cached by your internet browser. For that reason, you may notice some slow
pages as they load for the first time, just after a Deployment since that is
what will trigger a cache update.
Why does it take so long to load FINSNet.org on
open?
After FINS has Deployed new code/images/files to
FINSNet.org, the ‘Cache Buster’ will be triggered when you open up your
internet browser for the first time since those changes were made available
(aka a forced ‘cache update’ of your internet browser).
· Note that
when you have restarted the browser and it has fetched new versions of
available files, the new version may take a while to load – because it is
actually coming from the distant server to be rendered, and will be in the
process of being cached by your internet browser. For this reason, you may
notice some slow pages as they load for the first time.
The Percent Saturation actions allow you to enter or edit
percent saturations of gasses by entire array or by individual container. This
feature requires special permissions to be allowed on the account that will be
inputting the Percent Saturation data for a Facility. *Please contact FINS
Support for assistance and permission approval/access.
Data Collection input options include:
· Scope/Container
· Date/Time
· Total Dissolved Gasses Percent
Saturation
· Oxygen Percent Saturation
· Dissolved Nitrogen Percent Saturation
*FINS User
credentials are managed via a request and approval process. Access to FINS
requires approval from Agency Representatives and/or FINS Sponsors/Steering
Committee. The first step of a new FINS login is User Login
approval.
Current users of
FINS are predominantly involved with hatchery programs administered by the
Lower Snake River Compensation Plan (LSRCP) and Idaho Power Company (IPC) but
as FINS use has become more prevalent with the Snake Basin co-managers, it has
grown to be used by other non-LSRCP/IPC programs and projects. Currently, a
number of BPA administered programs operated by the Nez Perce Tribe and Idaho
Department of Fish and Game use FINS data modules and receive FINS staff
support (training, troubleshooting, help desk assistance).
FINS’
primary platform is a website which means that you can use it as long as you
have access to the internet. There is no intranet or network privilege
necessary to get access to FINS Data or enter the data into FINS. All that is
needed is a User Name/Password with assigned permissions, further known
as Password Authentication Protocol (PAP).
FINS Team
Domain Administrators, Facility Administrators and Data Coordinators can
Create/Edit/Delete User accounts for all FINS users assigned to their Facility
via the Admin tab on FINSNet.org. The default FINS Role/permissions assigned
via FINS Facility Administrators and Data Coordinators is Data Query.
As of 4/2023, per
consensus by the Steering Committee Members, only FINS Team Domain
Administrators can Create and/or Edit existing User accounts to have Data Entry
or higher FINS Role/permissions.
·
Per the 4/6/2023 Steering Committee Meeting – members decided to enforce
Mandatory FINS Training for all new Data Entry User permissions.
o
Completion of FINS user designated Training Videos is now required
before access to data entry within each module
(Trapping/Holding/Spawning/Inbox/Incubation/Rearing/Release) is approved.
§
Facility Admin Role has been modified to prevent any new user
permission apart from Data Query
§
All new users and identified existing users will be required to
view FINS Mandatory Training Videos before receiving Data Entry permissions
·
Once all videos have been completed for a module, please contact
FINS Support for upgrading Data Query permissions to Data Entry
·
FINS Support will verify completion of mandatory training videos
via auditing prior to granting Data Entry role
§
Mandatory Training Video Menu is located in the User tab of
FINSNet.org
To access certain FINSNet.org and any FINS Online tools, you
must have an account and an assigned User Role. User Roles in FINS define your
permission level and at which Location your permissions are granted.
The typical User Role is structured in a fully nested
hierarchical relationship format, meaning each standard User Role includes all
permissions of the Role or Roles below it plus additional permissions for that
Role specifically.
The 5 typical User Role permissions are structured in the
following hierarchical relationship format:
1. Domain
Administrator (Facility Admin Permissions + Domain Admin Permissions)
2. Facility
Admin (Data Coordinator Permissions + Facility Admin Permissions)
3. Data
Coordinator (Data Entry Permissions + Data Coordinator Permissions)
4. Data
Entry (Query Tool Permissions + Data Entry Permissions)
5. Query
Tool (Base level FINS User Role Permissions – only Querying capabilities
allowed)
*Exceptions to the typical User
Roles do exist, by Add-On and/or Standalone Permissions. Add-On and Standalone
Permissions are managed by the FINS Team Domain Administrators.
·
Exception examples are - the Data
Official role (which is an add on and/or standalone permission) as well as
*Beta Portal and *Beta PBT Upload permissions. Change Location, the add-on
feature for User Permissions that allows a User to belong to multiple
Facilities, can only be assigned by FINS (Domain Administrators) Team Permissions
Managers.
A
description and the inherent permission for each typical User Role are as
follows:
Domain Administrator - members of
the FINS development team have been assigned this role. This role has
permissions to complete any task within FINSNet.org and FINS Online for all
Facilities and Users assigned to any Domain. This is the only Role that can
Create/Edit a User Account to have Data Entry permissions.
·
FINSNet.org
§
Admin – All Location, User and Workflow Management
§
User Tab – Create/Edit/Delete User Profiles, Read/Edit Locations
(Domain/Agency/Facility), Identify Users as Sponsors, Steering Committee or TAC
Members as well as Opt Users Out of What’s New communication
o
Contact Data Tab – Create/Edit and Note Contact Profiles
o
API Users Tab – Create/Edit/Delete and view Auditing for API
Users
§
Data Tab – Import, Upload, Query and Export Data to Excel
o
Create, Save, Open Customized Queries
§
FINS - Access FINS Online
§
Training/Support
·
FINS Online
§
Create/Edit/Delete Fish, Egg/Fry, Juvenile Records, Inventory and
Inbox Management
§
Verify/Finalize, Flag/Un-flag Fish, Egg/Fry, Juvenile Records
§
Query and Export Data to Excel
§
Create, Save, Open Customized Queries
§
Training/Support
Data Official - The Data
Official role is an Agency appointed position that holds the specific responsibility
of managing (Creating/Editing) Locations for their Agency’s Facilities. This
role was created to ensure that Location Disposition/Purposes and Names meet
Agency standards. This role is an Add-On and/or Standalone Permission. Add-On
and Standalone Permissions are managed by the FINS Team Domain Administrators.
·
FINSNet.org
§
Admin - Create/Edit Locations, Origin, Stock, Release
Types/Strategies
§
User Tab – User Profile, View Locations, Origins, Seasons,
Stocks, TAC, Learning Resources
§
Data Tab - Query and Export Data to Excel
o
Create, Save, Open Customized Queries
§
FINS - Access FINS Online
o
Training/Support
·
FINS Online
§
Flag/Un-flag Fish, Egg/Fry, Juvenile Records
§
Query and Export Data to Excel
§
Create, Save, Open Customized Queries
§
Training/Support
Facility Administrator - The
Facility Administrator role is intended to be assigned to the person at a Facility
who is ultimately responsible for the data reported by their Facility. Ideally
only one user per Facility will be assigned to this role to prevent data
management errors/confusion. In the event the Facility Administrator needs
another user to manage workflows, a second Facility Administrator that
collaborates with the first may be assigned. This role has permissions to
complete any task within FINSNet.org and FINS Online (except Agency Data
Official permissions for Location, Origin, Stock and Release Type/Strategy management)
for their Facility and staff.
·
FINSNet.org
§
Admin Tab – User, Quick View and Workflow Management
§
User Tab – User Profile, View Locations, Origins, Seasons,
Stocks, TAC, Learning Resources, Management Data Entry > Percent Saturation
§
Data Tab - Import, Upload, Query and Export Data to Excel
o
Create, Save, Open Customized Queries
§
FINS - Access FINS Online
§
Training/Support
·
FINS Online
§
Create/Edit/Delete Fish, Egg/Fry, Juvenile Sessions/Records, Inventory
and Inbox Management
§
Finalize/Verify/Flag/Un-flag Fish, Egg/Fry, Juvenile Records
§
Query and Export Data to Excel
§
Create, Save, Open Customized Queries
§
Training/Support
Data Coordinator - The Data
Coordinator role is intended to be assigned to the person that works closely
with the Facility Administrator at their Facility and who assists in managing
Users and other tools that Data Entry Users don’t have access to. A limited
Admin Menu is available to the Data Coordinator Role. Specifically, Data
Coordinator Role is allowed to Verify Fish, Egg/Fry and Juvenile Records and
Create/Update and Delete Users for their assigned Facility, whereas typical
Data Entry Users are not allowed those explicit permissions.
·
FINSNet.org
§
Admin Tab – User Management
§
User Tab – User Profile, View Locations, Origins, Seasons,
Stocks, TAC, Learning Resources, Management Data Entry > Percent Saturation
§
Data Tab - Import, Upload, Query and Export Data to Excel
o
Create, Save, Open Customized Queries
§
FINS - Access FINS Online
§
Training/Support
·
FINS Online
§
Create/Edit/Delete Fish, Egg/Fry, Juvenile Sessions/Records,
Inventory and Inbox Management
§
Verify/Flag/Un-flag Fish, Egg/Fry, Juvenile Records
§
Query and Export Data to Excel
§
Create, Save, Open Customized Queries
§
Training/Support
Data Entry - The Data Entry role
is intended to be assigned to a person trained and responsible for Data Entry
at their Facility. No Admin Menu is available to the Data Entry Role. Domain
Administrators grant Data Entry permissions; After mandatory training has been
completed.
·
FINSNet.org
§
User Tab – User Profile, View Locations, Origins, Seasons,
Stocks, TAC, Learning Resources, Management Data Entry > Percent Saturation
§
Data Tab - Import, Upload, Query and Export Data to Excel
o
Create, Save, Open Customized Queries
§
FINS - Access FINS Online
§
Training/Support
·
FINS Online
§
Create/Edit/Delete Fish, Egg/Fry, Juvenile Sessions/Records,
Inventory and Inbox Management
§
Flag/Un-flag Fish, Egg/Fry, Juvenile Records
§
Query and Export Data to Excel
§
Create, Save, Open Customized Queries
§
Training/Support
Data Query – The Data Query role
is the default Role in FINS for an authorized User. It allows access to Query
authorized data, for the Domain, Agency, Facilities their permissions are set
to. No Admin Menu, Import option or Verify/Finalize feature is available to
the typical Data Query Role.
·
FINSNet.org
§
User Tab – User Profile, View Locations, Origins, Seasons,
Stocks, TAC, Learning Resources
§
Data Tab - Upload, Query and Export Data to Excel
o
Create, Save, Open Customized Queries
§
FINS - Access FINS Online
§
Training/Support
·
FINS Online
§
Flag/Un-flag Fish, Egg/Fry, Juvenile Records
§
Query and Export Data to Excel
§
Create, Save, Open Customized Queries
§
Training/Support
Access Permission - Permission from a FINS Agency Official is required to
obtain a username to access FINS.
Access is restricted due to the preliminary version of the
data. The raw data is not considered ready for direct public consumption.
*FINS
User credentials are managed via a request and approval process. Access to
FINS requires approval from Agency Representatives and/or FINS
Sponsors/Steering Committee. The first step of a new FINS login
is User Login approval.
Admin > Permissions – The
following describes the FINS User Permissions by Module and Location Group (which
were initially expanded as available 6/21/2021 in the FINS Deploy Version
1.1.109.0, and continue to be expanded as priority dictates)
·
Permission Modules
§
Change Location Dropdown via User Tab
§
Origin Workflow – Create Data Entry for Date Range Origins
§
Trapping/Holding/Spawning/Incubation/Rearing/Release
§
Beta PBT Tagging/Tracking – Genotype Upload
§
Shed Rate Data Entry in Rearing Inventory
§
Shed Rate Data Entry at Release via Release Form
§
Shed Rate Data Entry Post Release via Release Query
·
User > Permissions by Module –
Users will be able to supersede
their existing FINS Role in certain circumstances when they have permissions in
a module that are different than their Original User Property FINS Designated
Role i.e.…Data Query. Permission
updates are auto emailed to the FINS Team Permissions Manager for auditing and
reporting
§ Permissions >
Role - When a User gets an Added User Location Option (Change Location
Feature) attached to their exiting permissions/FINS Login, the FINS Permissions
Manager(s) can assign a new/different Role to that User specific to each
Location that they have access to, instead of inheriting the Role tied to their
Original User Property (Location) permissions/Login (7/28/2022 – Version
1.1.130.0)
o
Example: A Facility Admin at Nez Perce Tribal Fish Hatchery
(NPTH) can now have Data Entry only access to ODFW Lookingglass FH (LGFH)
·
User > Change Location –
Users that have User Location
Options designated (managed by FINS Team Permissions Manager) will be able to
switch the Location that they belong to from their Original User Properties
(Location) to the designated Locations set up as User Location Options for
their login/username
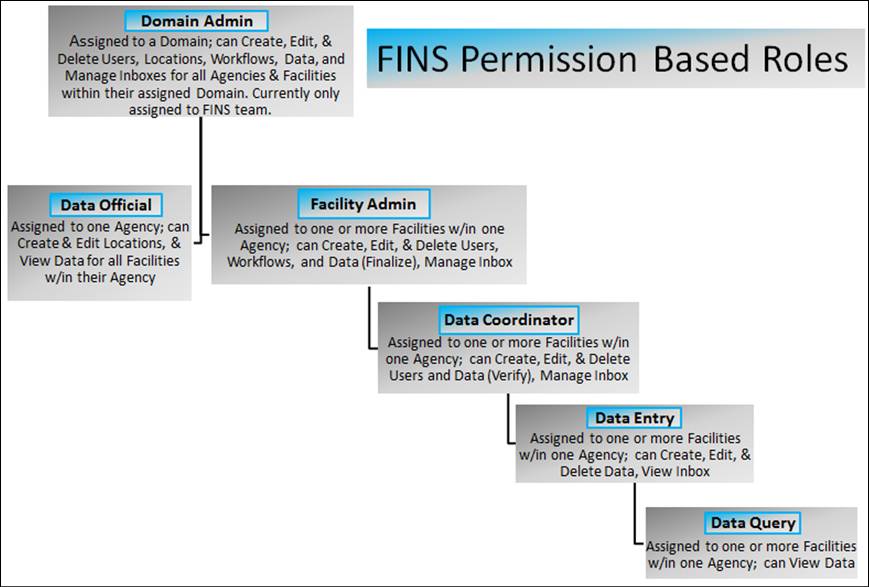

FINS User
credentials are managed via a request and approval process. Access to FINS
requires approval from Agency Representatives and/or FINS Sponsors/Steering
Committee. The first step of a new FINS login is User Login
approval.
*Facility Admin and/or Data Coordinator
Permissions Required
1. Click
on the Admin Tab
2. Click
on Setup > Users in the Admin Tab Menu
·
You will see the Manage Users grid containing the existing User
Accounts for the Facility you belong to
3. Right
Click in the Manage Users grid and select Add User
·
The ‘User Form’ popup will open
4. Complete
the User Form by entering the following required information
a) New
User's First and Last name
b) Agency
Email Address
c) Primary
Phone Number
d) Password
e) Domain
·
Confirm the Domain, Agency, and Facility is correct for this user
f) Default
FINS Role is assigned as Data Query (see FINS Roles above for detailed
permission descriptions and roles available)
·
If a new user will need Data Entry or higher permissions, please
direct them to the mandatory training video menu in the User tab of
FINSNet.org.
·
Once they complete their mandatory training for the module(s)
that they need immediate data entry access for, please contact, or have the new
user contact FINS Support (Support@FINSNet.org or 208.378.5279)
so that mandatory training requirements can first be confirmed as met and then
data entry permissions may be granted.
5. Enter
any other additional information associated with the New User that you prefer
·
Secondary Phone Number, Employer, Title, Supervisor, Website,
Physical and/or Mailing Address, Notes
6. Double
Confirm the Domain, Agency, and Facility set is correct for this user
7. Click
Save to Create New User
·
If the Save button is disabled, it is because there is an Error
in the User Form.
§
Hover over the Disabled Save Button and view the tooltip that
will guide you on the Error present
*If a New User needs to access more
than one Facility please contact FINS Support (Support@FINSNet.org or 208.378.5279)
for assistance in adding the Change Location feature to a New User. The FINS Change Location Feature – to allow a User to
belong to multiple Facilities – can only be assigned by FINS Team Permissions
Managers.
*Please Note that Training is
required for FINS; Mandatory Training Videos can be found in the
FINSNet.org User tab Menu
Please
contact FINS Support (Support@FINSNet.org
or 208.378.5279) to get New User Training scheduled or to verify and grant Data Entry permissions
after your Mandatory per Module Training Videos are completed for the module
that you need to access
Additional Self-paced
non-mandatory training videos and learning resources are also available via
this FINS User Manual and via the Training Library through many Training Videos
which can all be found on the User tab of FINSNet.org. There is also a
Training Calendar which displays dates available that we can schedule you for
custom Training.
To ensure the quickest assistance for FINS,
please always email FINS Support at: Support@FINSNet.org
*Facility Admin and/or Data Coordinator Permissions Required
1. Click
on the Admin Tab
2. Click
on Setup > Users in the Admin Tab Menu
·
You will see the Manage Users grid containing the existing User
Accounts for the Facility you belong to
3. Right
Click in the Manage Users grid on the row of the User you would like to Edit
4. Select
Edit from the Context Menu – “Edit username (First Last Name)”
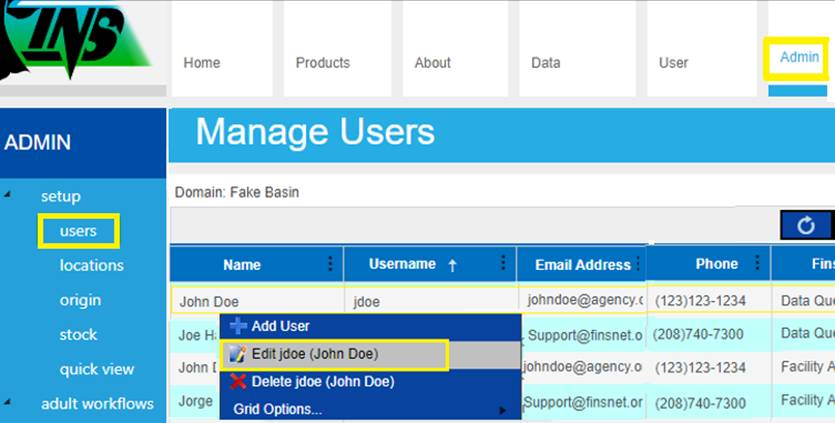
·
The ‘User Form’ popup will open
5. Edit
the existing User by Editing any/all of the following information
a) Existing
User's First and/or Last name
b) Agency
Email Address
c) Primary
Phone Number/Type
d) Secondary
Phone Number/Type
e) Username
f) Password
g) Domain
h) Agency
i) Facility
g) FINS
Role (Only FINS Team Domain Administrators can upgrade a Role from Data Query; see
FINS Roles above for detailed permissions)
j) Employer
k) Title
l) Supervisor
m) Website
n) Physical
and/or Mailing Address
o) Notes
6. Double
Confirm the Domain, Agency, and Facility set is correct for this user
7. Click
Save to Save the Edits to the Existing User
·
If the Save button is disabled, it is because there is an Error
in the User Form
§
Hover over the Disabled Save Button and view the tooltip that
will guide you on the Error present
*If an existing User
needs to access more than one Facility or have been logging in with multiple
usernames please contact FINS Support (Support@FINSNet.org or 208.378.5279) for
assistance in adding the Change Location feature to an
Existing User. The FINS Change Location Feature – to allow a User to belong to
multiple Facilities – can only be assigned by FINS Team Permissions Managers.
*Facility Admin and/or Data Coordinator Permissions Required
1. Click
on the Admin Tab
2. Click
on Setup > Users in the Admin Tab Menu
·
You will see the Manage Users grid containing the existing User
Accounts for the Facility you belong to
3. Right
Click in the Manage Users grid on the row of the User you would like to Delete
4. Select
Delete from the Context Menu – “Delete username (First Last Name)”
5. After
selecting Delete, a Browser Confirmation Notify will pop up at the top of the
webpage that reads:
“Are you sure you want to delete
user ‘username (first/last name)? [OK / Cancel]
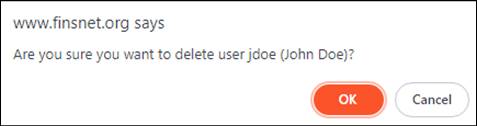
a. Selecting
OK – will Delete the User
·
Upon Delete, a Browser Notify will pop up at the top of the
webpage that reads: “User Deleted [OK]”
·
Click on OK and the Delete Notify will close and the Manage Users
grid will refresh displaying existing users
b. Selecting
Cancel – will Cancel the Delete command, leaving the existing User in the
Manage Users grid
*Change Location add-on permission required
Admin >
Permissions - The initial expansion of FINS User Permissions by Module and
Location Group available (6/21/2021 Version 1.1.109.0) includes the following
features and will continue to be expanded as priority dictates
Permission
Modules - Change Location Dropdown via User Tab
User > Permissions by Module - Users
are able to supersede their existing FINS Role in certain circumstances when
they have permissions in a module that are different than their Original User
Property FINS Designated Role i.e.…Data Query. Permission
updates are auto emailed to the FINS Team Permissions Manager for auditing and
reporting
User >
Change Location - Users that have User Location Options designated (managed
by FINS Team Permissions Manager) will be able to switch the Location that they
belong to from their Original User Properties (Location) to the designated
Locations set up as User Location Options for their login/username
*If you belong to
more than one FINS Facility and have been logging in with multiple usernames
please contact FINS Support (Support@FINSNet.org or 208.378.5279) to get
your User Location Options setup so that you can use the FINS Change Location
functionality
1. Once
logged in, Click on the User Tab of FINSNet.org
2. If
Change Location permissions are present for your account, the Change Location
dropdown menu will appear above the Change Password link
3. Your original location (Facility) assignment will display
as ‘Original User Properties’
·
This is the default Change Location selected
4. You may change your location (Facility) assignment by
selecting from the Change Location Dropdown Menu a different Location (Facility)
that you have permissions at
a. Select the Facility that you wish to switch your logged in permissions
to via the dropdown
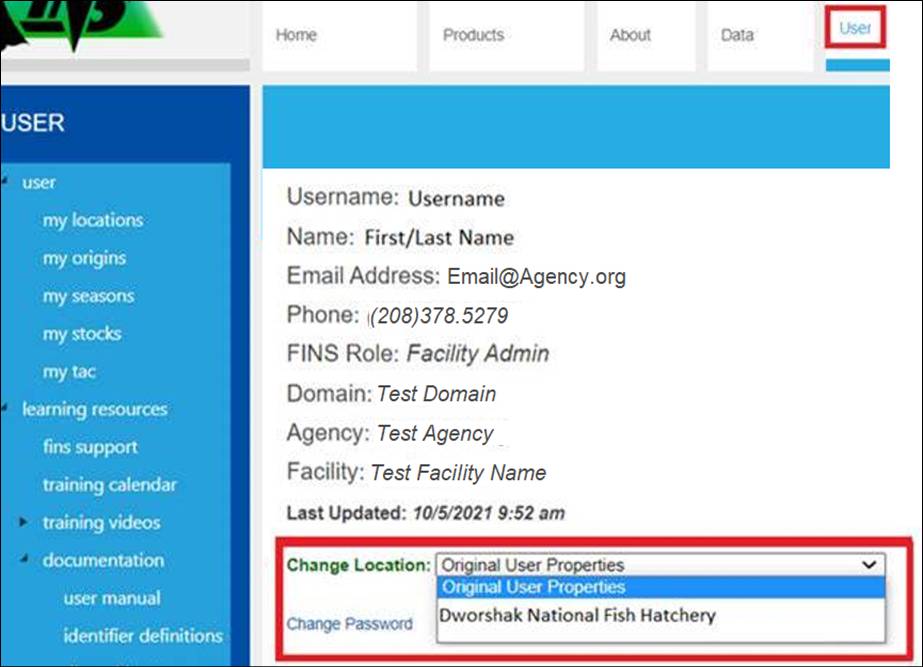
5. Once
your Change Location is selected, there will be a quick notify displayed in the
User Tab form that reads: “Successfully changed
your location to X.”

*Change Location
Feature – to allow a User to belong to multiple Facilities – can only be
assigned by FINS Team Domain Administrator Permissions Managers. Please
contact FINS Support at Support@FINSNet.org or 208.378.5279 if such permissions are necessary for any New
or Existing User accounts
All Locations (Facilities, Traps, Release Sites, Holding,
Transfer, Shipping, Spawning, Disposal and Distribution) will be created by
Data Officials. Once locations have been created, Facility Administrators will
be able to customize their Facility by creating customized workflows. Creating
and Editing Locations are permissions only available to Data Officials and
Domain Admins. Each Agency has an assigned Data Official and they are
responsible for those duties. If you need a Location created, edited, or deleted
you will need to contact your agency's Data Official.
Ø
Domain –
o
Agency/Tribe
§
Facility or Program
o
Trap
o
Release Site
o
Disposal + Distribution
o
Pond
o
Spawning
o
Shipping
o
Transfer
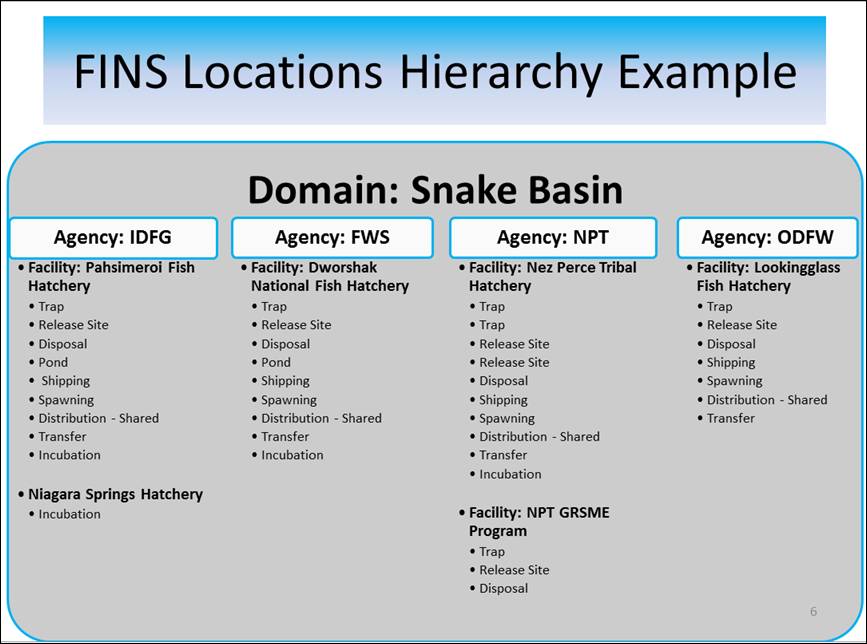
·
Creating a Location - FINSNet.org > Admin Tab > Setup
> Manage Locations (Data Official)
1. Select
the Type of Location you will be creating
2. Select
the Parent Facility of the New Location you will be creating
3. Click
‘New’
4. Complete
the New Location form. Latitude and Longitude values are required to save a new
Release location.
5. Submit
·
Editing a Location - FINSNet.org > Admin Tab > Setup
> Manage Locations (Data Official)
1. Select
the Type of Location you wish to Edit
2. Select
the Parent Facility of the Location you wish to Edit
3. Click
on the Location
4. Click
Edit
5. Enter
your Edits into the form
6. Submit
·
Deleting a Location - FINSNet.org > Admin Tab > Setup
> Manage Locations (Domain Admin)
1. Select
the Type of Location you will be Deleting
2. Select
the Parent Facility of the New Location you will be deleting
3. Click
on the Location you wish to Delete
4. Click
Delete
5. Submit
When a Location is 'Deleted' it will retroactively affect
the records or sessions associated to that Location. Records and Sessions
associated to a 'Deleted' Location will be marked as ‘Deleted’ in most
instances.
The Incubation Location Management UI allows you to
create, edit and delete Incubation locations and containers as they are
arranged in a hierarchy, by Facility.
Create New Incubation Hierarchy:
1.
Admin > Manage Locations
2.
Location Type: Select Incubation Locations
3.
Click ‘Show Hierarchy Map’ (blue text)
4.
Check ‘New Hierarchy’
5.
Enter Name of Incubation Hierarchy (i.e. BY15 Fall Chinook)
6.
Click ‘Add Type’ (top left of grid)
7.
Enter Name of highest level of Incubation Container (i.e. Row)
8.
Enter Number of Rows in your Incubation Location
9.
Continue to Add Container types until your lowest level of containers
have been added
(Example Container
hierarchy)
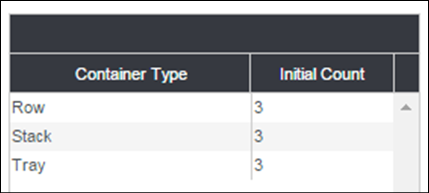
10.
Once your Containers have been added by level, click Save.
11.
Your Incubation Hierarchy will display in a Collapsed view by highest
level container type.
12.
Click on the arrow next to the highest-level container type to view the
containers nested within.
Edit Container Hierarchy – Add
containers to a level
1.
Right click on the Level of Container that is above the container type
you want to add. For example, if you want to add a Stack, right click on Row
the new stack will be in. If you want to add a new Tray, right click on the
Stack the new Tray will be in.
2. Click
‘Add New…’ in the context menu and the new container will be added.
Edit Container Hierarchy – Delete
containers from a level
1. To
Delete a container, right click on the container you wish to Delete and Click
‘Delete …’
2. Deleting
containers that currently have eggs in them is not permitted.
Edit Container Hierarchy – Rename
Containers
*It is suggested that Re-naming starts at the highest-level
containers
Rename one container
type at a time
1. Single
click on the Container you wish to Rename
2. Highlight
the Current Name
3. Enter
the New Name
4. Press
Tab or Click out of the Text Field
Mass Rename by Container Level
1. To
do a mass rename of a type of containers, right click on one of those
containers in the Container Hierarchy display.
2. Select
‘Rename …’
3. In
the dialog box that opens you have several options:
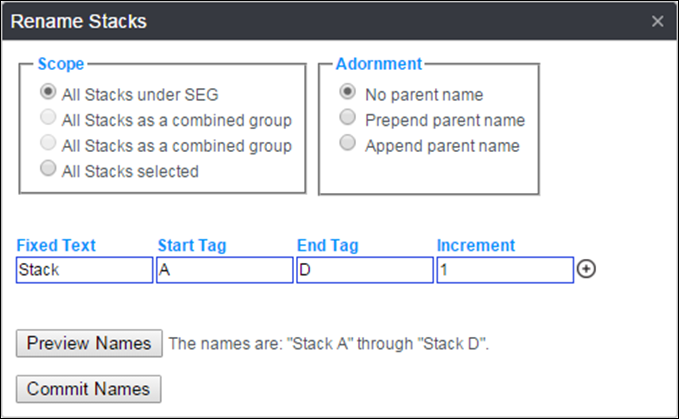
4. Scope:
this section of the box allows you to select the group of containers that will
be updated with the mass rename
5. Adornment:
this section of the box allows you select if and/or how you would like the
container type path to display in each name
6. Name
fields: *It is suggested the re-naming starts at the
highest-level containers
·
Fixed Text: enter the fixed name that will appear in all
of the names for this container level rename. For example: Stack
·
Start Tag: enter the first unique tag that will follow the
Container type name. For example: A (Stack A). These fields can be either
alphabetic or numeric, but not a combination of both. If you want to combine
alphabetic with numeric you need to add a line by clicking on the + button.
·
End Tag: enter the last unique tag that will follow the
Container type name. For example: C (Stack C) (Stack B will automatically be
updated in this mass rename). These fields can be either alphabetic or numeric,
but not a combination of both. If you want to combine alphabetic with numeric
you need to add a line by clicking on the + button.
·
Preview Names: click here to preview the new container
names before saving them.
·
Commit Names: Click here to Save the Mass Rename schema
you have created.
Inactivate/Delete/Clone Hierarchies:
·
Inactivate: Hierarchies can be made Inactive. This will
Hide the Hierarchy including all records associated with the Hierarchy. An
‘Inactive’ hierarchy can be ‘Re-Activated’
·
Delete: Hierarchies can be Deleted, if they are empty.
Once a hierarchy is Deleted, it cannot be ‘un-deleted’.
·
Clone: Hierarchies can be cloned. Cloning a hierarchy will
create a new hierarchy with the exact same structure. If the hierarchy that was
cloned has egg inventory in it, the new hierarchy will still only be just the
structure.
***All of these actions are done only by
the FINS team. Contact FINS support (Support@FINSNet.org
or 208.378.5279) for assistance.
Permissions
The following User Role is able
to make Create/Edit/Delete Facilities in FINS:
·
Domain Admin
o
This is a permission/role
restricted to FINS Team PSMFC Employees
o
This restriction is in place:
§ To prevent the unnecessary creation of duplicate
Facilities
§ As a Location control in the database
§ To prevent editing of Facility information by
unauthorized personnel
Use Case
There are instances when
Facilities (Offsite Owner) will perform fisheries activities at another
Facility’s (Offsite Parent) physical Location.
Some examples of possible
Offsite fishery activities can include the ‘Owner’ Facility Spawning Adults,
Collecting Egg Takes, Incubating Eggs or Rearing Juveniles at a ‘Parent’
Facility Physical Location. The Owner Facility in this case, would use the Parents
physical Locations (Spawning, Incubation or Rearing Location) to perform any of
these activities.
There are also instances in which Facilities that belong to
one Domain may Transfer Fish/Eggs/Juveniles to Facilities that belong to
another Domain (Inter-Domain Transfers). FINS gives Facilities the ability to
create both Intra and Inter Domain Offsite Locations so that all offsite
activities can take place.
*It is imperative that both the
Parent Facility and Owner Facility FINS Facility Admin staff have a
conversation prior to creating any Offsite Locations in FINS. It is also
important that after the creation of an Offsite “Relationship” there is Testing
& Confirmation completed and communicated between the Parent and the
Owner(s) FINS Facility Admin staff as to what they will each now see and the
agreed upon usage of the designated Offsite Location(s).
Business
Logic
·
Parent – Facility the Offsite Location belongs to/is physically
located at, that creates the Offsite Location designation for the Offsite Owner
to use
·
Owner- Facility using the Offsite Location created by and
physically located at the Parent Facility
·
Parent Facility Locations can have more than one Offsite Owner
Facility designation and an Offsite Owner Facility can have more than one
Parent Facility Location relationship
·
Only the Parent Facility of the applicable Location can designate
a Location as Offsite for an Owner Facility relationship
·
Offsite Locations can be created for the following Location
Types:
o Trapping
o Holding
o Spawning
o Incubation
o Rearing
·
Offsite Locations created can be seen by both the Parent and
Owner Facilities
·
Both Parent and Owner Facilities can enter Data for their Offsite
Locations
·
Offsite Relationship Descriptions are required on any Offsite
Designation and will display in all relevant Queries as metadata
·
Querying Data of a Parent or Owner’s Location via the FINSNet.org
Data Tab will display a notification in red text so the Query User is aware
that there is an Offsite Relationship for the queried dataset
Validation
·
Offsite Trapping, Holding, Spawning, Incubation and Rearing
Locations can only be designated by PARENT users with Data Official permission
(this includes FINS Domain Admins, Facility Admin/Data Officials and/or Agency
Data Officials)
·
Inbox Locations can only be designated as Inter-Domain Offsite by
a FINS Domain Admin
·
Descriptions are required and will display in all relevant
Queries as metadata
·
Querying Data of a Parent or Owner’s Location via the FINSNet.org
Data Tab will display a notification in red text so the Query User is aware
that there is an Offsite Relationship for the queried dataset
Required
Fields
Location Type
·
Selecting a Location Type is required
Name
·
Entering the name of the Location is required
This is an offsite location checkbox
·
Checking this checkbox is required when creating an Offsite
Location
Parent Location
·
Parent Location will be automatically prefilled with the Parent
Location that the user belongs to.
Latitude
·
Latitude is required for Release and Rearing Release Locations
Longitude
·
Longitude is required for Release and Rearing Release Locations
Owner Offsite Facility
·
Selecting an Offsite Owner Facility is required when creating
Offsite Locations
·
Facility selected will be the Owner Facility for the designated
Location
Description
·
Entering a Description is required for metadata purposes
Steps
- When creating an Offsite
Location, identify who the Parent is and who the Owner is; Confirm a
relationship has been communicated and agreed upon by both the Parent
Facility Admin and Owner Facility Admin(s)
- As the Parent, click on the
Admin Tab and then click on Locations
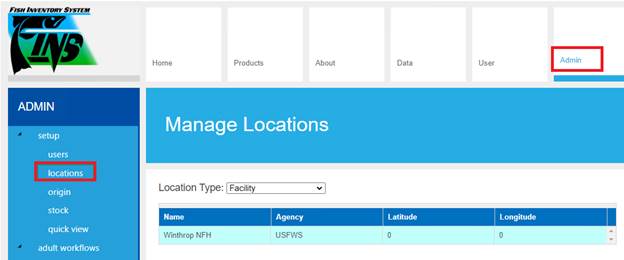
- Select the Location Type that
you will be making the Offsite Location for
Offsite Locations can be created
for the following Location Types:
·
Trapping
·
Holding
·
Spawning
·
Incubation
·
Rearing
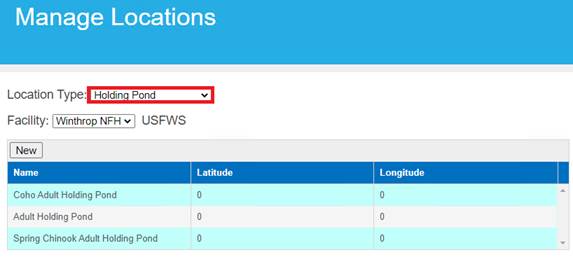
- After selecting the Location
Type click on ‘New’ to Create a New Location or click on ‘Edit’ to Update
an existing Location
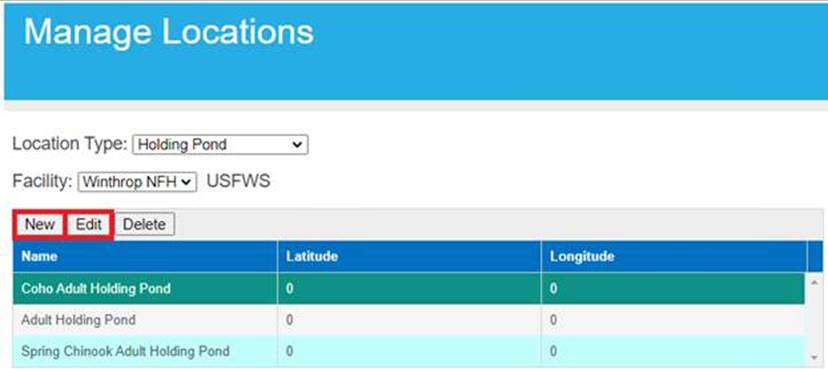
- After clicking on ‘New’ or
‘Edit’, check the ‘This is an offsite location’ checkbox
a. Checking
the checkbox will open up a separate dialogue box which will allow the
selection of the Owner Facility for this Offsite Location
i.
If the Offsite Location created is being made for Facilities that belong
to different Domains, click on the ‘Allow Owner Facility of Any Domain’
checkbox to see Facilities that belong to other domains

- Click on the checkbox for the
Offsite Owner Facility(s) that you want to create an Offsite relationship
with for your selected Location
- Enter a Description that
explains the relationship/purpose of the Offsite Owner designation then
click ‘Close’
- Click on ‘Submit’ to create the
new Offsite Location designation
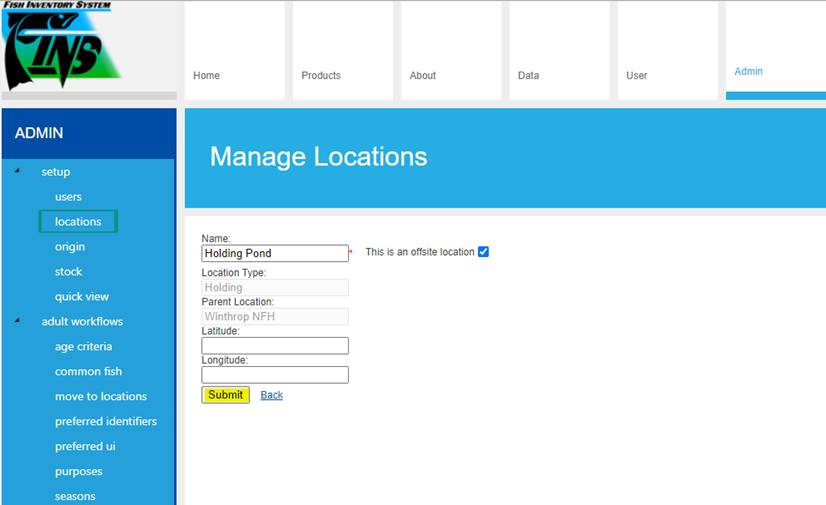
Use Cases
·
If a dataset is being sent to an Agency/Tribe/Facility that is
currently using FINS or not, the dataset will be handled as a Transfer, not a
Shipment.
o This
is to:
§ Safeguard against
duplicate data if/when an Agency/Tribe/Facility imports Historical Data into
FINS
§ Ensure a standard
process for handling data at Domains/Agencies/Tribes/Facilities within FINS
§ Protect integrity of
future data
§ Maintain data
consistency
·
If an Agency/Tribe/Facility for the Senders Domain is currently
NOT in any Domain of FINS, but Transfers are being made between Senders Domain
and the new Agency/Tribe/Facility, then the Senders Agency Data Official would
contact the FINS Support (Support@FINSNet.org
or 208.378.5279) to have that new Agency/Tribe/Facility created in the
FINS database before Transfers can take place via Data Entry by the Sender
Facility (via the Trap Fish, Move Fish, Spawn
Fish, Receive Fish/Egg/Fry/Juvenile, Move Egg, Rearing Move Forms)
·
If an Agency/Tribe/Facility for the Senders Domain IS currently
in a different Domain of FINS, but Transfers are being made between the Senders
Domain and the other Domain’s Agency/Tribe/Facility, then the Senders Agency
Data Official would contact the FINS Support (Support@FINSNet.org or 208.378.5279)
to have that existing Agency/Tribe/Facility Inbox marked as an Inter Domain
Offsite Inbox so that Transfer data may be entered (via
the Trap Fish, Move Fish, Spawn Fish, Receive Fish/Egg/Fry/Juvenile, Move Egg,
Rearing Move Forms)
o This
prevents a duplicate version of an existing Agency/Tribe/Facility from being
created in FINS under a different Domain just because the data will be sent to
a Location that falls in the Sender Domain’s footprint.
o This
logic applies to any Agency/Tribe/Facility that is already IN FINS
·
Shipping
Locations are reserved for Final Disposition Destinations, for example (OR Zoo,
MK Nature Center, WSU Bear Program…)
o
DO NOT CREATE SHIPPING LOCATIONS IN
PLACE OF AGENCY/TRIBE/FACILITY TRANSFER LOCATIONS
Use Case Definitions
·
Inter Domain Transfers: Transfers made to Agency/Tribe/Facility outside
of your Domain
·
Intra Domain Transfers: Transfers made to Agency/Tribe/Facility within
your Domain
1.
From the Admin tab, click on the locations option highlighted below.
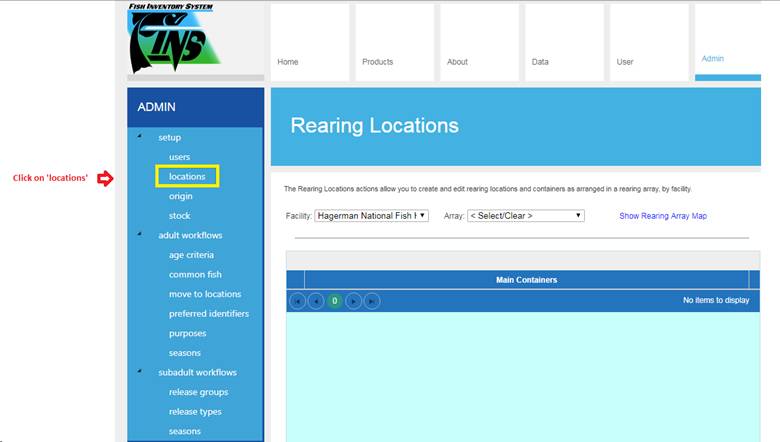
2.
Click on the ‘Location Type’ drop down menu and select ‘Rearing
Locations’ as shown below.
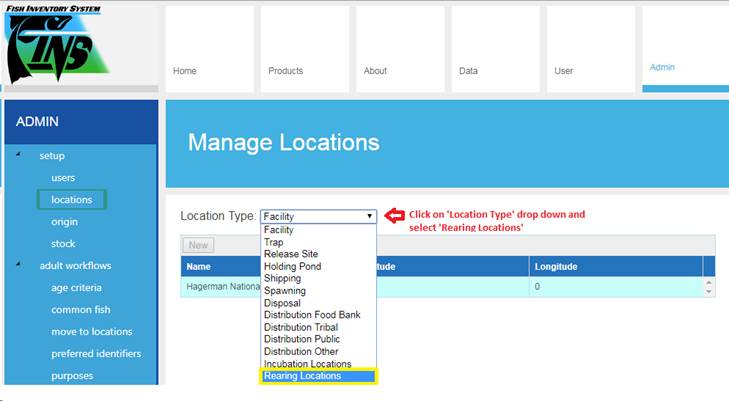
3.
From the Array drop down menu highlighted below, select the Array that
you want to Clone.
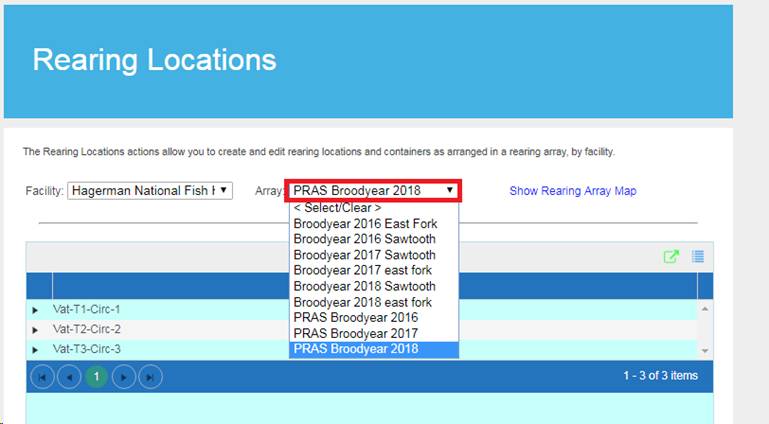
4.
Hold down on your ’Ctrl’+’Alt’ key and press the ‘C’ key to enable the
Clone button highlighted below.
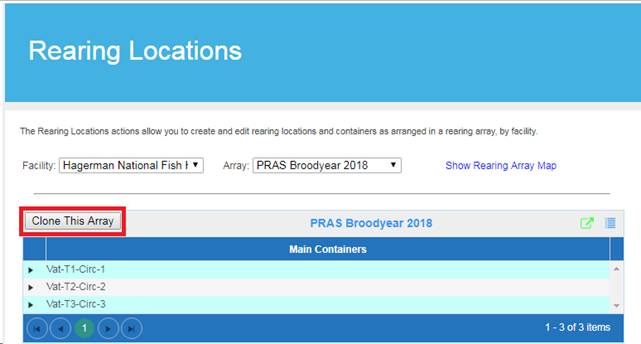
5.
Click ‘Clone This Array’ button to Clone the selected Array.
6.
To rename the cloned Array, click on the blue grid icon highlighted
below.
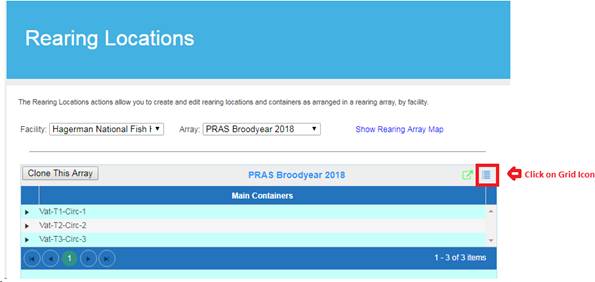
7.
An ‘Options’ dialogue box will pop up.
8.
Enter the desired Array name in the ‘Array Name’ field highlighted
below.
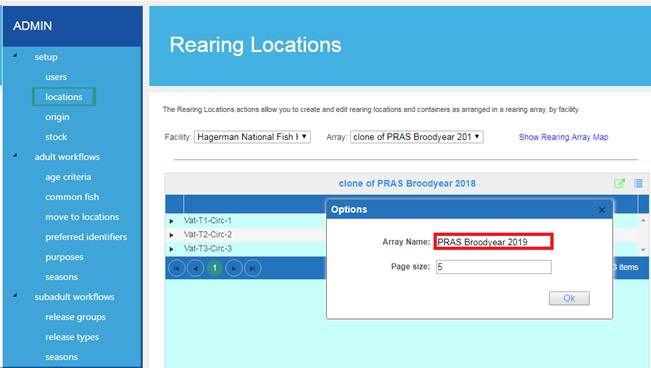
9.
Click ‘OK’ once ‘Array Name’ has been edited to save the changes.
Admin->Setup -> Origin
*FINS Origin Workflow Training should be completed
to best assist in your Agency FINS Origin management
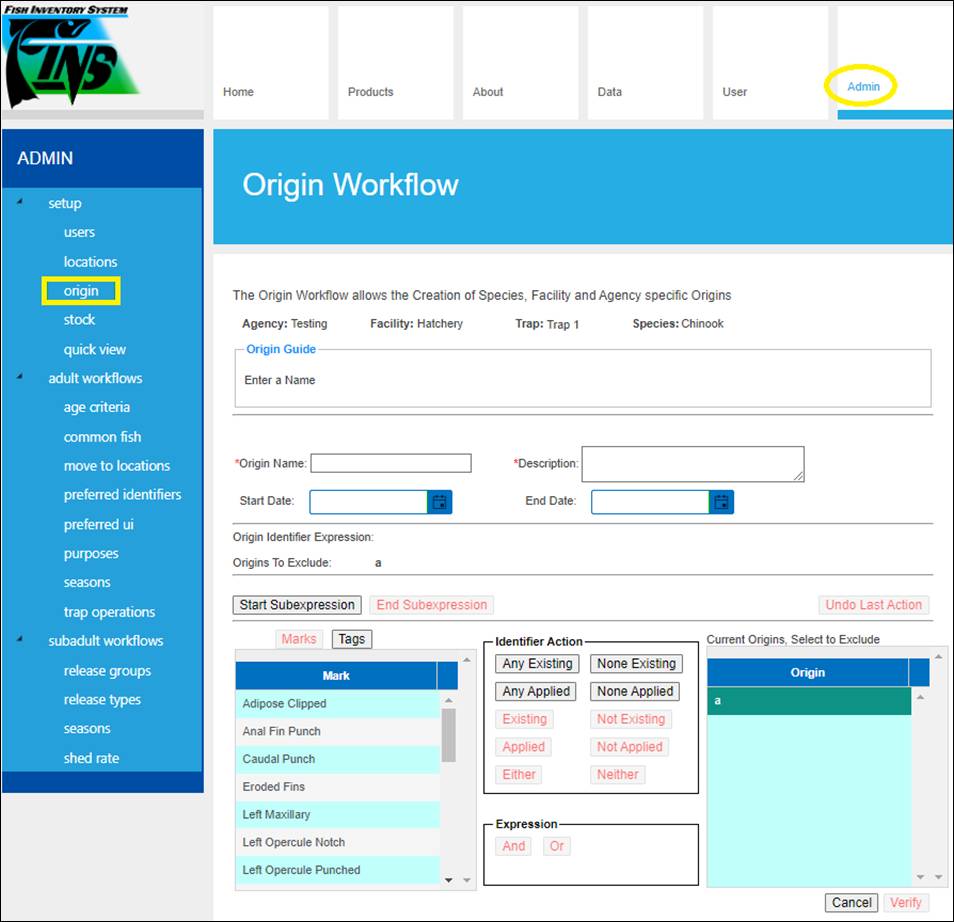
REVIEW
ANY AND ALL EXISTING ORIGINS BEFORE CREATING ANY NEW ORIGIN TO PREVENT
CONFLICTS
Origin Workflow Menu is available only to FINS Data Official
Users for managing Origins at their Agency.
Both Origin Workflows and Origin Filter Validation
menus are available under this Admin > Setup Menu.
Origin
Workflows - allow customizing the
name of Fish Origins in FINS Trapping, Holding and Spawning per Agency.
Created expressions are used to calculate the Origin Name in Trapping, Holding
and Spawning Queries/grids. Origin Workflow allows the Creation of Species,
Facility and Agency specific Origins.
Origin
Filter Validation - feature allows
customization of the Save Logic on FINS Trapping, Holding and Spawning Forms.
Origin Filter Validation selections apply and are allowed per Form Type, Agency
and Facility. Origin Admin Users can determine if/when an Origin during Data
Entry is required, not required or just displays as a warning before allowing a
record to be saved, for each module/data type.
Origin
Workflow ‘Origins’ grid – displays the existing Origins for the Selected Facility, Trap, Species
and Run
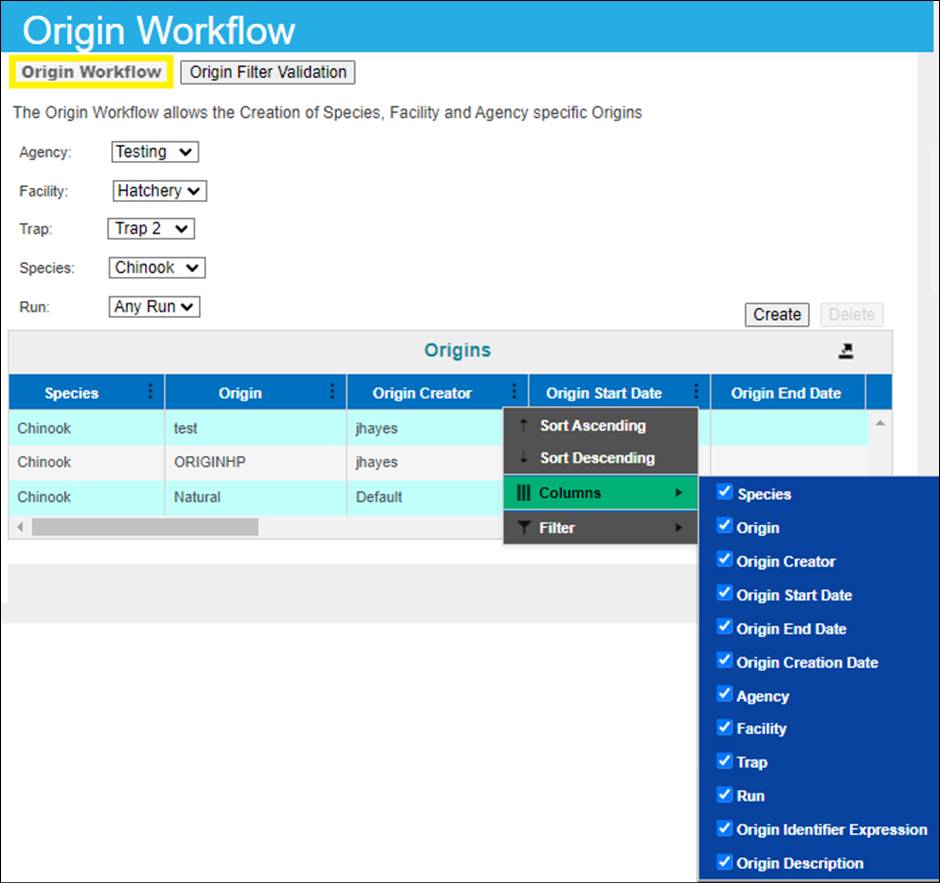
The
following Columns (all default as shown) are included in the Origins grid:
Species –
Species the Origin applies to
Origin –
The Name of the Origin as defined by the Origin ‘Creator’
Origin
Creator – FINS Username of the Admin User that Created/defined the Origin
Origin
Start Date – The first Date in which the Origin is calculated
Origin End
Date – The final Date in which the Origin is calculated
Origin
Creation Date – Date/Time Stamp that the FINS Admin User Created the Origin
Agency – Agency
the Origin applies to
Facility – Facility
the Origin applies to
Trap – Trap
the Origin applies to
Run – Run
the Origin applies to
Origin
Identifier Expression – Expression (including any Origin Exclusions) of Origin
as defined by the Admin user that Created the Origin
Origin
Description – Description defined by the Admin User that Created the Origin to
assist Data Entry and Query Users with the details of the Origin
Origin
Filter Validation Workflow – displays the existing Origin Data Entry validation
requirements (Required, Warning, Not Required) per data type/module
(Trapping/Holding/Spawning)
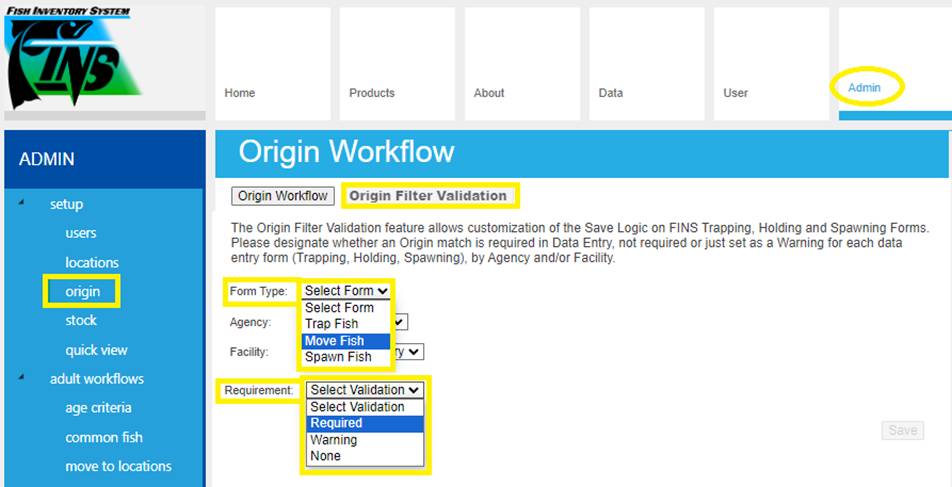
Business
Logic
Display – If there has ever been a Quick View workflow started/saved
for a Trap/Species combination, then the option for ‘Standard’ or ‘Quick’ will
display within a Trapping Session when attempting to open the Trap Fish Form
Exclusions – By Default, existing Origins are selected as ‘Current’
Origins to Exclude from your New Origin Expression being created. This is meant to assist the Origin Workflow User from
creating conflicting Origin Expressions, which could result in Fish having
multiple possible Origins. However, you can UN-Exclude existing
Origins by unselecting them from the ‘Origin’ grid of existing Origins before
Verify.
Create/Delete – Origins are only able to be Created and/or
Deleted. There is no Editing functionality available
- to prevent further complicating the validation on Verify/Create due to the
possible complexity of existing Origin (Sub)Expressions.
Origins on
Transfers – When
Fish are transferred between facilities, the Original Hatchery's Origin
information (where the Fish were moved from) is transferred to the destination
location. This allows for accurate tracking when Fish are transferred to
another Facility with no defined Origins.
This also applies when the Fish transferred to another FINS
facility have the same Identifiers but different Origins. In this situation,
the Original Hatchery's Origin information (where the Fish were transferred
from) is transferred to the destination location, even if the receiving
Hatchery has different Origins for Fish with the same Identifiers applied.
Admin->Setup -> Stock
*FINS Stock Workflow Training should be completed
to best assist in your Agency FINS Stock management
Stock Workflow Menu is available only to FINS Data Official
Users for consistency in managing Stocks per Agency.
The Stock Workflow allows the Creation/Edit/Deletion of
Stocks Spawned at your Agency, per Agency, Facility and/or Species.
FINS
Agency specific Stocks allow the inclusion of the following metadata on
Create/Edit –
Custom Name
Custom
Description
Applicable
to entire Agency – Agency is owner of stock
Applicable
only to specific Facility – Facility is owner of stock
Applicable
to one or more Species
Admin->Setup -> Quick View
Quick View
customization is available for FINS Online and FINS Offline Users and managed
per Facility/Trap and/or Species/Run by the FINS Facility Admin Role. The
Quick View ‘Form Designer’ that displays in the Admin > Setup> Quick View
Menu allows an Agency/Facility to customize the design of the FINS Trap Form
to match their process at Trapping, to facilitate the quickest possible
real-time Trapping Data Entry.
Using Quick View
FINS Online –
To view/use the customized Trap form select the ‘Quick’
option when opening a Trapping Session Trap Fish form.
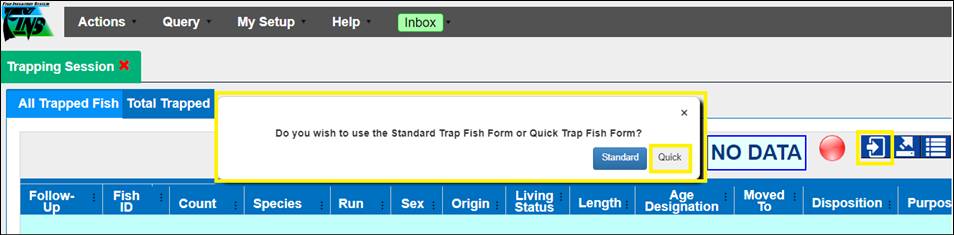
FINS Offline –
To view/use the customized Quick
Views in the FINS Offline that are created/edited by Facility Admins Online:
1. Offline
Users have to download the latest version of the FINS Offline App via
Products->FINS Offline
2. Once
Logged In to the Offline App, download the current version of the customized
Quick View settings by going to Admin->Update Database->Update All Tables
in the Offline App Menu itself. *This update table
action requires an internet connection, so this update will need to occur at
the Hatchery/Office before heading out/offline
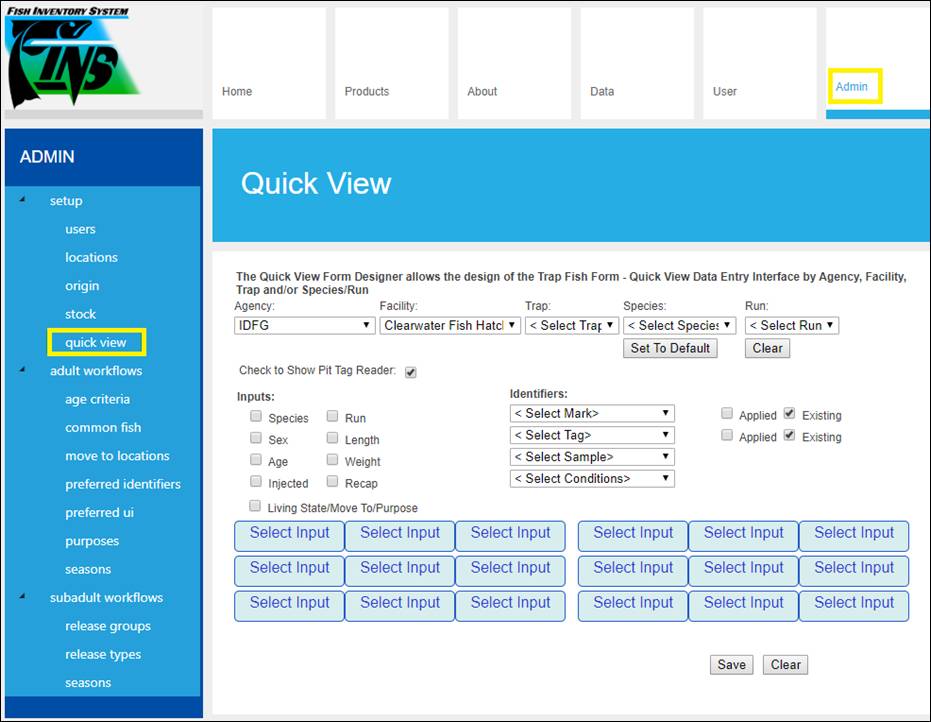
For assistance creating a Trapping Quick View template,
please contact FINS Support by calling 208.378.5279 or emailing us at Support@FINSNet.org
Age Criteria Workflow
Permissions
The following users are able to make
changes to the ‘Age Criteria’ workflow:
a) Facility Administrator
b) Facility Administrator/Data Official
These options have been determined by
FINS User Committee and agreed upon by the Steering Committee.
Description:
The ‘Age Criteria’ workflow allows users the ability
to specify the Age Designation of Chinook depending on the parameters entered
for Trapping, Holding, or Spawning Locations. All fields are required to
properly set up an Age to Length Designation.
The ‘Age Criteria’ workflow is retroactive. This means
that if in the future, users decide to change the Age Designation of a Chinook
and keep the same parameters, they can do so. Since the workflow is
retroactive, existing & future data will be updated to reflect the new
changes to the workflow.
This workflow is accessed via FINSNet.org > Admin
Tab > Sub-Menu Workflows > Age
Use Case:
The Age Designation of a Chinook
can vary by Location. What constitutes an Adult in one Location can constitute
a Jack in a different Location. Furthermore, a Chinook with the same length can
be considered an Adult during a certain time period & a Jack/Jill during a
different time period. Because of this, Hatcheries can determine what
constitutes an Adult, Jack/Jill, or Mini-Jack by Location, by Date.
Species
Currently, ‘Chinook’ is the only
species available for ‘Age Criteria’ designation.
Age Designations
a)
Adult
b)
Jack/Jill
c)
Mini-Jack
These options are what have been determined by FINS’
User Committee and agreed upon by the Steering Committee.
Validation:
Gaps
a)
Gaps cannot exist between the
Length End of an Age Designation & Length Start of an Age Designation of
another Age Criteria that exists in the current Location (Refer to screenshot
below).
Overlap
a)
When adding a new ‘Age
Designation’, ‘Start Date’ & ‘End Date’ cannot overlap with existing Dates
on a current ‘Age Designation’ within the current Location.
b)
‘Length Start’ & ‘Length End’
cannot overlap with other Age Designations that exist in the current Location
(Refer to screenshot below).
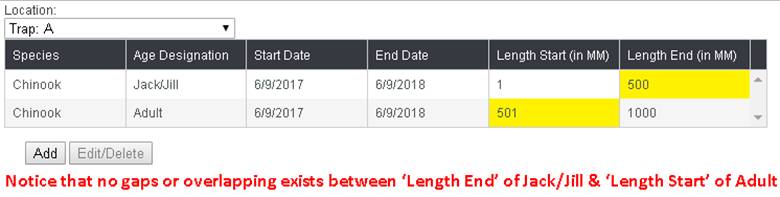
Location
1.
One ‘Location’
selection is required.
2.
Add/Edit/Delete.
a. ‘Add’ button will enable after
selecting a ‘Location’.
b. ‘Edit/Delete’ button
will only enable if there are multiple workflows and the user selects a
specific workflow.
3.
The ‘Optional-Add Other Locations with this Age
Criteria’- field is only required if you want to Add/Edit criteria to multiple
locations.
Species
4.
The ‘Species’
field is required & defaults to ‘Chinook’.
Age Designation
5. ‘Age Designation’ is
required. Select from the following options:
a.
Adult
b.
Jack/Jill
c.
Mini Jack
Date
6.
‘Start Date’ is required.
a. Start
Date is based off PST beginning at 12:00 AM PST of the Start Date selected.
7.
‘End Date’ is required.
a. End
Date is based off PST ending at 11:59 PM PST of the End Date selected.
Length
8.
'Length
Start' is required.
a.
Length Start must be in
millimeters (mm).
b.
Length Start must be greater than
or equal to 1 (mm).
9.
'Length End' is required.
a.
Length End must be in millimeters
(mm).
b.
Length End must be greater than
Length Start with a maximum value allowed of 1500 (mm).
10.
Click on the
‘Save’ button to save changes.
Steps
Create
1. Select a ‘Location’ from the drop-down menu
highlighted below for the workflow you want to create.
·
Validation
– One ‘Location’ selection is required

2.
After selecting a ‘Location’, click on the ‘Add’ button to create a new
workflow.
·
Validation – ‘Add’ button will enable after
selecting a ‘Location’
Example
of Location to Add a workflow

Clicking on
the ‘Add’ button will present you with the following screen:
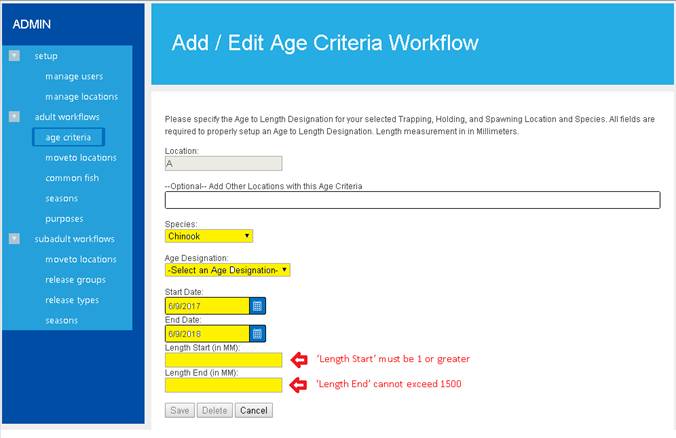
3. If
you need to ‘Add’ multiple locations, click on the ‘Optional-Add Other
Locations with this Age Criteria’ drop down menu and select any additional
locations that need to be added to the workflow.
·
Validation – The ‘Optional-Add
Other Locations with this Age Criteria’- field is only used if the user wants
to add the same parameters to multiple locations.
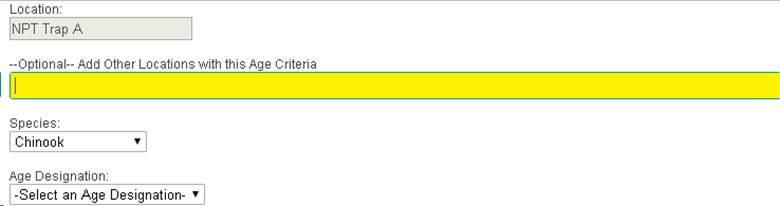
4. Species- Defaults to ‘Chinook’ (currently the only
species this workflow can be applied to.
·
– The
‘Species’ field is required & defaults to ‘Chinook’
5.
Select ‘Age Designation’. Options
include:
a)
Adult
b)
Jack/Jill
c)
Mini-Jack
·
Validation – ‘Age Designation’ is required. Select from one of the
options presented above

6.
Enter the ‘Start Date’ for this workflow.
·
Validation – ‘Start Date’ is required
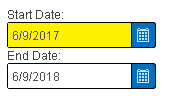
7.
Enter the ‘End Date’ for this workflow.
·
Validation – ‘End Date’ is required
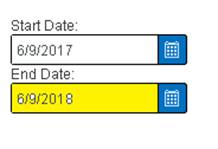
8.
Enter the ‘Length Start’ (Must be greater than or equal to 1 mm).
·
Validation –
·
Length Start cannot be blank
·
Length Start must be in millimeters (mm)
·
Length Start must be greater than or equal to 1 (mm)
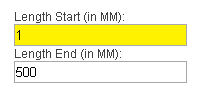
9.
Enter the ‘Length End’ (Cannot exceed 1500 mm).
·
Validation –
·
Length End cannot be blank
·
Length End must be in millimeters (mm)
·
Length End must be greater than Length Start with a maximum
value allowed of 1500 (mm)
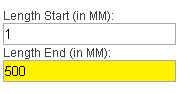
10.
Click on the ‘Save’ button to save the new workflow.
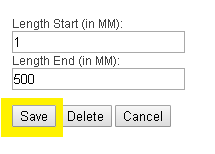
Edit
1.
Select a ‘Location’ from the drop-down menu highlighted below for
the workflow you want to edit.
·
Validation – One
‘Location’ selection is required
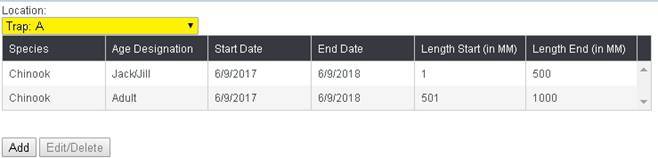
2. After selecting a ‘Location’, select the ‘Age
Designation’ that you are interested in editing and then click on the
‘Edit/Delete’ button highlighted below.
·
Validation – ‘Edit/Delete’ button will enable after selecting an
‘Age Designation’ from the menu
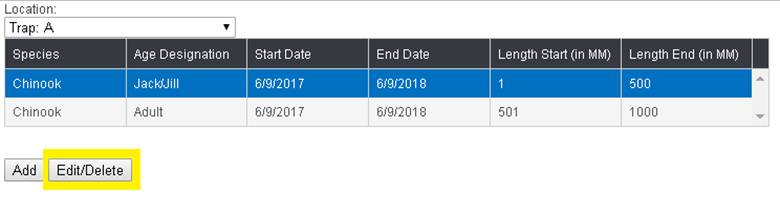
Clicking on the ‘Edit/Delete’ button will
present you with the following screen:

3.
If you need to ‘Edit’ multiple locations, click on the
‘Optional-Add Other Locations with this Age Criteria’ drop down menu and select
any additional locations that need to be edited on the workflow.
·
Validation – The ‘Optional-Add
Other Locations with this Age Criteria’- field is only used if the user wants
to add the same parameters to multiple locations.
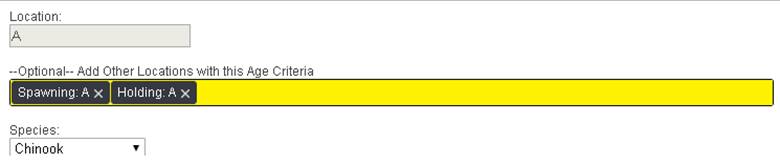
4.
Species- Defaults to ‘Chinook’ (currently the only species this
workflow can be applied to).
·
Validation – The ‘Species’ field is
required & defaults to ‘Chinook’
5.
Select ‘Age Designation’. Options include:
a) Adult
b) Jack/Jill
c) Mini-Jack
·
Validation – ‘Age
Designation’ is required. Select from one of the options presented above
6.
Edit the ‘Start Date’ for this workflow.
·
Validation – ‘Start Date’ is required
7.
Edit the ‘End Date’ for this workflow.
·
Validation – ‘End Date’ is required
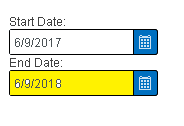
8.
Edit the ‘Length Start’ (Must be greater than or equal to 1 mm).
·
Validation –
·
Length Start cannot be blank
·
Length Start must be in millimeters (mm)
·
Length Start must be greater than or equal to 1 (mm)
9.
Enter the ‘Length End’ (Cannot exceed 1500 mm).
·
Validation –
·
Length End cannot be blank
·
Length End must be in millimeters (mm)
·
Length End must be greater than Length Start with a maximum
value allowed of 1500 (mm)
10. Click on the ‘Save’ button to update the workflow with the
new changes.
Delete
1.
Select a ‘Location’ from the drop-down
menu highlighted below for the workflow you want to delete.
2.
After selecting a ‘Location’,
select the ‘Age Designation’ that you are interested in deleting and then click
on the ‘Edit/Delete’ button highlighted below.

Clicking on
the ‘Edit/Delete’ button will present you with the following screen:
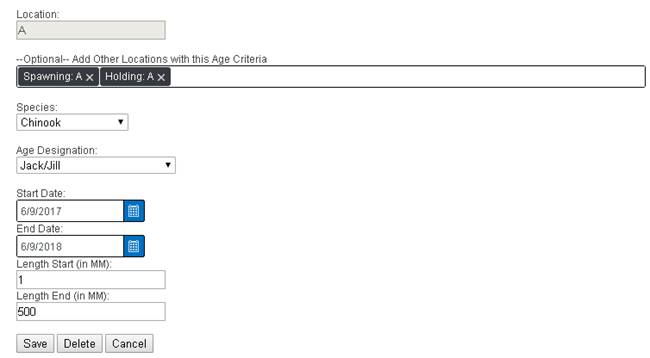
3. Click on the ‘Delete’ button highlighted below.
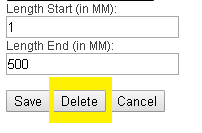
4. ‘Delete’ will completely remove the workflow you are
working on.
Note: If deleting multiple locations via the
‘—Optional—Add Other Locations with this Age Criteria’, refer to the ‘Edit’
section of this document.
5. After deleting the workflow, the UI will take you back
to the ‘Age Criteria’ menu with the updated changes.
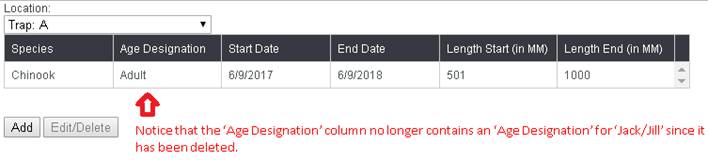
Business Logic:
Trapping:
Once
the ‘Age Designation‘ workflow is determined by the user and has been saved,
the workflow is ready to be used. When users are ready to enter the length of a
Chinook in the ‘Trap Fish’ form that they are working on, FINS will determine
the age of the Chinook depending on the workflow ‘Age Designation’ (Reference
below). 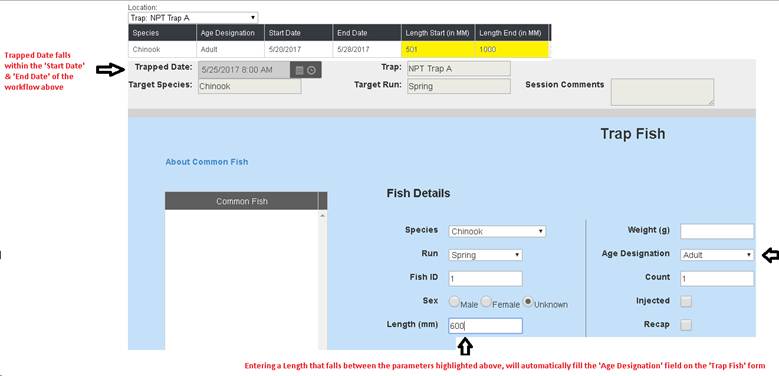
Holding:
Once
the ‘Age Designation‘ workflow is determined by the user and has been saved,
the workflow is ready to be used. When users are ready to enter the length of a
Chinook in the ‘Move Fish’ form that they are working on, FINS will determine
the age of the Chinook depending on the workflow ‘Age Designation’ (Reference
below).
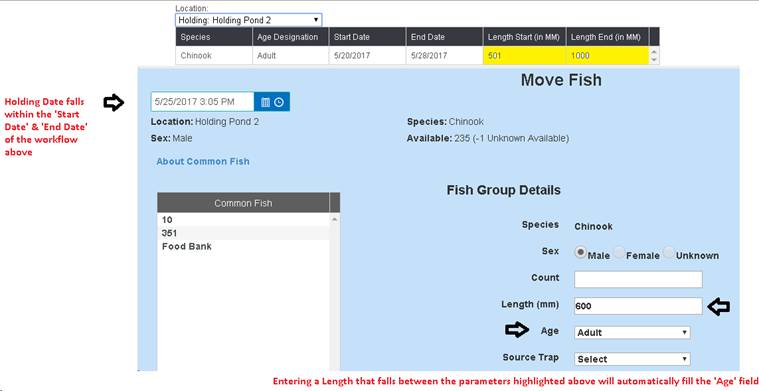
Spawning:
Once
the ‘Age Designation‘ workflow is determined by the user and has been saved,
the workflow is ready to be used. When users are ready to enter the length of a
Chinook in the ‘Spawn Fish’ form that they are working on, FINS will determine
the age of the Chinook depending on the workflow ‘Age Designation’ (Reference
below).
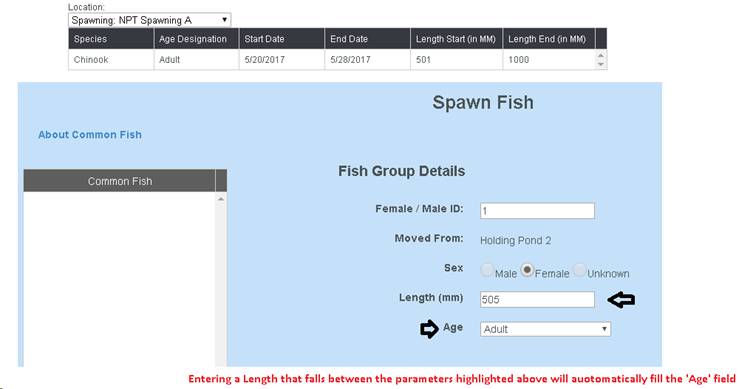
Currently
the Common Fish Workflow is used to Deactivate, Reactivate, or Delete Common
Fish Templates created via the Trap, Move and Spawn Fish forms. Common Fish are
managed by selecting the Type (Trapping or Spawning), Location, and Species of
the template. The Common Fish Workflow allows you
to update the status of your Common Fish templates. The Common Fish templates
that have been created for your Spawning or Trapping Location(s) are displayed
in the 'Active Common Fish Workflows' box below. Any template displayed
in that box, is 'Active' and available for your Data Entry person to
select from as they create Spawning or Trapping Records.
*Trapping Sessions are
‘Target Species’ specific, whereas Common Fish templates are not.
Therefore each Run Year for each active Species being Trapped, Admin management
of Active and Inactive Common Fish templates for Trapping is required – so that
only the Active Common Fish templates display within your current Trapping
Sessions.
There is no Target
Species reference for Common Fish only ‘Species’ (which accounts for the
specific use case of non-target/alternate species trapped that have common fish
templates available – since a user wouldn’t want to create a target session for
a non-target/alternate species – and instead would capture it in the existing
session as ‘non-target’ via current active common fish templates available for
that ‘Module’ (the Common fish workflow menu has per module specific
active/inactive template lists per species).
Deactivate
a Template -
1.
Click on the
Active Template you want to Deactivate.
2.
Click Deactivate
– The selected template will move to the Inactive Workflows box on the right.
3.
Click Save
Delete
a Template -
1.
Click on the
Active Template you want to Delete
2.
Click Delete -
The selected template will move to the Inactive Workflows box on the right,
marked delete.
3.
Click Save. Once
deleted, the template cannot be reactivated.
Activate
a Template
1.
Click on the
Template in the right-side box that you wish to Activate
2.
Click Activate –
The selected template will move to the Active Common Fish Workflows box on the
left.
A workflow created by Facility
Administrators that limits the 'Move To' locations of specific Species of fish,
based on the event (Trapping, Holding, Spawning). This workflow is accessed
via FINSNet.org > Admin Tab > Adult Workflows > Move To Locations
Steps
1.
By default, you will see the grid below when you click on ‘move to
locations’. Make sure that you click on the record that you wish to create the
Workflow for.

2.
Click on ‘Events’. Doing so will take you to the ‘Event’ grid shown
below.
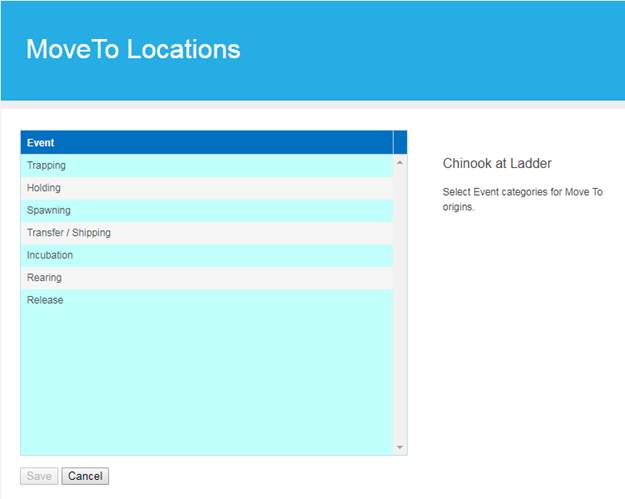
3.
Click on the Event that you want to create a Move To Location Workflow
for. In this example, we are creating a Workflow for the ‘Trapping’ event. *Currently the Transfer/Shipping; Incubation; Rearing;
Release Events are not fully functional
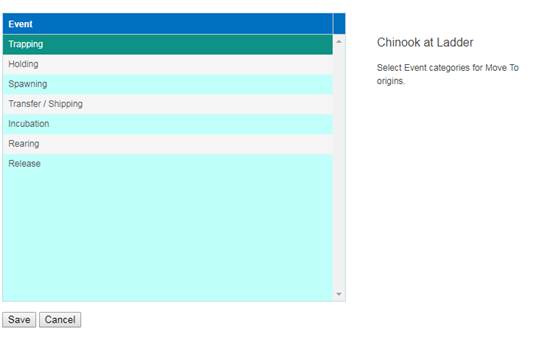
4.
Click ‘Save’ once you have selected an Event.
5.
Clicking ‘Save’ will take you back to the main grid.
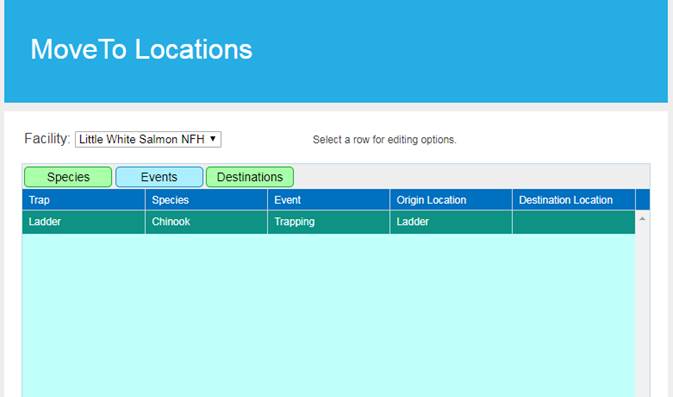
6.
Next, click on the ‘Destinations’ button so that you can then determine
the Locations in which Fish will be able to be Moved To from your Selected
Event (Trapping/Holding/Spawning).
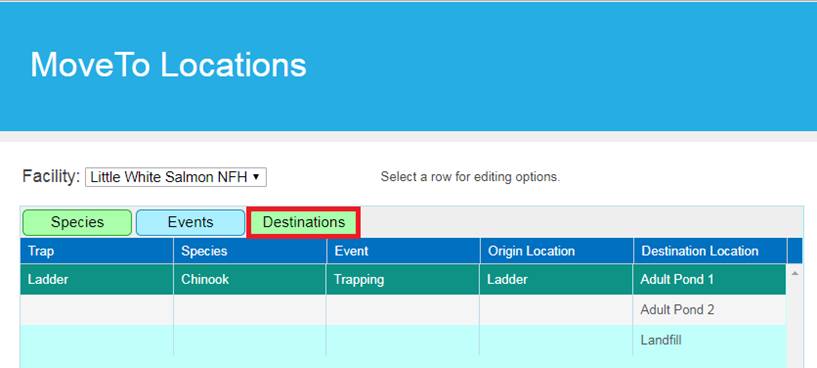
7.
Hold down the ‘Ctrl’ key to select the Location(s) that you want to add.
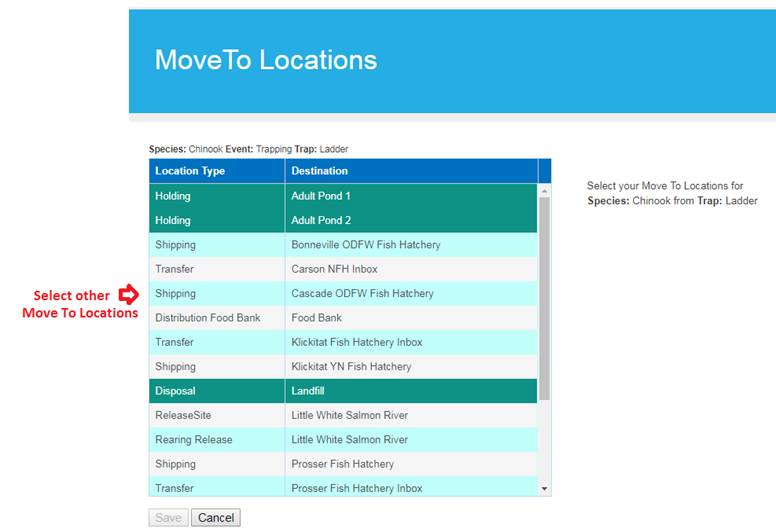
8.
Click ‘Save’ to save your changes which will in turn update your Move To
Location Pick List/Dropdown Men
A workflow created by Facility
Administrators that limits the ‘Spawn From’ locations depending on the Spawning
Location.
1. From
the grid, click on the Species for which this Workflow applies (if the Species
you need is not listed in the grid, click on the Species button and add by
holding down your Ctrl button and selecting another Species).
2.
Click on the Events button and select Ponded.
3.
Click Save
4.
Click on the ‘Holding’ button
5.
Select the Holding Locations that you Spawn from at the Spawn
Location/Species for which this workflow applies.
6.
To select multiple options, hold the *Ctrl key on your keyboard for each
selection
7.
To de-select, hold the *Ctrl key and click on the location again
8.
Click Save
9. Repeat
this process until you have created Spawn From workflows for all of your
Spawning Locations **If you do not create Spawn From workflows, all of your
holding locations will be available to Spawn from.
Preferred Identifier - Workflow
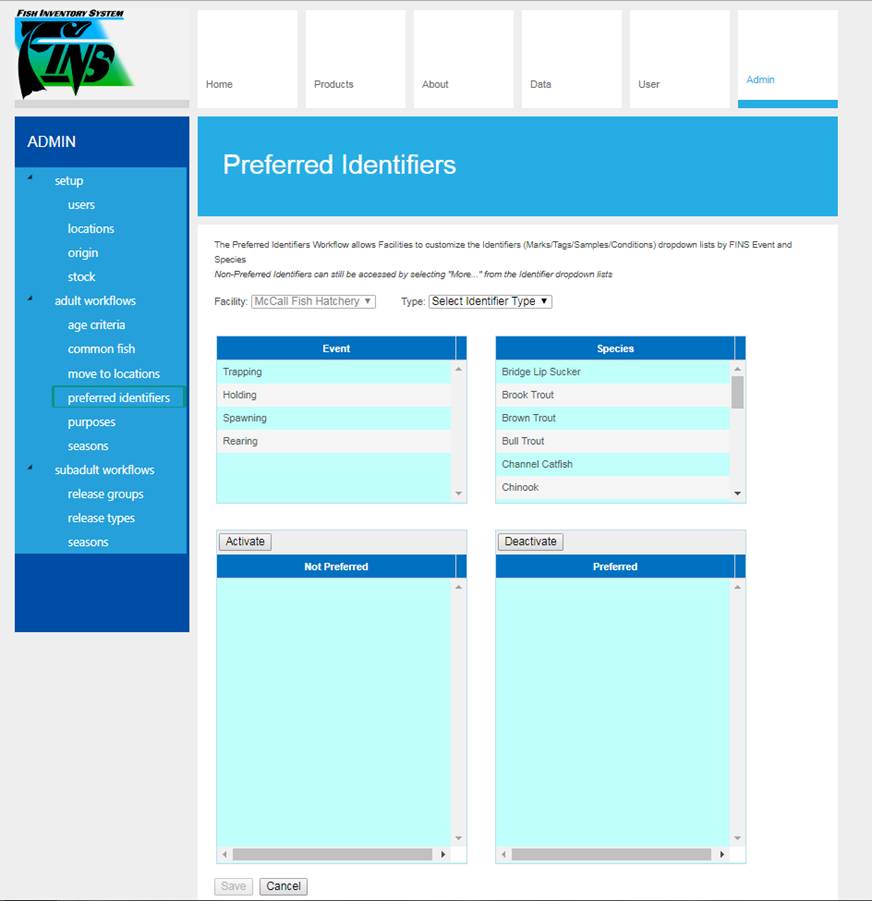
Use Case
Depending on the Facility, Event
and Species, users will frequently only Trap, Hold, Spawn Fish or Rear
Juveniles that have similar Identifiers (Marks/Tags/Samples/Conditions) on
them. In which case seeing the entire list of Marks, Tags, Samples and/or Conditions
that FINS presents in the Identifier pick list of the Trap/Move/Spawn Fish and
Rearing ID Forms isn’t convenient or efficient.
FINS provides Facility
Administrators the ability to manage which Identifiers
(Marks/Tags/Samples/Conditions) the Data Entry users at their Facility are able
to see when selecting from the drop-down menu in the respective Data Entry
(Trap/Move/Spawn/Rearing ID) Form. They are able to do this by setting up a
Preferred Identifiers Workflow, giving Data Entry Users the ability to quickly
enter the Identifiers (Marks/Tags/Samples/Conditions) found on a Fish at
Trapping, Holding or Spawning and applied to a Juvenile at Rearing, without
having to scroll through a long list of Identifiers that may be inappropriate
for that specific Facility.
The Preferred Identifiers Workflow effectively provides
built in Quality Assurance during the Data Entry process, preventing Data Entry
users from inadvertently selecting the wrong Identifier
(Mark/Tag/Sample/Condition) for a Trapped, Moved, Spawned Fish and/or Reared
Juvenile.
Business
Logic
When
setting a Preferred Identifier Workflow:
·
Facility is auto populated to the
Facility that you belong to
·
If you only belong to a single
Facility, the Facility Dropdown Menu will be greyed out as shown below
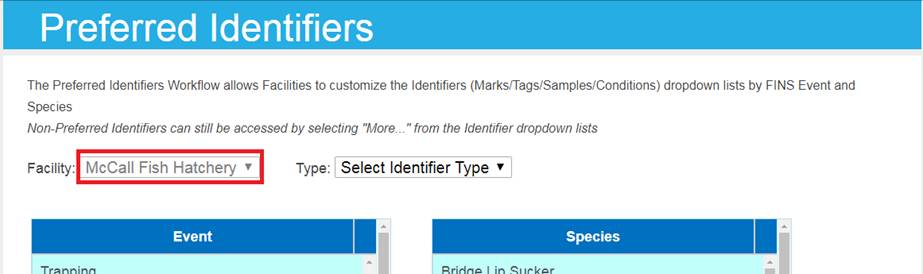
·
The Identifier Type that you are
setting your Preference for is a required selection and will default to
‘Select’
·
Identifier Types available
include:
o
Marks
o
Tags
o
Samples
o
Conditions
·
Non-Preferred Identifiers can
still be accessed during Data Entry in all Event Forms by selecting ‘More’ from
the Identifier dropdown list within the applicable Form
o
Selecting ‘More’ will show the
full list of all available Identifiers to select from, within the given Form,
instead of only the default ‘Preferred Identifiers’ list
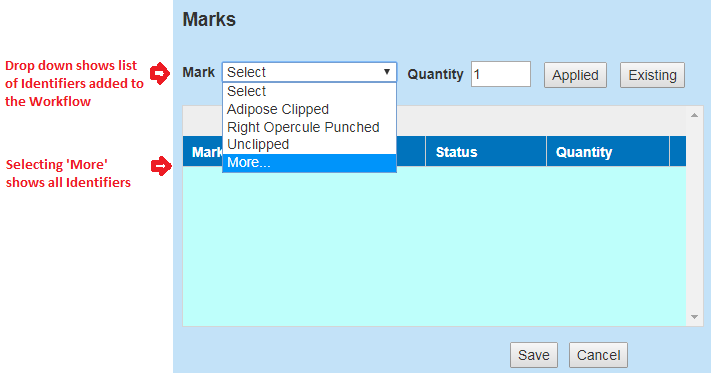
Event
·
A Preferred Identifier Workflow
can be applied at the following Events:
o
Trapping
o
Holding
o
Spawning
o
Rearing (*Note that only Marks & Tags can be applied to a Rearing
Workflow)
·
Selecting an Event is required to
Save a Preferred Identifier Workflow
·
More than one Event can be
selected at a time for quicker setup
o
Multiple Events can be selected by
holding down the ‘CTRL’ key and selecting more than one Event
Species
·
Identifier Workflows can be
applied to any or all Species
o
Multiple Species can be selected
by holding down the ‘CTRL’ key and selecting more Species
o
If a Species is NOT selected, then
the Workflow will be applied to all Species in FINS
Identifiers
·
Users are able to ‘Activate’ as
many Preferred Identifiers as desired
o
If there is no Preferred
Identifier Workflow (Identifiers are NOT selected), then all Identifiers will
appear in the drop-down menu when selecting an Identifier
·
To ‘Activate’ more than one
Preferred Identifier, hold down the ‘CTRL’ key and select as many Identifiers
as you would like. Then Click ‘Activate’ in order to activate the selected
Identifiers as shown below.
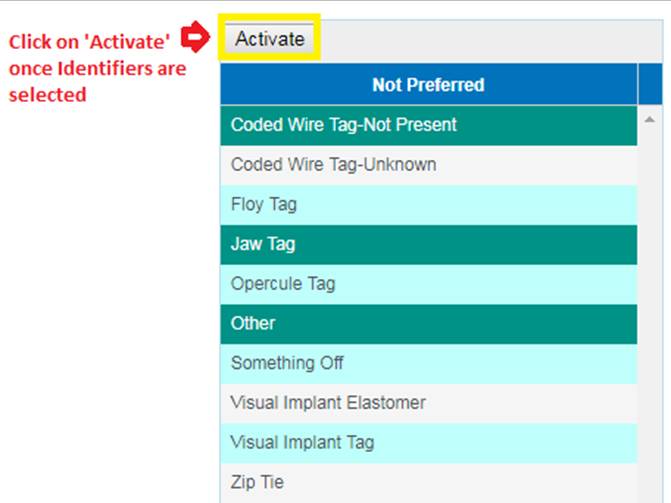
·
Activating Preferred Identifiers,
will move selected Identifiers to the ‘Preferred’ Identifier list, shown below
·
To ‘Deactivate’ (Remove) more than
one Preferred Identifier, hold down on the ‘CTRL’ key and select the
Identifiers you want to remove from your preferred list. Then Click
‘Deactivate’ in order to deactivate the selected Preferred Identifiers, as
shown below
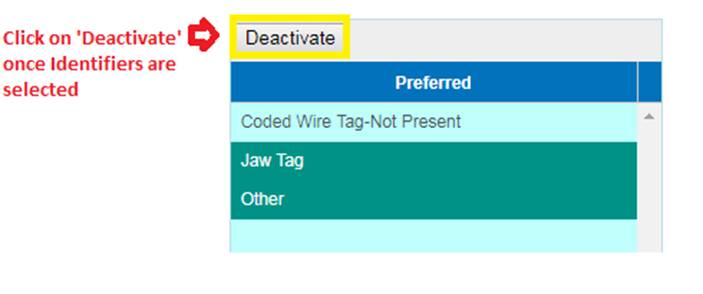
·
Deactivating Preferred Identifiers
will move selected Identifiers back to the ‘Not Preferred’ Identifiers list,
removing them from your Preferred Identifiers Workflow
·
After setting your Type’s
Preferred Identifiers in the Preferred list, selecting ‘Save’ is required to
Save them as your Preferred Identifiers Workflow
Validation
·
Selecting a ‘Type’ of Identifier
is required
·
Selecting an ‘Event’ is required
·
Selecting a ‘Species’ is NOT
required
·
Activating Identifiers is required
in order to Create/Apply a Preferred Identifiers Workflow
·
Deactivating Identifiers is NOT
required
·
Selecting ‘Save’ before selecting
a new ‘Type’ is required in order to ‘Apply’ the Created/Edited Preferred
Identifiers List as your Workflow
Steps
Adding Identifiers
1.
Once you are logged into FINS,
click on the ‘Admin’ tab highlighted below
2. Click on the ‘preferred identifiers’ tab highlighted
below

3. Select the Type of Identifier from the drop-down menu
that you want to set a Preferred Identifier Workflow for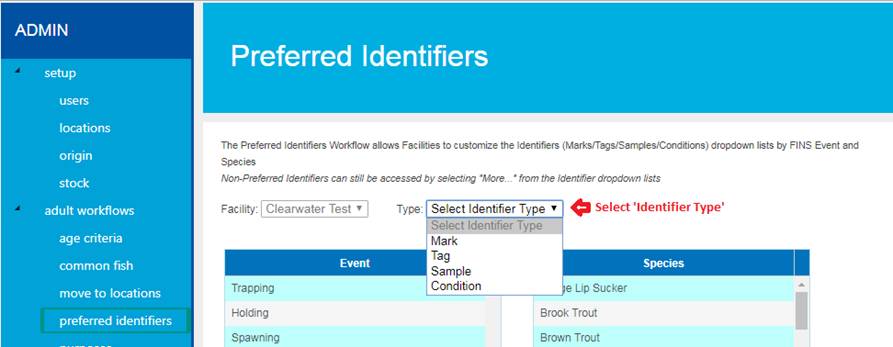
4. Select the Event(s) that the Preferred Identifiers
Workflow will be applied to
·
Multiple Events can be selected by
holding down the ‘CTRL’ key and selecting more than one Event for quicker setup
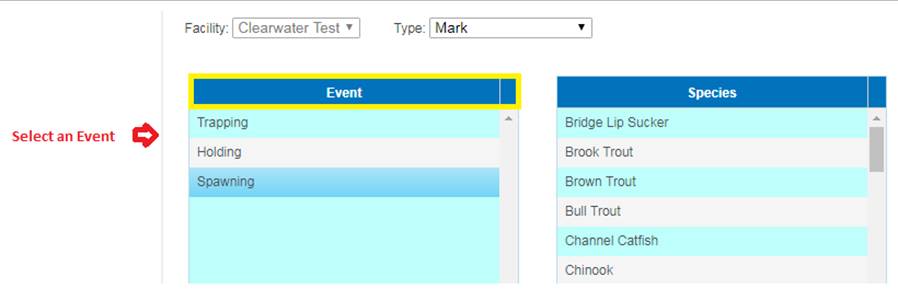
5. Select the Species that the Preferred Identifiers
Workflow will be applied to
·
Multiple Species can be selected
by holding down the ‘CTRL’ key and selecting more than one Species
·
If a Species is NOT selected,
then the Workflow will apply to all Species in FINS
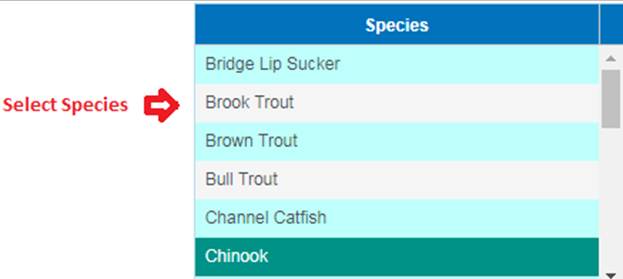
6. Select the Preferred Identifiers that will be applied
to your Workflow
·
To select more than one
Identifier, hold down on the ‘CTRL’ key and select all Identifiers preferred
7. Click ‘Activate’ to make the selected Identifiers part
of your Preferred Identifiers Workflow
8. Clicking ‘Activate’ will move selected Identifiers to
the ‘Preferred’ Identifiers list, shown below
9. Click ‘Save’ to save the Preferred Identifiers
Workflow Created/Updated
*Note: To prevent losing your selections, clicking on ‘Save’ must
be done for each ‘Type’ of Identifier, before selecting a new ‘Type’ of
Identifier
10. The Saved Preferred Identifiers Workflow will be
applied to the applicable Event selected (Trapping, Holding, Spawning and/or
Rearing)
11.
Once Saved, only Preferred
Identifiers will now display by default in the Trap Fish, Move Fish, Spawn Fish
and/or Rearing Identifier Forms

*Note- The
Identifiers in the Trap Fish Form example image above, are the same Identifiers
that were ‘Activated’ in Step 8
Deleting
Identifiers
1. Once you are logged into FINS click on the ‘Admin’ Tab
highlighted below

2. Click on the ‘preferred identifiers’ menu option from
the Admin Tab, highlighted below
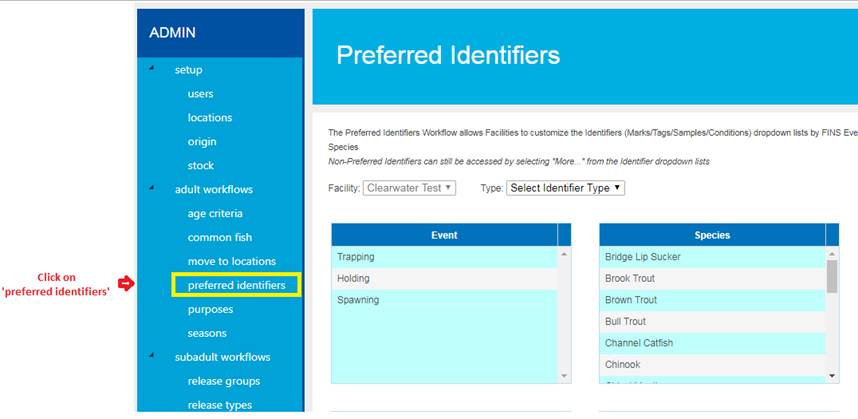
3. Select
the Identifier Type from the drop-down menu that you want to Delete the
Preferred Identifiers Workflow for
4. Select
the Event or multiple Events that the Preferred Identifiers Workflow will be
Deleted from

5. Select the Species that you want to delete the
Preferred Identifiers Workflow from
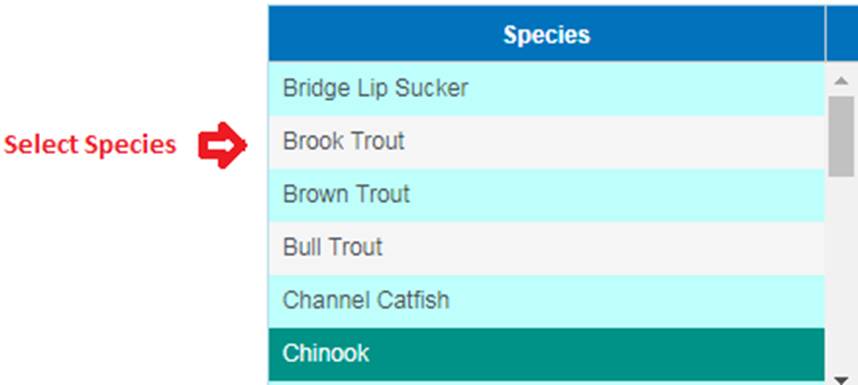
6. Select the existing ‘Preferred’ Identifiers that you
want to Delete from the Preferred Identifiers Workflow via the ‘Preferred’
Identifiers list
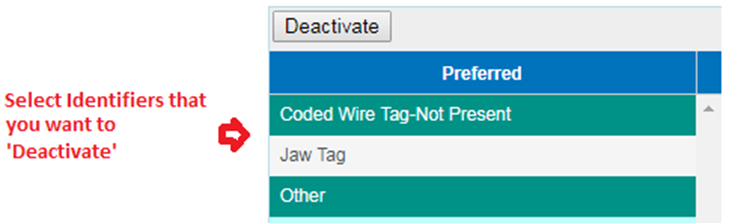
·
To select more than one Identifier for Deletion, hold down on the
‘CTRL’ key and select all Identifiers that need to be Deleted
7. Click ‘Deactivate’ to Delete selected Identifiers from
the Preferred Identifiers list, which will remove them from the Preferred
Identifiers Workflow upon Save
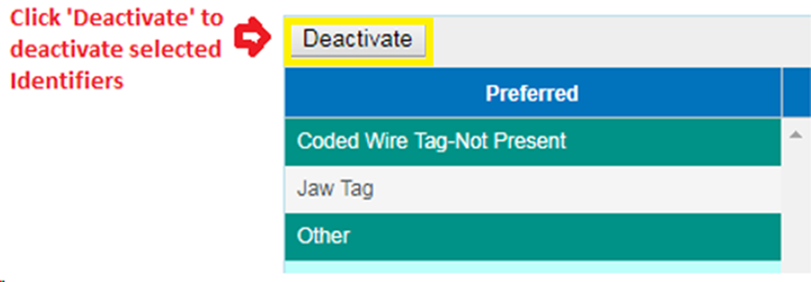
8. Click ‘Save’ to Save the Update made to the existing
Preferred Identifiers Workflow
*Note:
To prevent losing your selections, clicking on ‘Save’ must be done for each
‘Type’ of Identifier, before selecting a new ‘Type’ of Identifier
Use Case:
The creation of Seasons allows you to purposefully limit
available data if you know what range of data you want. This allows reduced
load times and reduces time spent having to filter/sort data to find the record
or session you are looking for. The Season Workflow allows you to create
Seasons by Facility and lets you access your records by Action, based on the
Season you create. You can create Seasons workflows for Adults, Eggs and
Juveniles. If creating a Seasons workflow for Eggs, it can be applied to a specific
Incubation Hierarchy. If creating a Seasons workflow for Juveniles, it can be
applied to a specific Rearing Array.
Creating
a Season
1.
Go to User>my seasons as shown below. If you are a Facility
Admin/Data Official, you can access the creation of Seasons by going to
User> my seasons or Admin>seasons as shown below.
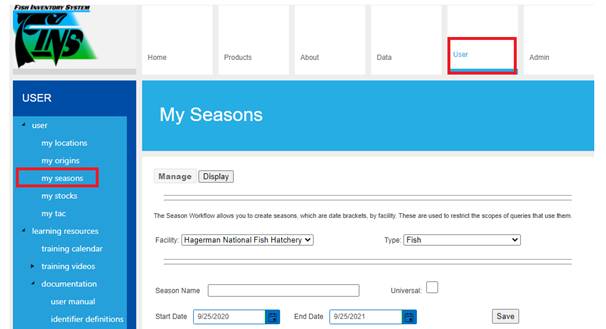
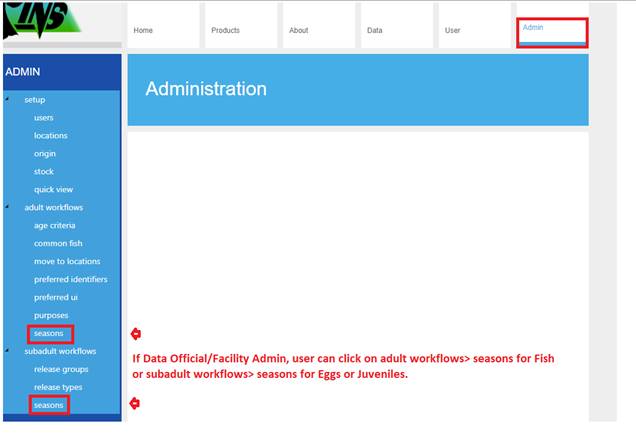
2.
Select the Type; Adults, Eggs or Juveniles for which you wish to Create
your Season:
·
Fish will provide users with Trapping/Holding/Spawning data.
·
Eggs will provide users with Incubation data.
·
Juveniles will provide users with Rearing data.
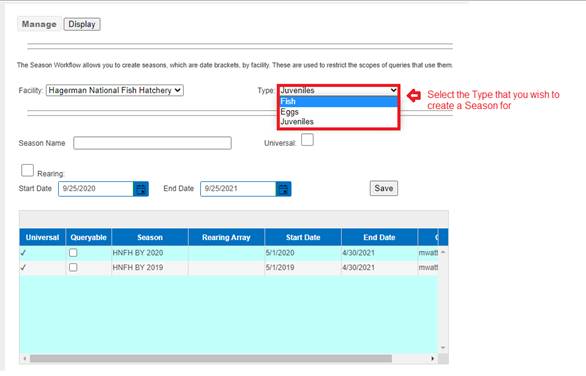
3.
Enter a Name for the Season.
·
Click on the Universal checkbox if you want all users at your Facility
will be able to access your Seasons.
·
Leave it unchecked if you are the only one that wants to access
the Season created.
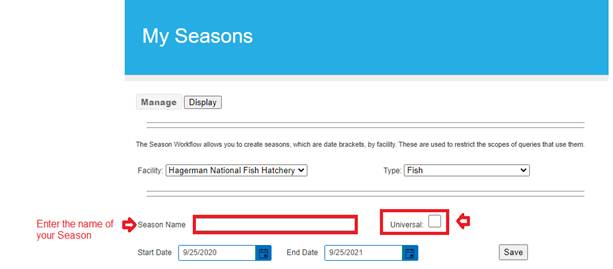
4. If
creating a Season for Eggs or Juveniles:
·
You can select a specific Incubation Hierarchy to limit the data
set to the Hierarchy selected. Click on the Hierarchy checkbox and select an
Incubation Hierarchy from the drop down as shown below.
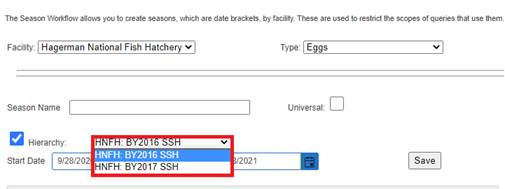
·
You can select a specific Rearing Array to limit the data set to
the Rearing Array selected. Click on the Rearing checkbox and select a Rearing
Array from the drop down as shown below.

5.
Enter a Start Date and End Date for the Season.
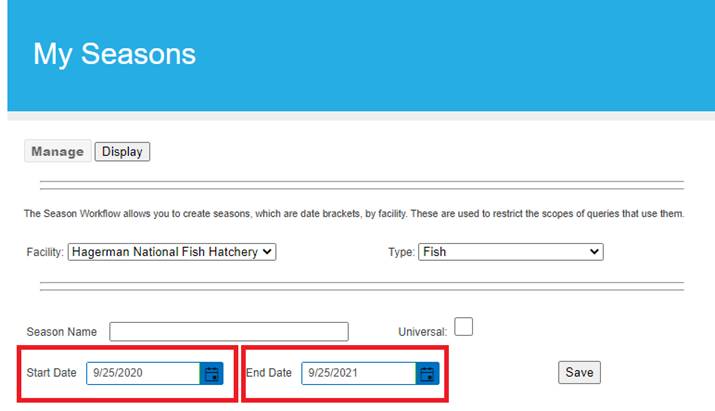
6.
Click ‘Save’ to save the Season. The Season will now display in the grid
below along with other Seasons that have been created.
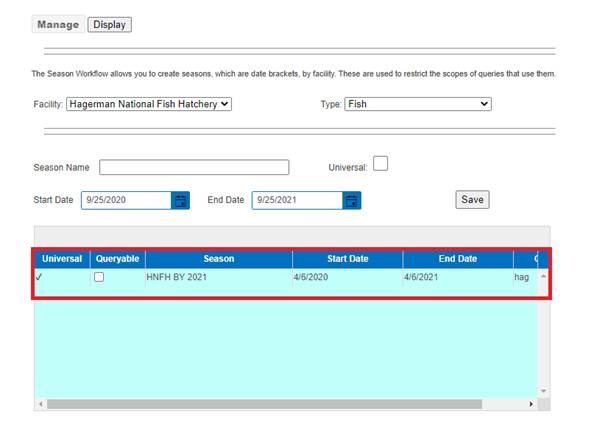
7. Make
your Season Queryable by checking the checkbox highlighted below if you wish
to. Making a Season Queryable will allow users to use that Season in lieu of a
manual date range for the applicable Queries.
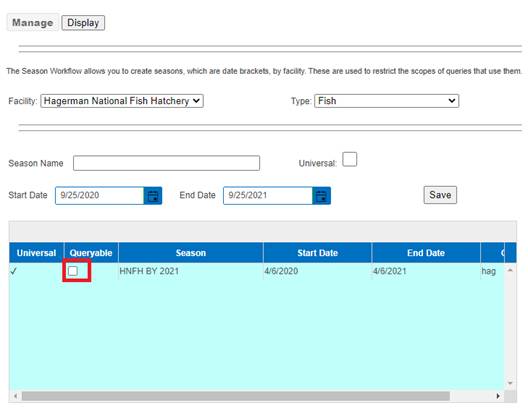
Viewing a Season
Access newly created Season.
1.
Click on the FINS logo
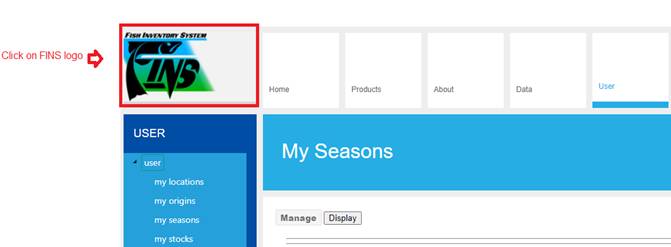
2.
Hover over Query or Action depending on the data you want to retrieve.
3.
Hover over the Season that you wish to select.
·
Hovering over a Season before selecting it will allow you to see
the Date Range applied to the Season selected as shown below.
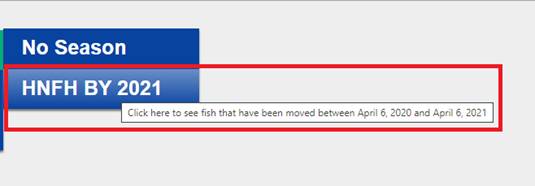
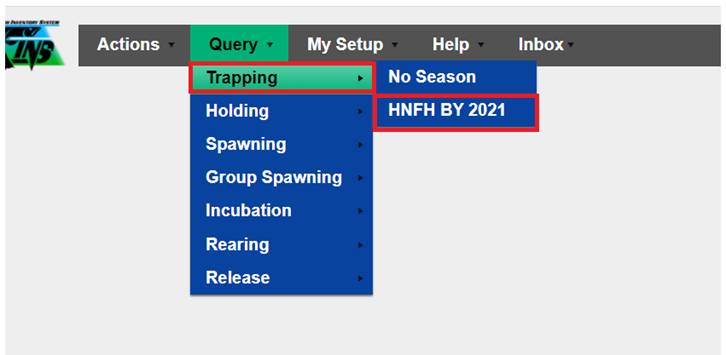
4.
In a Query grid, you will see all of the records, based on the Action
you selected, that were entered into FINS with records that fall within the
dates selected of the season you created.
5. In
the Data Tab, Queryable Seasons can be selected from the Fish Return Summary
and other applicable Queries.
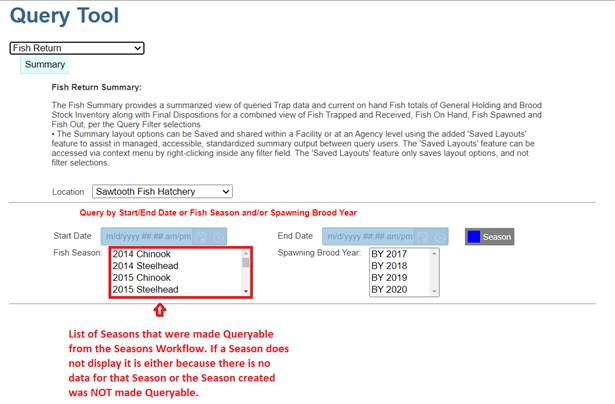
Release
Types and Strategies Workflow
1.
From the Admin Menu, click on the ‘release types’ option highlighted
below.
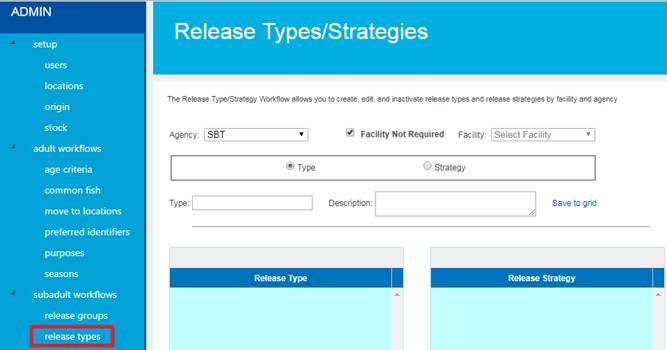
2.
Select the Agency and Facility from the drop-down menus highlighted
below.
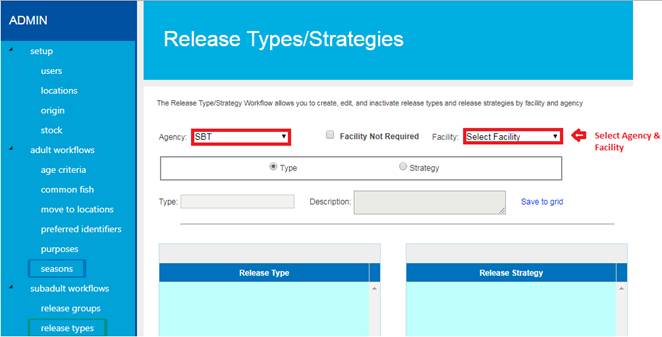
3.
Select ‘Type’ to create a Release Type.
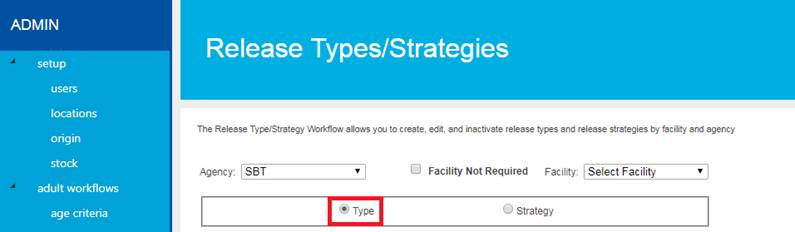
a. Enter
a Release Type name in the ‘Type’ field.
b. Enter
a Description in the ‘Description’ field.
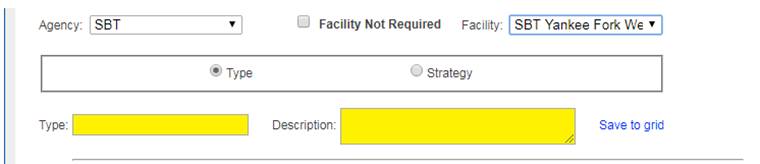
c. Click
‘Save to grid’ to save the created Release Type to the grid.
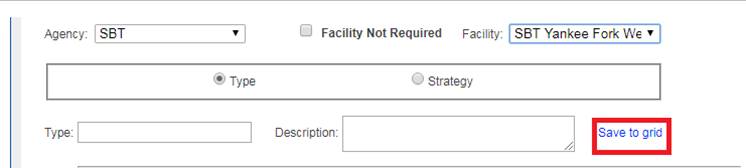
d. Repeat
the steps above to add more Release Types.
4.
Select ‘Strategy’ to create a Release Strategy.
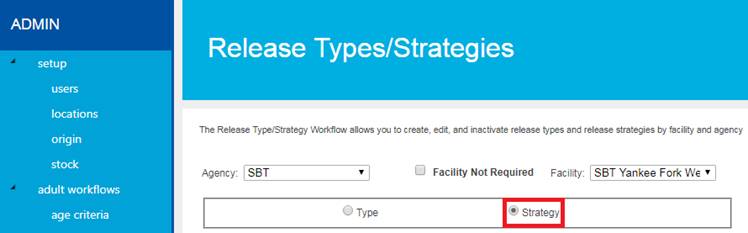
a. Enter
a Release Strategy in the ‘Strategy’ field.
b. Enter
a Description in the ‘Description’ field.
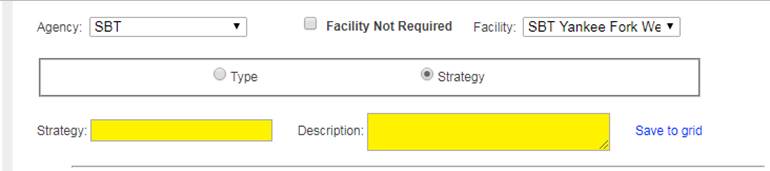
c. Click
‘Save to grid’ to save the created Release Strategy to the grid.
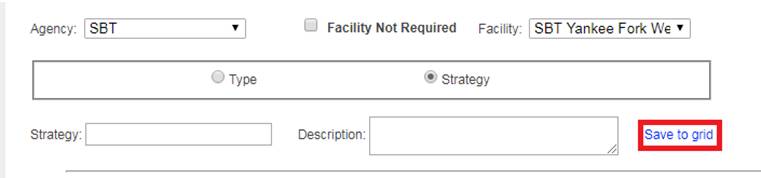
d. Repeat
the steps above if you need to add more Release Strategies.
5.
Once you are done creating Release Types and Strategies, click the
‘Save’ button highlighted below.
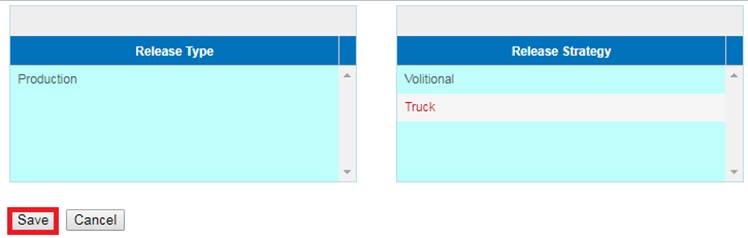
Use
Case:
The Shed Rate Feature gives users the ability to enter the
CWT Shed Rate to account for Juveniles that shed CWTs in Rearing, post the
Marking Trailer event. Users can enter their Shed Rate Data at Rearing, at
Release, or Post Release.
Business
Logic/Validation
Creating a Shed Rate Workflow
- Creating a Shed Rate Workflow is required prior to
entering a Shed Rate in FINS.
o Only
Facility Administrators/Data Officials can create a Shed Rate Workflow.
- Creating a Shed Rate Workflow can only be done from
the Admin tab.
- Creating a Shed Rate can be created for:
o Rearing
o Release
o Post
Release- A Shed Rate can only be entered for the Juveniles part of the Release
Group. If there is a specific Container that you need to apply a Shed Rate to
and that Container is part of a group of other Containers that make that
Release Group, then you will be unable to enter a Shed Rate at the individual
Container level.
- Shed Rate Workflow can be created by:
o Species-
Can be applied to a specific Species or to all Species.
o Array-
Can be applied to one specific Array or to all Arrays.
o If
multiple Shed Rate Workflows are created, the more detailed Workflow will take
precedence over the less detailed Workflow. In the example below, the Workflow
highlighted in Green will take precedence over the more generic Workflow since
the Workflow highlighted in green is specific to a Species and an Array. In the
example below, when a User applies a Shed Rate, the CWT count applied to the
Rearing Array will not be affected since the user elected to NOT Apply a Shed
Rate on Save.

- The Shed Rate Workflow will appear in the Shed Rate
Container Workflow Grid if saved successfully.
- Apply Shed Rate on Dialog Save-
o Checking
the checkbox will ensure that the CWT count is adjusted based off the Shed Rate
applied to a Container within a Rearing Array.
o Check
the checkbox if Shed Rate is being applied in real time and if you want the CWT
count to be adjusted based off the Shed Rate entered on a Rearing Container or
At Release/Post Release.
o Leave
the checkbox unchecked if you don’t want to apply the Shed Rate to existing CWT
count on a Container or Release. If a Shed Rate gets applied, the Shed Rate
will NOT impact existing CWT count (i.e. when applying a Shed Rate to
historical data).
Steps:
1. From within the Shed
Rate Workflow, select whether to Apply Shed Rate on Dialog Save after having
selected your Agency and Facility.

2. Select whether to
create a Shed Rate Workflow for a Container/Release or if you wish to create a
Workflow Post Release:
·
If you wish to create a Shed Rate Workflow for a Rearing
Container or for a Release from Rearing, click on the ‘Container Tab’.
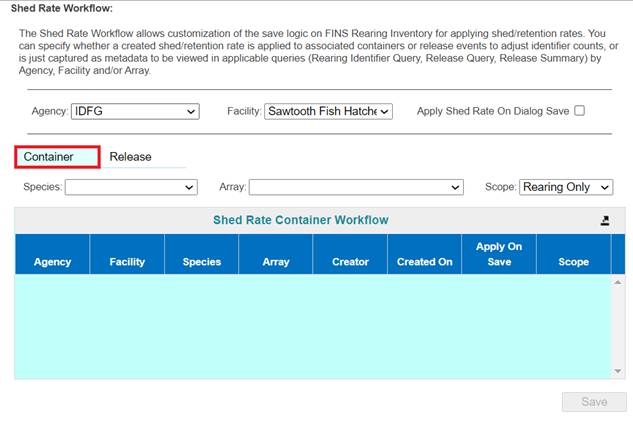
·
If you wish to create a Shed Rate Workflow for a Release Event
that took place (i.e. historical), click on the Release Tab.
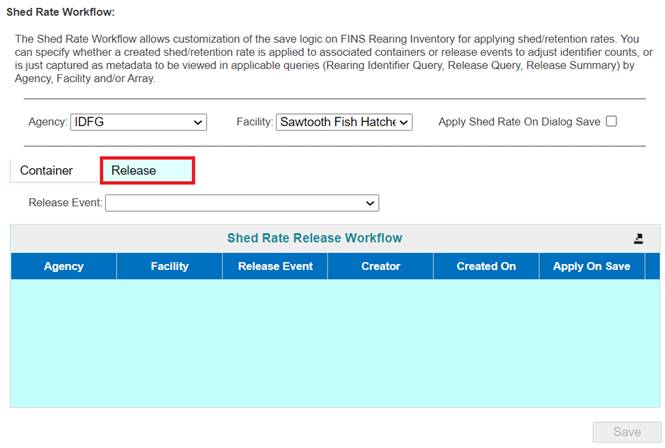
3. From
the drop-down menu:
·
Container Tab: Select the Species and Array you wish to create a
Shed Rate Workflow for. If you wish to make a Shed Rate for All Species or All
Arrays, click on the ‘<any>’ option.
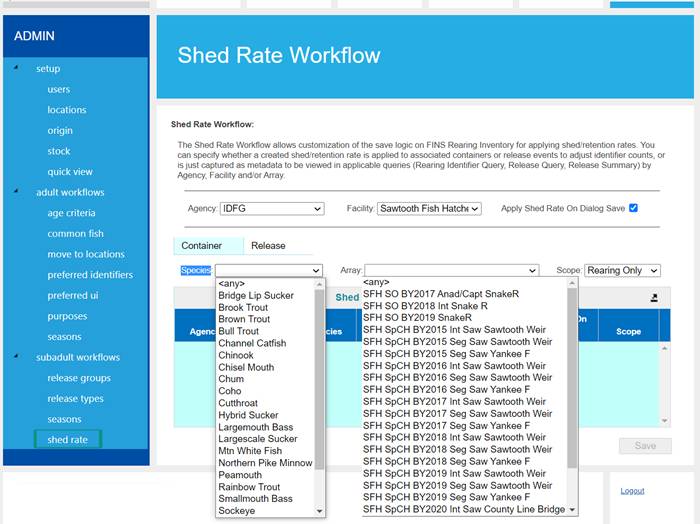
·
Release Tab: Select the Release Event you wish to create a Shed
Rate Workflow for. If you wish to create a Shed Rate Workflow for all events,
select ‘<any>’ as shown below:
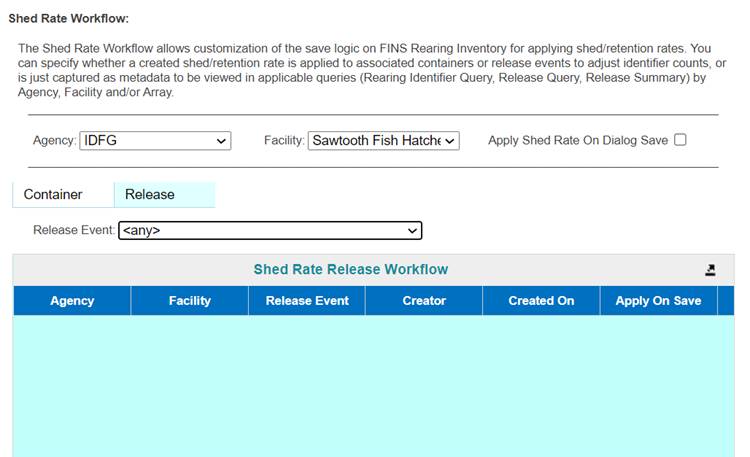
4. Select
the Scope that you are creating the Shed Rate Workflow for.
·
Rearing- If Rearing is selected, users will be able to apply a
Shed Rate at the Container level, prior to Release from Rearing.
·
Release- If Release is selected, users will be able to apply a
Shed Rate from the Release Form prior to Releasing their Juveniles.
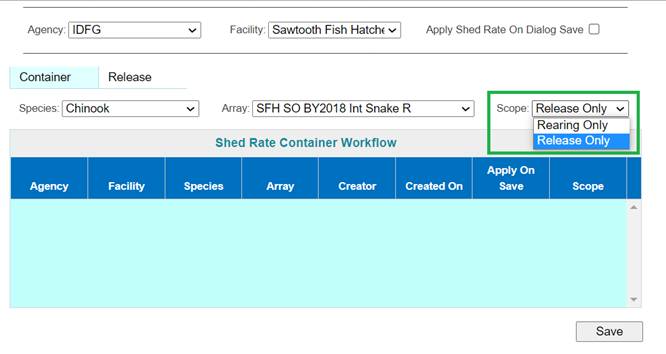
·
Post Release/Release Event- If the Release Tab is selected, users
will be able to apply a Shed Rate Workflow from the Release Query in FINS
Online for historical data that has already been entered into FINS.
5. Click
on ‘Save’ to save your Workflow and FINS will save the Workflow to the grid
shown below:
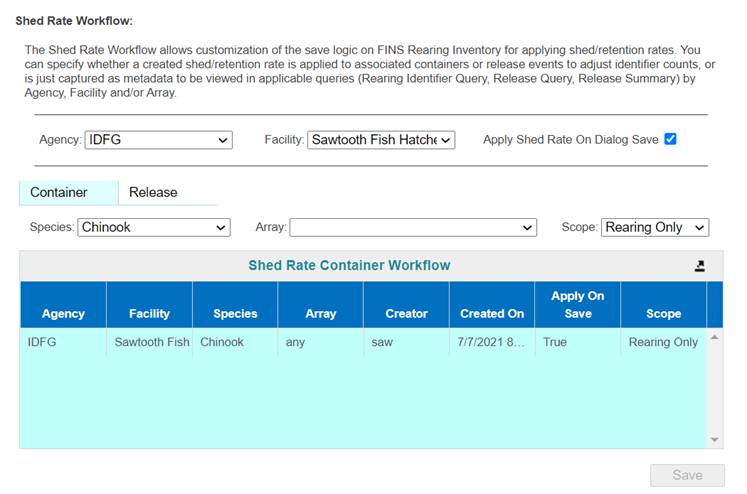
6. If
user wishes to export a paper copy to Excel, they can click on the button
highlighted below and a paper copy of the grid will download via an Excel File.
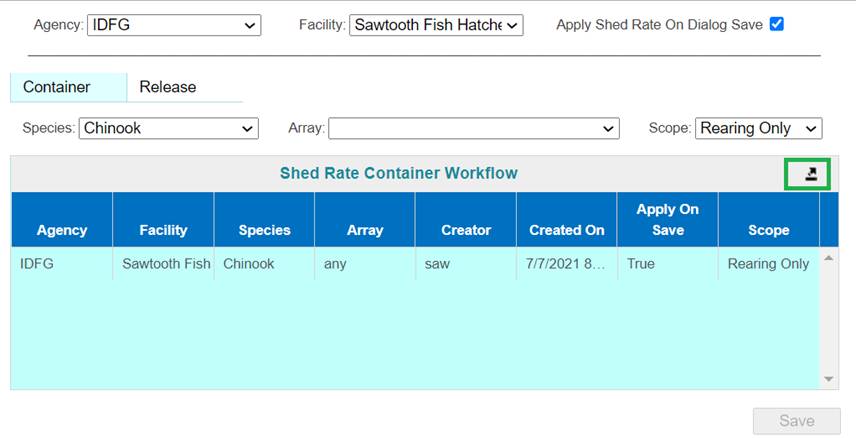
FINS Online is accessed by:
1. Log
into FINSNet.org by clicking on the Login’ link in the bottom, right corner of
the Home page.
2.
Click on the FINS logo in the upper, left corner of FINSNet.org (any
page). This will allow you to have both FINSNet.org and FINS Online open
simultaneously.
OR
1.
Go to FINSNet.org
2.
Click on the FINS logo in the Upper, left corner of your screen
3. Enter
your username and password
·
Create New Trapping Session: To Create a New
Trapping Session, you will use the New Trapping Session form. The New Trapping
Session form is accessible by hover over Trapping in the Actions menu.
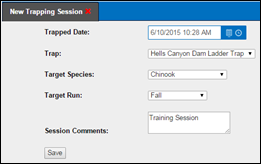
1.
After clicking on New Session, the New Trapping Session Header form will
open. In this form, also referred to as the ‘Header’, you will enter details
about the Trapping Session such as date and time, Trapping Location, Target
Species, and Comments. The Date, Trapping Location, and Time data entered into
this form will be used to create the Session Name for the Trapping Event.
a. Trapped
Date: This field is intended to capture the Date and Time the Trapping
Event occurred.
b. Trap:
Select the Trapping Location that the Trapping Event occurred.
c. Target
Species: Select the Target Species for this Trapping Event. ***The
Target Species entered into the Trapping Session Header will not limit you. The
Target Species is used as an intended guideline for that Trapping Session, and
will be the default Species per record.
d. Target
Run: Select the Target Run for this Trapping Event. If the Target Species
is a Chinook, it is required that you select a Target Run for the Session
(Fall, Spring, and Summer). If the Target Species is a Steelhead, the field is
required, but will default to the only Steelhead run option, Summer. If the
Target Species is any other Species besides Chinook or Steelhead, the Target
Run field will not appear in the Header Creation form.
e. Session
Comments: A user defined field where you should type any information that
is important to this Trapping Session.
2. Once
all data necessary is entered, click Save.
After creating your Trapping
Session Header and clicking Save, a new page will open under the same Trapping
Session tab. This page will display the Session Header data, Trap Fish button,
and your All Trapped Fish grid. To begin adding New Trapping records to your
New Trapping Session, click on the Trap Fish button located to the Right side
of the Session Header, or type CTRL+Enter on your keyboard. Either way will
open the Trap Fish Form.
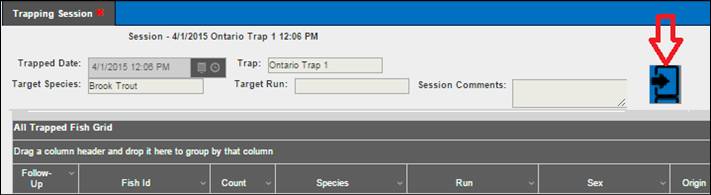
Business Logic:
**FINS has Origin Validation that is enforced by Origins
created by either Facility or Agency Data Officials from the Admin>Origin
Workflow. Origins are specific to Species, Run, Facility, and Agency.
By default, FINS does not enforce any business logic
regarding Identifiers, as the process may differ between Agencies/Facilities
and is instead managed via a custom validation workflow by designated users
with the correct permissions for an Agency/Facility.
Specifically, the following Data Entry inputs are allowed
if Origin Validations have not been created to explicitly prevent them:
·
Adding Clipped and Unclipped Marks to a Fish
·
NOT Saving a Mark or Tag unless it is required by an Origin
Expression and Validation is set at ‘Required’ in the form
Common
Fish – Create (Save/Update): The Trap Fish form allows you to create Common Fish
templates on the fly. Species, Run, Sex, Injected, Recap, Living Status, Moved
To location, Purpose, Marks, Tags, Samples, and Conditions can be stored in a
Common Fish template. *Unique values for each Identifier (Marks/Tags/Samples)
are not saved in the template. Once you have selected your setting, Name the
template and click Save. ***The Moved To location and Purpose that can be
stored in your template are dependent on the Living Status you selected.
Business Logic:
Active/Displayed Common
Fish Templates are either Templates that have been Created during your Trap
Session (on-the-fly) and/or have been marked as ‘Active’ in the Admin Menu >
Common Fish Workflow for the Trap of your Trapping Session. *Trapping Sessions
are ‘Target Species’ specific, whereas Common Fish templates are not.
Therefore each Run Year for each active Species being Trapped, Admin management
of Active and Inactive Common Fish templates for Trapping is required – so that
only the Active Common Fish templates display within your current Trapping
Sessions.
Steps to Create a New
Common Fish:
1.
From within the Trapping Form, select the common fields for the Common
Fish that will be created.
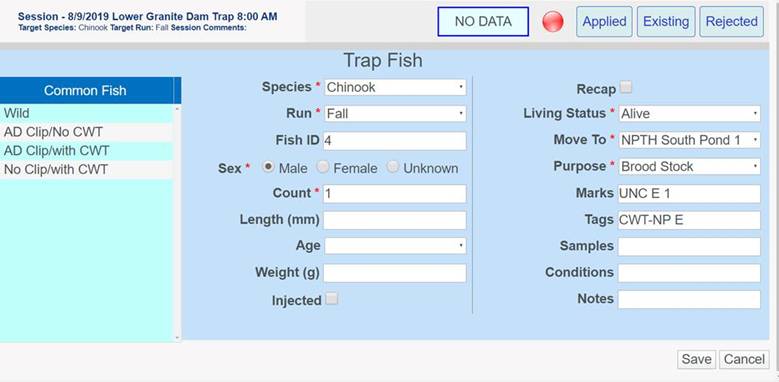
2.
Once Common Fish fields have been selected, hover over the Common Fish
label highlighted below, right click and select ‘Save New Common Fish’.
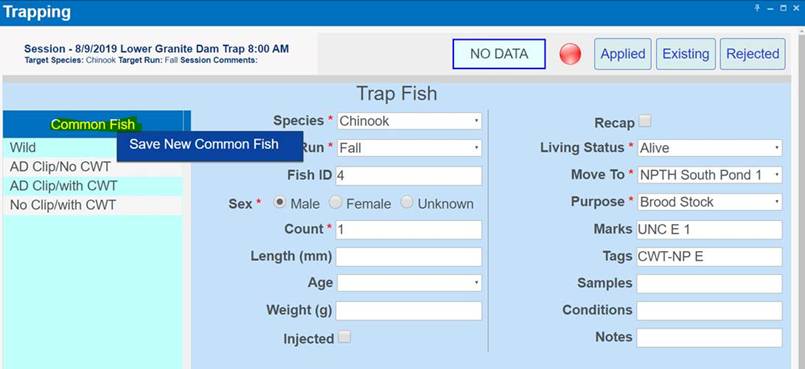
3.
Enter the Name of the new Common Fish and click ‘Save’.
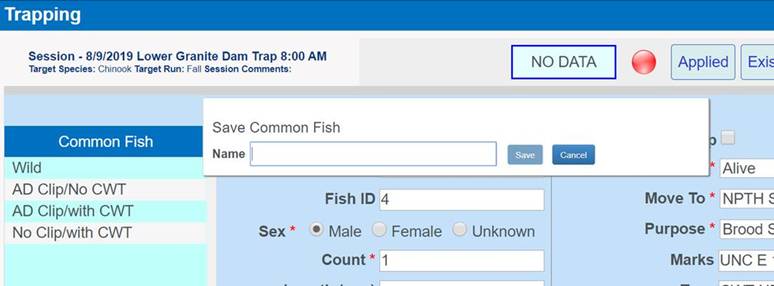
4.
The Common Fish has been added to the Common Fish Grid and is now
available for use.
·
Edit (Save As): If you click on an already saved Common
Fish template, but then make an adjustment to the original settings and wish to
create a new template with the edited selections, enter a new Common Fish Group
Name and select Save. This will add a new Common Fish template for use.
·
Edit (Overwrite/Update (Save)): If you wish to change an
existing Common Fish template’s settings and save the edited/overwritten
settings under the same original Common Fish Group Name, change the settings
and click Update. This will overwrite the originally created Common Fish template
with the newest settings.
Steps to Edit/Update an
Existing Common Fish:
1.
Select the Common Fish you want to Edit by clicking on it from the
Common Fish Grid.
2.
Once selected, Edit only the Common Fields that you want to Update.
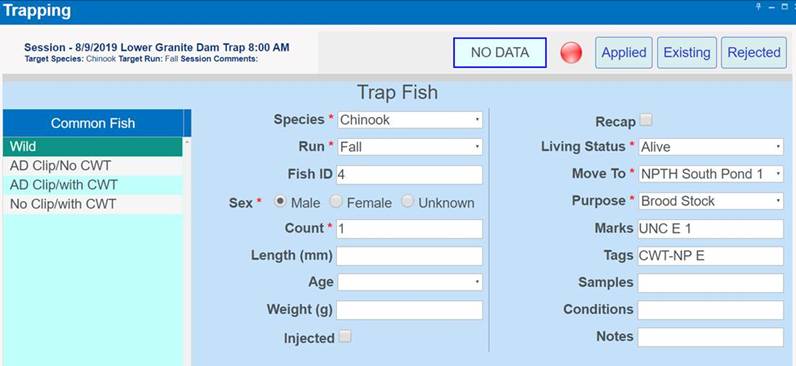
3.
Once you change the Common Fields that need to be updated hover over
the highlighted Common Fish, right click and select ‘Update CF…’
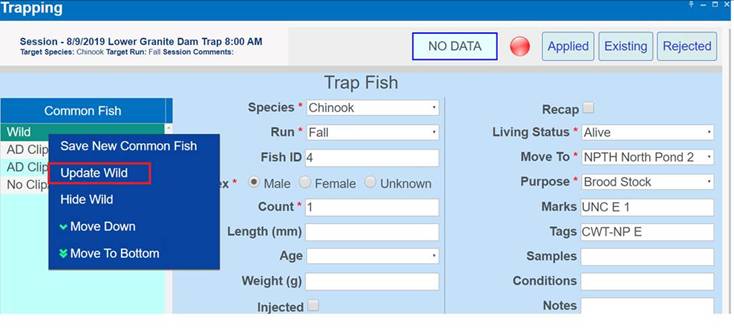
4.
The Update Common Fish dialogue box will pop up. Click Update to
Save your changes.
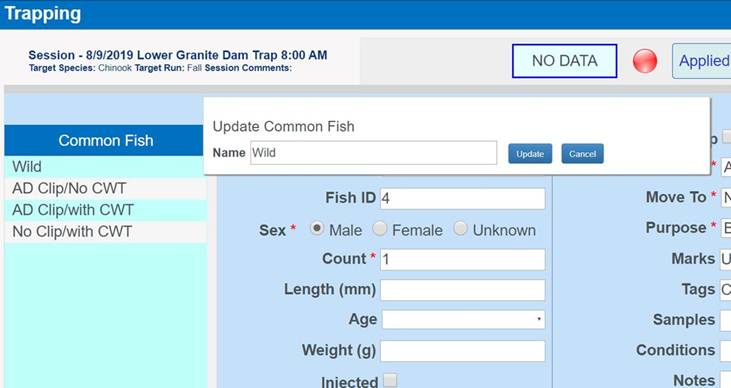
·
Fish Group
Details:
·
Species: This field will default to the Species of fish
designated as the Target Species for the Session. If the fish in this record is
not of the Target Species, select the appropriate Species from the drop-down
box.
·
Run: This field will default based on the Target
Species/Target Run selections in the Session Header. If you are creating a
Chinook record and the Run is different than that of the Target Run, select the
appropriate Run.
·
Fish ID: This field chronologically auto-assigns a number
ID to each record. You can change the Fish ID to any format of values. If you
have a preferred format for the Fish ID’s on all of your records, you will have
to manually enter it for each record; otherwise the Fish ID will default to the
next chronological number starting with ‘1’.
·
Sex: Select the Sex of the fish in this record. At
Trapping, ‘Unknown’ sexed fish records can be Saved.
·
Length: Length of fish, measured in mm, from tip of nose
to fork of tail (Fork Length). Length cannot exceed 1500 mm. This field is not
required.
·
Weight: Weight of the fish in grams (g). This field is not
required.
·
Age: This field currently only applies to Chinook, and is
not required
o
Age Designations (Adult, Jack/Jill, Mini-Jack) can be manually
selected based on a visual determination (Length field must be left blank to do
this) OR:
o
If an Age Criteria workflow is applicable, the Age Designation
will be auto-assigned based on the date the record is created and the Length
that was entered.
o
It is automatically populated based on the Length entered, as
Adult, Jack/Jill, or Mini-Jack, based on Age Criteria Workflow for the Spawning
location. If no length is entered, the value (Adult, Jack/Jill, Mini-Jack) may
be manually selected based on Visual Determination. If the field is disabled,
it is because you have entered a Length that doesn’t have an Age Criteria
Workflow, or the fish is not a Chinook.
·
Count: This field defaults to the value of ‘1’. You can
change value in this field if you are creating a Trapping record that includes
more than one, non-uniquely identified fish.
·
Injected: This field is a true or false value that
indicates if the trapped fish was given any sort of drug treatment using a
needle at Trapping. (True if checked)
·
Recap: In FINS, a fish is a Recap if it was caught in the
same trap the same year. Recap is a Trapping specific field. (True if checked)
·
Disposition:
This Tab has dependency validation rules. **All of these
fields are Required, and need to be selected in the order displayed. The Move
To options you will be allowed to select from are dependent on the Living
Status you select. The Purposes are dependent on the selected Move To location.
·
Living Status: A required field; available options are
Alive, DOA, Trap Mort, Killed.
·
Move To: A required field; select the Location the fish
was Moved To after removal from the Trap.
·
Purpose: A required field; select the Purpose, or the
reason you moved fish to the ‘Move To’ location that you selected. If the
Purpose you need is not available, select ‘Other’ and comment in the Notes
field what the actual Purpose was.
*Click here to view Dispositions by Event & Location
Type
**FINS has Origin Validation that is enforced by Origins
created by either Facility or Agency Data Officials from the Admin>Origin
Workflow. Origins are specific to Species, Run, Facility, and Agency.
By default, FINS does not enforce any business logic
regarding Identifiers, as the process may differ between Agencies/Facilities
and is instead managed via a custom validation workflow by designated users
with the correct permissions for an Agency/Facility.
Specifically, the following Data Entry inputs are allowed
if Origin Validations have not been created to explicitly prevent them:
·
Adding Clipped and Unclipped Marks to a Fish
·
NOT Saving a Mark or Tag unless it is required by an Origin
Expression and Validation is set at ‘Required’ in the form
·
Marks
·
Select the Mark
·
Enter the Quantity
·
Select Applied or Existing
o
Applied: if the Mark was Applied to the fish during the Trapping
event or
o
Existing: if the Mark was Existing prior to this Trapping event
·
The data you entered will display in a small summary grid below
the data entry fields.
·
At least one Existing Mark is Required
·
To Delete a selected Mark, click on the selected Mark, then click
Delete.
·
Tags:
·
Select the Tag
·
Enter the Quantity
·
Select Applied or Existing
o
Applied: if the Tag was Applied to the fish during the Trapping
event or
o
Existing: if the Tag was Existing prior to this Trapping event
·
The data you entered will display in a small summary grid below
the data entry fields.
·
If the type of Tag you are documenting is not in the list of
approved Tags, select ‘Other’ and comment in the Notes field what the actual
Tag was.
·
You can Edit and Delete the Tag and/or value from this grid by
clicking in the grid.
·
Samples: Select the Sample taken and enter the value. The
data you entered will display in a small summary grid below the data entry
fields.
·
If the type of Sample you are documenting is not in the list of
approved Samples, select ‘Other’ and comment in the Notes field what the actual
Sample was.
·
You can Edit and Delete the Sample and/or value from this grid by
clicking in the grid.
·
Conditions: Select the Conditions identified on the fish.
The data you entered will display in a small summary grid below the data entry
fields.
·
You can Delete Conditions from this grid by clicking in the grid.
*Click here to view
Identifier list
·
Notes: A user defined field where you should type any
information that is important to this record and you are not able to capture it
elsewhere in the Trap Fish form.
·
If you selected ‘Other’ in any field of the record, add a
comment in the Notes that clearly explains why ‘Other’ was selected.
***To Exit the Trap Fish form
without saving a record, click Cancel
***Once your Trap Fish form is complete, click Save. The
Trap Fish form will clear out and you are ready to enter your next Trapping
record. To close the Trap Fish form and return to the Trapping Session
Header/All Trapped Fish grid, click Cancel.
The All Trapped Fish grid displays all of the saved
Trapping records for the current Trapping Session. From this grid, you can
Open, Edit and Delete individual Trapping records. This grid does not
auto-refresh. You have to manually refresh the grid by clicking on the
‘refresh’ button on the top, right corner of the grid if you want to see new
records or edits made to existing records.
·
Open Trapping Record: To Open a Trapping Record, double
click on the record to Open the Trap Fish form. If edits are made to the form,
click Save to Save the Edited record. If you do not make any edits to the form,
click Cancel.
·
Edit Trapping Record: To Edit a Trapping Record, double
click on the record, or highlight and right click on the record, and then
select Edit from the Options to open the Trap Fish form. After making your
Edits, click Save.
·
Delete Trapping Record: To Delete a Trapping Record,
highlight and right click on the record. Select Delete from the Options, and
confirm your Deletion by clicking OK on the Notification.
·
Export to Excel & Refresh – Export to Excel and
Refresh functionalities are available from the top, right corner of this grid.
Columns in this grid:
·
Follow-Up – The Flag in this column defaults as Green, but
can be clicked on and turned Red by any user. This feature is to be used as a
reference tool.
·
Fish Id – This column displays the Fish ID value saved on
this record.
·
Count – This column displays the number of fish included
in this record.
·
Species – This column displays the Species of the fish in
this record.
·
Run – This field displays the Run of the fish in this
record.
·
Sex – This field displays the Sex of fish in this record.
·
Origin – This field displays the
Origin of the fish in this record. The origin is systematically determined
based on the Marks and Tags included in this record.
·
Living Status – This column displays the Living Status of
the fish in this record.
·
Length – This column displays the Length in mm of the fish
in this record.
·
Age Designation – This column displays the Age Designation
of the fish in this record.
·
Age Calculated – If this column is checked, an Age
Criteria workflow was used to determine the Age Designation based on the Length
of the fish in this record.
·
Moved To – This column displays where the fish in this
record was Moved To after being removed from the Trap.
·
Disposition – This column displays the Disposition of the
Fish after being removed from the Trap. Click here to
view Dispositions by Event & Location Type
·
Purpose – This column displays the Purpose for the
Disposition of the fish in this record.
·
Applied Marks – This column displays Marks that were
Applied to the fish after it was removed from the Trap.
·
Applied Marks Quantity – This column displays the amount
of each Applied Mark.
·
Existing Marks – This column displays Marks that were
Existing on the Fish when it was removed from the Trap.
·
Existing Marks Quantity – This column displays the amount
of each Existing Mark
·
Applied Tags – This column displays Tags (other than CWT)
that were Applied to the fish when it was removed from the Trap
·
Existing Tags – This column displays Tags (other than CWT)
that were Existing on the fish when it was removed from the Trap
·
Existing CWT – This column displays the CWT that was
Existing on a fish; either CWT, CWT-Not Present, or CWT Unknown.
·
Existing CWT Value – This field displays the tag value
entered for an Existing CWT
·
Applied CWT – This column displays the CWT that was
Applied to a Fish at trapping; either CWT, CWT-Not Present, or CWT Unknown
·
Applied CWT Value – This column displays the tag value
entered for an Applied CWT
·
Existing PIT – This column displays the tag value for an
Existing PIT
·
Applied PIT – This column displays the tag value for an
Applied PIT
·
Samples – This column displays Samples that were taken
from the fish when it was removed from the Trap
·
Conditions – This column displays Conditions that were
identified on the fish when it was removed from the Trap
§
*Click here to view the Identifier list
·
Recap – If this column is checked, the data entry person
identified this fish as being trapped at the Trap in this record for a second
time in the same year.
·
Injected – A true or false value that indicates if the
trapped fish was given any sort of drug treatment using a needle at Trapping.
(True if checked)
·
Weight – This column displays the weight of the fish in
grams (g).
·
Notes – A user defined field where a data entry can enter
information pertinent to a specific record
To Open and/or View Existing (previously created)
Trapping Sessions, go to Actions > Trapping > Existing Sessions from the
Menu. This will take you to a list of Existing Trapping Sessions. From here,
you can:
Open (an Existing Session):
1. Double
click on an Existing Session or single click on an Existing Session and then
right click > Open
2. This
will take you into that Trapping Session, where new records can be added to
this Existing Session, or Existing records can be edited and/or deleted.
Edit (the Header of an Existing Session):
1. Single
click on an Existing Session and then click on the Edit button at the bottom
left corner of the list; or single click and then right click > Edit.
2. This
will take you to the Session Header form where you can change the Session
Header data originally entered. Edit the Session Header data and click Save (to
be brought to the Trapping Session where new records can be added to this
Session or Existing records can be edited/deleted) or Close the Session Header
by clicking on the X in the New/Edit Trap Session Tab to Cancel the Edit
Action.
Delete (an Existing Session):
1. Single
click on an Existing Session and then Click on the Delete button at the bottom
left corner of the list; or single click and then right click > Delete.
2.
A confirmation message will appear asking you to confirm that you want
to delete this Session (and all associated Trapping Records tied to it).
3. To
continue with the Deletion, click OK. To Cancel the Deletion, click Cancel.
1.
Create New Trapping Session Header; Save OR click
on Existing Session to open and add to an already created Trapping Session.
2. Trap
Fish by clicking on the Trap Fish button located on the right side of the
Trapping Session Header, or by typing CTRL+Enter.
3. Enter
the collected data in the Trap Fish form & Save
4. After
Saving, repeat this process until all of the records for this Trapping Session
have been entered.
5.
Refresh/Export, View, Edit, and Delete from the All Trapped Fish
grid.
1.
With the Trapping Session list open, select the session that
contains the Fish you’d like to edit and click the open button

2.
With the All Trapped Fish tab open, right-click the fish you’d
like to edit and select the Edit option from the dropdown menu that appears
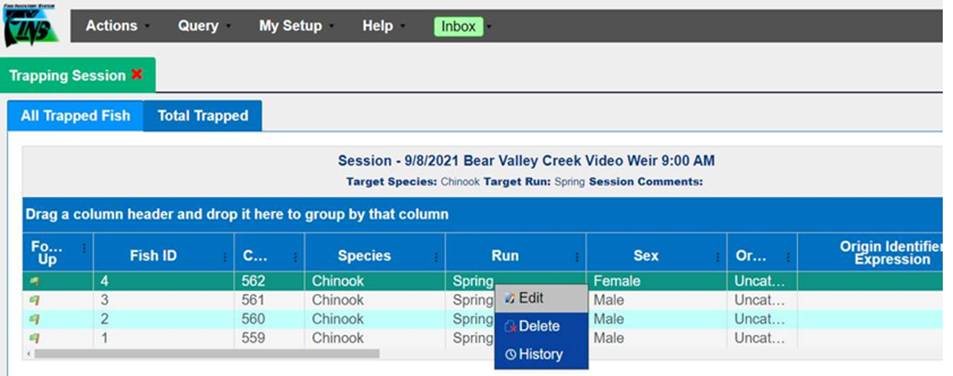
3.
With the Edit Trapping Records form open, all that’s left is to
enter is the input you would like to edit then click save. For example, the
length option.
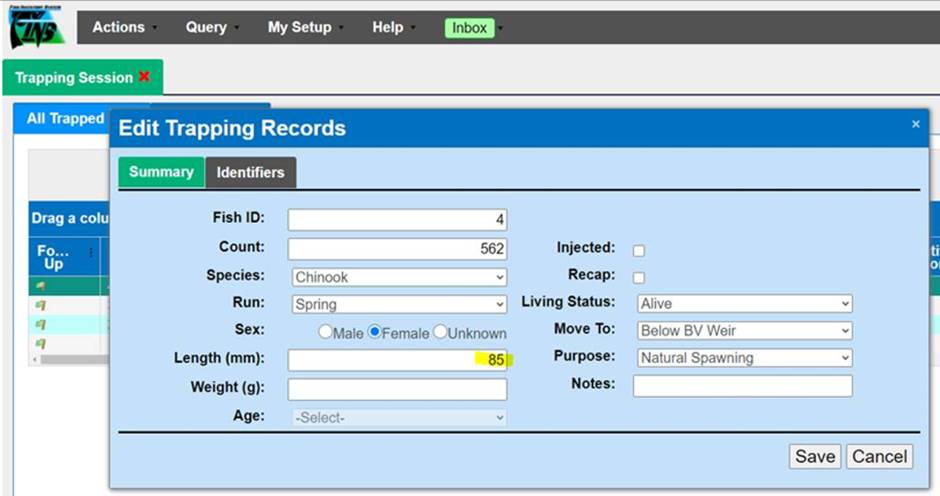
4.
The Edit Saved can then be verified quickly by viewing it within
the All Trapped Fish grid.
Validation
Origins
**FINS has Origin Validation that is
enforced by Origins created by either Facility or Agency Data Officials from
the Admin>Origin Workflow. Origins are specific to Species, Run, Facility,
and Agency.
By default, FINS does not enforce any
business logic regarding Identifiers, as the process may differ between
Agencies/Facilities and is instead managed via a custom validation workflow by
designated users with the correct permissions for an Agency/Facility.
Specifically, the following Data Entry
inputs are allowed if Origin Validations have not been created to explicitly
prevent them:
·
Adding Clipped and Unclipped Marks to a Fish
·
NOT Saving a Mark or Tag unless it is required by an Origin
Expression and Validation is set at ‘Required’ in the form
Use Case
Facilities
regularly Trap Fish that have existing Tags or Marks at the time of Trapping.
Users then register any Tags or Marks that they observe on the Fish. However,
there are instances in which users need to make corrections to the data that
they entered.
An example of
this would be editing an incorrect CWT value that was originally entered or
deleting a Mark or Tag that was incorrectly entered. Because of this, FINS
gives users the ability to Add, Edit, or Delete Marks/Tags directly from the
Trapping Query. Any changes that are made
Business Logic
Any Add/Delete
changes that are applied, will be applied to ALL records that are selected,
with the exception of the Edit tab where you can differentiate between each.
Selecting a Record:
User is
required to:
1.
Select a record from the Trapping Query.
2.
Multiple Records can be selected at one time.
3.
Right click to get access to the Context Menu and select ‘Edit
Identifiers’ from the Context Menu.
4.
Once ‘Edit Identifiers’ is selected, the ‘Edit Trapping Records’
dialogue box will display.

Adding/Editing/Deleting
Identifiers
Adding Identifiers:
1.
To Add Marks/Tags/Samples/Conditions, click on the ‘Add’ radio button.
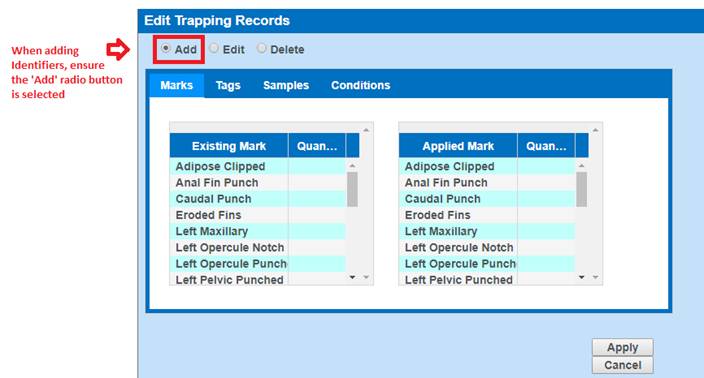
2.
Any time a specific Mark/Tag/Sample/Condition is selected, FINS will
notify user of the specific Identifiers selected.
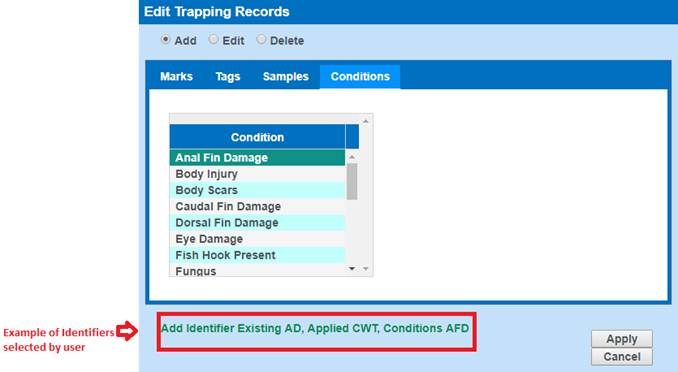
3.
If a ‘Quantity’ is not entered when adding a Mark from the ‘Marks’ tab,
FINS will automatically generate a quantity of 1.
4.
Clicking on the ‘Apply’ button will add the selected Identifiers to the
Trap record.
5.
Clicking on the ‘Cancel’ button will close out the dialogue box and take
the user back to the Trapping Query grid.
Editing Identifiers
1.
When selecting the ‘Edit’ radio button, FINS will display the current
Marks/Tags/Samples applied to the current Trapped Record.
2.
The Conditions tab will not appear when clicking the ‘Edit’ button since
Conditions are not eligible for edits.
3.
If a record has Marks/Tags/Samples that need to be edited, then these
will display in the grid shown below. Otherwise, the grid will be empty.
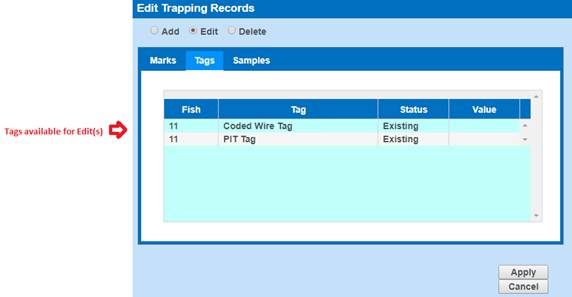
4.
Value is the only field that is eligible for edits in the Tags and
Samples tab.
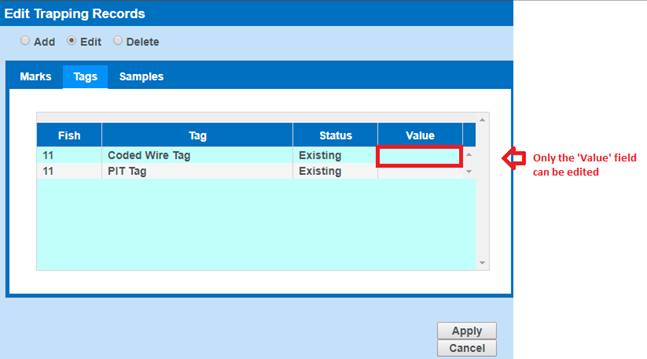
o
Quantity is the only field eligible for edits in the Marks tab.
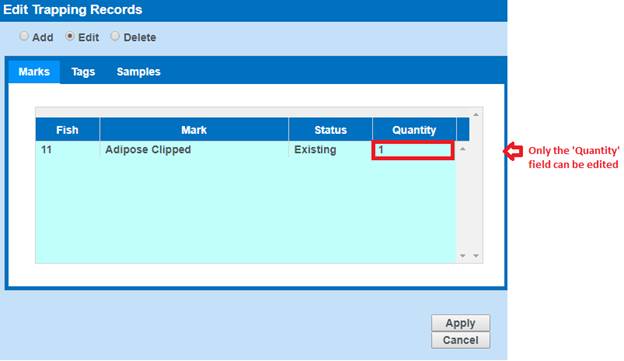
5.
Clicking on the ‘Apply’ button will apply the edits to the selected
Identifiers and update the Trap record.
6.
Clicking on the ‘Cancel’ button will close out the dialogue box and take
the user back to the Trapping Query grid.
Deleting Identifiers
1.
When selecting the ‘Delete’ radio button, FINS will display the
Marks/Tags/Samples/Conditions Tabs.
2.
When selecting Marks/Tags/Samples/Conditions that you want to delete,
FINS will notify you of the Marks/Tags/Samples/Conditions selected for deletion
and whether the selected Identifiers are Existing or Applied.
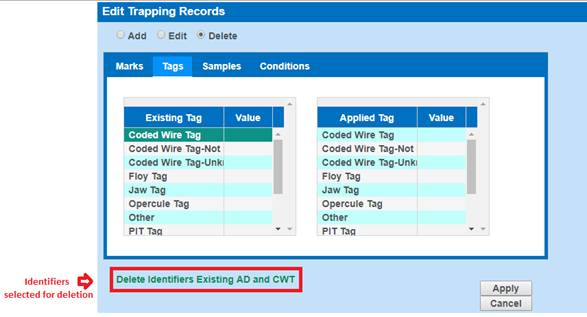
3.
If the Marks/Tags/Samples/Conditions being deleted are not on the Trap
record, FINS will notify you that the record does not contain the selected
Identifiers.
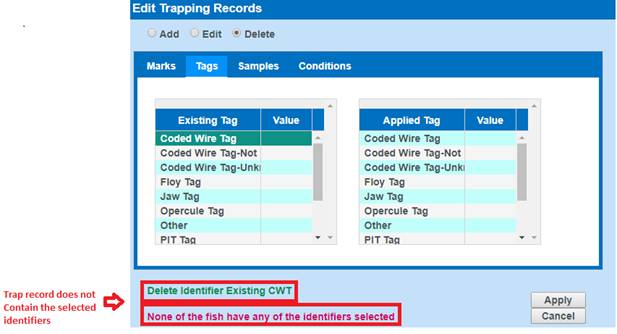
Validation
Marks
·
Adding a Mark from the Marks tab is optional.
·
Adding a quantity for any of the Marks in the Marks tab is
required. If no quantity is entered, FINS will automatically generate a
quantity of 1 for the user.
·
Quantity entered must be greater than 1.
Tags
·
Adding a Tag from the Tags tab is optional.
·
Adding a value for any of the Tags in the Tags tab is optional.
·
Values entered can be numbers or letters or a combination of
both.
·
Adding a Sample from the Samples tab is optional.
·
Adding a value for any of the Samples in the Sample tab is
optional.
Samples
·
Adding a Sample from the Samples tab is optional.
·
Adding a value for any of the Samples in the Sample tab is
optional.
·
Values entered can be numbers or letter or a combination of both.
Conditions
·
Adding a Condition from the Conditions tab is optional.
This grid is a Summary of all ‘Ponded’ inventories you
currently have at your Facility, displayed by Holding location. Displays as
On-Hand Inventory. From the Holding Inventory grid, you can Move Fish to
different locations, or you can apply Count Corrections based on Sex and/or
Species to reflect the actual current inventory.
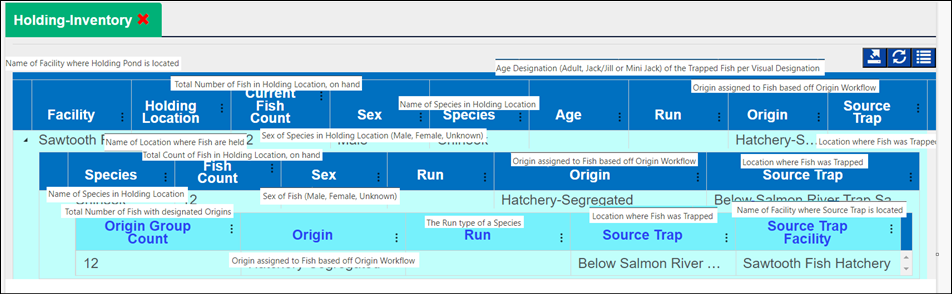
The Grid
Display Options menu provide Holding Inventory grid users with the ability to
customize what and how data displays in their Holding Inventory grid. The Grid
Display Options are saved locally, to the user’s machine, for their login.
Users have the ability
to:
·
Hide/display Holding Locations
·
Select how to view their Origins
·
Hide/display Columns
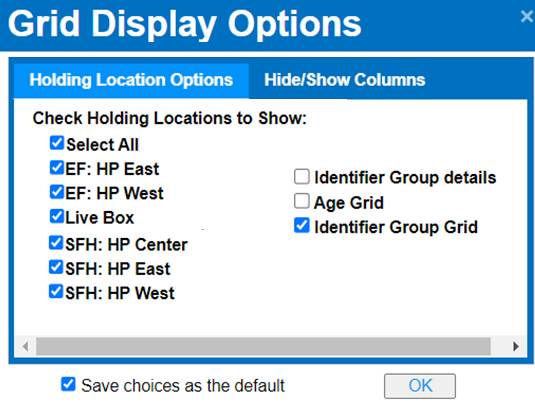
*Locations and Columns are able to be shown/hidden
anytime from the Holding Inventory Grid Display Options Menu or in the
Inventory Grid directly, however the selections will only persist if selected
using the Grid Display Options menu and then Saving the selections as your
default preference by checking the ‘Save choices as the default’ box before
closing/clicking ‘OK’
Steps
To Open the Grid Display Options Menu -
1.
From within Holding Inventory,
click on the grid MENU icon outlined in red below

2.
Select ‘Set Display Options’ as shown below
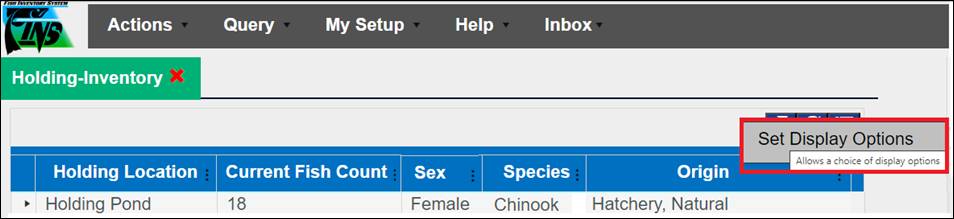
Holding Location Options
– Tab that allows you to manage Location Display details
Steps
1. Select
which Holding Locations to display in your view of the Holding Inventory grid
To quickly check/uncheck all Holding
Locations select/unselect ‘Select All’ Checkbox
·
Checked Locations will display
·
Unchecked Locations will be hidden

2. Select
how you prefer Identifiers to display in your view of
the Holding Inventory grid
·
*Identifier Group Grid – This must be checked if you’d
like to see the Origin/Identifier details in each Holding Location
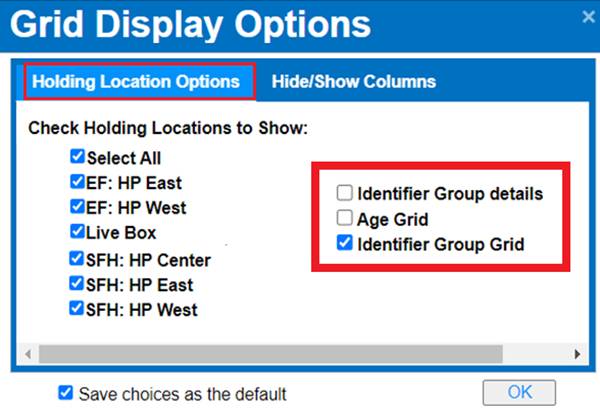
When ‘Identifier Group Grid’ is checked
> FINS will display the following Origin data contained in
each Holding Location:
o Origin
Group Count (Default Shown Column) – Total Number of Fish with
designated Origins
o Origin
(Default Shown Column) – Origin assigned to Fish based off Origin
Workflow
o Run
(Default Shown Column) – Run type of Species
o Source
Trap (Default Shown Column) – Location where Fish was Trapped
o Source
Trap Facility (Default Hidden Column) – Name of Facility the Source
Trap is located
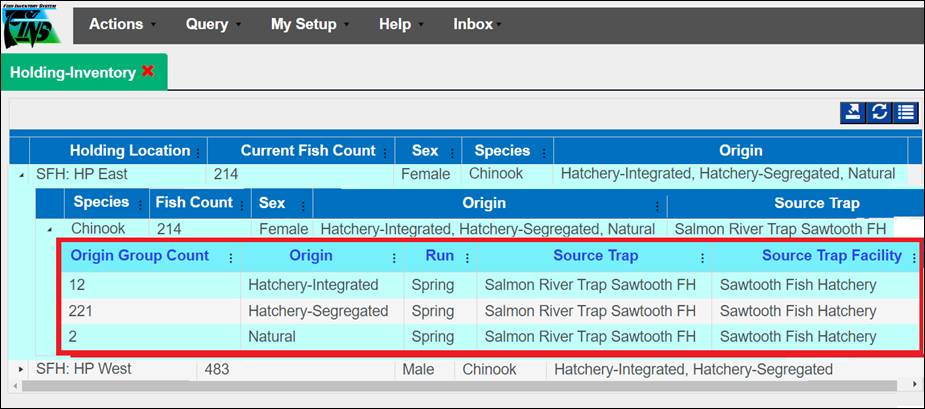
If there are no Identifiers currently
in a Holding Location – the Identifiers Group Grid will be empty when
expanding a Species, as shown below
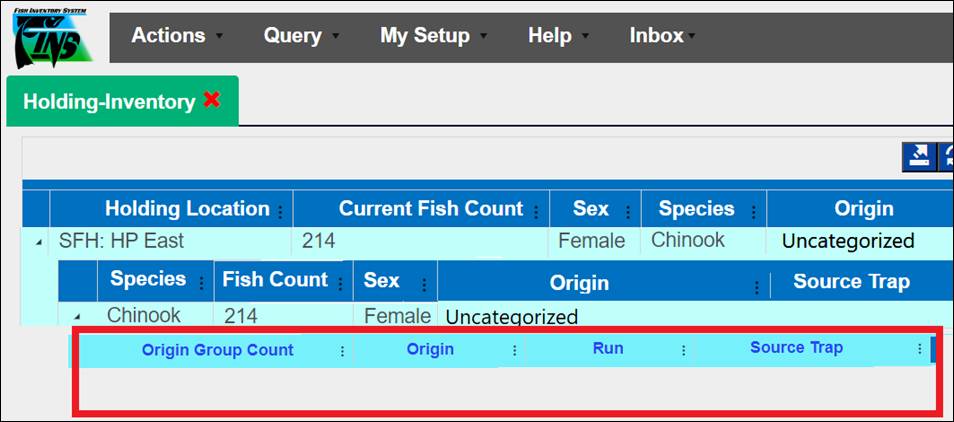
·
Identifier Group Details – If this display option is
checked, along with the Identifier Group Grid, FINS displays the following Identifier
details of each Holding Location for each Origin
o
Identifier Group Count (Default Shown Column) – Total
Number of Fish with designated Identifiers
o
Origin (Default Shown Column) – Origin assigned to
Fish based off Origin Workflow
o
Run (Default Shown Column) – Run type of Species
o
Source Trap (Default Shown Column) – Location where
Fish was Trapped
o
Source Trap Facility (Default Hidden Column) – Name
of Facility the Source Trap is located
o
Existing Marks (Default Shown Column) – Marks that
Existed on a Fish when placed into this Holding Location
o
Existing Marks Quantity (Default Shown Column) – Quantity
of Existing Marks at time Fish was placed into Holding Location
o
Applied Marks (Default Shown Column) – Marks that
were Applied to Fish when placed into this Holding Location
o
Applied Marks Quantity (Default Shown Column) – Quantity
of Applied Marks at time Fish was placed into Holding Location
o
Existing Tags (Default Shown Column) – Tags that
Existed on a Fish when placed into this Holding Location
o
Applied Tags (Default Shown Column) – Tags that
were Applied to Fish when placed into this Holding Location
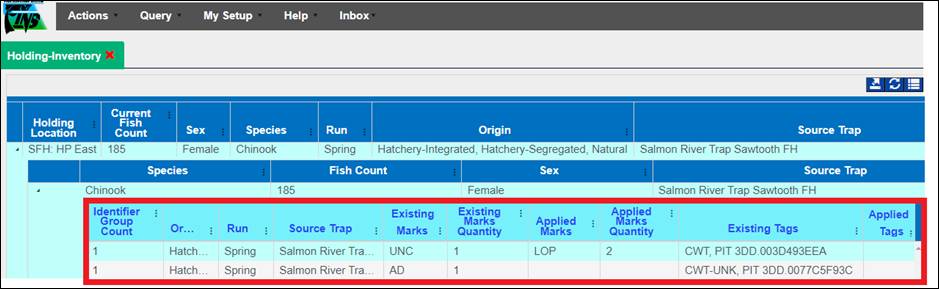
·
Age Grid – The Age Grid option displays VISUAL Age
Designations on Fish in Holding (Only applicable to Chinook) *This feature
was originally built for Facilities in Region 1 that don’t capture Length at
Trapping due to the nature of the Fish entering Holding are coming up a Ladder,
instead their Trapped Fish are visually Aged (either via a Fish Counter or once
in Holding)
When ‘Age Grid’ is checked > FINS
will display the following Visual Age data contained in each
Holding Location
o Number of
Aged Fish (Default Shown Column) – Number of Fish that have visually
assigned Age Designations
o Age (Default
Shown Column) – Age Designation (Adult, Jack/Jill or Mini-Jack of the
Trapped Fish per Visual Designation
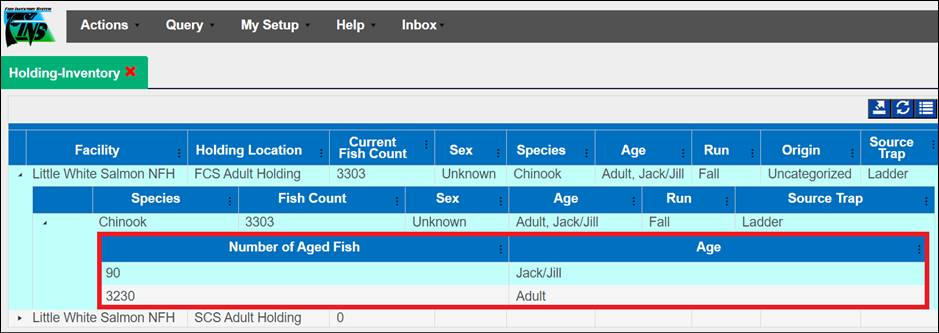
Hide/Show Columns –
Tab that allows you to manage the Columns to Display in the Holding Inventory
Grid
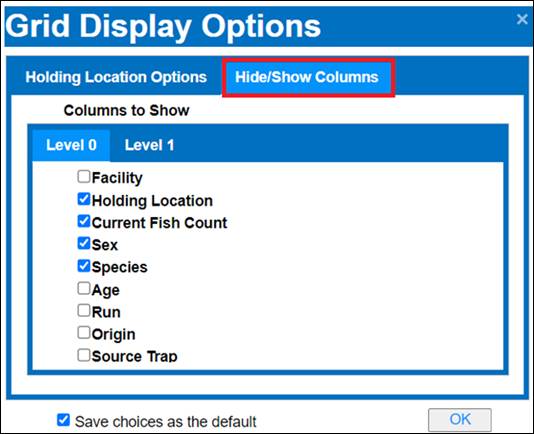
Steps
*First, be sure to have expanded your
Holding Locations in the Holding Inventory to ensure that both Level 0 and
Level 1 display options are available to you
1. Click
on the ‘Hide/Show Columns’ Tab to select which columns you wish to set
as default shown every time you open/view your Holding Inventory grid. You can
manage your preferred show/hide columns for both levels of the Holding
Inventory Grid. The form opens to Level 0 Tab and Level 1 Tab will only
display if you have expanded a Holding Location in your Holding Inventory grid
to view Level 1 of the grid.
·
Level 0 – is the top most level and includes the following
Columns to choose from
o
Facility (Default Hidden Column) – Name of Facility
of Holding Location
o
Holding Location (Default Shown Column ) – Name of
Holding Location
o
Current Fish Count (Default Shown Column) – Total
Number of Fish in Holding Location, on hand
o
Sex (Default Shown Column ) – Sex (Female, Male,
Unknown) of Species in Holding Location
o
Species (Default Shown Column) – Species Name of
Fish in Holding Location
o
Age (Default Hidden Column) – Visual Age
Designations (Adult, Jack/Jill, Mini-Jack)
o
Run (Default Hidden Column) – Run type of Species
in Holding Location
o
Origin (Default Shown Column) – Origin calculated
per Origin Workflow
o
Source Trap (Default Hidden Column) – Location
where Fish was Trapped
·
Level 1 – is the next/expanded level down and includes the
following Columns to show/hide
o
Species (Default Shown Column) – Species Name of
Fish
o
Fish Count (Default Shown Column) – Total Number of
Fish
o
Sex (Default Shown Column) – Sex (Female, Male,
Unknown) of Species
o
Age (Default Hidden Column) – Visual Age
Designation (Adult, Jack/Jill, Mini-Jack)
o
Run (Default Hidden Column) – Run type of Species
o
Origin (Default Shown Column) – Origin calculated
per Origin Workflow
o
Source Trap (Default Shown Column) – Location where
Fish was Trapped
2. Select
the Columns you wish to display at Level 0
·
Checked Columns will display
·
Unchecked Columns will be hidden
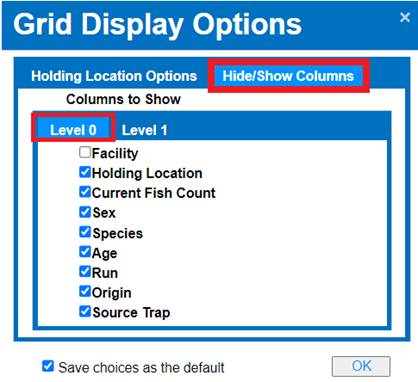
3. Click
on the ‘Level 1’ tab and select the Columns you wish to display at Level 1
*Level 1 Tab will
only display if you have expanded a Holding Location in your Holding Inventory
grid to view Level 1 of the grid
·
Checked Columns will display
·
Unchecked Columns will be hidden
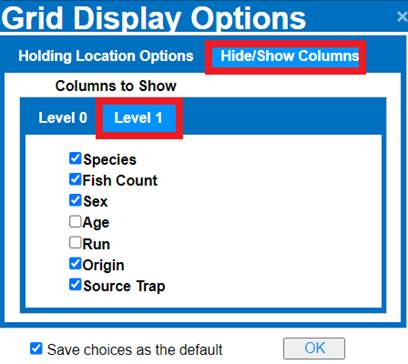
*Columns are able to be shown/hidden anytime from the
Holding Inventory Grid directly, however the column selections will only
persist if selected from this Grid Display Options menu and then ‘Saved’ as
your default preference by checking the ‘Save choices as the default’ box
·
If you wish to make your current selections the default view,
then leave the ‘Save choices as the default’ box checked
·
If you don’t want to modify your current view with the selections
made, then uncheck ‘Save choices as default’ box
4. Click
‘OK’ to have your current selections apply to your view of the Holding
Inventory grid
There
is a Collapsed and Expanded view for this grid
·
Expanded View: (Default Display)
o
This view displays the total count
by Species and Sex
o
Users are also able to
view the number of Identifiers for that Holding Location along with the Origins
associated to the Fish in the Holding Location.
·
Collapsed View: This view displays the Location Name, Current Count,
Sex, and Species of all inventories in that location.
·
Context Menu:
§
From Holding Location:
o
Count Correction: Click here to perform a Count Correction on the
Location
o
See History: Click here to view a Count Correction history on the
Location
5.
The ‘See History’ option will
provide users with an audit history on Count Corrections
Users
will be able to see:
§
Who made the Count Correction
o
Username – FINS Login Username of
the user that Created the manual Count Correction or approved the FINS
automated Count Correction
§
When the Count Correction was made
o
Date Saved – the date the Count
Correction Action was saved to the FINS Database, manually or approved for FINS
automated Count Correction
§
The reason for creating a Count
Correction
o
Notes – Required Notes entered by
the User (for manually entered Count Corrections) and/or by FINS (for automated
Count Corrections) when Count Correction Saved
§
Action/Detail about the Count
Correction
o
Action – type of database Action
taken (Update); Updated On-Hand Inventory
o
Description – details of the
Correction to the On-Hand Inventory Count
6.
Count Correction History can
be exported to Excel via Export to Excel icon outlined in red below
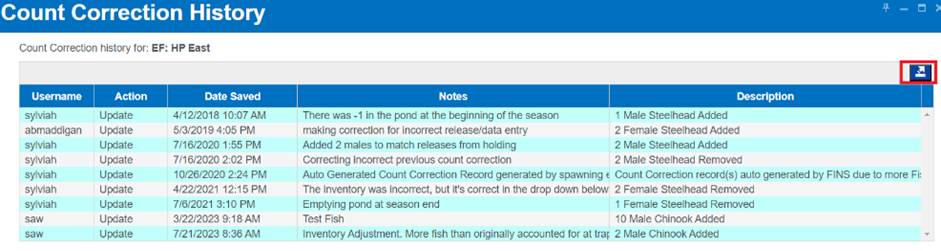
§
From Inventory:
o
Move Fish: Click here to Move Fish. Move Fish form will be Sexed
based on the sex of the fish you accessed the Context Menu from
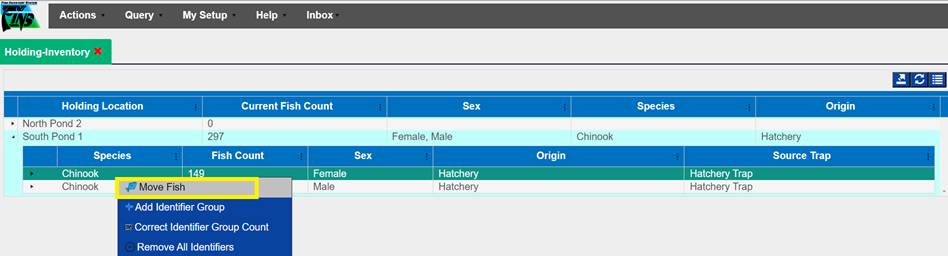
To speed up the Data Entry process, we
highly recommend setting up a Common Fish Template first.
For instructions on how to do so, scroll down to the ‘Common Fish’ Section of Holding
(below this ‘Move Fish’ section)
Move Fish
Steps:
1.
Select the Holding Pond you will be
moving fish from.
Ensure that you expand the Holding Pond and select the
Species/Sex that you wish to move as highlighted below.

2.
Right click on the selected
Species/Sex row and select the ‘Move Fish’ option
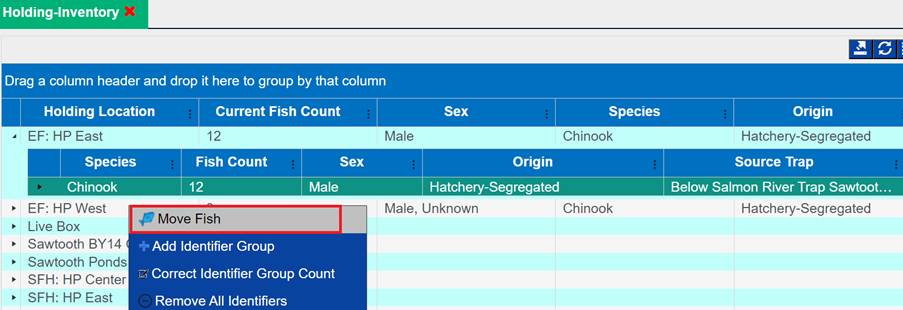
3.
This will open the Move Fish form
and will allow users to move fish to their destination location
Move Fish Form:
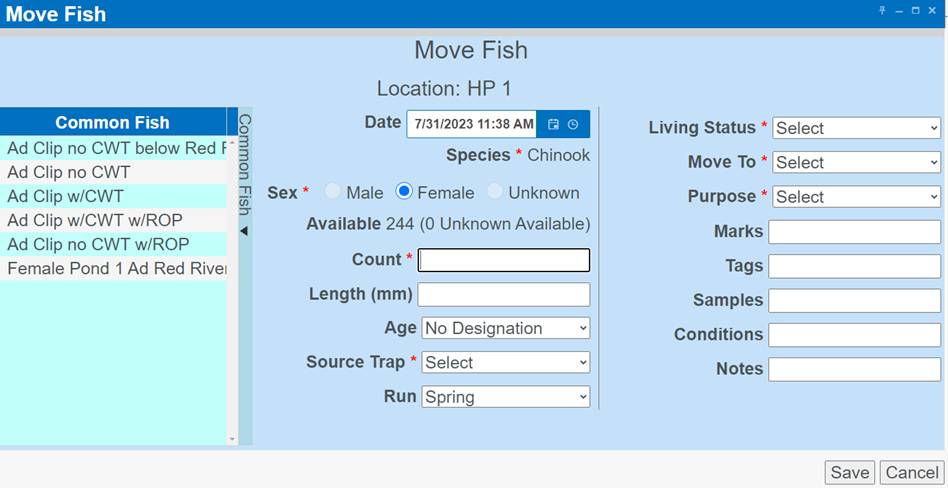
4.
From the Move Fish form, take a top
to bottom, left to right approach and enter the following data - Starting with
Fish Group Details
a.
FINS will by default, prepopulate the
form with any Identifiers that are associated to the selected fish in the pond
Fish
Group Details:

·
Location: Not an input field, but a Display of the
Location the Move Form is selected for, to assist Data Entry
·
Date: Automatically populates the current Date/Time by
default to assist with quicker data entry, by not requiring this field to be
manually input at the time of a Move; However, if the move being recorded isn’t
real-time, select the appropriate Date/Time for the Move by adjusting the
Date/Time manually; Required field
o
Ensure that the correct dates/times in-season and/or post-season
are input so that they are available correctly for expected Holding Queries
·
*Species: Defaults
to the Species of fish designated as the Target Species for the Session;
Required field
o
If the fish in this record is not of the Target Species, select
the appropriate Species from the drop-down box
·
*Sex: Defaults to
the Sex of the fish selected to be moved; Required field
o
If you selected an ‘Unknown’ sexed fish from your Count Summary –
Ponded grid, you may sex the fish upon moving it if you prefer, but it is not
required
·
Available: Not an input field, but a Display of the Number
of Fish (per selected Species/Sex) are available in the Move From Location the
Move Fish form was selected, to assist Data Entry
·
*Count: Field
defaults to the value of ‘1’; Required field
o
You can change value in this field if you are creating a Trapping
record that includes more than one, non-uniquely identified fish
·
Length: Length of fish, measured in mm, from tip of nose
to fork of tail (Fork Length); Field is not required
·
Age: Field currently only applies to Chinook; Field is
not required
o
Visual Age Designations (Adult, Jack/Jill, Mini-Jack) can be
manually selected based on a visual determination (*Length field must be left
blank to do this) OR
o
If an Age Criteria Workflow is applicable to this Location, the
Age Designation will be calculated based on the date the record is created and
the Length that was entered per the Age Criteria Workflow
·
*Source Trap: Field
defaults to the Trap Location where the Fish being moved was Trapped; Required
field
o *If you
do not know the ‘Source Trap’ of the fish in your Move Fish record, select
‘Other’ and comment in the Notes field why you selected ‘Other’
o See Source Trap logic
·
Run: This field defaults to the Run of the Fish being
Moved, when applicable; Required for Species that have a Run (Chinook [Fall,
Spring, Summer]; Steelhead [Summer, Winter])
Disposition: This section has dependency validation rules
All of these
fields are Required, and need to be selected in the order displayed. The Move
To option you will be allowed to select from are dependent on the Living Status
and any applicable Move To Workflows set. The Purposes are dependent on the
Move To Location selected.
*Disposition/Purpose relationships,
definitions and related Location Types are detailed in the “Disposition/Purpose”
file available for download and/or viewing in the FINSNet.org > User Tab
> Learning Resources > Documentation menu
For quick reference Click here to view
Dispositions by Event and Location Type
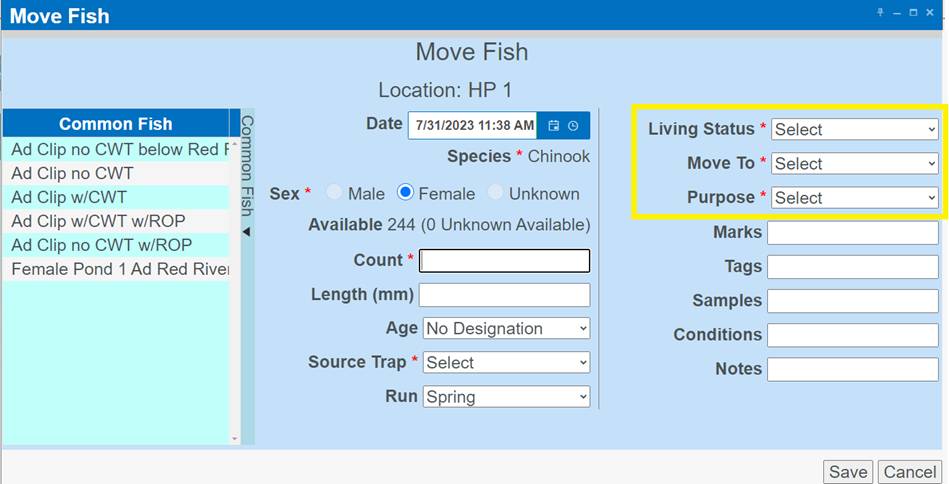
·
*Living Status: A
required field; available options are Alive, Pond Mort, and Killed
·
*Move To: A required
field; select the Location the fish was Moved To after removal from the Trap
o
If a Move To Workflow is applicable, the available Locations will
be limited per the Workflow
o
By Default, if no Move To Workflow exists, all possible Move To
Locations display
If you don’t see the Move To
Location that you are trying to move your Fish to, you will either need the
Location Created and/or added to your existing Move To Locations Workflow from
the Admin Tab. *Facility Admin permissions are required to Create/Update/Delete
Move To Workflows. Data Official permissions are required to Create new Move
To Locations.
·
*Purpose: A required
field; select the Purpose, or the reason you are moving the selected fish to
the ‘Move To’ location that you selected
o
If a Purpose Workflow is applicable, the available Purposes will
be limited per the Workflow
o
By Default, if no Purpose Workflow exists, all possible Purposes
associated with the selected Move To Lcoation Type will display
§
If no Purpose Workflow is applied and the Purpose you need is not
available, select ‘Other’ and comment in the Notes field what the actual
Purpose was
*Disposition/Purpose relationships,
definitions and related Location Types are detailed in the
“Disposition/Purpose” file available for download and/or viewing in the
FINSNet.org > User Tab > Learning Resources > Documentation menu
For quick reference Click here to view
Dispositions by Event and Location Type
Identifiers: Marks, Tags,
Samples and/or Conditions of the Fish and/or Fish Group being Moved
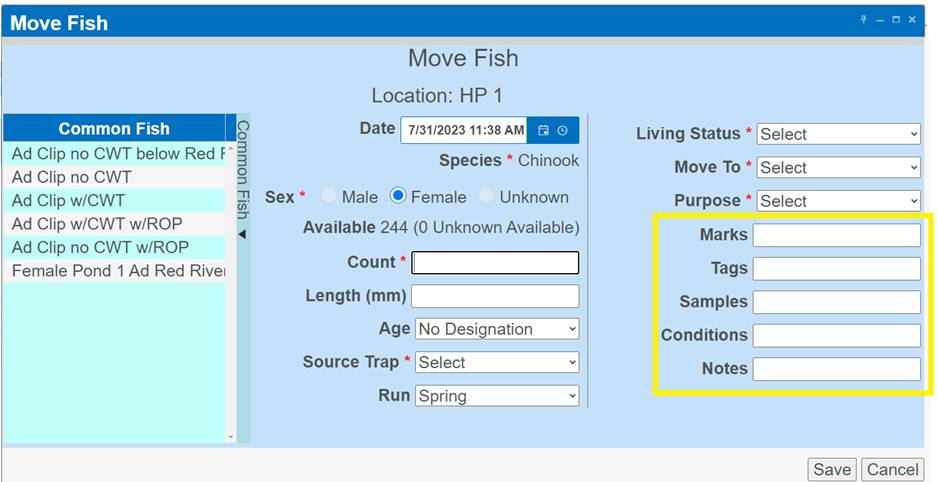
Validation
– Identifiers/Origins
By
default, FINS does not enforce any business logic regarding Identifiers, as the
process may differ between Agencies/Facilities and is instead managed via a
custom validation workflow by designated users with the correct permissions for
an Agency/Facility.
FINS has
Origin Validation that is enforced by Origin Workflows created by either
Facility Admins or Agency Data Officials in Admin > Origin Workflow. Origins
are specific to Species, Run, Trap, Facility, and Agency per Origin Identifier
Expressions.
The
following Data Entry inputs are allowed if Origin Validations have not been
created to explicitly prevent them:
· Adding Clipped and Unclipped Marks to a Fish
·
NOT Saving a Mark or Tag unless it
is required by an Origin Expression and Validation is set at ‘Required’ in the
form
Marks
·
Select the Mark
·
Enter the Quantity
·
Select Applied or Existing
o
Applied: if the Mark was Applied
to the fish during the Move event or
o
Existing: if the Mark was Existing
prior to this Move event
·
The data you entered will display
in a small summary grid below the data entry fields
·
To Delete a selected Mark, click
on the selected Mark, then click Delete
Tags:
·
Select the Tag
·
Enter the Quantity
·
Select Applied or Existing
o
Applied: if the Tag was Applied to
the fish during the Move event or
o
Existing: if the Tag was Existing
prior to this Move event
·
The data you entered will display
in a small summary grid below the data entry fields
·
If the type of Tag you are
documenting is not in the list of approved Tags, select ‘Other’ and comment in
the Notes field what the actual Tag was
·
You can Edit and Delete the Tag
and/or value from this grid by clicking in the grid
Samples:
·
Select the Sample taken and enter
the value
·
The data you entered will display
in a small summary grid below the data entry fields
·
If the type of Sample you are
documenting is not in the list of approved Samples, select ‘Other’ and comment
in the Notes field what the actual Sample was
·
You can Edit and Delete the Sample
and/or value from this grid by clicking in the grid
Conditions:
·
Select the Conditions identified
on the fish
·
The data you entered will display
in a small summary grid below the data entry fields
·
You can Delete Conditions from
this grid by clicking in the grid
Click here to see Identifier list
5.
Notes: A user defined field where any information that is
important to this record that you are not able to capture elsewhere in the Move
Fish form should be entered
a.
*If you selected ‘Other’ in any field of the Move Fish
Form, add a comment in the Notes that clearly explains why ‘Other’ was selected
6.
Click ‘Save’ to
make the move
**If you
need to Exit the Move Fish form click Cancel. If you have started filling out
the form, clicking Cancel will place the ‘in process’ fish back in the ‘Moved
From’ inventory.
When Fish are transferred between facilities, the
Original Hatchery's Origin information (where the Fish were moved from) is
transferred to the destination location. This allows for accurate tracking when
Fish are transferred to another Facility with no defined Origins.
This also applies when the Fish transferred to another FINS
facility have the same Identifiers but different Origins. In this situation,
the Original Hatchery's Origin information (where the Fish were transferred
from) is transferred to the destination location, even if the receiving
Hatchery has different Origins for Fish with the same Identifiers applied.
Common
Fish – Create (Save/Update): The Move Fish form allows you to create Common Fish
templates on the fly. Species, Sex, Age, Source Trap, Disposition fields
(Living Status, Move To, Purpose) as well as Marks, Tags, Samples, and
Conditions can be stored in a Common Fish template. *Unique values for each
Identifier (Marks/Tags/Samples) are not saved in the template. Once you have
selected your setting, Name the template and click Save.
Business Logic:
Active/Displayed Common
Fish Templates are either Templates that you have Created on-the-fly and/or
have been marked as ‘Active’ in the Admin Menu > Common Fish Workflow for
the Holding Module.
Admin management of
Active and Inactive Common Fish templates for Holding is required – so that
only the Active Common Fish templates display within the Move Fish Form.
Steps to Create a New
Common Fish:
1.
From within the Move Fish Form, enter the common data for the
Common Fish that will be created
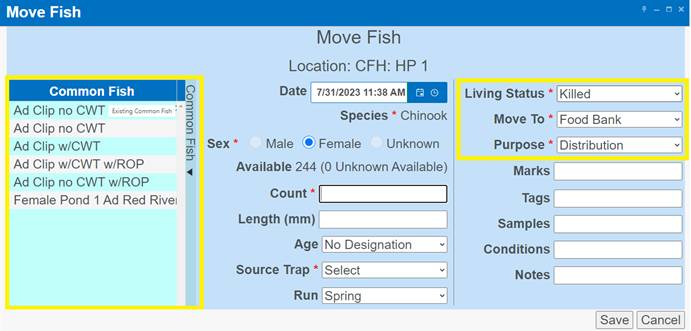
2. Once
common fish data fields have been input, hover over the Common Fish
label highlighted below
a. Right
click
b. Select
‘Save New Common Fish’
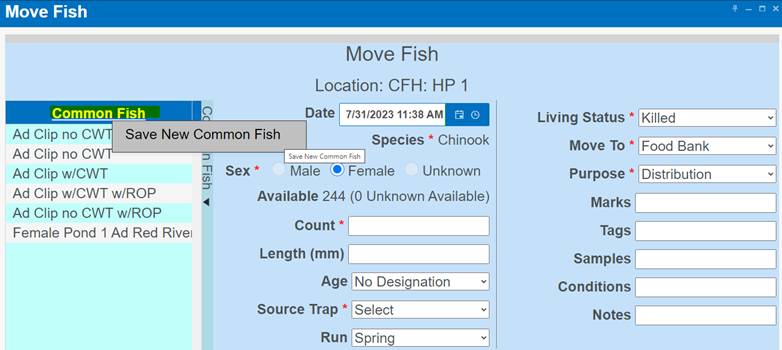
3. Enter
the Name of the new Common Fish and click ‘Save’
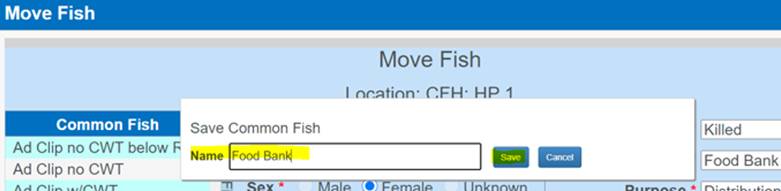
4. The
new Common Fish has been added to the Common Fish Grid and is now available for
use on moves from that specific Holding Location for that Species…
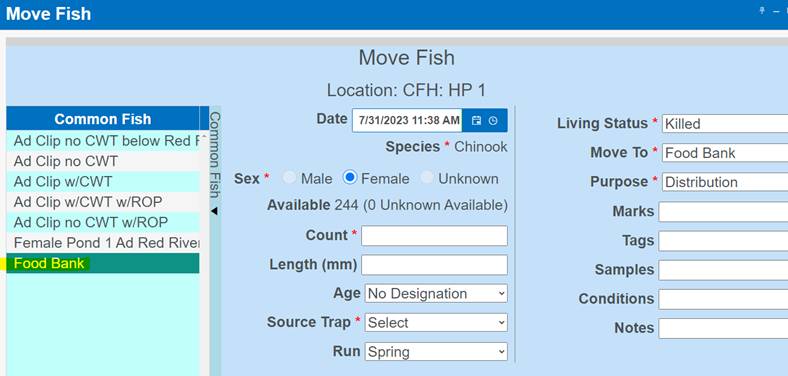
Steps to Edit/Update an Existing Common Fish:
1.
Select the Common Fish you want to Edit by clicking on it from the
Common Fish Grid
2. Once
selected, Edit only the Common Fields that you want to Update
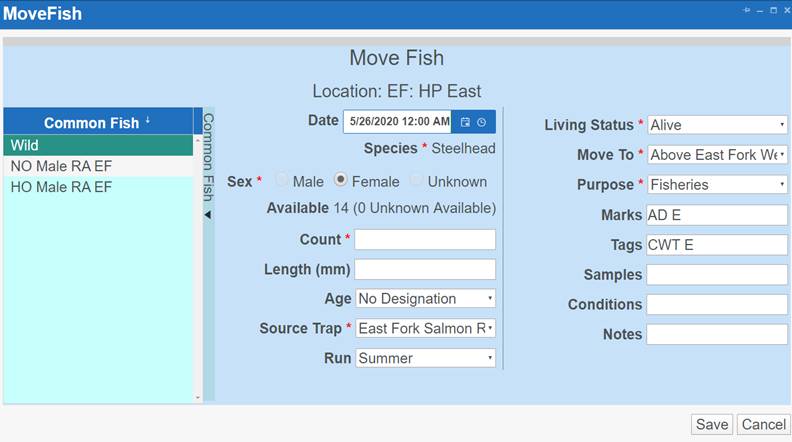
3. Once
you change the Common Fields that need to be updated hover over the highlighted
Common Fish, right click and select ‘Update CF…’
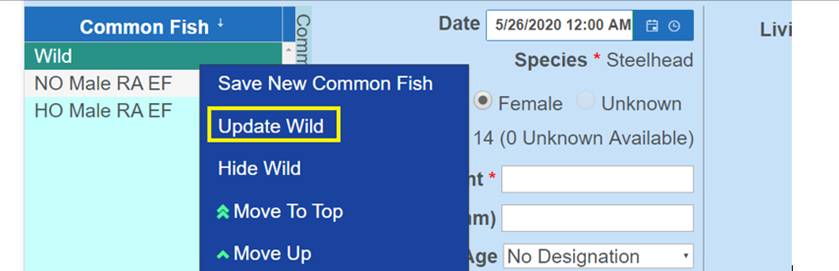
4. The
Update Common Fish dialogue box will pop up. Click Update to Save your changes
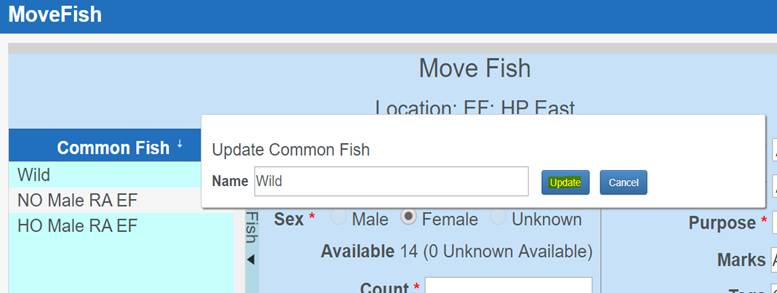
The
Count Correction tool is to be used for adjusting on-hand inventory (Fish
and/or Identifiers) as needed.
Here
are a few examples of known instances you would use the Count Correction tool:
1.
In-season, after a sort you
determine a different inventory count/make-up (Sex/Origins) of your inventory
a.
Inventory differences are expected
and normal in fisheries
i. FINS doesn’t require ‘paper fish’ (fish that only
exist on paper) and instead expects data entry captured at Trapping into
Holding to undoubtedly differ
ii. FINS also accommodates data entry users to be able to account
for unknown variances of initial and/or day-to-day inventory counts that occur,
such as predation…
2.
Post-season, your holding pond is
physically empty, but after entering all moves to account for final
dispositions of your Inventory at the end of the season, your FINS Holding
Location is still showing that it contains fish
3.
To account for fish that were
shipped to you from a Facility that does not use FINS
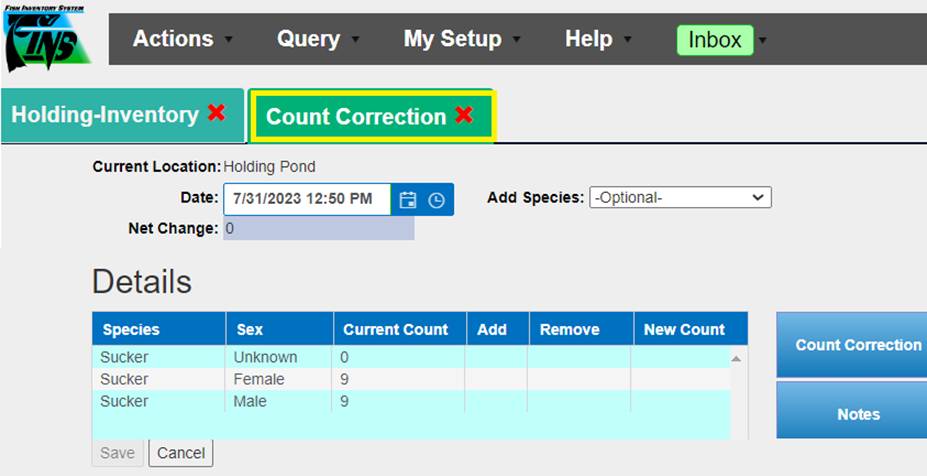
Use Case
When Count Corrections are made on Inventory, if post
sort Sex and/or Origins are determined as needing corrected, or more/less Fish
are determined in a Holding Location since Trapping and/or the last physical
sort was done - Data Entry users can Add/Edit/Delete Fish Inventory per Holding
Location to ensure that On-Hand Inventory remains accurate
*Do not use Count Corrections to account for
Fish that you do have Disposition/Final Disposition data collection for
Use Case
When Count Corrections are made on Inventory, if post
sort Origins are determined as needing corrected, or Fish are moved out of or
into a Holding Location without capturing Identifiers - Data Entry users can
Add/Edit/Delete Identifiers per Holding Location to ensure that On-Hand
Inventory remains accurate. When Fish
are moved into a Holding Location, either from Trapping, an Inbox or from
another Holding Location, they typically have Identifiers such as Coded Wire
Tags, AD Clips, PIT, etc.. associated to them (Existing or Applied). While in
Holding, fish are handled for picking mortalities, sorting, distribution or
other management decisions that cause initial inventory counts to change. When
fish count changes, the associated Identifiers also need updated. Fish counts and Identifier counts are kept track of
separately and can be altered independent of each other.
Business Logic/Validation
· Fish Count and Identifiers are not tied together which
means that discrepancies can occur if users don’t explicitly update Identifier
Counts when Moving Fish or making Count Corrections to Fish Inventory
· Origins will display when the Species section of
Holding Inventory grid is expanded as shown below.
· If an Origin workflow has NOT been created by your
Facility Admin/Data Official, or the current set of IDs on the fish do not
match an Origin, FINS will display the Origin Field as ‘Uncategorized’
·
If there are currently no
Identifiers tied to a Holding Location, the Origin Group Details will be empty
when expanding the Species, as shown below
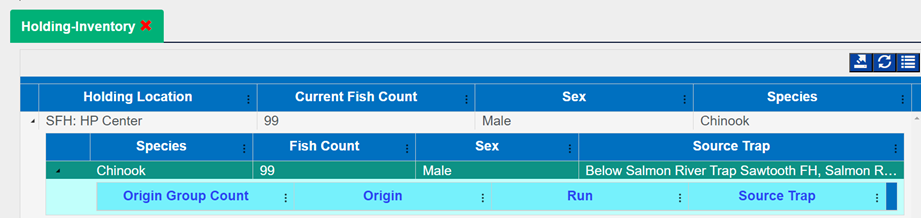

Use Case
Facilities with Ladders typically use a Fish Counter
to identify the initial estimated Trap Count that goes into Holding, since not
each fish is handled Visual Age is commonly assigned. Count Corrections can be
made on Visual Aged Inventory, if post sorting it is determined that a Ladder
Fish Counter did or didn’t correctly account for the correct Visual Age of On
Hand Inventory – Visual Age can be updated as needed when corrections are
known. Data Entry users can Add/Edit/Delete Visual Age Counts per Holding
Location to ensure that On-Hand Visual Age Inventory remains accurate. When a known fish visual age changes, the user can
appropriately update it. Fish counts,
Identifier counts, and Visual Age are kept track of separately and can be
altered independent of each other.
Business
Logic/Validation
· To Count Correct Visual Age of Fish On-Hand the Age
Grid needs to be displayed in the Holding Inventory grid
o
Check ‘Age Grid’ via the Holding
Inventory ‘Grid Display Options’ menu to display the Age Grid data
Completing the Count Correction form
For Fish (when no Identifiers/Origins are applicable)
1.
Open the Count Correction Form by clicking on the Count
Correction button located on the right side of the Holding Location Name row of
the Count Summary
2.
The Count Correction Form will provide you with the current
species, sex, and count of fish in each Holding location
3.
If you are increasing the Current Count, enter the number of
fish you are adding into the ‘Add’ column. If you are decreasing the Current
Count, enter the number of fish you are removing into the ‘Remove’ column
4.
The New Count column will display the ‘New Count’ of that
Species & Sex in a specific location
5.
Once you have made your adjustments, add a detailed
description of the reason for the Count Correction. This is required to Save
the Count Correction form.
6.
**If you need to exit the Count Correction form without
applying a Count Correction, select Cancel.
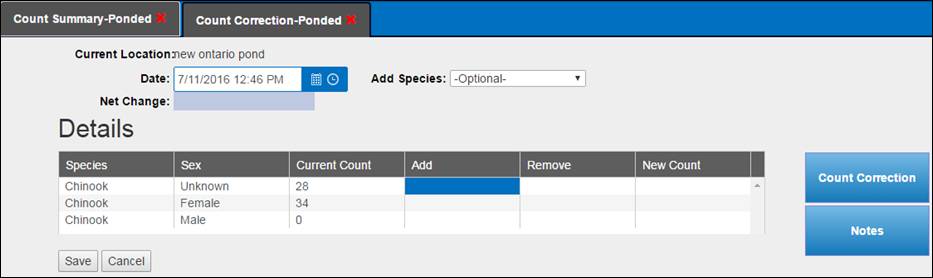
Count Correct Container (Fish and
Identifiers)
*NOTE: If Editing Identifiers after making a Count Correction to
Fish Count, please go to Count Correct
Container (Editing Identifiers
to correct Identifier Inventory) section
Steps
1.
From within Holding Inventory, click on the Holding Location
you wish to make the Count Correction on
a.
Right click and select ‘Count Correction’
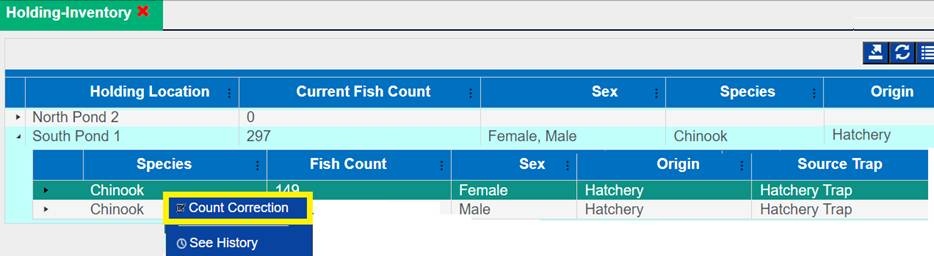
2.
Select the date you made the Count Correction in FINS along
with the Species
3.
From within the Count Correction grid, enter the number of
fish that you will be adding or removing
*Note: By default, if a Species
already exists in the current Holding location, this Species will appear in the
grid below and can be added to/removed from. However, if the Species is not
already in the Holding Location and displaying in the grid, it can be selected
in the ‘Add Species’ dropdown then additional Species can be added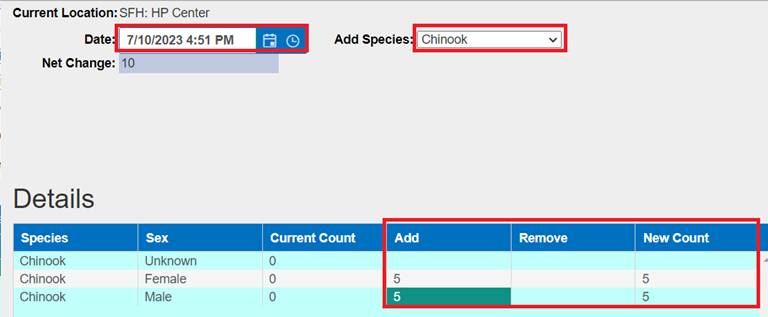
4.
User is required to enter a note, indicating why a Count
Correction was necessary
5.
Click ‘Save’
6.
After clicking Save, FINS will give you the option to add
Identifiers to the Fish Group being added
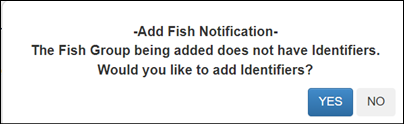
7.
Click ‘Yes’ if there are Identifiers associated to the Fish
Group
Select
the:
a.
Source Trap: Source Trap that the Fish that are getting
Identifiers applied to were Trapped at
b.
Number of Fish: Number of Fish that will receive the
Identifiers applied on this form
c.
Run: Run that the Fish getting Identifiers applied to are
associated to
d.
Marks: Select and enter the Marks and Tags that will be
applied to each of the Fish that you entered in the ‘Number of Fish’ field
*Identifier
Quantity Note: When entering the numerical value for Identifiers, make sure
to enter ‘1’ as the number of Identifiers in the Quantity section instead of
entering the Fish Count value entered in Step 2.b. as ‘Number of Fish’.
Entering ‘1’ in the Identifier Quantity field indicates that
ONE identifier will be associated to each of the ‘Number of Fish’ entered in
step 2.b.
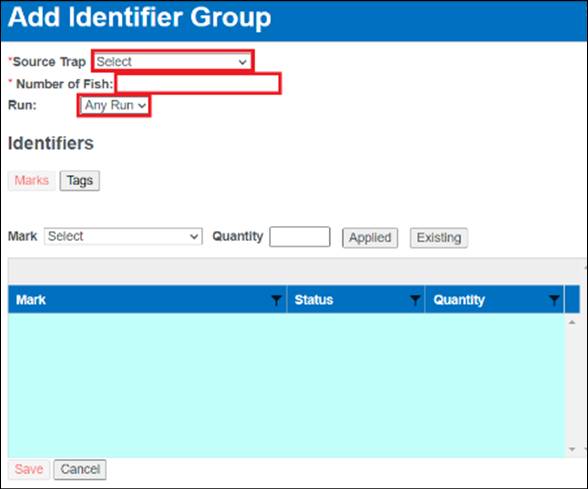
8.
Click on ‘Save’ to save the Identifier Group
a.
The ‘Save’ button will only enable if all required fields are
selected
Count
Correct Container (Adding Identifiers to correct Identifier Inventory)
Steps
1.
From within Holding Inventory, make sure to expand your Holding
pond, highlight the Sex and Species you wish to add Identifiers for, right
click and select ‘Add Identifier Group’
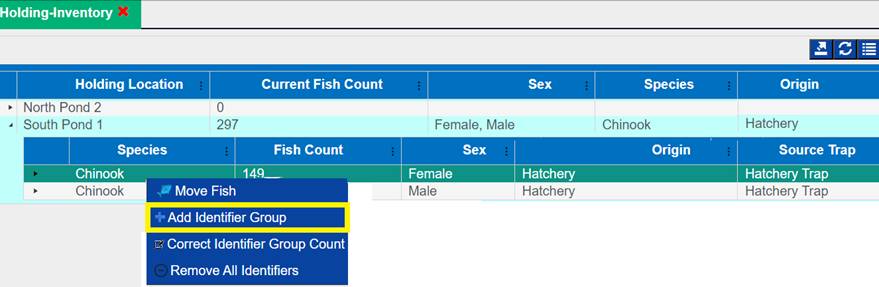
2. Select
the:
a.
Source Trap: Source Trap that the Fish that are getting
Identifiers applied to were trapped at
b. Number
of Fish: Number of Fish that will receive the Identifiers applied on this form
c. Run:
Run that the Fish getting Identifiers applied to are associated to.
d. Marks:
Select and enter the Marks and Tags that will be applied to each of the Fish
that you entered in the ‘Number of Fish’ field
*Identifier Quantity Note: When entering the
numerical value for Identifiers, make sure to enter ‘1’ as the number of
Identifiers in the Quantity section instead of entering the Fish Count value
entered in Step 2.b. as ‘Number of Fish’.
Entering ‘1’ in the Identifier Quantity field indicates that ONE
identifier will be associated to each of the ‘Number of Fish’ entered in step 2.b.
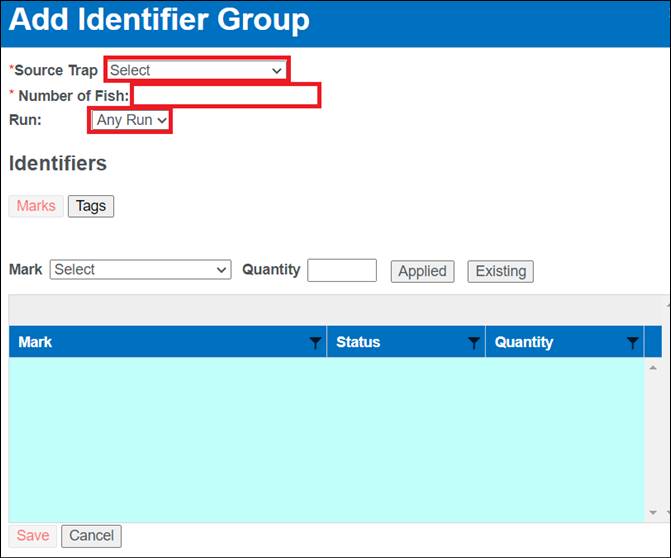
3.
Click on ‘Save’ to save the Identifier Group
The ‘Save’ button will
only enable if all required fields are selected
4.
Once saved, Holding Inventory will display the updated number
of Identifiers associated to the Fish in the holding pond. If the Identifier
combinations applied are tied to an Origin that was created, FINS will display
the Origin name. If the Identifier combinations applied are not part of an
Origin, FINS will display the Origin name as Uncategorized as shown below.
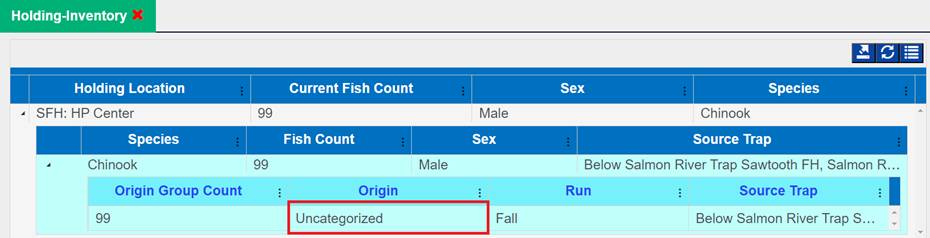
Count
Correct Container (Editing Identifiers to correct Identifier Inventory)
Steps
1.
From within Holding Inventory, make sure to expand your
Holding pond, highlight the Sex and Species you wish to edit Identifiers for
a.
Right click and select ‘Correct Identifier Group Count’
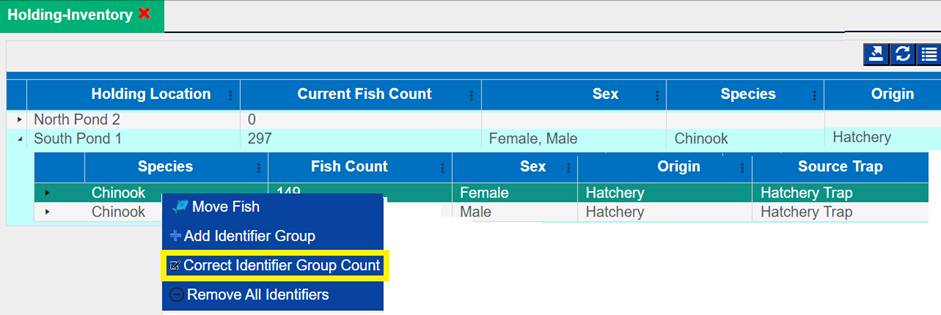
2.
This will open up the dialogue box displayed below.
From
this dialogue box
a.
Click on the ‘Add’ or ‘Remove’ field
b.
and enter the number of identifiers you wish to add or remove
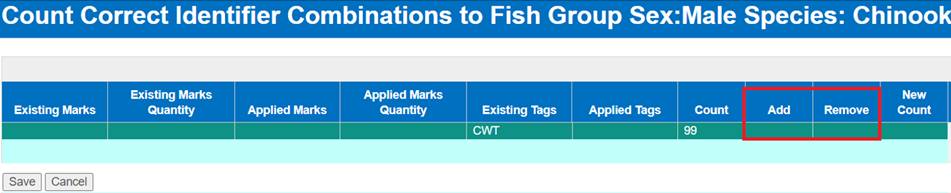
3.
The ‘New Count’ column will then display the new count of
Identifiers
This is
dependent on how many Identifiers were added or deleted in Step 2

4.
Click on ‘Save’
This
will update the Identifier Count for the Species and Sex selected within that
Holding Location
Count Correct Container (Deleting Identifiers to correct Identifier
Inventory)
Steps
1.
From within Holding Inventory, make sure to expand your
Holding pond, highlight the Sex and Species you wish to edit Identifiers for
a.
Right click and select ‘Remove All Identifiers’
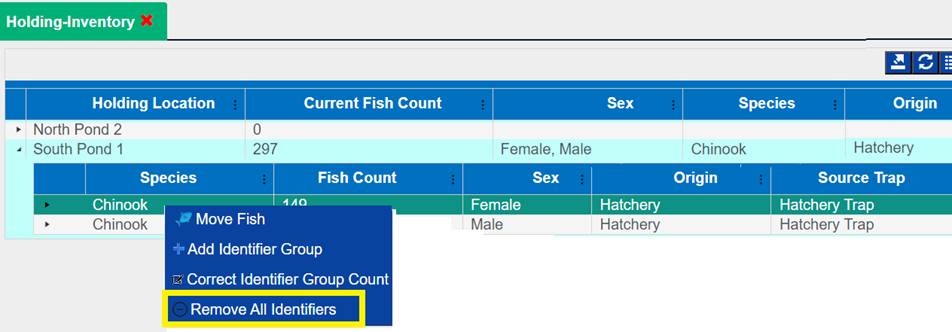
2.
This will delete all Identifiers associated with the Fish
within the Holding Location
a.
If you need to apply new Identifiers, please refer to the ‘Add Identifiers’ section
above.
b.
If only a certain number of Identifiers need to be deleted,
please refer to the ‘Edit Identifiers’
section above, specifically the Remove column entry
Every trap that moves fish into a
holding location will be an option in the drop down:
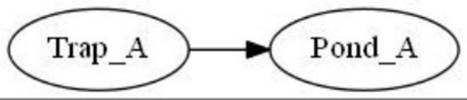
Would Return Trap A.
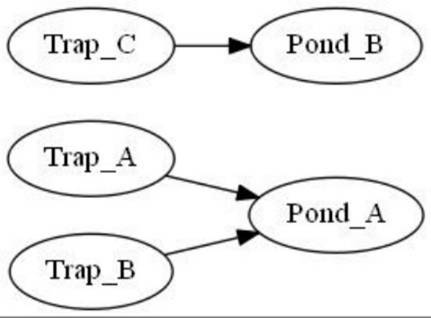
Would Return Trap A and Trap B for
Pond A, and Trap C for Pond B
If fish are moved from 1 pond to
another, all possible traps from the other pond become options for the
destination pond.
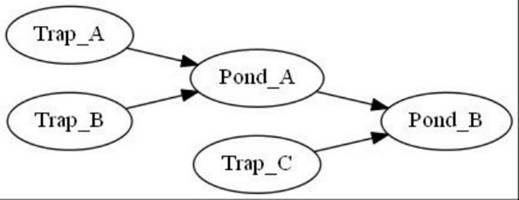
Pond A would have Trap A and Trap
B available as source traps.
Pond B would have Trap A, Trap B,
and Trap C available as options.
More complex:
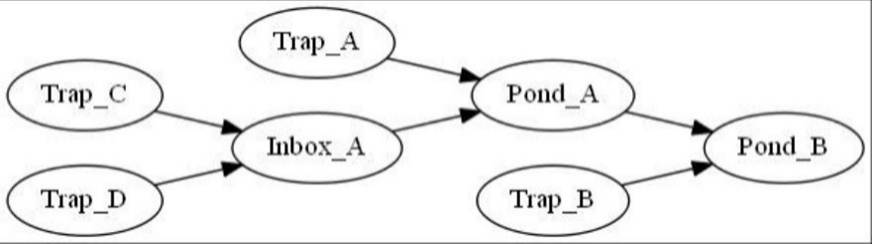
Inbox_A would have Trap_C and
Trap_D as options.
Pond_A would have Trap_A, Trap_C,
and Trap_D as options.
Pond_B would have Trap_A,
Trap_B, Trap_C, and Trap_D as options.
*If you do not know the ‘Source Trap’ of the fish in your
Move Fish record, select ‘Other’ and comment in the Notes field why you
selected ‘Other’
Before entering your Spawning Records into FINS, you should
match up your Spawn crosses from your data sheet. Doing this will improve the
data entry process and assist in Session Progeny separation and easily
identifying crosses that involve a Re-Used Male.
Create New Spawning Session: To Create a New
Spawning Session, you will use the New Spawning Session form. The New Spawning
Session form is accessible by hover over Spawning in the Actions menu
1. After
clicking on New Session, the New Spawning Session Header form will open. In
this form, also referred to as the ‘Header’, you will enter details about the
Spawning Session such as date and time, Spawning Location, Species, Spawning
Ratio (#of Females: # of Males), Lot # (Required), and Comments. The Date,
Location, and Lot #, and Time data entered into this form will be used to
create the Session Name for the Spawning Event.
·
Date: This field is intended to capture the Date and Time
the Spawning Event occurred.
·
Spawning Location: Select the Location the Spawning Event
occurred.
·
Species: Select the Species that was Spawned in the
Spawning Event.
·
Stock: Select the Stock associated with the fish spawned
in the Spawning Event
·
Spawning Ratio: Enter the Intended Spawn Ratio for the
Spawning Event. ***The Spawning Ratio entered into the Spawning Session
Header is not the Spawning Ratio that has to be used for all of the crosses
created (Spawned) within the Spawning Session, it is only used as an intended
guideline Spawning Ratio for the Spawning Session.
·
Estimated Egg Count: A required, user defined field
intended to capture the estimated egg count per cross, per session. The value
entered into this field will be a default value for the Egg Count field in the
Current Spawn Cross panel, but can be edited from that field if necessary.
·
Lot Number: A required, user defined field intended to
capture the unique identifier of the Spawning Session (i.e. R1, 1001,
S101).
·
Progeny: Select the intended Progeny of this Spawn session
from the dropdown box.
*The Progeny is the intended
outcome of the Cross between the Spawned adult fish.
·
Session Comments: A user defined field where you should
type any information that is important to the Spawning Session.
2. Once
all data necessary is entered, click Save.
After creating your New Spawning Session Header and clicking
Save, a new page will open under the same Spawning Session tab. This page will
display the Session Header data, your Spawning Summary, Current Spawn Event
panel, and the All Spawned Crosses grid. The following are components of the
FINS Spawning Data Entry Process.
Your Spawning Summary will display all inventories you have
available to Spawn within your Spawning Session. There is a Collapsed and
Expanded view for this grid.
1. Expanded
View (Default Display): By clicking on the small arrow at the Left
of each ‘Current Locations’ listed in your Spawning Summary grid, you can
‘Expand’ your Spawning Summary to view the details of what is contained in each
location. This view will breakdown the inventory and shows you how many of each
sex of fish are in that location.
·
On the right side of each sex of fish, there is a Spawn Fish
button. Clicking on the Spawn Fish button will open the Spawn Fish form,
specific to the Sex of the fish you clicked on it from. If the sex is Unknown,
you will be required to designate the actual Sex once in the Spawn Fish form.
You cannot save data on Unknown Sexed fish in a Spawning Session/Spawn Fish
form.
2.
Collapsed View: Each location you have that has Spawning
inventory will display individually. In addition to the Location name, you will
see the total Count of fish in that location, and the Sex and Species of those
fish. The Summary will only display the Species in that Location that matches
the Species you specified in the Session Header.
·
On the right side of each Location row that contains Fish
available to Spawn, there is a Count Correction button. Click on the Count
Correction button if you need to Correct the Count of fish that are available
in the location. If you add a new Species via the Count Correction form to a
Holding Location, the newly added Species will not be available to Spawn in
this session nor will they display in the Spawning Summary because you can only
designate one Species to Spawn at a time/per Spawning Session. The newly added
Species will be viewable in your Count Summary – Ponded grid as being held.
This is where the data for the specific fish you selected
is captured for the Spawning Session.
1. Common
Fish – Create (Save/Update): The Spawn Fish form allows you to create
Common Fish templates on the fly. Any Disposition field (Living Status, Move
To, Purpose) as well as Marks & Tags can be stored in a Common Fish
template. *Unique values for Tags are not saved in the template. Once you have
selected your setting, Name the template and click Save.
·
Business Logic: Active/Displayed
Common Fish Templates are either Templates that you have Created on-the-fly
and/or have been marked as ‘Active’ in the Admin Menu > Common Fish Workflow
for the Spawning Module. Admin management of Active and Inactive Common Fish
templates for Spawning is required – so that only the Active Common Fish
templates display within the Spawning Session.
2.
Edit (Save As): If you click on an already saved Common Fish
template, but then make an adjustment to the original settings and wish to
create a new template with the edited selections, enter a new Common Fish Group
Name and select Save. This will add a new Common Fish template for use.
3.
Edit (Overwrite/Save): If you wish to change an existing Common
Fish template’s settings and save the edited/overwritten settings under the
same original Common Fish Group Name, change the settings and click Update.
This will overwrite the originally created Common Fish template with the newest
settings.
4.
Fish Group Details:
·
Spawn Id (Female or Male ID): If spawning a Female fish,
the Spawn ID is required. If you are not spawning the Female, the Living Status
of the record is ‘Not Spawned’, and then the Spawn ID may be left blank. The
Spawn ID entered for Spawned Female (Female ID) records will become the first
value of a two-part Cross ID label for future reference to that Specific
Female/Cross. If spawning a Male, fish, the Spawn ID is not required. If a
Spawn ID is not entered for the male record, a default value of N/A will be
auto assigned to that Male and will be displayed as N/A in all grids for that
Cross.
·
Moved From: This field will default to the location name
the fish in this spawn record was moved from (either a Holding or Spawning
Location).
·
Sex: This field will default to the Sex of the fish the
Spawn Fish form was activated from.
§
Once the Spawn Fish form is open, you can’t change the sex from a
Male to a Female. If you selected the wrong sex, click Cancel to be taken back
to your inventory summary.
§
If you clicked the Spawn fish button for an ‘Unknown’ fish, you
will have to designate the sex of the fish before saving.
·
Length: Length of fish, measured in mm, from tip of nose
to fork of tail (Fork Length). This field is not required.
·
Age: This field currently only applies to Chinook.
§
Age Designations (Adult, Jack/Jill, Mini-Jack) can be manually
selected based on a visual determination (Length field must be left blank to do
this) OR
§
If an Age Criteria workflow is applicable, the Age Designation
will be assigned based on the date the record is created and the Length that
was entered.
·
Times Used: Field in the Male Spawn Form only. This field
is used to capture the amount of times a Male has been Spawned. This data is
then displayed in the ‘Times Used’ column of the Spawning Query, All Spawned
Crosses grid, etc. For Female Records, the ‘Times Used’ value will default to
‘1’ and for ‘Not Spawned’ records the ‘Times Used’ value will default to ‘0’
·
Source Trap: Drop down menu that will populate with the
Source Trap(s) that have fed into the spawned from ‘Holding Pond’ location.
Example below:
Example showing the relationship between Location and Source Trap
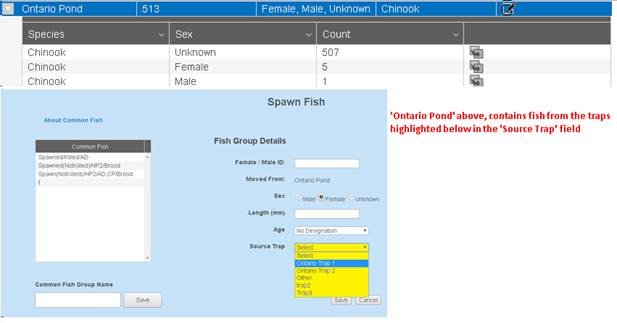
5.
Disposition:
·
Spawn/Living Status: A required field; available options
are Spawned (Killed), Spawned (Not Killed), and Not Spawned. * If ‘Not Spawned’
is selected, a ‘Why Not Spawned’ field will appear. A selection in this field
is required.
·
Move To: A required field; select the Location the fish
was Moved To during this Spawn Session.
·
Purpose: A required field; select the Purpose, or the
reason you moved fish to the ‘Move To’ location that you selected. If the
Purpose you need is not available, select ‘Other’ and comment in the Notes
field what the actual Purpose was.
*Click
here to view Dispositions by Event and Location Type
**FINS has Origin Validation that is enforced by Origins
created by either Facility or Agency Data Officials from the Admin>Origin
Workflow. Origins are specific to Species, Run, Facility, and Agency.
By default, FINS does not enforce any business logic
regarding Identifiers, as the process may differ between Agencies/Facilities
and is instead managed via a custom validation workflow by designated users
with the correct permissions for an Agency/Facility.
Specifically, the following Data Entry inputs are allowed
if Origin Validations have not been created to explicitly prevent them:
§
Adding Clipped and Unclipped Marks to a Fish
§
NOT Saving a Mark or Tag unless it is required by an Origin
Expression and Validation is set at ‘Required’ in the form
When Fish are transferred between facilities, the Original
Hatchery's Origin information (where the Fish were moved from) is transferred
to the destination location. This allows for accurate tracking when Fish are
transferred to another Facility with no defined Origins.
This also applies when the Fish transferred to another FINS
facility have the same Identifiers but different Origins. In this situation,
the Original Hatchery's Origin information (where the Fish were transferred
from) is transferred to the destination location, even if the receiving
Hatchery has different Origins for Fish with the same Identifiers applied.
6.
Marks
·
Select the Mark
·
Enter the Quantity
·
Select Applied or Existing
§
Applied: if the Mark was Applied to the fish during the Trapping
event or
§
Existing: if the Mark was Existing prior to this Trapping event
·
The data you entered will display in a small summary grid below
the data entry fields.
·
To Delete a selected Mark, click on the selected Mark, then click
Delete.
7.
Tags:
·
Select the Tag
·
Enter the Quantity
·
Select Applied or Existing
§
Applied: if the Tag was Applied to the fish during the Trapping
event or
§
Existing: if the Tag was Existing prior to this Trapping event
·
The data you entered will display in a small summary grid below
the data entry fields.
·
If the type of Tag you are documenting is not in the list of
approved Tags, select ‘Other’ and comment in the Notes field what the actual
Tag was.
·
You can Edit and Delete the Tag and/or value from this grid by
clicking in the grid.
8.
Samples: Select the Sample taken and enter the value. The data
you entered will display in a small summary grid below the data entry fields.
·
If the type of Sample you are documenting is not in the list of
approved Samples, select ‘Other’ and comment in the Notes field what the actual
Sample was.
·
You can Edit and Delete the Sample and/or value from this grid by
clicking in the grid.
9.
Conditions: Select the Conditions identified on the fish. The
data you entered will display in a small summary grid below the data entry
fields.
·
You can Delete Conditions from this grid by clicking in the grid.
*Click here to see
Identifier list
10. Notes:
A user defined field where you should type any information that is
important to this record and you are not able to capture it elsewhere in the
Spawn Fish form.
·
If you selected ‘Other’ in any field of the record, add a
comment in the Notes that clearly explains why ‘Other’ was selected.
**If you need to Exit the Spawn Fish form without
Spawning a Fish, click Cancel. If you have started filling out the form,
clicking Cancel will place the ‘in process’ fish back in its ‘Move From’
location inventory.
***Once your Spawn Fish form is complete, click Save, and
you will see that the Spawn ID (Female ID or Male ID) from the Saved form will
transfer over to the Current Spawn Event Panel.
The Current Spawn Event panel displays the Spawn ID of
the Female and Male that make up your current Cross, the corresponding, Egg
Weight (in grams), Egg Count (estimate), and Immediate Container ID
(identifier) that the eggs for this current Spawn Cross are placed during the
Spawning Session, for the Spawn Cross(es) you are currently creating.
Ø
Split Milt: Split Milt is a check box. By checking this box,
the Male Spawned Fish and assigned Spawn ID will be auto applied to all of the
crosses within the Current Spawn Event. Allowing you to ‘Split the Milt’ of
one/each Male in the current cross. If you later edit the Split Male’s data
within a spawn cross record, all of the Male records in that spawn event will
be updated. *If you Split Milt between crosses, you need to manually enter
‘2’ in the Times Used field. This field does not auto adjust for the split.
Ø
Split Eggs: Split Eggs is a check box. If you check the
Split Eggs box, the Female Spawned Fish and assigned Spawn ID (Female ID) will
be auto-applied to all of the crosses within the Current Spawn Event. Allowing
you to ‘split the eggs’ of one/each Female in the current cross. If you later
edit the Split Female’s data within a spawn cross record the Female data for
each cross in the spawn event will be updated.
*Do not split Eggs or Milt and place those crosses in the
same container. If crosses are sharing either Eggs or Milt, and are placed in
the same incubation container, enter the cross as a 1:2 or a 2:1 ratio.
Ø
Spawn ID (Female ID/ Male ID): When you spawn a fish by
saving the Spawn Fish form, the Spawn ID (Female or Male ID) of that record
will display in the appropriate places under the Female and/or Male labeled
fields for reference of which Spawned Fish are included in the Current Spawn Cross.
Ø
Egg Weight: Weight of Eggs from current Cross, in grams.
Not required.
Ø
Egg Count: This field will default with the value entered
in the Egg Count field in the Session Header. If this value needs changed for
the current cross, you can edit it. If you are using the Split Eggs feature,
the Egg Count per cross will auto-divide based on the number of crosses the
female is being used in.
Ø Immediate
Container (or Incubation Container): This is a required field
used to capture the container that eggs were placed in after spawning. If this cross is going into a temporary
container, enter the name of the container into the Immediate Container field. *It
is suggested that temporary container names not be the exact same as an
Incubation container name. If you know the Incubation container a Spawn
Cross is moved in to at the time you are entering your Spawn data, select that
container name. by doing this will prevent you from having to move those
crosses from temporary containers to your Incubation containers at another
time.
Ø
Clear: Clicking on the ‘Clear’ button will delete any data
in your Current Spawn Event fields (Female, Male, Egg Count Egg Weight, and
Immediate Container). If the Current Spawn Event panel displays Fish in it and
you ‘Clear’ those fish, they will be returned to the ‘Moved From’ location they
were originally taken out of to spawn and your Spawning Summary grid Counts
will be adjusted to reflect the cancellation of that Spawn Cross Event.
***Once the data in your Current Spawn Even is completed, click Save.
You will see the Saved Cross is now displayed below the Current Spawn Event
panel in your All Spawned Crosses grid, as a saved Spawned Cross.
The All Spawned Crosses grid displays all of the saved
Spawn Crosses and Not Spawned records for the current Spawning Session. You can
Edit and Delete (See Delete logic below) Spawn Crosses, Edit individual records
that make up a Cross, as well as Transfer Eggs of a Cross out of your Facility
via functions in this grid.
There is a Collapsed and Expanded view for this grid.
1. Collapsed
View (Default Display): This view displays the Cross ID, Immediate
Container, Egg Count, and Egg Weight entered for each Saved Spawned Cross.
2. Expanded
View –This view displays each record within the Cross and their associated
details (sex, Spawn ID, Moved From Location, Length, Age Designation, Age
Calculated status, Living Status, Moved To Location, Purpose, Disposition,
Identifiers (Marks, Tags, Samples, and Conditions) # of Times Used and Notes.
·
Edit Cross: Click on the row of the Cross that you wish to
Edit, and then Click the Edit button at the top of the All Spawned Crosses
grid. This will take you to the Edit Spawn Cross form; make your edits &
Save or Cancel the action. If a cross has been moved to an Incubation,
Transfer, or Shipping location it will be say, eggs have been moved’ in the
Cross ID column.
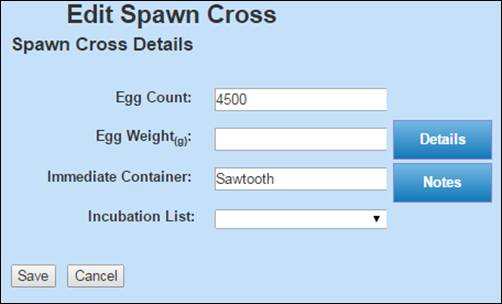
·
Edit Record in Cross: Click on the row of the Cross Record
that you wish to Edit, then Click the Edit button at the top of the All Spawned
Crosses grid. This will take you to the Spawn Fish form; make your edits &
Save or Cancel the action. For Spawn Fish form
instructions, click here.
·
Delete Cross: Click on the row of the Cross Record that
you wish to Delete, then Click the Delete Cross button at the top right of the
All Spawned Crosses grid. Confirm Deletion by clicking ‘OK’ or cancel deletion
by clicking ‘Cancel’. *If you Delete a Spawned Cross, the records in
that Cross WILL NOT be added back to your available inventory in the Spawning
Summary. Deletions can cause negative numbers and issues with Egg Transfers.
Use with Caution and necessary coordination. If the Cross
you are deleting is the result of a Male or Female being ‘Split,’ all other
crosses which are results of that ‘Split’ will also be deleted. To add the fish
in deleted Crosses back into your Ponded Inventory, a Count Correction must be
completed.
·
Move Eggs: Click on the row of the Cross Record
that you wish to Move, and then Click on the ‘Move Eggs of…’ button at the top
of the All Spawned Crosses grid. This will take you to the Move Eggs Form where
you can move a cross of eggs to your Incubation, Release, Transfer, or Shipping
location types. For Move Egg form
instructions, click here.

Source Trap
– Spawning Note
Existing Sessions/Fish well be blank
and defined as ‘Not Selected’ due to a Source Trap not being available at the
time of creation.
Validation
Origins
**FINS has Origin Validation that is enforced by Origins
created by either Facility or Agency Data Officials from the Admin>Origin
Workflow. Origins are specific to Species, Run, Facility, and Agency.
By default, FINS does not enforce any business logic
regarding Identifiers, as the process may differ between Agencies/Facilities
and is instead managed via a custom validation workflow by designated users
with the correct permissions for an Agency/Facility.
Specifically, the following Data Entry inputs are allowed
if Origin Validations have not been created to explicitly prevent them:
·
Adding Clipped and Unclipped Marks to a Fish
·
NOT Saving a Mark or Tag unless it is required by an Origin
Expression and Validation is set at ‘Required’ in the form
Steps
- Open a Spawning Query by going to
Query>Spawning>Select your Season.

- Click on the record that needs to be edited, right click
and select ‘Edit’.
- Editing can be made on any of the Summary fields or
Identifiers shown below. Edits made, will turn the label from black to
blue to notify you of the changes that are being made.

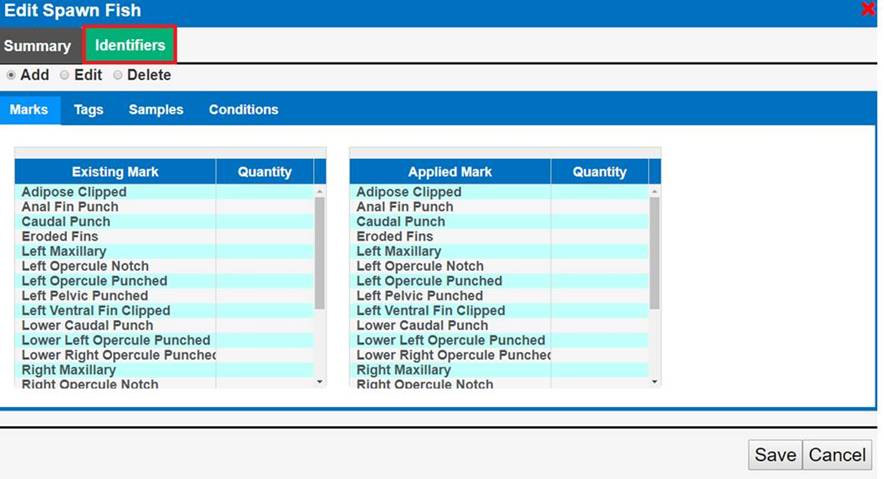
- If Adding/Editing/Deleting Identifiers, click on the
Identifier Tab and select the Identifier you want to Add/Edit/Delete.

- Click ‘Save’ to save the edits.
Use Case
There are
instances in which users will want to delete one or more Spawn Crosses.
For Example:
·
Users may mistakenly move a Spawn Cross Egg Take to the wrong
Incubation Location.
·
Users may inadvertently create duplicate Spawn Crosses.
FINS allows the
deletion of Spawn Crosses from either the Spawning Session via the All Spawned
Crosses grid or via the Spawning Query.
Business
Logic
When attempting to delete a
Spawn Cross, users are able to delete from either the Spawning Session via the
‘All Spawned Crosses’ grid or via the Spawning Query.
When deleting a Spawn Cross from
the Spawning Query tab:
·
A Multi-Select option is available so that multiple Spawn Crosses
can be deleted at one time.
·
Spawn Crosses can only be deleted from the Spawning Query tab if
and only if:
o
All Group Enumerations associated with that Cross have been
deleted in the ‘Group Enumeration’ query. To delete Group Enumerations, refer
to ‘Deleting Group Enumerations’ in the
‘Group Enumerations’ section of the User Manual for step by step instructions.
o
All Moves to and within Incubation associated with that Cross
have been deleted in the ‘Move Egg’ query.
·
If the user deletes a Move from the ‘Move Egg Query’ in
Incubation, and those eggs were moved directly into an Incubation Container and
were never placed in a temporary container, then users can delete the Cross
from the Spawning Query tab. Deleting a Cross from this grid will notify the
user that:
o
If a Cross deleted is the result of a Male or Female being
‘Split’, then all other Crosses which resulted from that ‘Split’ will also be
deleted.
o
A Count Correction must be completed to add the fish deleted back
into your Ponded Inventory.
§
Validation:
·
Date entry is required.
·
Add Species is optional.
§
Validation:
·
Entering a number greater than 0
is required.
*Note: ‘Orphan’ defined Spawn ID’s are intentionally displayed in
the Spawning Query on historical Spawn Cross Males that have had their (Split)
Female Deleted and the Male of the Cross that the Female was automatically
removed from hasn’t been manually deleted to indicate that the Cross never
occurred. Previously when a Split Female/Cross was Deleted in one instance but
was also used in another Cross; all instances of that Split Female were Deleted
by FINS, leaving the Male of a Deleted Split Female Cross ‘Orphaned’ in the
database; Deleting a Split Female used in multiple crosses has previously been
prevented in FINS)
When deleting a Spawn Cross from
the Spawning Session via the ‘All Spawned Crosses’ grid:
·
A Multi-Select option is NOT available and Spawn Crosses can only
be deleted individually.
·
If the user deletes a Move from Spawning in the ‘Move Egg Query’
of an Egg Take, the Spawn Cross will show as available in the ‘All Spawned
Crosses’ grid and the user can Edit/Move/Delete the Spawn Cross.
·
Spawn Crosses can only be deleted from the ‘All Spawned Crosses’
grid if and only if:
o
All Group Enumerations associated with that Cross have been
deleted in the ‘Group Enumeration’ query. To delete Group Enumerations, refer
to ‘Deleting Group Enumerations’ in the
‘Group Enumerations’ section of the User Manual for step by step instructions.
o
All moves to and within Incubation associated with that Cross
have been deleted from the ‘Move Egg’ query.
·
Deleting a Cross from the ‘All Spawned Crosses’ grid will notify
the user that:
o
If a Cross deleted is the result of a Male or Female being
‘Split’, then all other Crosses which resulted from that ‘Split’ will also be
deleted.
o
A Count Correction must be completed to add the fish deleted back
into your Ponded Inventory
§
Validation:
·
Date entry is Required.
·
Add Species is Optional.
§
Validation:
·
Entering a number greater than 0
is Required.
Validation
·
Deleting all Group Enumerations associated with the selected
Cross from the ‘Group Enumeration’ query is required.
·
Deleting all Moves associated with the selected Cross from the
‘Move Egg’ query is required.
·
Selecting ‘Delete Spawn Cross’ from the Context Menu is required
to delete selected Spawn Crosses.
Steps
Deleting Cross from the Spawning Query grid
Once
all the Group Enumerations and Moves for a Spawn Cross ID have been deleted, to
delete a Spawn Cross from the Spawning Query, follow the steps below:
1.
In the Spawning Query, select
the Cross ID(s) that you want to delete. If you want to delete multiple Cross
ID(s), hold down on the ‘CTRL’ key or hold down your mouse and drag to select
the records you want to delete.
2.
Right click on your mouse and
select ‘Delete Spawn Cross’ from the Context Menu.
Business Logic
·
The ‘Delete Spawn Cross’ option in
the Context Menu will only be made available if the eggs associated with the
Cross ID you are trying to delete, have been deleted from:
o
The Group Enumeration Query in
Incubation.
o
The Move Egg Query in Incubation.
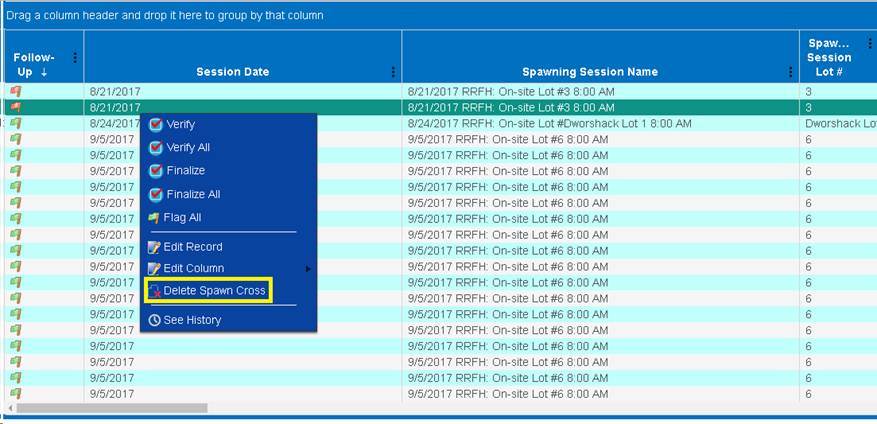
3.
A notification will display
alerting the user of two things:
a) If a
Cross deleted is the result of a Male or Female being ‘Split’, then all other
Crosses which resulted from that ‘Split’ will also be deleted.
b) A
Count Correction must be completed in order to add the fish deleted back into
your Ponded Inventory.

4.
Select ‘Ok’ to proceed and
delete the Spawn Cross or ‘Cancel’ to cancel the deletion of the Spawn Cross.
5.
After Deleting the Cross from
the Spawning Query, make sure to close and re-open the Spawning Session so that
changes are updated and the Cross no longer appears in the ‘All Spawned
Crosses’ grid.
6.
Deleting the Spawn Cross from
the Spawning Query will completely delete the Cross from FINS.
7.
After Deletion make sure to make
a Count Correction in order to add the fish deleted back into your Ponded
Inventory. To make a Count Correction in FINS follow the steps below:
a)
Select the Holding Location
that the Count Correction will be performed on by clicking on the ‘Apply Count
Correction to Spawning Inventory’ icon.

b)
The Count Correction form will
open.
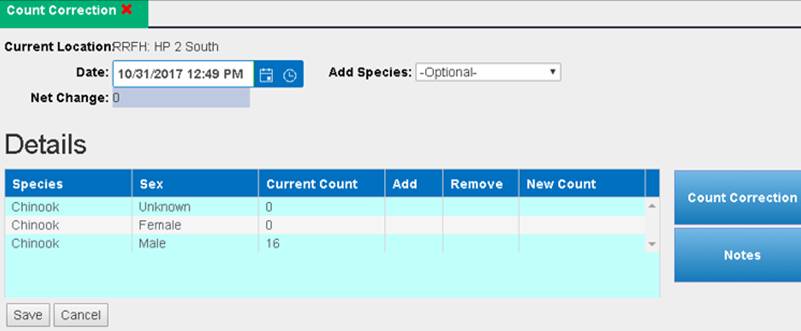
c)
Enter the Date and Species.
d)
To add the fish back into the
pond, go to the ‘Add’ column and enter the number of Males or Females that are
being added back to the pond.
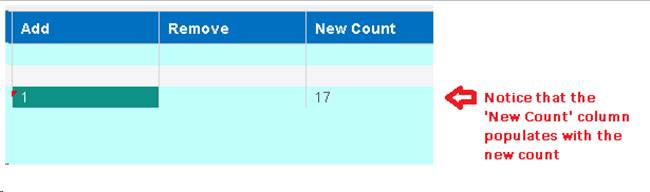
e)
Entering Notes is highly
recommended so that users know why a Count Correction was applied.
f)
Click ‘Save’ to save the
changes.
1. Create
New Spawning Session Header; Save OR click on Existing Session
to open and add to an already created Spawning Session.
2.
Spawn Fish from your Spawning Summary by clicking on the Spawn Fish
button that is located to the far right of each Sex available in each Container
displayed in your 'Spawning Summary' grid.
3.
Enter the collected data in the 'Spawn Fish' form & Save
4.
Repeat steps 2 & 3 until your Current Cross is complete.
5.
Finish the Current Spawn Cross by entering the necessary data into the
‘Current Spawn Event’ fields specific to the current cross you are working on.
(i.e. Egg Weight in grams if known/collected; Egg Count if known; Immediate
Container that the Eggs from the current cross are placed, which is required).
6.
Save the Current Spawn Cross by clicking on the Save button
7.
Now the Saved Spawn Cross and all the details associated to it are
displayed in the ‘All Spawned Crosses’ grid at the bottom right of the Spawning
Session
8. View,
Edit, Delete, Transfer from All Spawn Crosses grid.
To Open and/or View Existing (previously created) Spawning
Sessions, go to Actions > Spawning > Existing Sessions from the Menu Bar.
This will take you to a list of Existing Spawning Sessions. From here, you can
either Open Sessions (where new Spawn Cross records can be added or existing
Spawn Cross records can be edited/deleted). Edit Existing spawning session
Headers or Delete Spawning Sessions entirely (which also Deletes any Egg
Transfers/Crosses/Spawn Records – Spawned or Not tied to the Spawning Session).
Open Existing Session:
1. Double
click on an Existing Session or single click on an Existing Session and then
click the Open button that is located at the bottom left corner of the list
2. This
will take you to the Spawn Summary, where new records can be added to this
Existing Session, or Existing records can be edited and/or deleted.
Edit an Existing Session:
1. Single
click on an Existing Session.
2. Click
on the Edit button at the bottom left corner of the list.
3. This
will take you to the Session Header form where you can change the Session
Header data originally entered. Edit the Session Header data and click Save (to
be brought to the Spawning Session where new records can be added to this
Session or Existing records can be edited/deleted) or Close the Session Header
by clicking on the X in the New/Edit Spawn Session Tab to Cancel the Edit
Action.
Delete an Existing Session:
1. Single
click on an Existing Session
2. Click
on the Delete button at the bottom left corner of the list.
3. A
confirmation message will appear asking you to confirm that you want to delete
this Session (and all associated Spawn Records tied to it). Fish from
associated Spawn records will NOT be returned to the Move From Location of the
Spawn Record.
4. To
continue with the Deletion, click OK. To Cancel the Deletion, click Cancel
If upload is
successful, FINS will allow you to View or Download the Supplemental Data by
giving you the option after selecting the Session and opening the context menu
via a right click.
Use Case:
Spawning Sessions may have
ancillary data available from sources other than the Spawning Hatchery staff
that include information captured about the fish Spawned. To attach this
supplementary data to a Spawning and/or Group Spawning Session, users may
‘Upload Supplemental Data’ in PDF and/or Excel format, so that data associated
to the Spawning and/or Group Spawning Session can be captured, linked to the
Session, centrally stored, backed up and Queryable. In addition,
Supplemental Data files uploaded may be viewed and/or downloaded by any FINS
Online Query user that has permissions to the Spawning Location Facility of the
Session, enabling that separate data collected on the Spawned fish group to be
shared.
*The option to
manage Supplemental Data is available from Existing Spawning Sessions, Spawned
Inventory and/or Spawned Eggs grids.
Business Logic:
FINS gives Data Entry users the
ability to Upload, View, Download and/or Delete Supplemental Data files for
Spawning and/or Group Spawning Sessions by using the ‘Upload Supplemental Data’
feature. The data can be uploaded anytime to a saved Session via the Existing
Spawning Session grid, Spawned Inventory grid and/or FINS Online Spawning
and/or Group Spawning Queries. After Supplemental Data has been uploaded, users
are not only able to view the data but also download it to save/view.
Validation:
- Uploading
Supplemental Data to a Session is optional
- Uploaded
Supplemental Data file formats supported are:
o PDF
o Excel
Steps: Example below from Actions >
Spawning > Existing Session –
1.
From the Existing Spawning Session grid, click on the
Session that you want to upload Supplemental Data for, right click and select
‘Upload Supplemental Data
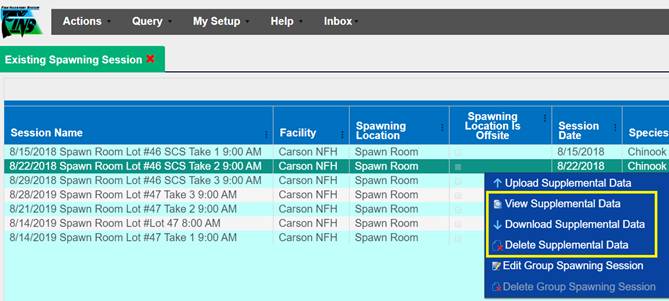
2. Click
on the ‘Choose File’ button and select the file that will be uploaded. File
needs to be in PDF or Spreadsheet format (FINS will notify you if upload was
successful or not).
·
If Successful, click OK.
·
If Unsuccessful FINS will notify you that the uploaded file is
either not an Excel spreadsheet or pdf or was corrupt. When this message
appears, the File did not save and you will need to click ‘Cancel’ and repeat
steps 1-2 again with an uncorrupt File in the accepted Format (PDF/Excel).
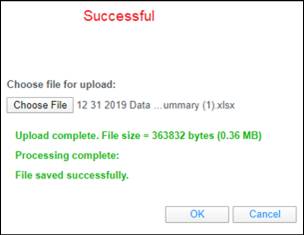
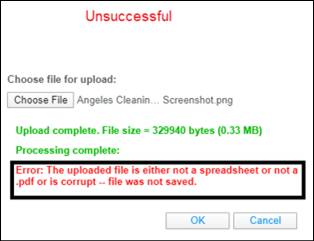
Example below from Actions >
Spawning > Spawned –
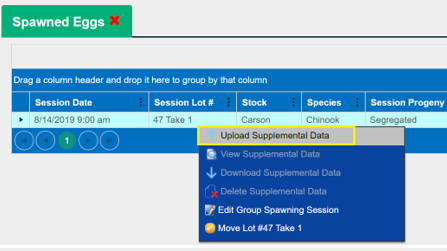
Example below from Actions > Spawning > Spawned –
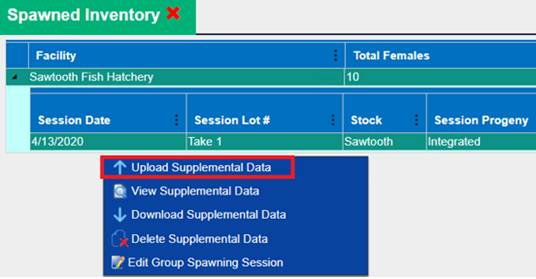
If upload is successful, FINS will allow you
to View or Download the Supplemental Data by giving you the option after
selecting the Session and opening the context menu via a right click.
This grid is a Summary of what
you have Spawned at your Facility. From the Count Summary- Spawned grid, you
can view your Spawning data in total, per Spawning location; or broke down by
session, per Spawning location.
There is a Collapsed and
Expanded view for this grid.
1. Expanded
View (Default Display): This view displays the Session Date, Session
Lot number, Session Species, Count of Females Spawned, Count of Eggs collected
(estimate) by Spawning Session per Spawning location.
2. Collapsed
View: This view displays the combined totals of Females Spawned, Eggs
collected (estimate), and Species spawned of all Spawning Session that took
place at each Spawning location.
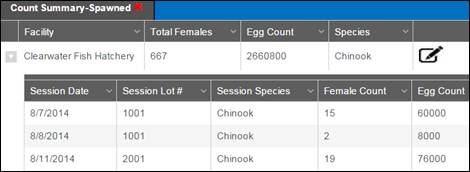
The Spawned Egg Grid is found in
FINS Online via Actions > Spawning > Eggs menu - Displays Eggs that have
been placed in a temporary location.
This is where Egg Takes that
have yet to be placed into a database location and/or have had their move
deleted from a database location will display so that data entry users can Move
them either to a Final Disposition (Disposed and/or Shipped location), into
Incubation or Transfer to another Facility’s Egg Inbox.
An
‘Immediate Container’ in the Spawning Session is used for Egg Takes as either:
·
A temporary, non-Database
Location, such as a bucket, which is used for the Egg Take to be placed into
while the Database Location/Incubation Container is determined or the
Incubation data set is ready for entry, which is then moved into a Database
Location via the Spawned Eggs grid
§
When an ‘Immediate Container’
value is entered in Spawning for a Cross that is not a database location but is
instead in a ‘temporary’ non-Database Location, they will display in the
Spawned Egg grid
·
A Database Location/ Incubation Hierarchy Container where the Egg
Take is placed directly via the Spawning Session Cross input fields – when this
type of a move is deleted, the Eggs will display in the Spawned Eggs grid
·
If ‘Move On Save’ is not checked, Moves will have to be made from
the Spawned Eggs grid after saving the Group Spawning Session
§
Eggs not ‘moved’ (left behind) from the Group Spawned Session
will be available as ‘Inventory’ to ‘Move as a Group’ from the Spawned Eggs
grid
·
Not checking the ‘Move On Save’ checkbox or cancelling a move on
save from within the Group Spawning Session, the Session will be saved but eggs
will have to be moved from the Spawned Eggs grid
Columns:
High Level
·
Session Date – Date of Spawning Session
·
Session Lot # - of specific Spawning Session
·
Stock – of Spawned Fish as entered in Spawning Session Header
·
Species – Species Spawned during this Session
·
Session Progeny – Intended progeny for Egg Takes in Session
·
Est. Egg Count – Current Total Count of Eggs taken during this
spawning session
·
Brood Year – the Egg Take is associated to
Expanded Level
·
Immediate Container – Name of temporary non-database location
that the Eggs from this Cross were placed during the Spawn Event
·
Female ID – assigned to this Spawn Record
·
Cross ID – Unique ID generated by FINS for each Cross within a
Spawning Session
§
(Female ID # and Name of Incubation/Immediate Container Eggs were
placed in at Spawning)
·
GEN Sample – entered for Spawn Record
·
Samples – entered for Spawn Record
·
Est. Egg Count – Total Estimated Egg Count of this Spawn Cross
·
Egg Weight (g) – Egg Weight (in grams) from each Cross
Business
Logic
·
Spawning Offsite Display – Spawned Eggs grid will display for
both the Parent and Owner, the Eggs moved to temporary containers from Offsite
Spawning Location Sessions
·
Spawn > Supplemental Data File – Upload/View/Download/Delete
Supplemental Files from Spawned Eggs grid (for Group and Non Group Spawn
Sessions)
§ Attach any
supplemental data related to a Spawn Session - Upload/Viewing capability of PDF
and/or Excel files
Training Video Resources
The following Training/Support Videos are also
available RE the Spawned Egg Grid –
Learning Resources > Training Videos > Spawning
> Eggs > Spawned Egg Grid
Spawning – Use Case Training Videos for the following
Use Cases:
§
Into Immediate Container
o
Eggs > into Immediate
Container
o
Spawning into an Unknown
(temporary) Container – Spawn Crosses where the Egg Take is put into an
unknown/temporary/(non-database Location) ‘Immediate Container’ (i.e.…a Bucket)
to be moved into either an Incubation Location (i.e.…Tray) and/or other Disposition
(i.e.…Transferred; Final Dispositions: Shipped/Disposed), post Spawning,
possibly by a different data entry user group than the one that entered the
Spawn Cross/created the Egg Take information and/or by the same data entry user
but the Incubation Disposition is unknown at the time the Spawn Cross/Egg Take
is created. The Egg Takes display in the Spawned Eggs grid.
o
to Transfer/Final Disposition
–
Eggs > Spawned Eggs grid
> to Incubation
Moving
Egg Takes from Unknown (temporary) Containers into Incubation – process of
moving Egg Takes, that were initially placed into an
unknown/temporary/(non-database Location) ‘Immediate Container’ (i.e.…a
Bucket), into an Incubation Location (i.e.…Tray) from the Spawned Eggs grid
§ to Transfer/Final Disposition
–
Eggs > Spawned Eggs grid
> to Transfer/Final Disposition
Moving
Egg Takes from Unknown (temporary) Containers into Transfer/Shipping/Disposal
Locations – process of Transferring Egg Takes, and/or Disposal/Shipping Final
Disposition of Egg Takes, that were initially placed into an
unknown/temporary/(non-database Location) ‘Immediate Container’ (i.e.…a Bucket)
from the Spawned Eggs grid
Learning Resources > Training Videos > Training
Webinar Recordings > 2022
§ Spawned Inventory & Spawned Eggs Grid
FINS
Online > Actions > Spawning > Green/Enumerated Inventory
Use Case
The Green/Enumerated Inventory grid provides a summarized
view of Enumerated Egg data by Brood Year, Facility, Species, Hierarchy and
Female ID of all Spawning Sessions by Date and Lot # for viewing Egg
Enumeration status and associated details when creating Run Reports to
determine ‘How many Green and Eyed Eggs were produced at each Hatchery’. Run
Report being the time in which a Facility’s Trap was open through the time
their Eggs are Eyed.
Business Logic
·
Egg Take Enumeration
details are visible to/as Parent/Offsite Owner of the Spawning Location
·
FINS will, by default,
display the Enumerated Inventory by Brood Year
·
Splitting of Female Eggs
o
Splitting a Females Eggs into
multiple Containers will also split the Estimated Egg Count into the number of
Containers those eggs are being split into
o
Splitting a Females Eggs into
multiple Containers will NOT double the number of eggs in each of the
Containers that Female Eggs are being split to
·
Group Enumerated Female Egg Takes – will display/be calculated
correctly as unique Enumerated Female Counts
o When a
container is Group Enumerated, FINS will uniquely count each Female in a Group
Enumeration rather than count each Group Enumeration as an Enumerated Female
Count
o For
example – A Group Enumeration of 3 Female Egg Takes across 10 Incubation
containers will accurately calculate as 3 ‘Enumerated Females’, not 10
·
Incubation Hierarchy Column
o ‘N/A’
will display if Eggs are currently sitting in a Temporary Container or
o If
Eggs were transferred to another FINS Facility and the Eggs are sitting in that
Facility’s Inbox
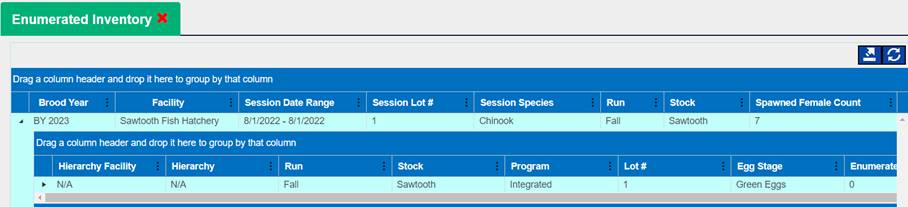
·
Users have the option
to export their data to excel by exporting:
o
Everything: Everything
will provide users with all session data, ever, as initially presented in the
grid
o
Filtered: Filtered
will provide users with data based on their filter selections made on the grid,
as displayed to them
·
Exported File: Users
will be provided with 4 different sheets once the Excel file downloads
o
‘Summary Everything’
Sheet – all Exported Session Data with Enumerated details by Brood Year,
Hierarchy and Female ID/Cross ID/Group ID
o
‘Brood Year Totals’
Sheet – all Exported Session Data with Enumerated
Totals by Brood Year
o
‘Totals by Hierarchy’ Sheet – all
Exported Session Data with Enumerated Totals by Hierarchy
o
‘Totals by Female’ Sheet – all Exported
Session Data with Enumerated Totals by Female ID/Cross ID/Group ID
·
Empty Columns – Users will see empty columns in the Enumerated
Inventory grid when there is no data present to display; either:
o
The Spawning Session associated to the Brood Year has No Spawned
Females
o
The Eggs of the associated Brood Year Spawning Sessions are still
Green (not yet Enumerated)

Columns
·
Brood Year Level
Columns
o
Brood Year – Brood
Year assigned to the Spawning Session
o
Facility – Facility
fish were Spawned at
o
Session Date – Date of
Spawning Session
o
Session Lot Number – Lot # Of Sessions
in Brood Year
o
Session Species – Species
Spawned in this Brood Year Session
Lot Number
o Spawned Female Count – Number
of Females Spawned in this Brood Year
o
Enumerated Female
Count – Number of Females for this Brood Year whose Eggs have been Enumerated
o
Estimated Egg Count – Total Estimated Egg Count of all Females Spawned
o
Actual Green Take – Total Inventory Count plus Loss at Enumeration by Brood
Year
o
Average Actual Green
Take – Actual Green Take/ Enumerated Females
o
Inventory Count – Total number of Viable Eggs at Enumeration; 2nd
count assigned to an Egg Group
o
Loss – Total number of Dead Eggs at Enumeration by Brood Year
o
Eye Up Rate –
Inventory Count / Actual Green Take
·
Hierarchy Level
Columns
o
Hierarchy Facility – Facility of the
Incubation Hierarchy the Eggs were Enumerated in; Current Location if Green
o
Hierarchy – Incubation Hierarchy the
Eggs were Enumerated in; Current Location if Green
o
Lot Number – Lot # of Sessions in this
Hierarchy
o
Egg Stage – Green (Unenumerated) or
Eyed (at Enumeration)
o
Enumerated Female Count – Number of
Females Enumerated
o
Estimated Egg Count – Total Estimated
Egg Count of Eggs in this Hierarchy as designated in Spawning
o
Actual Green Take – Total
Inventory Count plus Loss at Enumeration of Hierarchy.
o
Average Actual Green
Take – Actual Green Take/ Enumerated Females
o
Inventory Count – Total number of
Viable Eggs at Enumeration in this Hierarchy
o
Loss – Total number of Dead Eggs at
Enumeration in this Hierarchy
Inventory Count
o
Eye Up Rate –
Inventory Count / Actual Green Take
·
Female Level Columns
o
Female ID
o
Female ID – ID assigned at Spawning to
the Female from which the Egg Group came from
o
Cross ID – Unique ID for each Cross
within a Spawn Session (Female ID # and Name of Immediate Container Eggs were
placed in)
o Group ID – A Unique ID assigned by the database for a
combined egg group after Group Enumeration
o Session Date – Date Female Spawned as designated in
Spawning Session
o Lot Number – Female Lot# as designated in Spawning Session
o Run – Female Run as designated in Spawning Session
o Stock – Female Stock as designated in Spawning Session
o Program – Female Program at time of Enumeration; Current
Program if Green
o Egg Stage – Green (Unenumerated) or Eyed (at Enumeration)
o Estimated Egg Count – Estimated Egg Count of Female as
designated in Spawning Session
o Actual Green Take – Inventory Count plus Loss at
Enumeration
o Inventory Count – Viable Eggs at Enumeration; 2nd
count assigned to an Egg Group
o Loss – Number of Dead Eggs at Enumeration
o Eye Up Rate – Inventory Count / Actual Green Take
Steps
*PRE-REQUISITE: A Season is required for viewing the Green/Enumerated
Inventory grid due to the potential number of Spawning Sessions at a Facility
- From the Actions Tab, hover over Spawning > Green/Enumerated
and select a Season as highlighted below
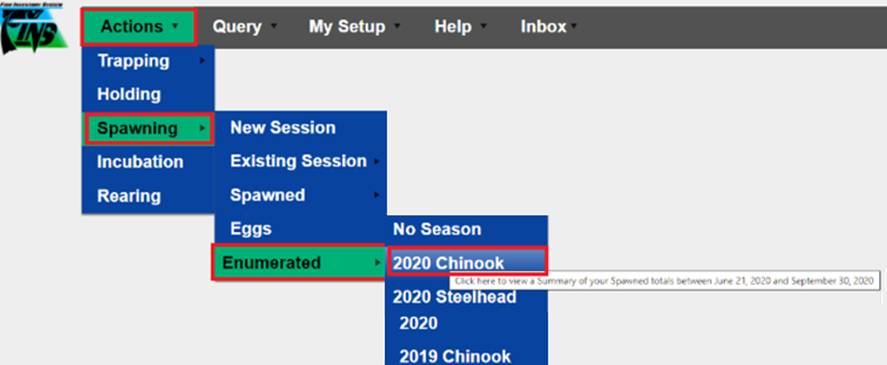
- FINS will by default display the Enumerated
Inventory report at the Brood Year Level on open
·
To view Enumerated Inventory by
Incubation Hierarchy, click on the triangle at Brood Year level to expand to
view the Hierarchy details
- To view Enumerated Inventory by Female
ID, click on the triangle at the Incubation Hierarchy level to expand to
view the Hierarchy details
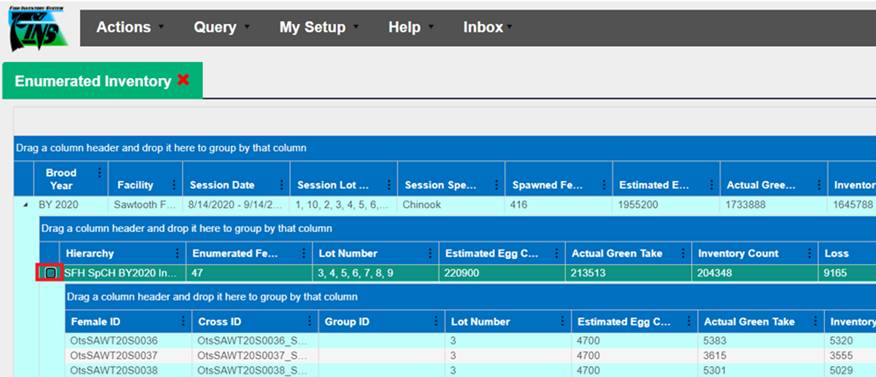
- Download the Green/Enumerated Inventory
report to Excel by:
- Selecting the Export to Excel grid Arrow
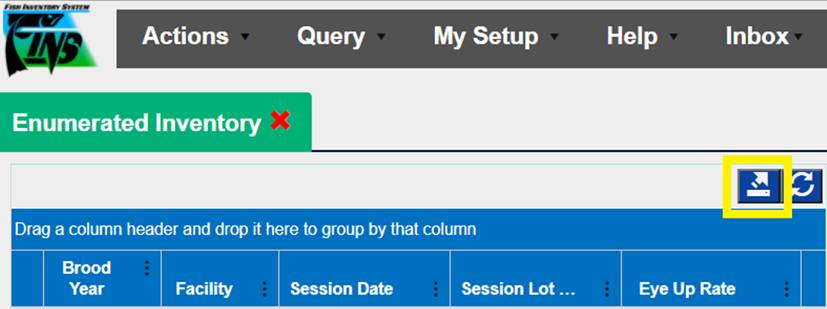
·
Choose either the Everything or
Filtered Export option:
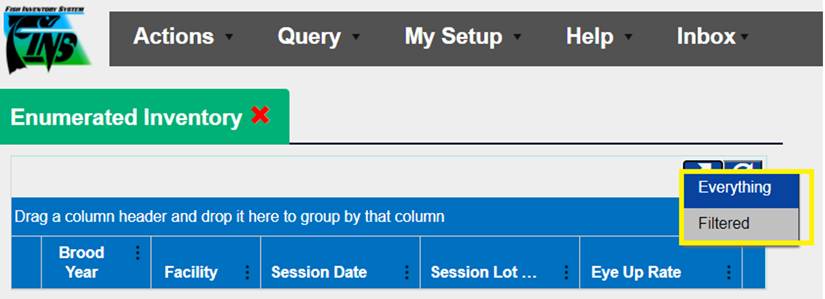
§
Everything – Selecting ‘Everything’ will include all Spawning Session
data, ever
§
Filtered – Selecting ‘Filtered’ will include the data as displayed
per filter selections made on the grid
Exported File: Includes 4 different Sheets for preferred viewing
options
·
‘Summary Everything’
Sheet – Displays all Exported Session Data with Enumerated details by Brood
Year, Hierarchy and Female ID/Cross ID/Group ID
·
‘Brood Year Totals’
Sheet – Displays all Exported Session Data with
Enumerated Totals by Brood Year
·
‘Totals by Hierarchy’ Sheet – Displays
all Exported Session Data with Enumerated Totals by Hierarchy
· ‘Totals by Female’ Sheet – Displays all
Exported Session Data with Enumerated Totals by Female ID/Cross ID/Group ID
*Group Spawning is a limited
BETA Feature released for further testing and scope determination.
Group Spawning – for use when individual Fish collection data entry
isn’t available; Historical and/or high-level data capture (where unique cross
and fish data aren’t captured/recorded/known)
o
Simple Use Case Examples:
·
Historical dataset where unique
information was not collected at the time, however the data needs to be
centrally stored, backed up and Queryable
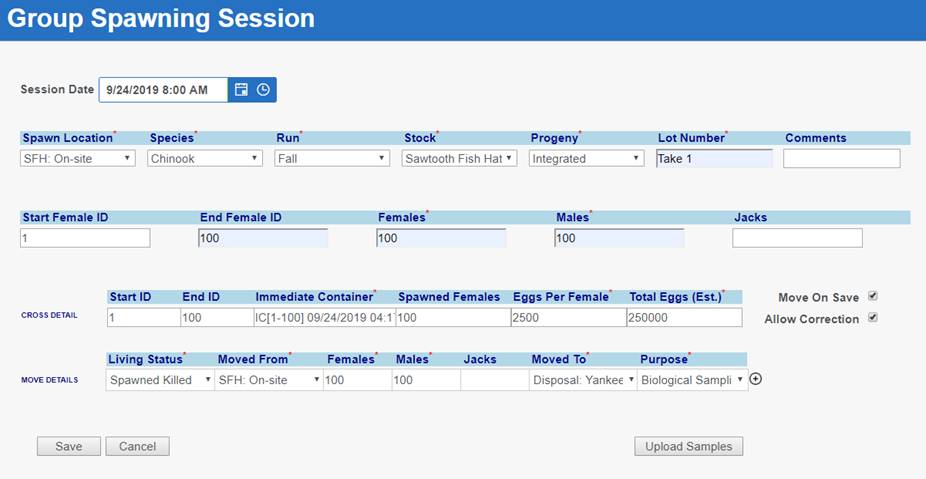
Use Case:
The
Beta Group Spawning Session feature in FINS was created for Historical Spawn
Data Collection where detailed Cross information was not taken. Group Spawning
Sessions allow for ‘Group Data’ to be collected so that only ‘total’ Spawn
information (Males/Females/Egg Takes) is necessary to create a Spawning
Session.
Business Logic:
Beta Group Spawning Sessions
do not allow for unique ‘PBT’ since the data captured is only total/summaries.
Instead, Beta Group Spawned Egg Takes are all identified as ‘the same’ when it
comes to PBT. However, movements are allowed from Spawning at the Female level
or as a group entirely. The difference allows the movement of Egg Takes to
either be handled uniquely (for Culling and/or Picking Morts) or to be handled
as a group collectively in Incubation.
Validation
Required Fields:
Session Date/Time
·
Enter the Session Date and Time that the Group Spawning Session
event took place. The Time auto defaults to 8:00 AM
Spawn Location
·
Select the Spawn Location that the Group Spawning event took
place
Species
·
Select the Species Spawned in the Group Spawning Session
o
Run – Conditional Requirement for specific
Species (Chinook & Steelhead)
§
Select the Run for the Species Spawned
Stock
·
Select the Stock for the Group Spawning Session.
Progeny
·
Select the Progeny that the Group Spawned Session Eggs are
intended for.
o
Integrated- A
hatchery production program with an explicit purpose to incorporate natural
adults into the hatchery broodstock on a regular basis. Spawn cross
combinations can include any of the following: Hatchery x Hatchery, Hatchery x Natural, or Natural by
Natural.
o
Segregated- A
hatchery production program with a management intent to rely on hatchery-origin
adults for the broodstock. Generally speaking, spawn crosses are limited
to Hatchery x Hatchery but
could include occasional use of natural-origin adults.
Lot Number
·
Enter the Lot Number for the Group Spawning Session
·
This is a ‘User Defined’ value that is not validated against, but
is required for saving a Group Spawning Session
·
This field is used as an identifying designator from Spawning
through to Release for the Spawned Crosses captured and their associated Egg
Takes
Females
·
Enter the total number of Females Spawned/Not Spawned for the
Group Spawning Session. The count in this field is validated against the Total
number of Female Fish in the Move Detail grid (Disposition)
Males
·
Enter the total number of Visually designated Males Spawned/Not
Spawned for the Group Spawning Session. The count in this field is validated
against the Total number of Male Fish in the Move Detail grid (Disposition)
Immediate Container
·
Enter the name of the Container that the Eggs generated from the
Group Spawning Session were placed in. If moving into a Database Location, then
can allow an auto populated Time Stamp. If a Start and End ID is entered, the
Immediate Container name is auto generated by FINS in the following format:
o
IC [Start ID-End ID] Date/Time Group Spawn Session created in
FINS i.e.… IC[1-100] 09/26/2019 12:24:14 PM
Spawned Females
·
Enter the number of Females Spawned for the Group Spawning
Session
Eggs per Female
·
Estimated number of Eggs per Female for the Group Spawning
Session. If a number is NOT input, FINS auto calculates Blank Count via input
from Spawned Females Counts and Total Eggs (Est.) fields.
·
Formula shown below:
Eggs Per Female = Total Eggs (Est.) / Spawned
Females
Total Eggs (Est)
·
Total Estimated number of Eggs. If a number is NOT input, FINS
auto calculates Blank Count via input from Spawned Females and Eggs Per Female
fields.
·
Formula shown below:
Spawned Eggs * Estimated Eggs per Female =
Total Estimated Number of Eggs [Total Eggs (Est)]
Living Status
·
Select the ‘Living Status’ applied to each Fish ‘group’ during
the Group Spawning Session
·
A row for each type of ‘Living Status’ of Sexed Fish ‘group’
(i.e.…Male and Female carcasses) in the Group Spawning Session should be
input/selected
·
‘Living Status’ is limited to the following options:
o
Not Spawned
o
Spawned Killed
o
Spawned Not Killed
Moved From
·
Select the Location where this Group of Fish were ‘Moved From’
for the Group Spawning Session
Females
·
Enter the total number of Females that have the same Living
Status and Disposition for each Fish group
·
Entering a number greater than 0 is required
·
The sum of Females from all Living Status/Disposition Rows must
match the Group Spawning Session ‘Female’ Count input
·
Number of Females that will have a Disposition in the Group
Session
Males
·
Enter the total number of Males that have the same Living Status
and Disposition for each Fish group
·
Entering a number greater than 0 is required
·
The sum of Males from all Living Status/Disposition Rows must
match the Group Spawning Session ‘Male’ Count input
·
Number of Males that will have a Disposition in the Group Session
Moved To:
·
Select the Location where this Group of Fish were ‘Moved To’ for
the Group Spawning Session
Purpose
·
Select the appropriate ‘Purpose’ for each Spawned/Not Spawned
Fish group/row
The available Purposes are
limited based on the selected ‘Moved To’ Location Type
o Why Not
Spawned - Conditional Requirement for Fish groups/rows with the
Living Status of ‘Not Spawned’
§
‘Why Not Spawned’ field will only display if the ‘Living Status’
of ‘Not Spawned’ is selected
§
Select the reason the Fish group were Not Spawned
Optional Fields
Comments
·
Enter any relevant comments specific to the Group Spawning
Session
Start Female ID
·
Optional/Auto Populated if no input/not tracked
·
First possible Female ‘ID’ in Group
·
If applicable (moving by Female), enter the first possible Female
ID represented in the Group Spawning Session
·
Part of the Group Cross information – must match Cross Detail
Section ‘Start ID’ of FINS auto adjusts Spawned Females for Group Session
End Female ID
·
Optional/Auto Populated if no input/not tracked
·
If applicable (moving by Female), enter the last possible Female
ID for this Group Spawning Session
·
Input upper bound of last Female ‘ID’ in Group
·
End Female ID must match the total number of Females input in
‘Female’ field for the Group Spawning Session
·
Part of the Group Cross information – must match Cross Detail
Section ‘End ID’ of FINS auto adjusts Spawned Females for Group Session
Jacks
·
If applicable (capturing visually designated Jacks in addition to
‘Adult’ Males of the Group Spawning Session), enter the total number of Jacks
Spawned/Not Spawned for the Group Spawning Session
·
Number of Males that will have a Disposition in the Group Session
Start ID
·
If applicable (moving by Female), enter the Female ‘Start ID’ for
the Group Spawned Cross
·
If no input, then FINS will auto generate the ‘Start ID’ as 001
·
Part of the Group Cross information – must match Cross Detail
Section ‘Start ID’ of FINS auto adjusts Spawned Females for Group Session
End ID
·
If applicable (moving by Female and/or a Start ID has been
input), enter the Female ‘End ID’ for the Group Spawned Cross
·
Optional/Auto Populated if no input/not tracked
·
FINS will auto generate the ‘End ID’ based on the number of
Crosses captured in the Move Detail section of the Group Spawning Session form
·
Part of the Group Cross information – must match Cross Detail
Section ‘Start ID’ of FINS auto adjusts Spawned Females for Group Session
Move On Save
·
Checking the ‘Move On Save’ checkbox will allow Eggs generated
from the Group Spawning Session to be moved from within the Group Spawning
Session into an Incubation Database Location/Container. * This option is chosen
when Data Entry for Incubation and Spawning is done simultaneously
o
*If ‘Move On Save’ is checked and then the Move action is
Cancelled from within the Group Spawning Session, the Session will be saved but
eggs will have to be moved from the Spawned Eggs grid
·
If ‘Move On Save’ is not checked, Moves will have to be made from
the Spawned Eggs grid after saving the Group Spawning Session
Allow Correction
·
Selected –
The ‘Allow Correction’ checkbox enables an
automatic Count Correction for any Fish groups/rows that make an inventory
adjustment necessary in order to Save the Group Spawned Session
o
When checked, FINS will allow Moves to be made from Locations for
Fish groups/rows in the Group Spawned Session, when there are not enough Fish
currently on hand in the selected Moved From Location, upon Save of the Group
Spawn Session
o This prevents a
manual Count Correction from having to be made before entering the Group Spawn
Session data if there were more Spawned/Not Spawned Fish in the Session than
currently available in the Moved From Locations/containers
·
Un Selected –
If the ‘Allow Correction’ checkbox is not
selected, and there are not enough current Fish in the designated Fish
group/row Moved From Locations/containers, the Group Spawning Session cannot be
Saved successfully, and instead has to be recreated after the necessary manual
count corrections/inventory adjustments are made
Upload Samples
·
‘Upload’ allows the ability to attach additional associated data
collected to the Group Spawning Session
·
The sample file must be in spreadsheet format
·
If Sample Data is collected, ‘Upload
Samples’ can be used to upload a file in a Group Spawn Session and associate
the data/file with the selected Session Group. Uploaded data can be viewed from
the Spawned Inventory grid or the Group Spawning Query online
Save
·
If Session Saved correctly, user will
see confirmation in Green
·
Save Hover will provide possible
Errors/Validation issues
·
Once a Group Spawn Session is saved,
only Header information can be edited via the Group Spawning Query
Cancel
·
Cancel will cancel the Session and form
will close. All inputs will be cleared and No Session will be Saved
Session
Form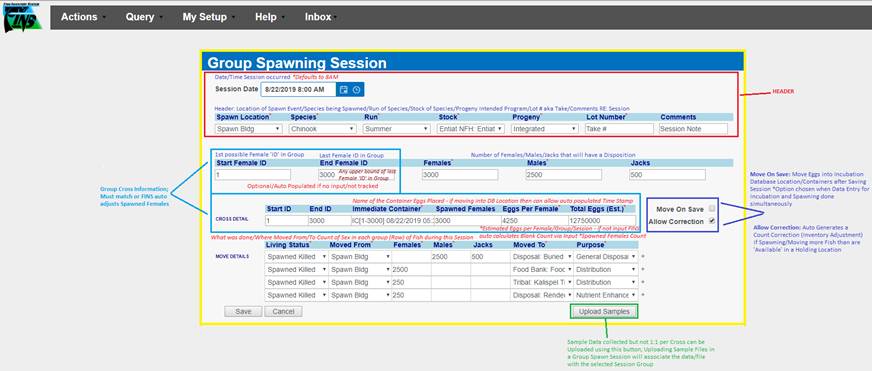
Sections
of Form –
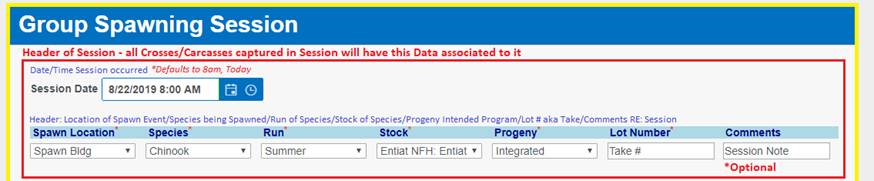


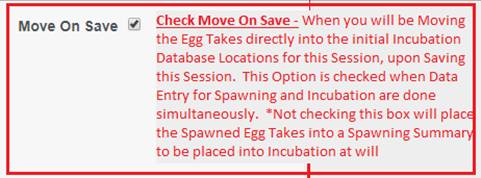

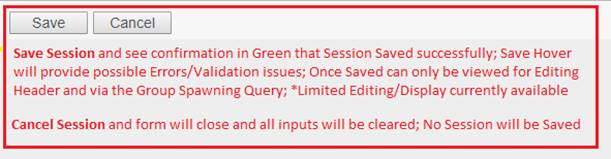
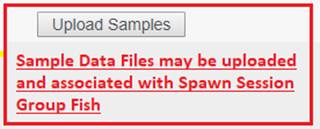
Steps
1.
From FINS Online > Actions Menu *Since
Group Spawning Session functionality is currently in Beta for testing and
feedback, the Menu option is hidden by default.
·
Press the ‘Shift’ key on your Keyboard to access the ‘Group
Session’ Option from the Spawning Menu
2.
Hover to Actions > Spawning > Group Session to open up the Group
Spawning Session form
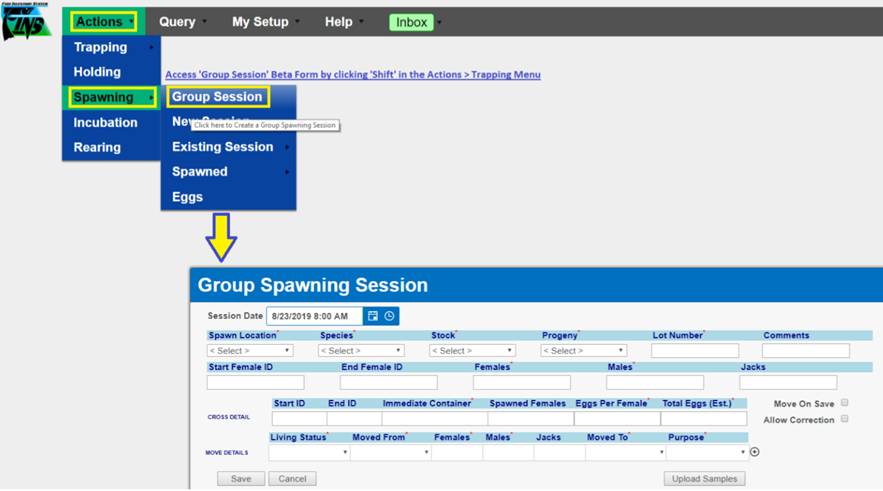
3.
From the Group Spawning Form take a top to bottom, left to right
approach and fill out the form entering the required fields: *Entering data in any other order will corrupt the auto
populated fields and auto calculations made on the form possibly preventing a
Save of the Group Spawning Session
1. Session
Date/Time
2. Spawn
Location
3. Species
4. Run (Will only appear if Species is Chinook and/or
Steelhead)
5. Stock
6. Progeny
7. Lot
Number
8. Comments
(Optional)
9. Start
Female ID (Optional - If not input, FINS Auto
Populates starting at 001)
10. End Female ID (Optional - If not input, FINS Auto Populates to Total Number
of Spawned Female Dispositions from ‘Move Details’ grid)
11. Females
12. Males
13. Jacks (Optional)
14. Start ID (Optional)
15. End ID (Optional)
16. Immediate Container (Optional)
17. Spawned Females
18. Eggs Per Female
19. Total Eggs (Est.)
20. Move On Save (Optional)
21. Allow Correction (Optional)
22. Living Status
23. Moved From
24. Females
25. Males
26. Jacks (Optional)
27. Moved To
28. Purpose
29. Why Not Spawned (Will only appear as a field if Living Status = Not Spawned)
30. Upload (Optional)
Use Case:
BETA
Group Spawning, by definition, indicates that only grouped data is entered for
the fish in a Spawning Session. Some Group Spawn Sessions may have
ancillary data available that include sub sample data and/or other unique
information captured about the Group Spawned. To attach this
supplementary data to a Group Spawning Session, user may ‘Upload Supplemental
Data’ via PDF and/or Excel, so that data associated to that Group Spawn Session
can be captured, linked to the Group Spawn Session, centrally stored, backed up
and Queryable. In addition, Supplemental Data files uploaded may be
viewed and/or downloaded by any FINS Online Query user that has permissions to
the Spawning Location Facility of the Group Spawning Session, enabling that
separate data collected on the fish group Spawned to be shared. *Specifically,
Columbia - Pacific NW Region FWCO Adult Bio Sampling Data Collected on
sub samples of fish in Group Spawn Sessions can be associated to applicable
Group Spawning Sessions that are saved by NFH Staff in FINS using this
Supplemental File functionality

Business Logic:
FINS gives Data Entry users the ability to Upload, View,
Download and/or Delete Supplemental Data files to a Group of Fish Spawned by
using the ‘Upload Supplemental Data’ feature. The data can be uploaded anytime
to a BETA Group Spawning Session; During the Group Spawning Session via the
‘Upload Supplemental Data’ Button; After saving the Group Spawning Session, via
the Existing Spawning Session grid, Spawned Inventory grid and/or Group
Spawning Query. After Supplemental Data has been uploaded, users are not only
able to view the data but also download it to save/view.
Validation:
- Uploading Supplemental Data to a Group Spawning
Session is optional
- Uploaded Supplemental Data file formats supported
are:
o
PDF
o
Excel
Steps:
- From within the New BETA Group Spawning Session
Form, click on the ‘Upload Supplemental Data’ button
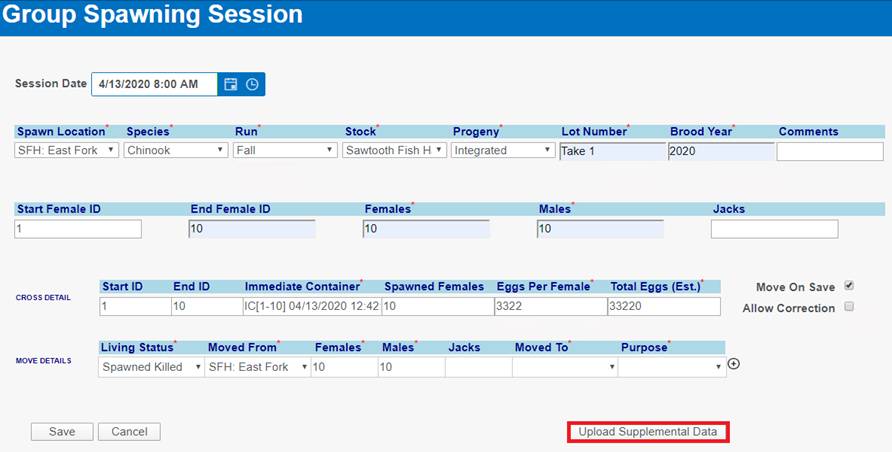
- This will open the ‘Choose file for upload’ box.
- Click on the ‘Choose File’ button and select the
file that will be uploaded. File needs to be in PDF or Excel format (FINS
will notify you if upload was successful or not).
a. If
Successful, click OK.
b. If
Unsuccessful FINS will notify you that the uploaded file is either not an Excel
spreadsheet or pdf or was corrupt. When this message appears, the File did not
save and you will need to click ‘Cancel’ and repeat steps 1-2 again with an
uncorrupt File in the accepted Format (PDF/Excel).
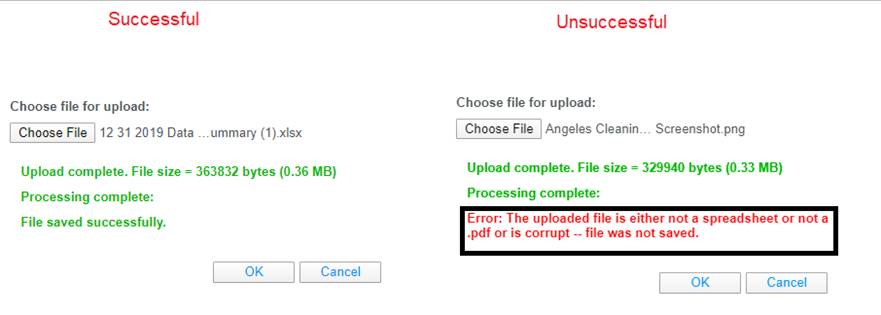
- Click ‘Ok’ to upload the supplemental data. Uploaded
supplemental data will be committed when the Session is saved. Previously
saved data will be overwritten.
- If upload is successful, FINS will allow you to
‘View Supplemental Data’ by giving you the option to click on ‘View
Supplemental Data’ Button as highlighted below.
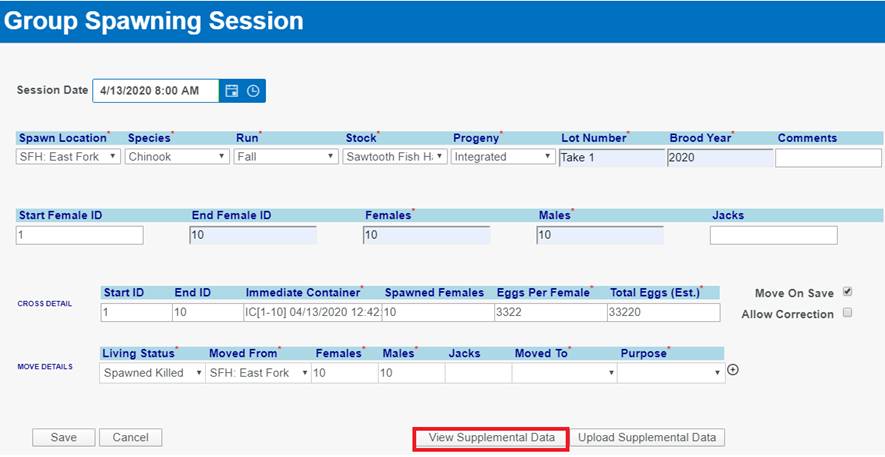
- Click ‘Save’ to save the entire Group Spawning Session with the
associated ‘supplemental file’
Movements of
Group Spawned Females can be made at the Female ID level or entirely as an Egg
Group
Move as Group
·
Moving by Egg Group (leaving the Checkbox unchecked; the Group of
Egg Takes from the Group Spawned Session) allows the resulting eggs to be
treated as a group of one after Spawning (in Incubation, Rearing…)
o
For example: When no individual Culls will occur in Incubation on
the Group
Move by Female ID Checkbox
·
If selected, user is indicating that they want the Group Spawned
Egg Takes to be treated as individuals.

Use Case:
Movements
of Group Spawned Females were originally intended to be made as an Egg Group,
since no unique PBT information is collected/generated on a Group Spawned Take.
·
Moving by Egg Group (the Group of
Egg Takes from the Group Spawned Session) allows the resulting eggs to be
treated as a group of one after Spawning (in Incubation, Rearing…)
o
When no individual Culls will
occur in Incubation on the Group
o
When no unique information is
available for the Egg Take at Incubation/Rearing…
o
When no unique actions are needed
on the Egg Take, post Spawning
Business Logic:
BETA
Group Spawning Sessions do not allow for unique ‘PBT’ since the data captured
is only total/summaries. Instead, Group Spawned Egg Takes are all identified
as ‘the same’ when it comes to PBT.
Not all of the Group Spawned
Egg Take has to be moved at the same time. Left behind portions of the Group
Spawned Egg Take (per the Number of Female Takes Moved vs the Number Females
Spawned) will result in a warning ‘notify’ pop up for confirmation that ‘Some
Female IDs are missing from the Move’ attempting to be Saved.
Left behind Eggs from the Group
Spawned Session will be available as ‘Inventory’ to ‘Move as a Group’ from the
Spawned Eggs grid.
Use Case – during Spawn
Session Data Entry
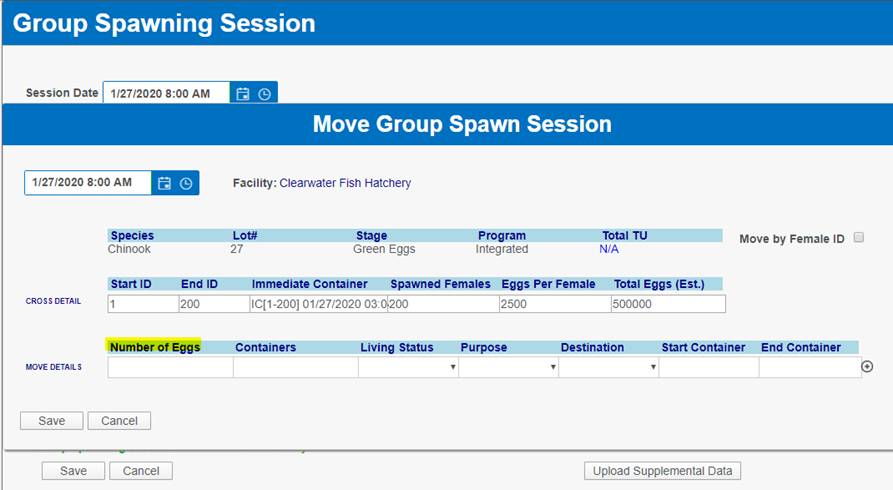
When
the Spawning and Incubation placement of Group Spawned Egg Data Entry occurs
simultaneously, rather than after entering the BETA Group Spawning Session
details, the Move Group Spawn Session Form may be used while creating the Group
Spawning Session.
The
Move Group Spawn Session Form allows Group Spawning users to immediately move
the Group Spawned Egg Take, for the current Group Spawn Session that they are
entering data for, into an Incubation, Disposal, Shipping and/or Transfer
Location as a Group from within the Group Spawning Session, rather than making
the move from the Spawned Eggs grid, post Spawn Session data entry.
Use Case – post Spawn
Session Data Entry
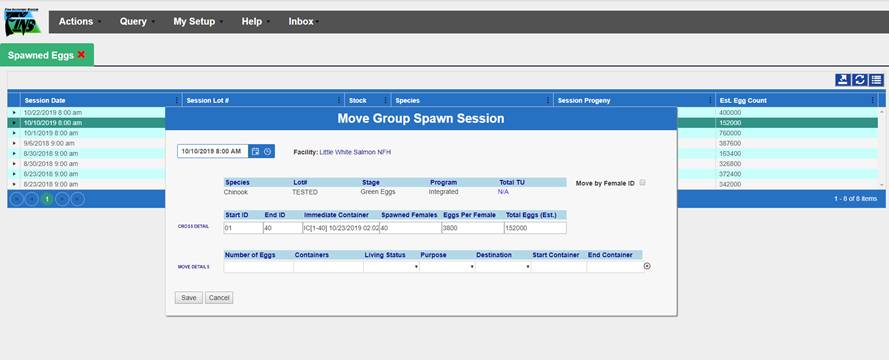
When the placement of BETA Group Spawned Egg Data
occurs after entering the BETA Group Spawning Session details, the Move Group
Spawn Session Form from the Spawned Eggs grid may be used.
This may
include the ‘leftover’ inventory portions that were not moved from within the
Group Spawning Session, as any left behind Eggs from the Group Spawned Session
will remain available as ‘Inventory’ until Moved as a Group from the Spawned
Eggs grid.
Movements of
Group Spawned Females can be made at the Female ID level or entirely as an Egg
Group.
‘Move by Female
ID’ of Group Spawned Eggs allows users to move the Group Spawned Egg takes
individually to Incubation, Disposal, Shipping and/or Transfer Locations
Move by Female ID Checkbox
·
If selected, user is indicating that they want the Group Spawned
Egg Takes to be treated as individuals.
Move as Group
·
Moving by Egg Group (leaving the Checkbox unchecked; the Group of
Egg Takes from the Group Spawned Session) allows the resulting eggs to be
treated as a group of one after Spawning (in Incubation, Rearing…)
o
For example: When no individual Culls will occur in Incubation on
the Group
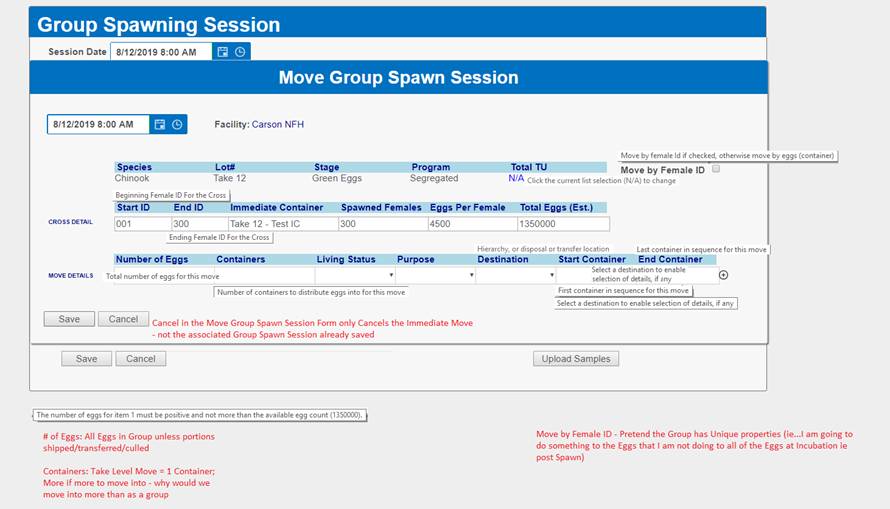 Use Case:
The
‘Move by Female ID’ feature in FINS was created for Group Spawned Egg Takes
that will need to be viewed or treated as individuals/unique, post Spawning.
Specifically, when the Group Spawned has unique properties and will be treated
uniquely after Spawning.
Known
Examples of possible movements at the Female ID level of Group Spawned Females
–
·
Culling individual containers
(Trays) of Green Eggs in Incubation (pre-Enumeration) per Eliza results:
o
FINS doesn’t allow partial
Culls of ‘Containers’ in Incubation, so the Group Spawned Egg Take would have
to be moved into unique Incubation Containers in order to allow Culling of
specific portions of the Group Spawned Egg Take, before treating them as non-individuals/a
‘Group’
·
Portion of Eggs taken will be sent
to different Location types/have different Dispositions;
o
Some of the Group Spawned Eggs are
immediately sent post Spawning to Incubation, some are immediately Culled, some
Disposed, Shipped and/or Transferred
Business Logic:
BETA Group Spawning Sessions do not allow for unique ‘PBT’
since the data captured is only total/summaries. Instead, Group Spawned Egg
Takes are all identified as ‘the same’ when it comes to PBT.
Not all of the Group Spawned Egg
Take has to be moved at the same time. Left behind portions of the Group
Spawned Egg Take (per the Number of Female Takes Moved vs the Number Females
Spawned) will result in a warning ‘notify’ pop up for confirmation that ‘Some
Female IDs are missing from the Move’ attempting to be Saved.
Left
behind Eggs from the Group Spawned Session will be available as ‘Inventory’ to
‘Move From the Spawned Eggs grid’.
Use Case – during Spawn
Session Data Entry
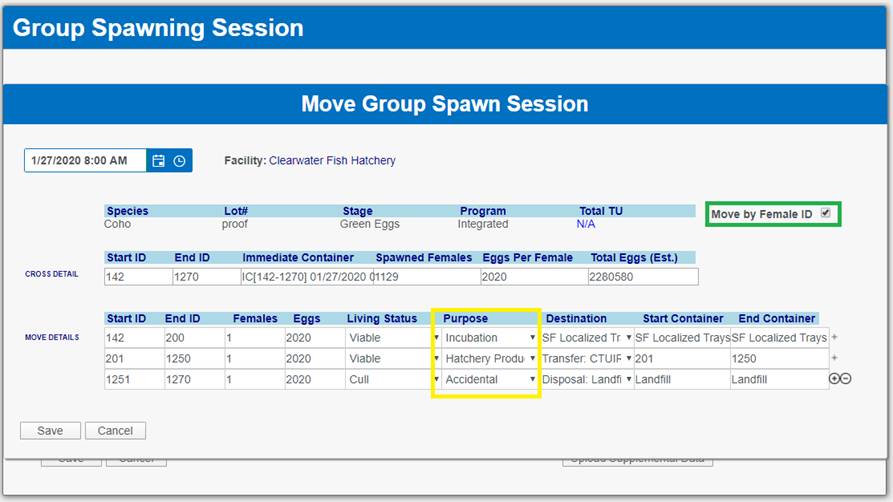
When
the Spawning and Incubation placement of Group Spawned Egg Data Entry occurs
simultaneously, rather than after entering the BETA Group Spawning Session
details, the Move Group Spawn Session Form may be used while creating the BETA Group
Spawning Session.
The
Move Group Spawn Session Form allows Group Spawning users to immediately move
the Group Spawned Egg Take, for the current Group Spawn Session that they are
entering data for, into Incubation, Disposal, Shipping and/or Transfer
Locations by Female ID from within the Group Spawning Session, rather than
making the move from the Spawned Eggs grid, post Spawn Session data entry.
Use Case – post Spawn
Session Data Entry
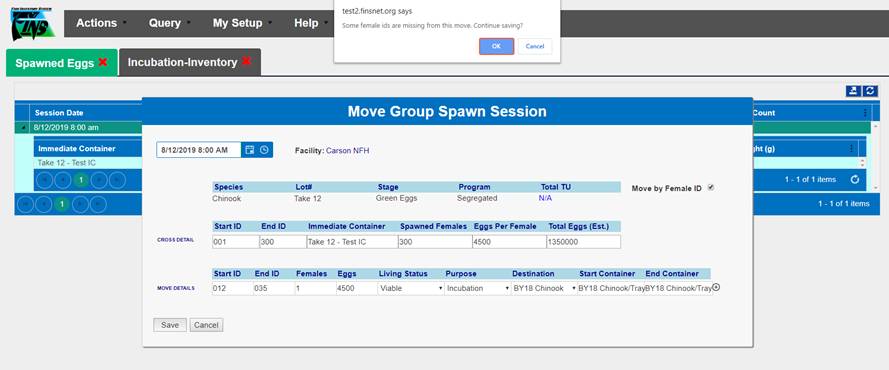
When
the placement of BETA Group Spawned Egg Data occurs after entering the BETA Group
Spawning Session details, the Move BETA Group Spawn Session Form from the
Spawned Eggs grid may be used.
This may include the ‘leftover’
inventory portions that were not moved from within the BETA Group Spawning
Session, as any left behind Eggs from the BETA Group Spawned Session will
remain available as ‘Inventory’ until Moved by Female ID from the Spawned Eggs
grid.
Move BETA Group Spawn Session - Validation:
Use Case
– See Inventory Link
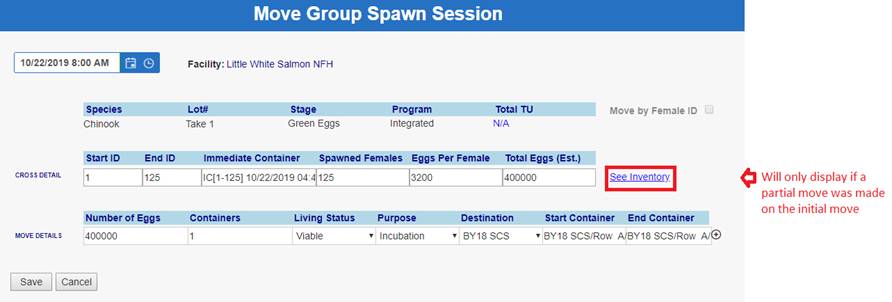
The ‘See Inventory’ link displayed
in the BETA Group Spawn Session Form will only display if a partial move was
made on the first move.
·
‘See Inventory’ allows users to view the number of remaining eggs
that are available to be moved into an Incubation, Disposal, Shipping and/or
Transfer Location.
·
The number within ‘See Inventory’ Updates with the balance of
Eggs remaining during Move dependent on the Move Details Eggs Value input (by
Group or Female ID depending on the move type)
MOVE DETAILS ‘Row’ >
> Move by Female ID Checked
·
If Move by Female ID is selected, the Move Details ‘Row’ will
display the Start ID and End ID of Females to be Moved uniquely
·
The Females field, which displays the number of Females to move
into each Destination Container
o This value can
represent one or all Females from the BETA Group Spawning Session
§ Example: 100 Females
Spawned; only moving 2 Females into each Container
·
The Eggs field, which is the number of estimated number of eggs
per female per the BETA Group Spawning Session
o This value can
be modified from the Estimated Eggs per Female value to a smaller number of
eggs for the Females being moved
§ Example: Est Eggs per
Female = 3,600; only moving 5 Females and only moving 2400 of each Female)

·
If checkbox is unchecked, the Move Details row will display the
Number of Eggs, and Containers fields shown below.

Required Fields:
Move as Group
·
This form Defaults to Move BETA Group Spawn Session Egg Take as a
Group
o
Move by Female ID box is unselected/unchecked
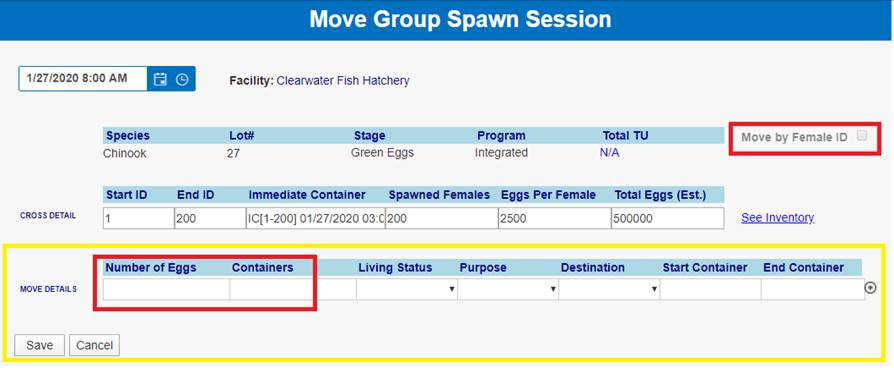
MOVE DETAIL ‘Row’ > >
Move as Group
·
Number of Eggs
o Total
number of Eggs for this move. This field will only appear if ‘Move by Female
ID’ field is NOT checked.
o Entering
a number is required.
·
Containers
o Number
of Containers these eggs will be distributed across.
o This
field will only appear if ‘Move by Female ID’ is NOT checked.
·
Living Status
§ Living
Status associated for this Move of the Group Spawn Egg Take
§ Selecting
a Living Status is required
§ Living
Status is limited to the following options:
§ Viable
– Eggs/Fry that are Alive
§ Loss-
Eggs /Fry that are no longer viable
§ Cull-
Viable Eggs/Fry that are intentionally killed for various management purposes
·
Purpose
o Selecting
a Purpose is required
o The
available Purposes are limited based on the selected ‘Living Status’ per
associated Disposition by Location Type
·
Destination
o Selecting a
Destination is required
o Location where
this Group of Group Spawned Eggs were ‘Moved To’
o This can be an
Incubation, Disposal, Shipping and/or Transfer Location
·
Start Container
o Selecting
a Start Container is required
o *If
Destination is a Shipping and/or Transfer Location, user is required to enter a
name for the Transfer Container
·
End Container
o Non-User
Input
o FINS
automatically populates it for you provided a Start Container has been selected
o *If
Destination is a Shipping and/or Transfer Location, user is required to enter a
name for the Transfer Container
·
Save
o Save
Hover will provide possible Errors/Validation issues
§ Pop
Up Notify will display if Business Logic requires data entry confirmation
o If
Session Saves successfully, user will see confirmation in Green
o
*Editing a Saved Group Spawn Session – is only allowed on
‘Header’ information of a Group Spawning Session via the Group Spawning Query
·
Cancel
o Cancel
in the Move Group Spawn Session Form only Cancels the Move – Not the associated
Group Spawn Session already Saved
Move by Female ID
·
Must be Selected/Checked to Move the Group Spawned Egg Take ‘by
Female ID’
·
If selected, user is indicating that they want the Group Spawned
Egg Takes to be treated as individuals
·
This field Defaults as unselected/unchecked to Move Eggs as a
Group
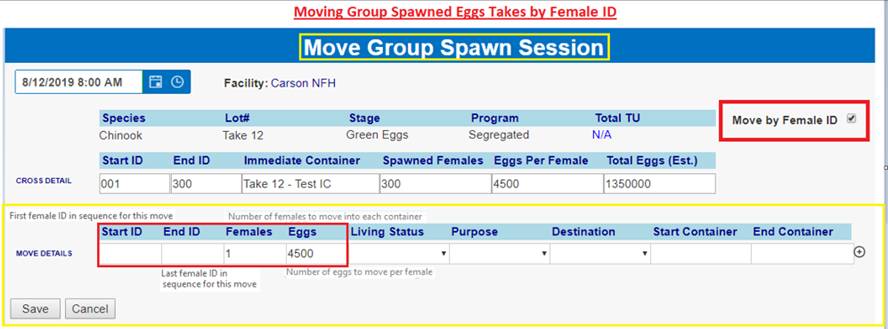
MOVE DETAIL ‘Row’ > > Move by Female
ID Checked
·
Start ID
o First
Female ID in sequence for this Move. Entering a Start ID is required.
·
End ID
o Last
Female ID in sequence for this Move. Entering an End ID is required
·
Females
o Number
of Females to move into each container
o Enter
the total number of Female Egg Takes, by Female ID, that have the same Living
Status, Purpose, Destination for the Move
o The
count in this field is validated against the Total number of Females Spawned in
the associated Group Spawn Session and the ‘left over’ number of Female Egg
Takes will remain as ‘Inventory’ until Moved
o The
sum of Females Egg Takes being Moved, by Female ID, must match the associated
Group Spawning Session Total Eggs (Est.) Count originally input
o Entering
a number greater than 0 is required
·
Eggs
o
Number of Eggs per Female that will be moved into each Container
o
Defaults to ‘Estimated Eggs per Female’ input for associated
Group Spawning Session
·
Living Status
o Living
Status associated for this Move of the Eggs, by Female ID
o Selecting
a Living Status is required
o Living
Status is limited to the following options:
§ Viable
– Eggs/Fry that are Alive
§ Loss-
Eggs /Fry that are no longer viable
§ Cull-
Viable Eggs/Fry that are intentionally killed for various management purposes
A different row representing each type of
‘Living Status’, Disposition of the Group Spawned Egg Takes being Moved by
Female ID should be input using the ‘Plus Button’ for adding Move Detail ‘Rows’
·
Purpose
o Selecting
a Purpose is required
o Select
the appropriate ‘Purpose’ for each Move by Female ID for the Group Spawned Egg
Take, for which the Eggs are being Moved
o The
available Purposes are limited based on the selected ‘Living Status’ per
associated Disposition by Location Type
·
Destination
o Selecting
a Destination is required
o Destination
Location these Eggs, by Female ID are being Moved To
o
Location where this Group of Group Spawned Eggs, by Female ID
were ‘Moved To’
o This
can be an Incubation, Disposal, Shipping and/or Transfer Location
·
Start Container
o Selecting
a Start Container is required
o Select
the First Container in sequence for this move
§ Clicking
on this field will pop up a Move Destination Dialogue box, which will allow
user to ‘Assign’ the Eggs being Moved into their respective Containers
§ Assigned
Containers are in successive order
o *If
Destination is a Shipping and/or Transfer Location, user is required to enter a
name for the Transfer Container
·
End Container
o Non-User
Input
o FINS
automatically populates it for you provided a Start Container has been selected
o By
default, FINS will select the last Container in the Sequence.
o *If
Destination is a Shipping and/or Transfer Location, user is required to enter a
name for the Transfer Container
·
Plus ‘+’ Button

o A
different Move Detail ‘Row’ representing each type of Living
Status/Purpose/Destination (Disposition) of the Group Spawned Egg Takes being
Moved by Female ID should be input
o Use
the Plus button if Eggs are being moved by Female ID to multiple Destinations
(Move To Locations)
o Clicking
on the Plus Button will add another row to ‘Move Details’ as shown below

·
Save
o Save
Hover will provide possible Errors/Validation issues
§ Pop
Up Notify will display if Business Logic requires data entry confirmation
o If
Session Saved correctly, user will see confirmation in Green
§ If
Move by Female ID is Saved correctly, user will see Session and Move Form Close
o
*Editing a Saved Group Spawn Session – is only allowed on
‘Header’ information of a Group Spawning Session via the Group Spawning Query
·
Cancel
o Cancel
in the Move Group Spawn Session Form only Cancels the Move – Not the associated
Group Spawn Session already Saved
Form:
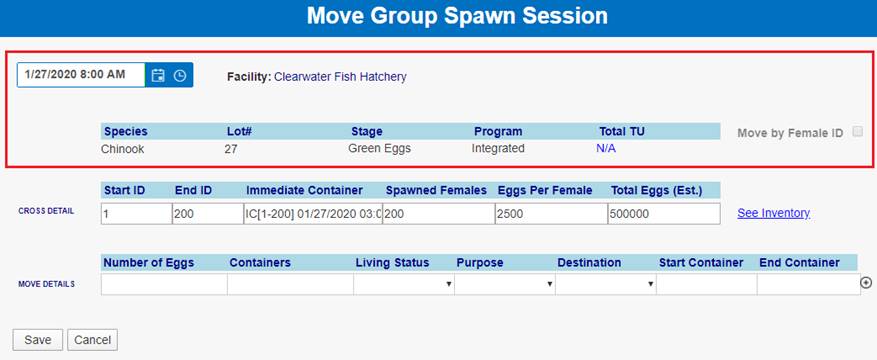
Display Only Fields:
Move Date/Time
·
The Session Date and Time for the associated Group Spawning
Session auto populates here, to match
·
The Time auto defaults to 8:00 AM, as it does in the Session
Facility
·
Display the Facility in which this Group Spawning Session belongs
to as reference
Species
·
Displays the Species Spawned in the Group Spawning Session that
generated these Egg Take being moved
·
This field is automatically populated based off the Species
Spawned in Group Spawning
Lot #
·
Displays the Lot Number of the associated Group Spawning Session
·
This field is used as an identifying designator at Spawning
through to Release for the Spawned Crosses captured and their associated Egg
Takes
Stage
·
Displays the Stage of the Group Spawned Egg Take, being moved
from Spawning as ‘Green Eggs’
·
Egg Stage will always be Green when moving from Spawning since
this is the first Egg stage designation in FINS
Program
·
Displays the Progeny as designated in the associated Group
Spawning Session
o FINS
Progeny/Program Definitions
§
Integrated- A hatchery production program with an explicit
purpose to incorporate natural adults into the hatchery broodstock on a regular
basis. Spawn cross combinations can include any of the following: Hatchery x
Hatchery, Hatchery x Natural, or Natural by Natural.
§ Segregated-
A hatchery production program with a management intent to rely on
hatchery-origin adults for the broodstock. Generally speaking, spawn crosses
are limited to Hatchery x Hatchery but could include occasional use of
natural-origin adults.
Optional Field:
Total TU
·
Displays as ‘N/A’ by default
·
Total TU is an optional field provided so that users can capture
the Total Temperature Units applied to the Egg Group being moved
o By default, N/A
will display in the Move Group Spawn Session Form
o Temperature
Units can be applied in Celsius or Fahrenheit by clicking on the ‘N/A’ link and
selecting
§ (F
or C; i.e.…550 degrees F = applied units above 32 degrees)
CROSS DETAIL ‘ROW’

·
Start ID (Display Only)
o Displays
First Female ID of Group Spawned Egg Take (Group Cross)
§ Female
‘Start ID’ as input for the associated Group Spawning Session (Group Cross)
§ If
no input in Group Spawning Session, then FINS auto generated the ‘Start ID’
(i.e.…as 001)
·
End ID (Display Only)
o Displays
Ending Female ID of Group Spawned Egg Take (Group Cross)
§ Female
‘End ID’ as designated on input for the associated Group Spawning Session
(Group Cross)
§ If
no input in Group Spawning Session, then FINS auto generated the ‘End ID’ per
the Number of Females Spawned in the Group Spawning Session (i.e.…as 4001)
·
Immediate Container (Display Only)
o Displays
the Immediate Container as input in the associated Group Spawning Session
§
Format: IC [Start ID-End ID] Date/Time Group Spawn Session
created in FINS i.e.… IC[1-100] 09/26/2019 12:24:14 PM
·
Spawned Females (Display Only)
o Displays
the Number of Spawned Females in Group Spawn Session (Group Cross, to be Moved)
·
Eggs Per Female (Display Only)
o Displays
the Estimated Number of Eggs per Female (of Group Cross, to be Moved)
·
Total Eggs (Est.) (Display Only)
o Estimated
Total Number of Eggs (in Group Cross, to be Moved)
·
See Inventory – Displays Available Inventory, yet
to be Moved by Female ID
o Clickable
Link
o Only
visible from the Spawned Eggs grid
o Displays
the left-over balance of Eggs not yet moved from the ‘Immediate Container’
designated in the associated Group Spawning Session
MOVE DETAIL ‘Row’ > >
Move as Group
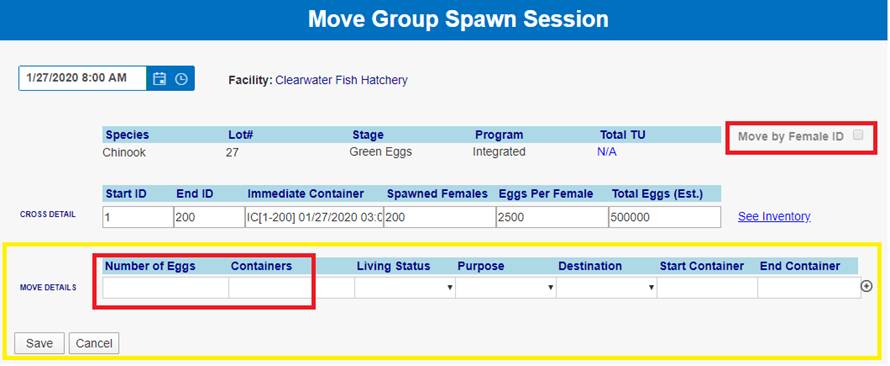
·
Number of Eggs
o Total
number of Eggs for this move. This field will only appear if ‘Move by Female
ID’ field is NOT checked.
o Entering
a number is required.
·
Containers
o Number
of Containers these eggs will be distributed across.
o This
field will only appear if ‘Move by Female ID’ is NOT checked.
o Living
Status
§ Living
Status associated for this Move of the Group Spawn Egg Take
§ Selecting
a Living Status is required
§ Living
Status is limited to the following options:
·
Viable – Eggs/Fry that are Alive
·
Loss- Eggs /Fry that are no longer viable
·
Cull- Viable Eggs/Fry that are intentionally killed for various
management purposes
·
Purpose
o Selecting
a Purpose is required
o The
available Purposes are limited based on the selected ‘Living Status’ per
associated Disposition by Location Type
·
Destination
o Selecting a
Destination is required
o Location where
this Group of Group Spawned Eggs were ‘Moved To’
o This can be an
Incubation, Disposal, Shipping and/or Transfer Location
·
Start Container
o Selecting
a Start Container is required
o *If
Destination is a Shipping and/or Transfer Location, user is required to enter a
name for the Transfer Container
·
End Container
o Non-User
Input
o FINS
automatically populates it for you provided a Start Container has been selected
o *If
Destination is a Shipping and/or Transfer Location, user is required to enter a
name for the Transfer Container
·
Save
o Save
Hover will provide possible Errors/Validation issues
§ Pop
Up Notify will display if Business Logic requires data entry confirmation
o If
Session Saves successfully, user will see confirmation in Green
o
*Editing a Saved Group Spawn Session – is only allowed on
‘Header’ information of a Group Spawning Session via the Group Spawning Query
·
Cancel
o
Cancel in the Move Group Spawn Session Form only Cancels the Move
– Not the associated Group Spawn Session already Saved
MOVE DETAIL ‘ROW’ > >
Move by Female ID Checked
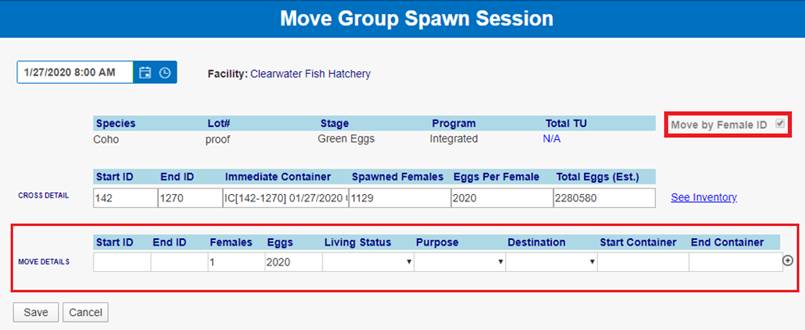
·
Start ID
o First
Female ID in sequence for this Move. Entering a Start ID is required.
·
End ID
o Last
Female ID in sequence for this Move. Entering an End ID is required
·
Females
o Number
of Females to move into each container
o Enter
the total number of Female Egg Takes, by Female ID, that have the same Living
Status, Purpose, Destination for the Move
o The
count in this field is validated against the Total number of Females Spawned in
the associated Group Spawn Session and the ‘left over’ number of Female Egg
Takes will remain as ‘Inventory’ until Moved
o The
sum of Females Egg Takes being Moved, by Female ID, must match the associated
Group Spawning Session Total Eggs (Est.) Count originally input
o Entering
a number greater than 0 is required
·
Eggs
o
Number of Eggs per Female that will be moved into each Container
o
Defaults to ‘Estimated Eggs per Female’ input for associated
Group Spawning Session
·
Living Status
o Living
Status associated for this Move of the Eggs, by Female ID
o Selecting
a Living Status is required
o Living
Status is limited to the following options:
§ Viable
– Eggs/Fry that are Alive
§ Loss-
Eggs /Fry that are no longer viable
§ Cull-
Viable Eggs/Fry that are intentionally killed for various management purposes
o A
different row, representing each type of ‘Living Status’, Disposition of the
Group Spawned Egg Takes being Moved, by Female ID, should be input using the
‘Plus Button’ for adding Move Detail ‘Rows’
·
Purpose
o Selecting
a Purpose is required
o Select
the appropriate ‘Purpose’ for each Move by Female ID for the Group Spawned Egg
Take, for which the Eggs are being Moved
o The
available Purposes are limited based on the selected ‘Living Status’ per
associated Disposition by Location Type
·
Destination
o Selecting
a Destination is required
o Destination
Location these Eggs, by Female ID are being Moved To
o
Location where this Group of Group Spawned Eggs, by Female ID
were ‘Moved To’
o This
can be an Incubation, Disposal, Shipping and/or Transfer Location
·
Start Container
o Selecting
a Start Container is required
o Select
the First Container in sequence for this move
§ Clicking
on this field will pop up a Move Destination Dialogue box, which will allow
user to ‘Assign’ the Eggs being Moved into their respective Containers
§ Assigned
Containers are in successive order
o *If
Destination is a Shipping and/or Transfer Location, user is required to enter a
name for the Transfer Container
·
End Container
o Non-User
Input
o FINS
automatically populates it for you provided a Start Container has been selected
o By
default, FINS will select the last Container in the Sequence.
o *If
Destination is a Shipping and/or Transfer Location, user is required to enter a
name for the Transfer Container
·
Plus ‘+’ Button

o A
different Move Detail ‘Row’ representing each type of Living
Status/Purpose/Destination (Disposition) of the Group Spawned Egg Takes being
Moved by Female ID should be input
o Use
the Plus button if Eggs are being moved by Female ID to multiple Destinations
(Move To Locations)
o Clicking
on the Plus Button will add another row to ‘Move Details’ as shown below

Steps
1.
Enter the Date these Group Spawned Eggs
were moved on
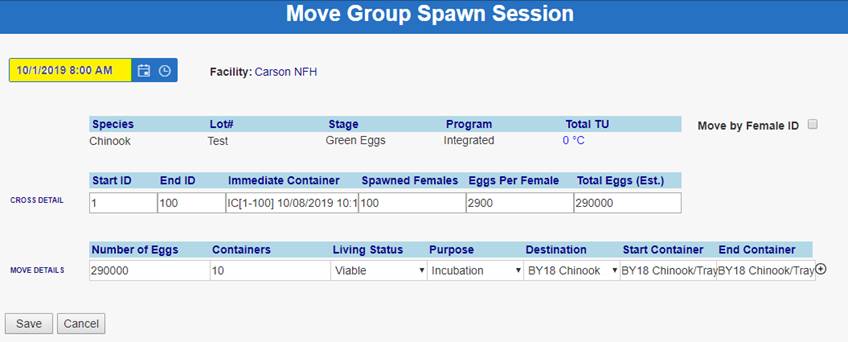
2.
By default, Species, Lot #, Stage and
Program will be prefilled based off the data entered when creating the Group
Spawning Session
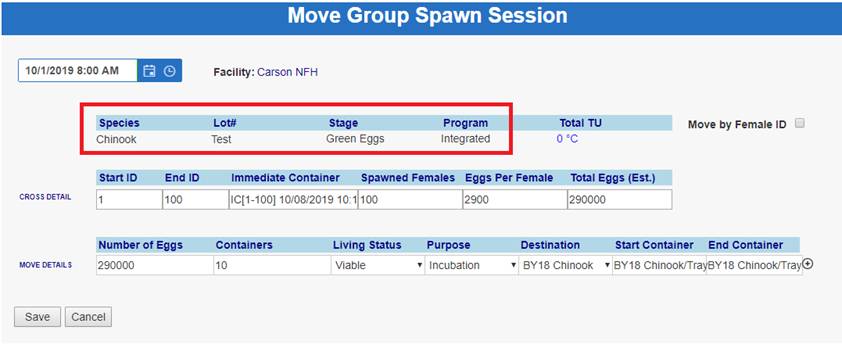
3.
Enter Total Temperature Units if you
capture this data. Units can be entered in Celsius or Fahrenheit
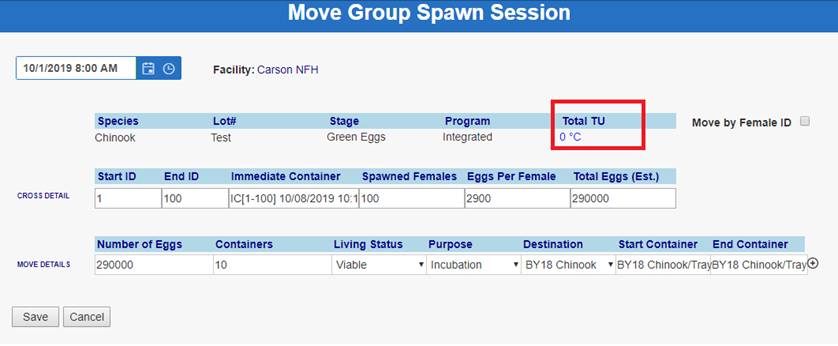
4.
If Eggs were moved by Female ID, check
the checkbox highlighted below and skip to Step 14. Otherwise proceed to Step 5
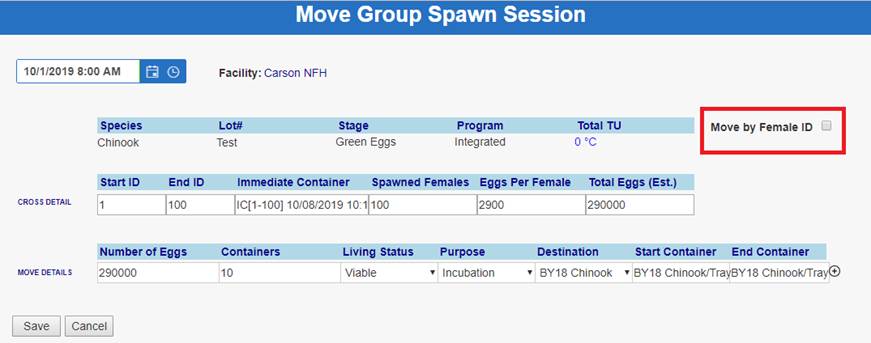
5.
The Cross Details will be prefilled
based off the data entered when creating the Group Spawning Session
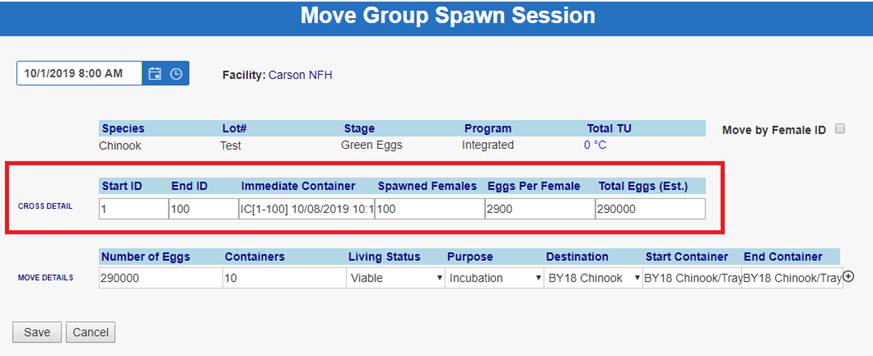
6.
Enter the number of Eggs being moved
for the Spawn Session

7.
Enter the number of Containers these
Eggs will be moved across

8.
Select the Living Status applied to
these Eggs

9.
Select the Purpose

10. Select the Destination

11. Click on the Start Container field

a. If Eggs were placed into an Incubation Location, user is
required to select the first Incubation Location that Eggs were moved into
i.
After clicking in the Start Container
field, select the first Container that these Eggs were moved to
ii.
Hover over the first Container that
Eggs were moved
iii.
Right Click and select ‘Assign
Containers’
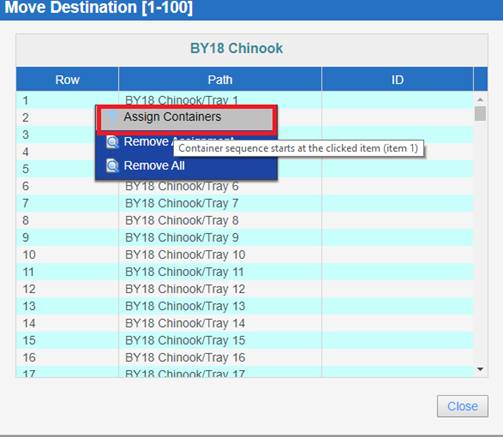
iv.
FINS will prefill the rest of the
Containers in sequential order if Eggs were moved into more than one Container
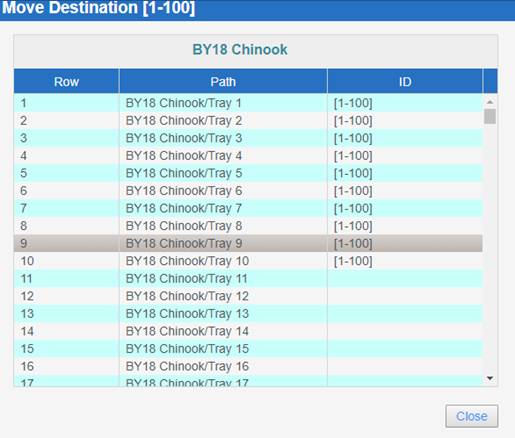
b. If Eggs were placed into a Non-Incubation Container user is
required to enter the Transfer Container from the Start Container field. To do
this, follow the Instructions below:
i.
Click on the Container(s) that are
being named
ii.
Right Click on the first row and click
on ‘Select All’
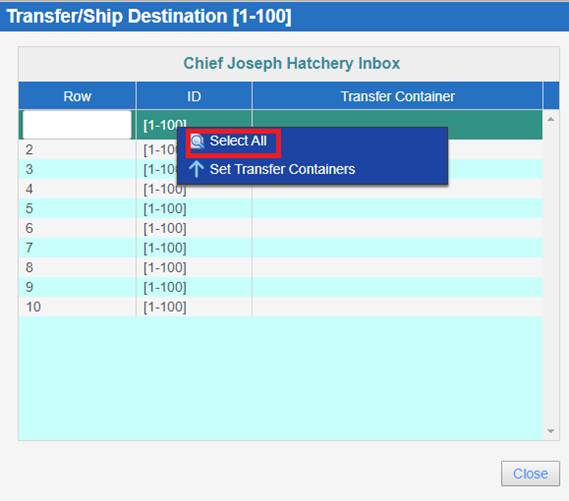
iii.
Right Click again and then click on
‘Set Transfer Containers’
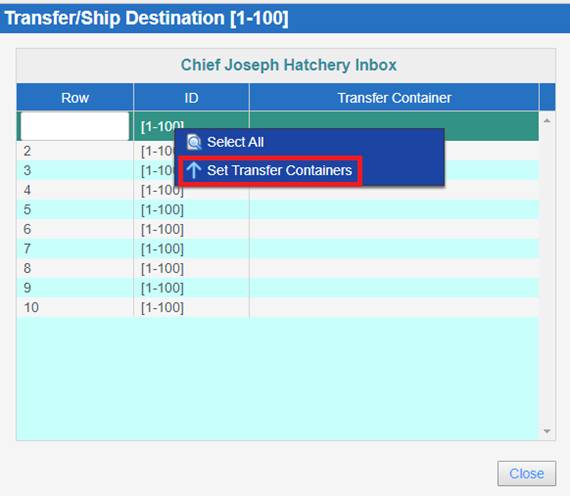
iv.
This will open up the ‘Set Transfer
Containers’ dialogue box where you will enter the Start and End name of the
Containers

v.
Click Apply.

vi.
Click Close to close the Move
Destination Dialogue box
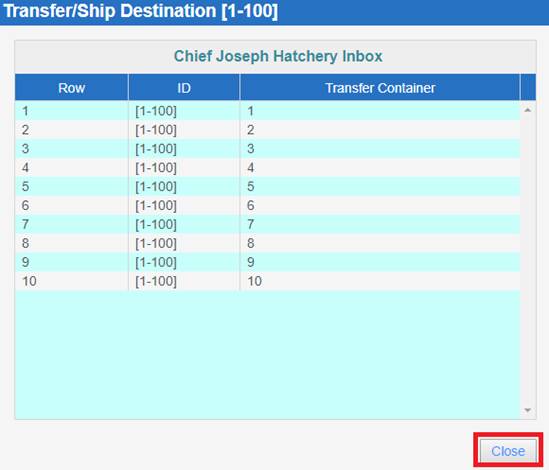
12. If making multiple Moves to different Locations, click on
the Plus Button highlighted below and follow the respective Steps for the type
of Move being made

13. Click Save to finalize the Move
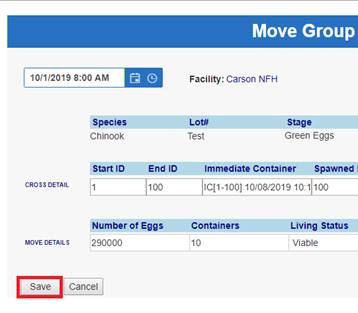
14. Click Cancel to cancel the Move
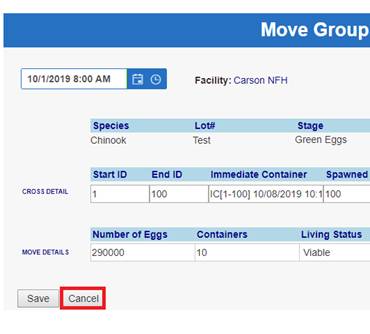
*Note- Steps 15-18 only
apply to users that are moving Eggs by Female.
15. Enter the Start ID of the first Female ID in sequence for
this Move

16. Enter the End ID of the last Female ID in sequence for this
Move

17. Enter the Number of Females moved into each Container

18. Follow Steps 8-14 to finalize the Move
*NOTE: If any balance of BETA Group Spawned Egg Take is left behind the
Session will remain visible in the Spawned Eggs grid for the remaining
Inventory to be moved
The ‘See
Inventory’ link displays available BETA Group Spawned Egg Inventory
available to be moved.
This
includes anytime partial moves are made from Group Spawning or when Moves made
from Group Spawning are Deleted, creating a balance of Group Spawned Egg
Inventory available to be moved again.
Depending
on the type of move that was made from BETA Group Spawning (Move by Group Vs
Move by Female ID), the ‘See Inventory’ link will display the Group
Spawned Egg Inventory available to move differently.
Move by Group:
·
If Eggs are partially moved from Group
Spawning and it is the first move being made, the ‘See Inventory’ link will NOT
display.
·
If Eggs are partially moved from Group
Spawning, selecting the ‘See Inventory’ link will display in brackets in
the Available Inventory box and the ‘Available Eggs’ column will display the
grand total number of Eggs available to be moved. The ‘Move by Female ID’
checkbox will be unchecked.
·
If a Move is deleted, the ‘Available Eggs’ number will increase
as the Eggs are placed back into Available Inventory.
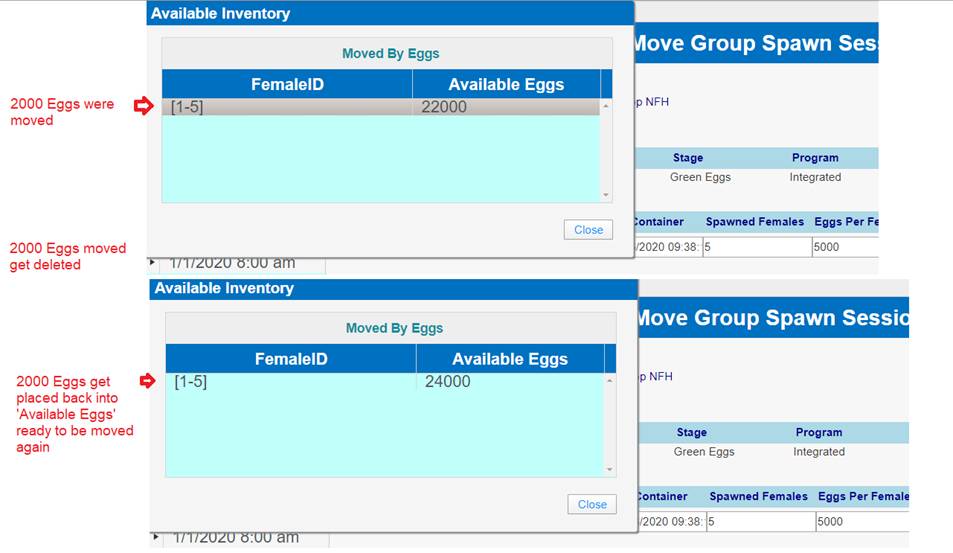 Move by Female ID:
·
If Eggs are partially moved and it is
the first move being made, the ‘See Inventory’ link will NOT display.
·
If Eggs are partially moved from Group Spawning, ‘See Inventory’
will display the amount of Eggs remaining per Female as shown below.
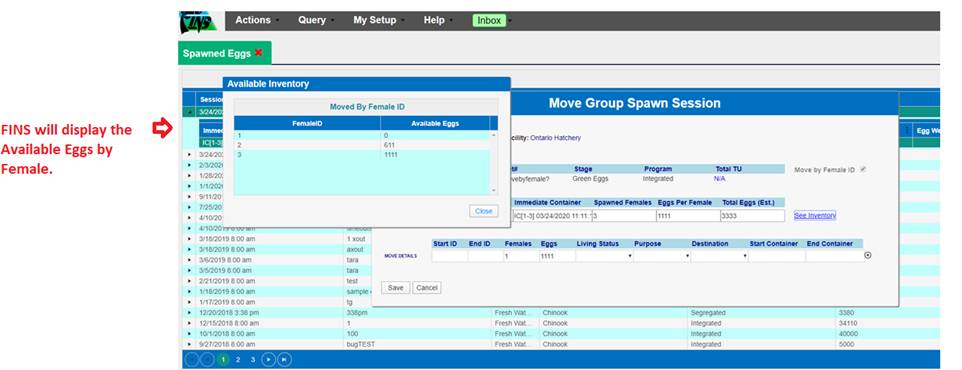
·
If all Moves are
deleted, the Inventory Available will display in brackets in the Available
Inventory pop up and the
‘Move by Female ID’ checkbox will be checked. The ‘Available Eggs’ number
applies to each individual Female within the brackets (available Eggs per Female available to
Move)
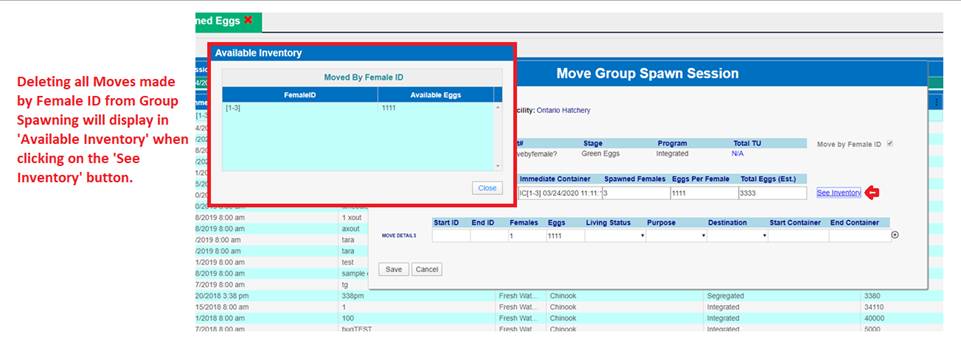
·
If a Move is Deleted,
the Female ID column will include the Female ID that was added back into
Available Inventory. The Inventory Available will display in brackets in the
Available Inventory pop up and the “Move by Female ID’ checkbox will be
checked. The ‘Available Eggs’ number applies to each individual Female within
the brackets (available Eggs
per Female available to Move)
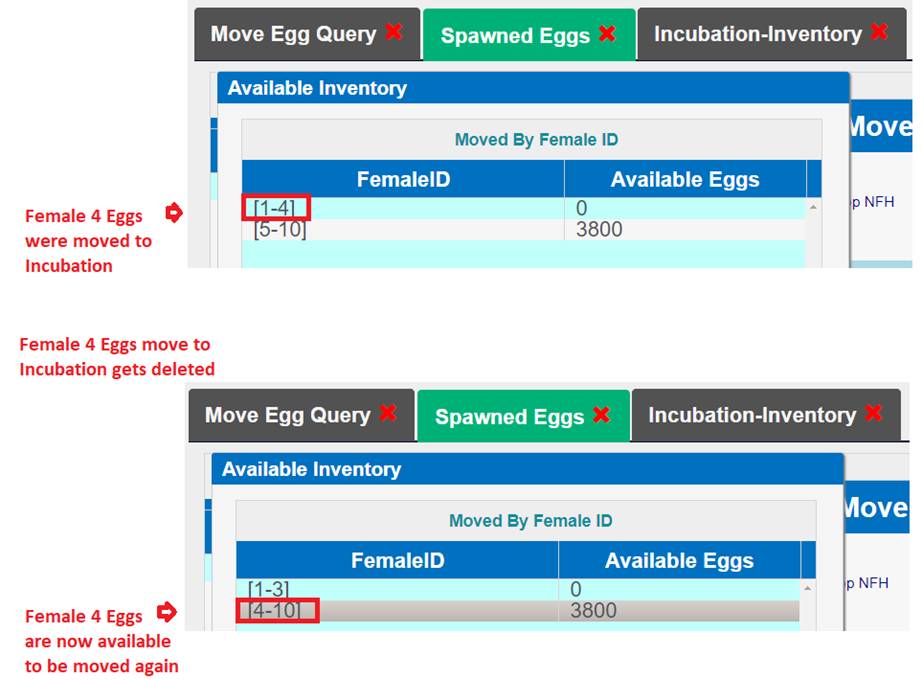
Deleting a BETA
Group Spawning Session is only permitted via the Existing Spawning Session grid
to prevent multiple paths and possible confusion as to the business logic
preventing deletions when the BETA Group Spawned Egg Takes have been moved
Business Logic:
FINS will prevent a Group Spawn Session from being Deleted
if any/all of the Group Spawned Egg Takes have been moved subsequent to the
Create of the Group Spawned Egg Takes, which will have been done through the
Group Move Egg form. Example - If on the Group Move, Eggs are ‘moved’ into a
Hierarchy container, the Session can still be Deleted and the moves in
Incubation will be Deleted by FINS at the time the Session is Deleted. If
you have moved the Egg Takes into a Hierarchy container and then into another
Location (Incubation/Inbox/Rearing/Release…etc.), Deleting a Group Spawn
Session will be prevented, until the Moves have been Deleted.
Before entering Incubation Data, you must have an
Incubation Hierarchy created in the FINS database. Incubation Hierarchies are
created in the Admin Tab of FINSNet.org by your Agency Data Official.
Incubation Hierarchies a collection of nested locations, called ‘Containers’.
Containers within a Hierarchy will vary between Incubation Facilities.
Once your Incubation Hierarchy is created, you can move
your Spawned or Received eggs into the Incubation Component of FINS.
If your Incubation Hierarchy is created at the time
Spawning Data is entered, Eggs can be placed directly into Incubation
Containers via the Container field in the Current Spawn Event Panel. Eggs that
are placed in Immediate (temporary) Containers can be moved into Incubation
Containers from the All Spawned Crosses Grid or Spawning > Eggs (grid that
displays all Existing Spawn Session and their associated records).
The Incubation Inventory grid displays
current on-hand Incubating inventory by Incubation Hierarchy. This Summary
defaults in a collapsed view, and has display options for customized viewing
preferences.
Ø
Context Menu – Additional Incubation Count Summary options
are available by clicking the small blue icon located at the top, right corner
of the grid. Context menu with the following options will be available.
Grid:
Contains Refresh and Customization tools
o
Collapse All – Collapses all Expanded areas of the grid
o
Redraw Grid – Reloads grid to display in default format
o
Set Display Options –
§
Don’t show empty containers: Clicking on this check box
will prevent the Count Summary – Incubation grid from displaying
§
Container Height: To limit the containers displayed in
your Summary grid, you can enter ‘Container Height’. For example, if an
Incubation Hierarchy contains Rows, Stacks, and Trays, my hierarchy has a
height of 2
|
Container
Type
|
Height
|
Depth
|
|
Row
|
2
(has 2 types within it)
|
0
|
|
Stack
|
1
(has 1 type within it)
|
1
|
|
Tray
|
0
(has 0 types within it)
|
2
|
If you enter ‘0’ in
the Container Height field, you would see all of your containers. If you enter
‘1’ you would see your Stacks and Trays. If you enter ‘0’ you would only see
your Trays. If you leave it blank or enter a number larger than 2 you would see
all of your containers.
§
Hierarchies to Hide: Click to select the Hierarchies that
you do not want to display upon opening your Count Summary Incubation. The
Hierarchies you select will be Hidden from your view until you un-select them
in the Display Options.
§
Save choices as the default: Click here if you want your
selections for the first two options to be applied all hierarchies, each time
you open the Count Summary – Incubation grid.
Ø
Export: Select this option if you want to export your
Count Summary – Incubation in Excel. You can export All Hierarchies or specify
which Hierarchies you want to export. The export will be paged by Hierarchy.
You will see a ‘Hierarchy Totals’ row at the top, which displays the rolled-up
count totals for each Hierarchy.
Ø
Columns in the Summary grid (collapsed):
|
Follow Up
|
Species (H)
|
Inventory Count
|
|
Facility (H)
|
Program (H)
|
Loss
|
|
Spawning Session Lot #
|
Stage (H)
|
Actual Green Take
|
|
Date
|
Female ID
|
Mort Count
|
|
Incubation Hierarchy (H)
|
Cross ID (H)
|
Live Count
|
|
Container Path (H)
|
Samples
|
Notes
|
|
Container
|
Estimated Egg Count
|
|
o Mort Summary
Located in the
Upper Right corner of the Mort Query is the Mort Summary button. When you click
on Mort Summary the Mort Summary Filter will open in a dialog box. Filter the
Export by using the filter, or just click Export to get an unfiltered version
of the Mort Summary Data. This will Export the Mort Summary selected (filtered
or un-filtered) to Excel. Your Export will display by Incubation Hierarchy, for
each Location (i.e.…Tray/Container), the Female ID, and associated Sample
Value, Spawning Session Lot #, Estimated Egg Count, Actual Green Take, Loss
& Inventory Count. As well as the Quantity of Morts Picked by Date, the
Current Live Count, Totals of Morts picked per day, Total Morts picked to date
and the % Survival & Eye Up Rate per Location (Tray/Container) to date.
o
Mort Summary Filter:
§
Hierarchy: This field will default if you only have
one Hierarchy; otherwise select the Hierarchy for which you would like to
summarize Mort counts.
§
Location: If you are wanting to summarize a specific
location within your selected Hierarchy, enter that container name in this
field. The name has to be entered exactly. For example, if your Trays are named
‘Tray-5’, you need to type ‘Tray-5’, ‘Tray’, or ‘5’; ‘tray’ will not work.
§
Female ID: The dropdown box on this field will display
all of the Female ID’s that have Mort records. You can select one, or
multi-select by holding the Ctrl button and clicking on addition ID’s
§
Spawning Session Lot
#: The dropdown box on
this field will display all of the Spawning Session Lot #’s that have Mort
records. You can select one, or multi-select by holding the Ctrl button and
clicking on addition Lot #’s.
o
Mort Summary Export:
§
Location: Displays the location that Morts were
picked from
§
Female ID: Displays the Female ID associated with the
picked Morts
§
Samples: Displays the Samples values associated with
the Female ID of the cross Morts were picked from
§
Spawning Session Lot
#: Displays the Spawning
Session Lot # the Eggs in each record were taken
§
Estimated Egg Count:
Displays the Estimated Egg
Count assigned to the eggs.
§
Actual Green Take: Displays the Actual Green Take that is auto
assigned to each cross at Enumeration
§
Loss: Displays the Loss that is entered for each
cross at Enumeration
§
Inventory Count: Displays the Inventory Count that is
entered for each cross at Enumeration
§
Mort Entry Columns: Displays by day the number of Morts that
were picked from each cross
§
Live Egg Count: Displays the number of eggs currently
in each container
§
% Survival: Displays the Survival Rate which is the
quotient of the Live Count / Inventory Count
§
Eye Up Rate: Displays the Eye Up Rate which is the
quotient of the Inventory Count / Actual Green Take
§
Mort Total: Displays by day the total number of Morts
picked
§
Total Morts: Displays the total number of Morts that
have been picked and entered for your data set
o
Group Enumeration Query: This is a Collapse/Expand Grid that
displays levels of data. This query displays Groups that are created via
the Group Enumeration form and the Inline Group Enumerate form. The Collapsed
view of the query displays the Group data; the Expanded view of the query
displays the individual egg cross data for each cross that is in a Group.
o
Context Menu:
·
Verify All: Will
Mark All Records in Query as Verified
·
Finalize All:
Will Mark all Records in Query as Finalized
·
Flag All: Will
change the Status of the Flag on all Records in Query
·
Edit Group Enumeration: Opens the Edit Group Enumeration
Form
·
Undo Group Enumeration: This option Deletes the Group
Enumeration record and returns all Egg Groups of the record back to the
container they were Moved From. If those Egg Groups are part of other Group
Enumeration records, the other Egg Groups will not change.
·
Delete Group Enumeration: This option Deletes the Group
Enumeration record. If the Egg Groups in that combined group are not part of
other Group Enumeration records, the Egg Groups will be returned back to the
container they were Moved From. If they are part of other Group Enumeration
records, these groups will not change and the Egg Groups in the record you are
Deleting will not be returned back to their Moved From container.
·
History:
·
Context menu of Expanded Record:
o
Return Eggs: This option will remove the Egg Group you
have selected from the Group Enumeration record, returning it back to the
container it was Moved From.
o
Delete Eggs: This option will remove the Egg Group you
have selected from the Group Enumeration Record. If this Egg Group is not part
of another Group Enumeration record, it will be Deleted. If it is a part of
other Group Enumeration records, those records will not change.
Columns
in the Group Enumeration Query for the Group Data are:
|
Finalize (H)
|
Enumerated (H)
|
Moved
To Hierarchy (H)
|
|
Verify
(H)
|
Enumeration Method
|
Moved
To Path (H)
|
|
Follow-Up
|
Species
|
Moved
To
|
|
Group
Enum Date
|
Group
ID
|
Living
Status
|
|
Loss
|
Program
|
Disposition
|
|
Actual
Green Take
|
Stage
|
Purpose
|
|
Inventory Count
|
Moved
To Facility (H)
|
Group
Enumeration Notes
|
Columns in
the Group Enumeration Query for the Female Data are:
|
Female
ID
|
Spawn
Session Lot #
|
|
|
Cross
ID (H)
|
Moved
From Facility (H)
|
|
|
Estimate Egg Count
|
Moved
From Hierarchy (H)
|
|
|
Samples
|
Moved
From Path (H)
|
|
|
Spawn
Session Date (H)
|
Moved
From
|
|
|
Spawn
Facility (H)
|
Egg
Weight (H)
|
|
|
Spawn
Location (H)
|
|
|
Use Case:
There are instances
in which users will want to Delete one or more Group Enumerations.
Females that are
part of (in) a single Group Enumeration:
·
If a Female’s Eggs were
Enumerated and Grouped once, into a single Container, and users decide to
Delete that Female from that Group, they can do so. By doing so, the Female’s
Eggs will be placed back to the location they were in prior to the Group Enumeration.
Females that are
part of (in) multiple Group Enumerations:
·
If a Female’s Eggs were
Enumerated and Grouped into multiple Containers as separate Group Enumerations,
and users decide to Delete a Female from a specific Group, they can do so,
without it affecting other Group Enumerations that the Female is part of.
Business Logic:
When deleting a
Group Enumeration:
1.
If a user made a Group
Enumeration part of one Container, then deleting the Group Enumeration from the
‘Group Enumeration Query’ will place the Female eggs back into their original
location.
2.
If a user made a Group
Enumeration part of multiple Containers, then when deleting the Group
Enumeration from the ‘Group Enumeration Query’, only that instance will be
deleted, leaving all other Group Enumerations in other Containers untouched.
Eggs will be placed back into their original Containers if and only if all
instances of an Egg Take that have been Group Enumerated get deleted.
3.
Group Enumerations can
be deleted as long as those Group Enumerations have NOT been moved to other
Containers after they were initially Enumerated.
4.
If the ‘Delete Group
Enumeration’ option does not display in the Context Menu, then the Group
Enumeration(s) selected, have since been moved to a different Container.
5.
If a Group Enumeration
has been moved to another Container, you have to first delete the Move from the
‘Move Egg Query’ in Incubation, and then go back to the ‘Group Enumeration
Query’ to delete the Group Enumeration. To delete a Move, refer to the ‘Move
Egg Query’ section under ‘Deleting a Move’.
6.
Multiple Group
Enumerations can be deleted using the multi select option.
Validation:
1.
Group Enumerations can
only be deleted as long as they have NOT been moved to another Container after
Group Enumerating them.
2.
If the ‘Delete Group
Enumeration’ option does not display in the Context Menu, then the Group
Enumeration(s) selected, have since been moved to a different Container.
Steps:
1.
Go to the Query >
Group Enumeration > Season (if applicable)
2.
Select the Group
Enumeration(s) that you want to delete. To delete multiple Group Enumerations,
hold down the ‘CTRL’ key or use your mouse to drag your cursor to select
multiple Group Enumerations.
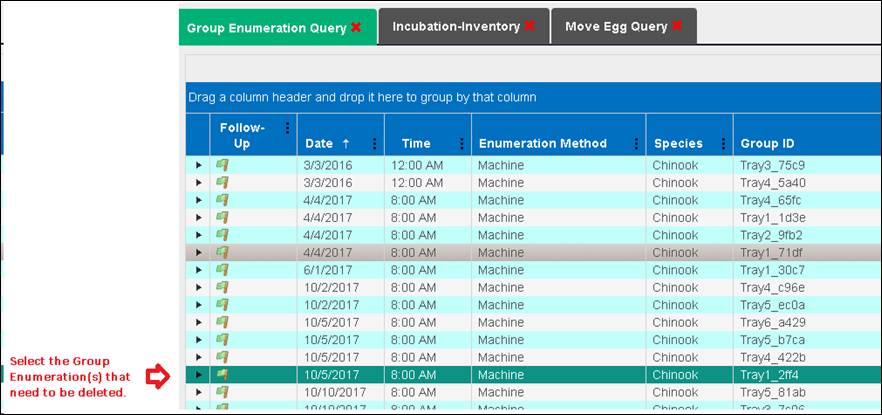
3.
Right click on your
mouse once you are done selecting the Group Enumerations that need to be
deleted. To select multiple Group Enumerations, either drag or hold down the
‘CTRL’ key and click on the multiple Group Enumerations you wish to delete.

4.
If the Context Menu
does not provide the option to ‘Delete Group Enumeration’, refer to
Steps 3-6 of the Business Logic
section above or Step 1 of the Validation section above for more information.
5.
A warning will pop up
asking you to confirm that you want to delete the selected Group
Enumeration(s).

6.
Select ‘Ok’ if you want
to proceed or ‘Cancel’ to cancel the Deletion.
The Rearing Inventory grid displays
current on-hand Rearing inventory by Rearing Array for managing Juveniles.
This Summary defaults in a collapsed
view, and has display options for customized viewing preferences.
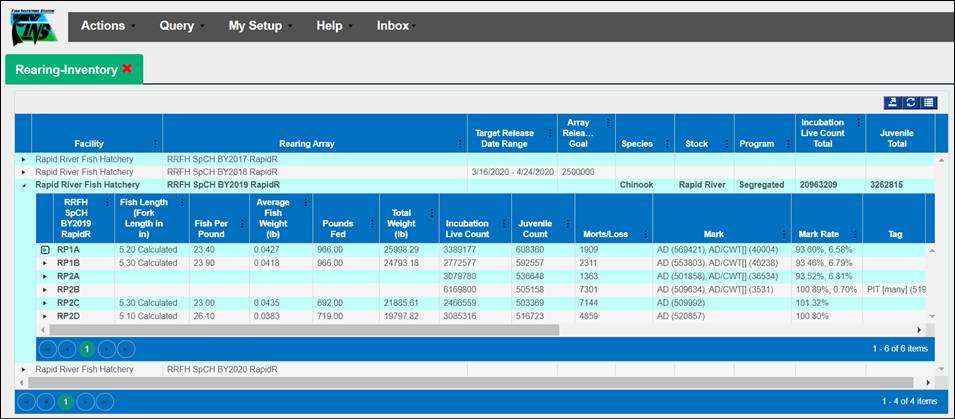
Multiple Count Columns are included in the Rearing Inventory
grid for different data points.
For example, Users have the ability to compare Juvenile Count
they thought they had at Rearing vs the Juvenile Count they had post Marking
Trailer Enumeration. This number can be determined from the Rearing Inventory
grid by comparing the Juvenile Count Column vs the Incubation Live Count
column; Example Below…
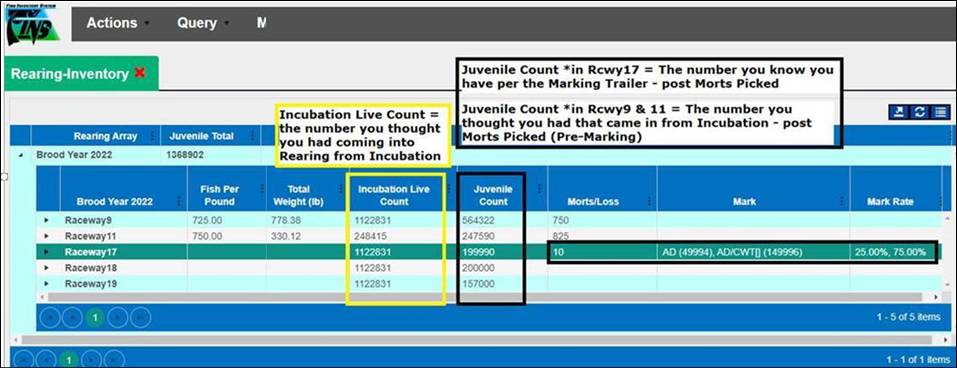
Display
Business Logic
Rearing Moves > BETA Group Spawned/Group Enumerated
*Display Note
RE: Group Spawned/Group Enumerated Eggs/Fry Moved into Rearing from Incubation:
·
Group Spawned Eggs (Moved as a Group or by Female ID) moved from
Incubation to Rearing will display with the following format in the Female ID
Column of the Rearing Inventory grid, regardless of how they displayed in
Incubation: ‘F(# of Females Spawned)[Start Female ID]-[End Female ID]’
·
Group Enumerated Eggs moved from Incubation to Rearing will
display in the Female ID Column of the Rearing Inventory grid with brackets, if
Female ID’s are sequential
*Group
Enumerated Eggs/Group Spawned Eggs moved by Female ID and ‘Inline Group
Enumerated’ Eggs all display with brackets in the Female ID column of the
Rearing Inventory grid if Female ID’s are sequential
Columns
Business Logic
Rearing Inventory grid:
·
If a User does not have a Saved Display Setting for the
Rearing Inventory grid, Shed Rate columns will be hidden by default
·
If a User does have a Saved Display Setting for the
Rearing Inventory grid that includes Shed Rate columns, they will display as
selected
Shed
Rate Columns
Shed Rate
columns are present in both the Rearing Inventory Grid and Online Release
Query:
·
Shed
Rate %- Rate
at which CWT Shed
·
Retention
Rate %- Rate
at which CWT Retained
·
Sample
Date/Time- Date/Time of Rate
Sampling
·
Sample
Size-Number
of Juveniles Sampled
·
Sample
Retention-Number
of Juveniles Sampled that retained their CWT
·
Rate
Note-Note of Rate/Sampling
·
Original CWT Total-Original Number
of CWTs applied at Marking
·
Adjusted CWT Total -Number
of CWTs after applying Rate
·
Original
Mark/Tag Rate-Mark/Tag
Rate of Original Marking
·
Adjusted
Mark/Tag Rate-Mark/Tag
Rate after Rate applied
Display Options
Rearing > Move Juveniles
> Form
Page Size
Use Case
There are
instances in which users will need to move Juveniles from multiple Containers
into one location, and then move other Juveniles from multiple Containers into
a different location. However, in order to do this, users must be able to view
all their containers on one page on the grid.
Because of
this, a Page Sizing option has been added to the grid section of the Move
within Rearing form [Move To Selected Containers], enhancing it so that Group
Move Ratio Move Types, Block Mode Move Types, and Visibility of all Rearing
Groups being Moved from Rearing within Rearing can be applied to/displayed in
the form, instead of just the first 10; Minimum page size allowed is (5); This
enhancement is accessible via a Menu Icon at the top right of the grid in the
form, or via the Context Menu within the grid of the form.
Business Logic
·
By default, the Move Form grid will display 10 Containers per
page.
·
To view more than 10 Containers per page:
o
Click on the ‘Pancake’ icon located on the right-hand corner at
the top of the grid.
o
Indicate the number of Containers you want to view per page in
the ‘Page size’ field.
o
Click ‘Ok’ to save the changes.
o
Entering a number less than 5 will be ignored and the display
size will default to 5.
o
Entering letters will be ignored and the display size will
default to 5.
o
User is required to enter the page size every time they open up
the Move Form.
·
The above logic applies to Moves made within Incubation
Locations, moves made within Rearing, moves made from Rearing Locations to
other non-Rearing/Release Locations and moves made to Release.
Validation
·
Page size
o
Entering a number is required.
o
Number is required to be larger than 5.
o
Entering letters is not allowed.
Steps
1.
Select the Containers that you want to move.
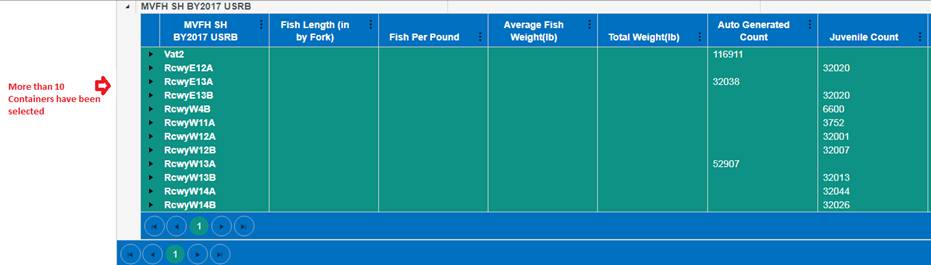
2. Click
on ‘Move Selected Containers’ if moving within Rearing, or ‘Move Selection To
Release’ if releasing Juveniles.
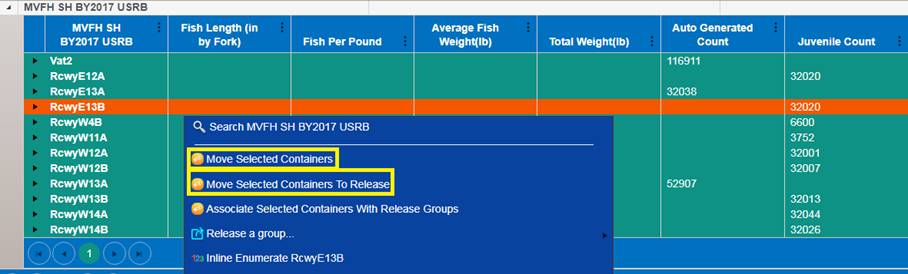
3. To
show more than 10 records per page on the grid, you have two options:
a. Click
on the ‘Pancake’ icon located in the top right corner of the grid highlighted
in red below.
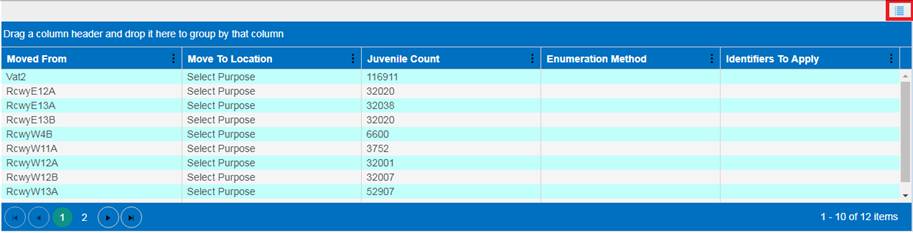
i.
Clicking on the icon will open up the ‘Options’ dialogue box and
allow the user to enter the number of records they want to view per page.
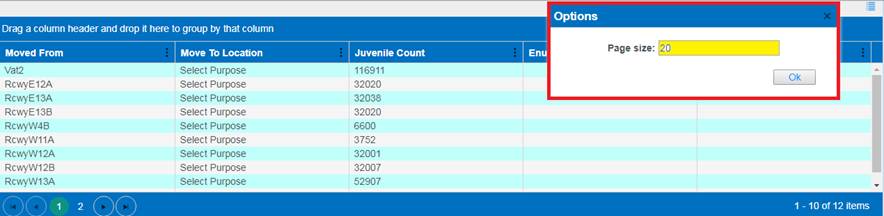
ii.
Click ‘Ok’ to update the ‘Page size’.
b. Right
click anywhere within the grid.
i.
Highlight the ‘Set Grid Page Size’ option from within the context
menu.
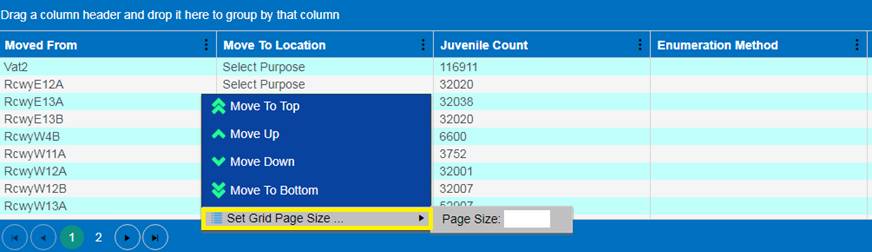
ii.
Enter the number of records you want to see per page in the box
highlighted below.
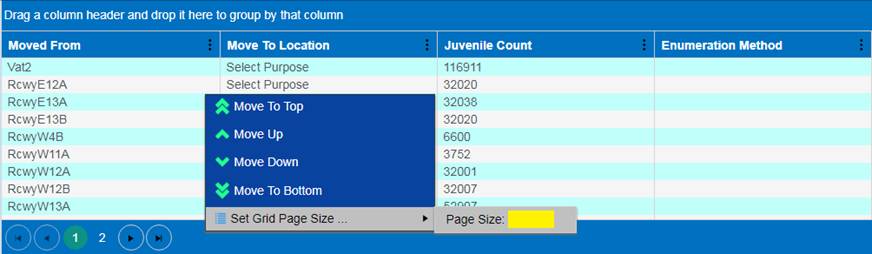
4. Select
the Container(s) that the Records will be moved to.
5.
Click ‘Save’
Block Mode
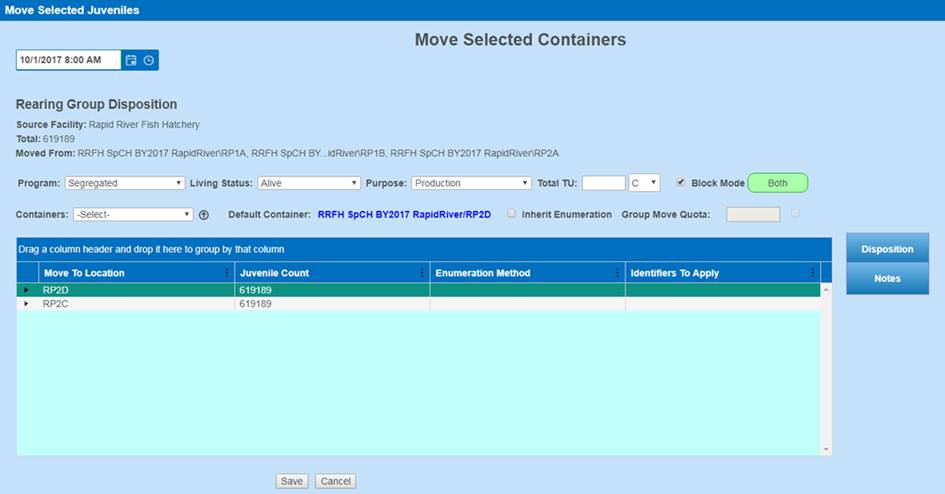
Use Case
Facilities need
to be able to spread the PBT data from all Moved From Containers into several
Destination/Move To Containers, for the Marking Event, on moves that occur
either during the process or after it is completed.
The Block Mode
in FINS allows users to indicate the quantity of Juveniles moved through the
Marking Trailer and what containers those Juveniles came from.
Facilities can
use this feature to enter the inventory count of each move during the Marking
Event, or for final moves at the end.
Business Logic
Activating the Checkbox to turn on
Block Mode
To Create a Block in FINS:
·
User is required to select from the Containers dropdown menu for
the ‘Block Mode’ checkbox to be enabled

·
Enabling the ‘Block Mode’ checkbox will automatically disable the
‘Group Move Quota’ option in the form

·
Once the ‘Block Mode’ checkbox gets selected, a green icon
appears next to the ‘Block Mode’ checkbox

Default Container
Move To Location has to be reselected
after turning on Block Mode:
·
Even though a Default Container Name displays in blue on the
Form, it is still necessary to select a Move To Location from the grid, for
each Block

Justification
If the Juvenile Count of a Block is
greater than the Juvenile Count available in the Move From Container, a
Justification is required
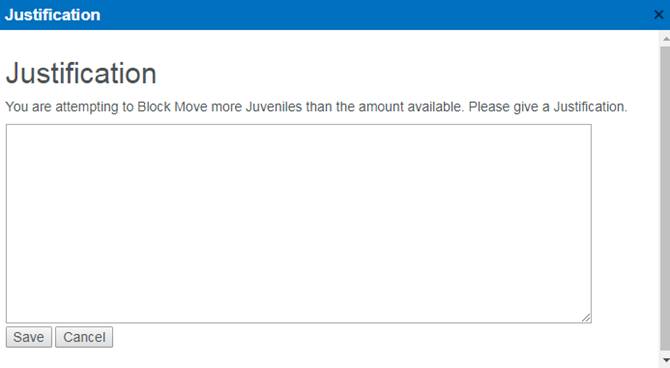
·
Save – To Save the Block(s) being Moved, enter a ‘Justification’
as to why the Juvenile Count is higher than originally Enumerated, then click
‘Save’
·
Cancel – If this value was a data entry error, click ‘Cancel’ to
go back to the main grid and correct the Juvenile Count for the appropriate
Block(s)
Validation
There are
Required, Optional and Invalid Data Entry Fields in the Move Form when moving
Blocks
Required Fields:
Date/Time
·
Enter the Date/Time that the Block was Moved; ‘Date/Time’ is
required
Program
·
Selecting a ‘Program’ is required. The ‘Program’ will default to
‘Segregated’ or ‘Integrated’ depending on what the Juveniles were already
designated as
Living Status
·
Living Status will default to ‘Alive’ as required to move within
Rearing
Purpose
·
Purpose will default to Rearing Purpose: Production
·
Rearing Purposes available include: Acclimation/Production/Other
Enumeration
Method
·
Selecting an Enumeration Method is required for each Block
·
Enumeration Methods available include: Machine/Manual/Water
Displacement/Marking Trailer
Containers
·
Selecting an Array from the Container dropdown menu is required
in order to activate the Block Mode Checkbox, where Block Mode can then be
chosen.
Block mode
·
Enabling ‘Block Mode’ via the checkbox is required to move
Blocks.
Move To Location
·
Selecting a Move To Location in the grid is required for each
Block.
·
Blocks do not reference the Location in the Containers dropdown
menu.
·
Blocks have a designated Move To Location Dropdown Menu that is
activated by clicking on the field in the grid for each Block.
Juvenile Count
·
Juvenile Count is required for each Block, as the use of a Block
is that you are moving a sub group of a group, not the entire amount. Entering
a value greater than 1 is required.
·
If the Count is greater than that which was Available, a
Justification is also required to describe the reason for the discrepancy in
Juvenile Count.
Optional
Fields:
Total TU
·
‘Total TU’ is optional. ‘Total TU’ will be empty unless a
numerical value is entered
·
Only numerical values are accepted
Identifiers to Apply
·
Applying Identifiers are optional at the time of a Move, as they
can be added to the Move To Location/Destination Container after the Move
Notes
·
Notes are optional, but always recommended so that users querying
data have all relevant information available
Invalid Fields:
Inherit
Enumeration
·
This is not a relevant data input for Blocks, as Enumeration is
required
·
Inherit Enumeration is used when the Juvenile Count will not be
changed on the Move/No Enumeration is occurring
Group Move Quota
·
This is not a relevant data input for Blocks, as it is a
different type of Move
·
Group Move Quota Moves are intended for use when the Move From
and Move To/Destination Container is known and the Move From Containers are
deliberately emptied to meet a ‘Quota’ of Juveniles called for in the Move
To/Destination Container
Block
Move Steps
1.
Select the Containers that will be part of the Block Move. To select
multiple Containers, hold and drag your cursor to select them or use the ‘Ctrl’
key to select separate ones.
2.
Right click on your mouse to access the Context Menu and select ‘Move
Selected Containers’.
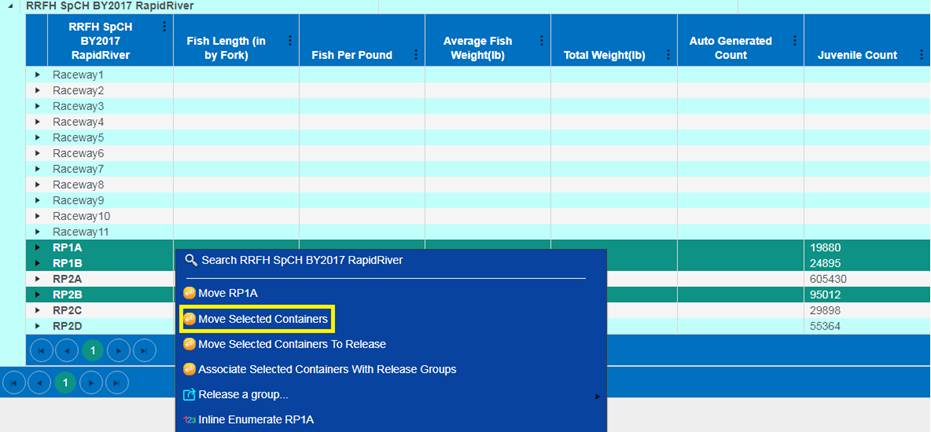
3.
The ‘Move Selected Juveniles’ form will display.
4.
Enter the Date that these Juveniles were moved on.
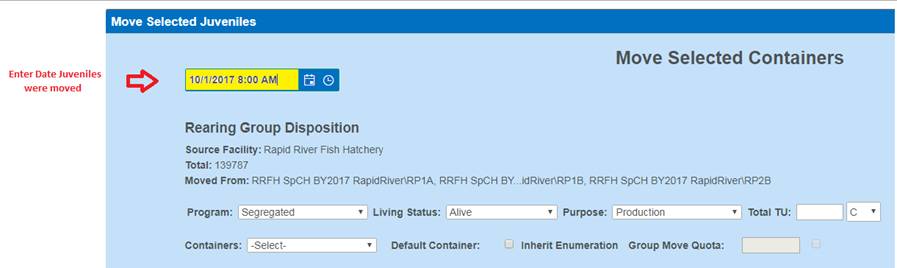
5. Program is set, by default, to the Program that the group
was already designated as, however this field can be changed on a move for the
Blocks created via the dropdown menu.
6. Living Status is set, by default, to
‘Alive’ for quick entry of a move within Rearing, however this field can be
changed if applicable.
7. Purpose is set, by default, as the Rearing Purpose,
‘Production’, for quick entry of a move within Rearing, however this field can
be changed if necessary.
8. Total TU for the Block being moved is
optional.
9.
In the Containers dropdown menu select the Array this Block will be
moved into. Selecting the Array will enable the checkbox so that ‘Block Mode’
can be turned.
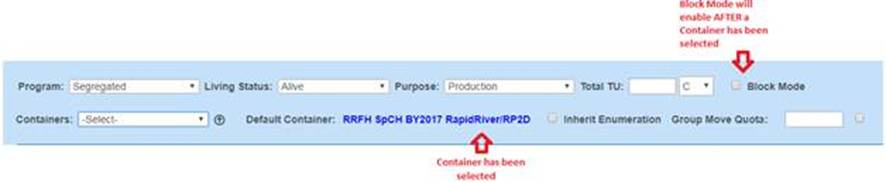
10. Check
the Block Mode checkbox, to turn on ‘Block Mode’.
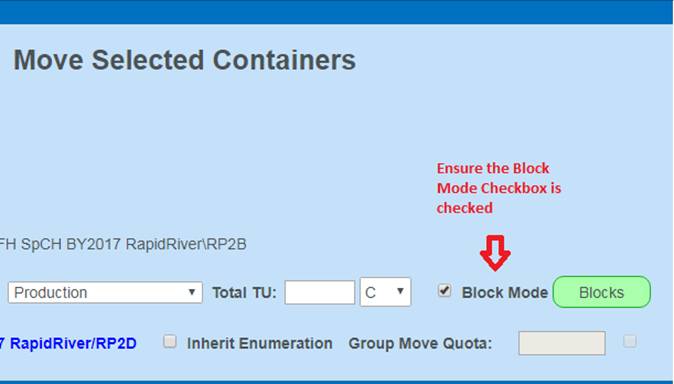
Once the
‘Block Mode’ checkbox gets selected, a green icon appears next to the ‘Block
Mode’ checkbox.

Enabling the ‘Block
Mode’ checkbox will automatically disable the ‘Group Move Quota’ option in the
form

11. In
the grid, select the Containers that are in each Block by dragging your cursor
or using the ‘Ctrl’ key to designate all the Containers in a Block.

12.
Once all Containers that will be in the
Block have been selected, right click on your mouse to access the Context Menu
and select ‘Create a Block from the selected rows’ to Move these Blocks.
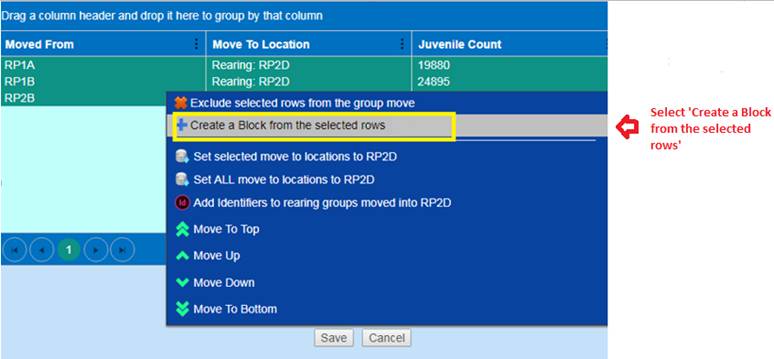
13.
To move Multiple Blocks, repeat the
process above, ‘x’ amount of times, depending on how many Blocks are moved.
14. Once Blocks have been moved, there are three viewing
options in the grid (Blocks/Both/Containers):
a. Blocks:
To view the Blocks that have been created click on the ‘Blocks’ icon
highlighted below:
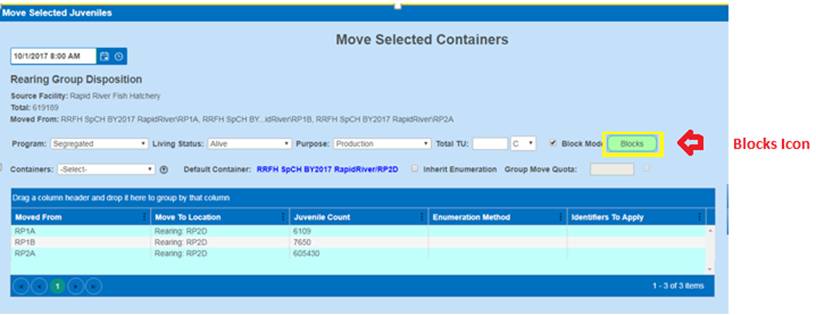
Clicking on the ‘Blocks’ Button will
display the Blocks moved.
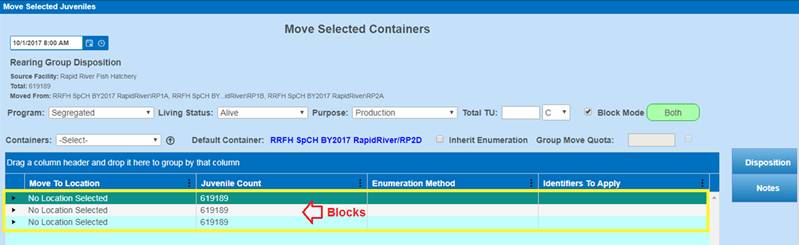
From this view; for each Block you
need to set:
1. Move
To Location- Set the Destination Location for each Block that it needs to be
moved into.
2. Juvenile
Count- Update with the number for each Block as appropriate.
3. Enumeration
Method- Set which Method used to determine updated Juvenile Count.
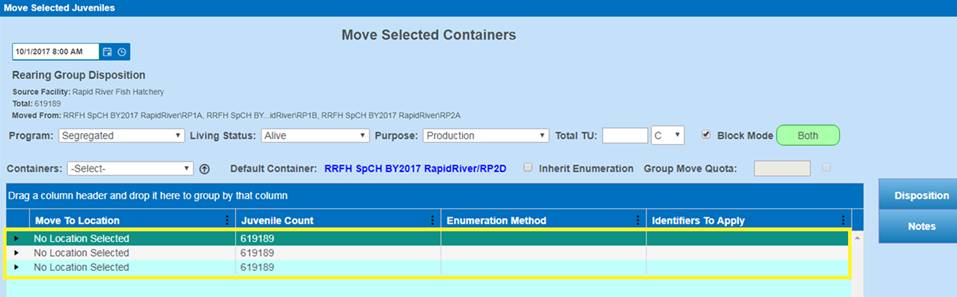
b. To
view both the Blocks Created and the Containers available to Create Blocks
from, click on the ‘Both’ icon.
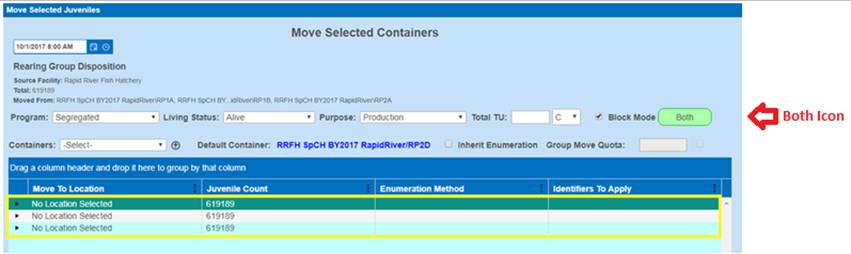
Clicking on this icon will display
the Blocks created and the Containers available.
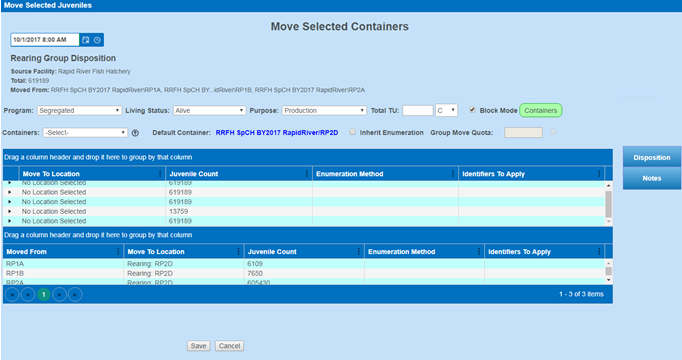
c. To
view the Containers from which the Blocks have been Created from, and more can
be Crated from, click on the ‘Containers’ icon.
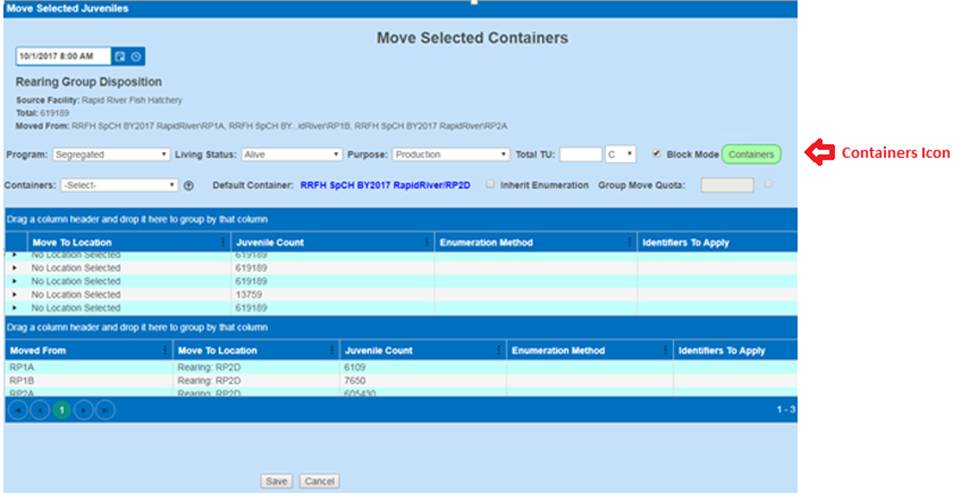
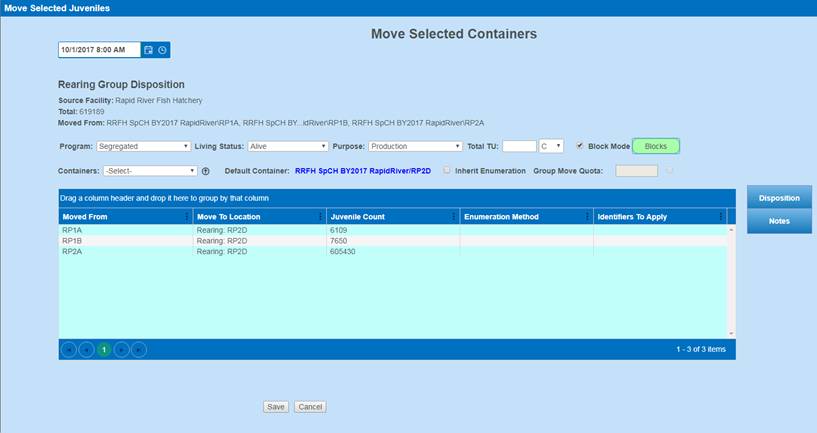
15.
Click on the ‘Blocks’ icon. Clicking on
the icon will take you to the Blocks that have been Created.

16.
Select the ‘Move To Location’ for each
Block.
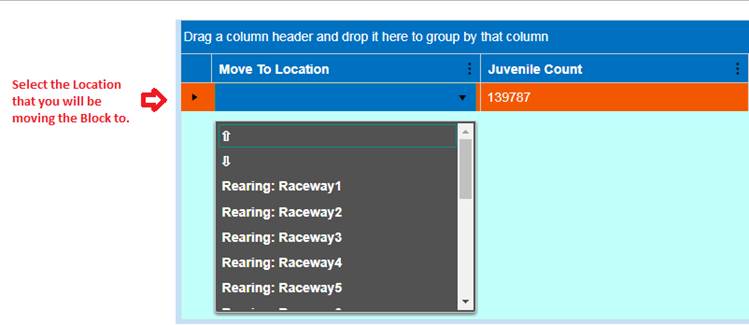
17. Enter the number of Juveniles that were part of the Block
Move(s) in the ‘Juvenile Count’ column. Entering a Juvenile Count is
required for each Block, as the use of a Block is when you are moving a sub
group of a group, not the entire amount.
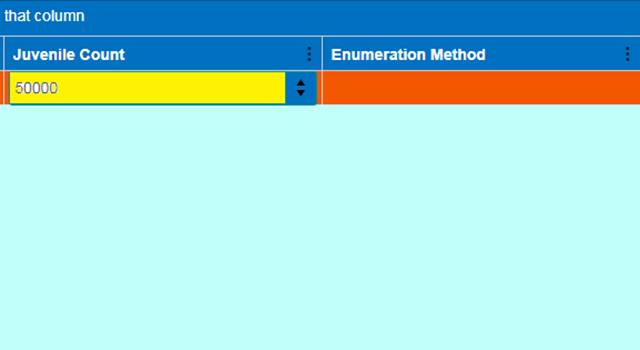
18.
Set the Enumeration Method with the
Method used to determine updated Juvenile Count for each Block.
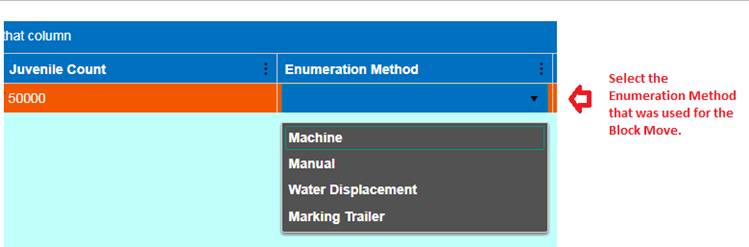
19.
Click ‘Save’
In order to
Enumerate a single container of a Rearing Array, follow the instructions below:
1)
Select the
Container that you are interested in enumerating.

2)
Once selected,
right click on your mouse and the context menu will display.
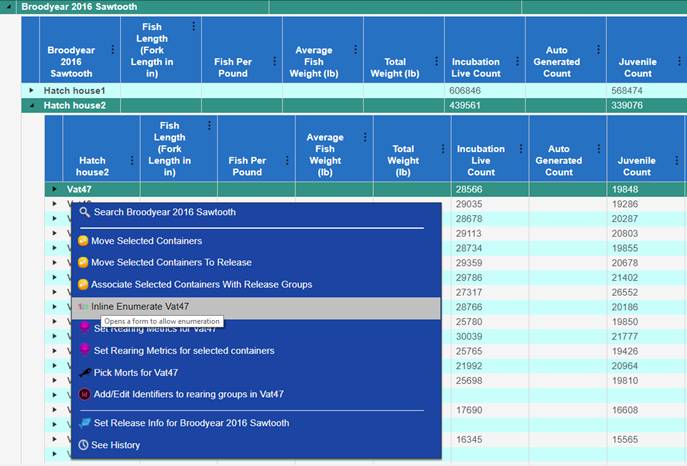
3)
Select ‘Inline
Enumerate “Name of Container” to open up the enumeration dialogue box.
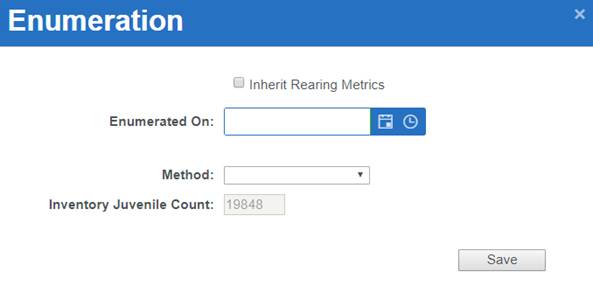
4)
Enter the
following Data:
· Inherit Rearing Metrics Checkbox:
If checkbox gets checked as True, the
current enumeration action will Inherit the Rearing Metrics that are already on
the Container for the ‘New’ current inventory count. *If the Rearing Metrics for the Container were input prior to
the Enumeration and still apply after the Container is Enumerated, this box
MUST be Checked to ‘Save’ the Rearing Metrics after this Enumeration. Click
Here for Instructions/Steps on how to enter Rearing Metrics.
· Enumerated On: Set the Date and Time
to the actual Date and Time that the Juveniles in this Container were
enumerated.
· Method: Select the Method that was
used to Enumerate the Juveniles in this Container.
· Inventory Juvenile Count: Enter the
number of Live Juveniles for this enumeration.
Click ‘Save’ to Save this enumeration to the selected
Container and continue.
5)
· Containers can be enumerated as many
times as justified/necessary. However, the date on enumerations needs to be set
subsequently, so that current enumerations are input with the most current
Date/Time (later than the previous enumeration assuming that Array has not been
emptied out since the previous enumeration).
· If moving Juveniles from Container
‘A’ to Container ‘B’ it is necessary that any Current Inventory Enumerations
that take place for Container ‘B’ are set for after the recorded Move Date/Time
into Container ‘B’. (Reference Below)
· ** If a Move made within Rearing
needs to be deleted, refer to the Rearing Move Query by Clicking
Here for
instructions on how to delete the Move and place Juveniles back into its
original Container.
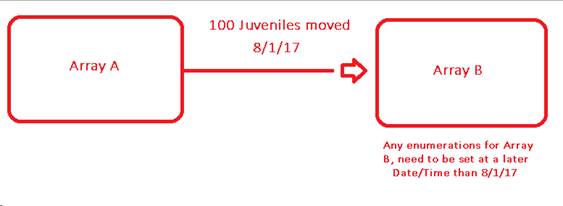
If you want to compare your Juvenile Counts from when they
entered Rearing vs the Juvenile Count determined post Marking (Enumeration),
you can view this number from the Rearing Inventory grid and compare the Incubation
Live Count column against the Juvenile Count column.
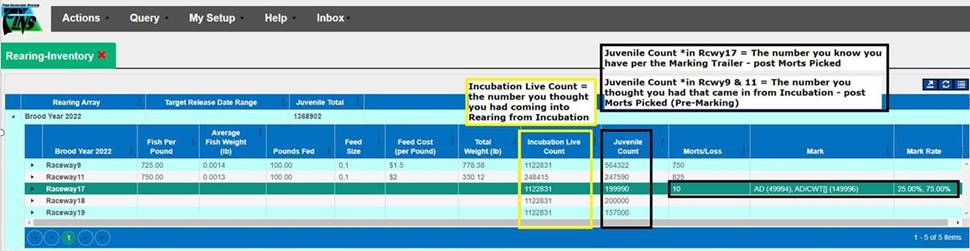
Another option
would be to download the Rearing Survival Mortality Rate Summary from the Data
Tab Query Tool.
Where you will be able to compare the
following data:
o Incubation
Data –
Will
provide you with Count from Incubation into Rearing, along with Incubation
Survival and Mortality Rates
o Receipt
Enumeration Data –
Will
provide you with expected egg data along with Re Enumeration Count if you Re
Enumerated once Eggs were Received from Inbox
o Rearing
Enumeration Data –
Will
provide you with current Juvenile Count, Total Juvenile Count, along with
Morts, Mortality Rate and Survival Rate
Use Case
Facilities apply AD and/or CWT at Marking and later on PIT
Tags, when applicable, to Juveniles that are in Rearing. This is done so
Juveniles are able to be tracked throughout their life cycle (from Rearing to
Release and when they return back to the Trap as Adults). FINS allows the entry
of these Identifiers at Rearing via either the Marking Form or the PIT Tag
Form. Data entry in FINS can mimic the Marking Trailer process by either AD,
CWT or AD and CWT Applied Simultaneously.
·
Marking Identifiers (AD, AD/CWT,
CWT) – are applied as mutually exclusive
·
PIT Tag Identifiers (PIT) – are
applied in a separate PIT Tag specific form
Business Logic/Validation
·
By default, the ‘Add’ Menu of the form will be checked to
display, on open
·
Entering a Date is required when applying Identifiers – the date
should be the date Marks/Tags were applied
·
Typing ‘f’ or ‘fill’ in the AD, AD/CWT or CWT Applied input
fields will automatically populate the applicable field with the maximum number
of Identifiers that can be applied to a container (based on the number of
current unmarked juveniles in the container)
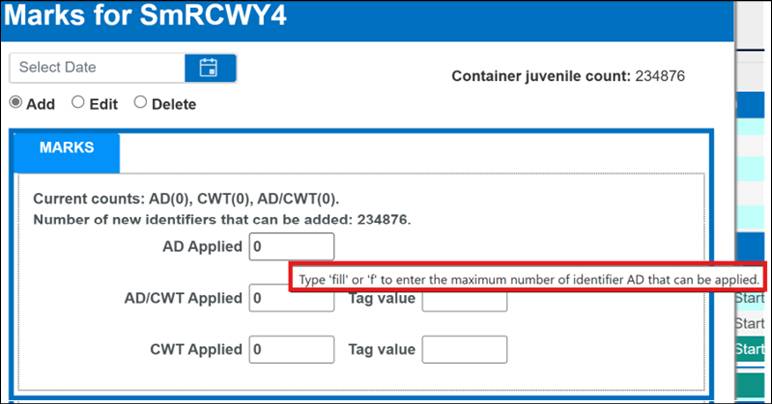
·
Current counts applied to Juveniles in the selected Container
will display in the form for quick user reference:
§
Number of AD
§
Number of CWT
§
Number of AD/CWT
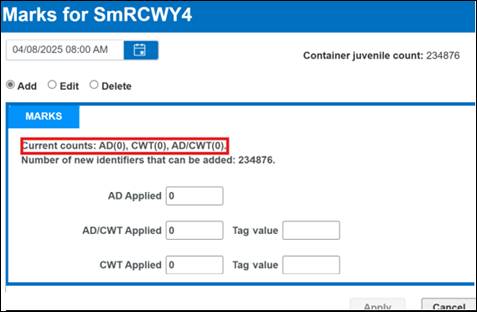
·
The total number of Juveniles that don’t have Identifiers and can
be added to the Container, will also display
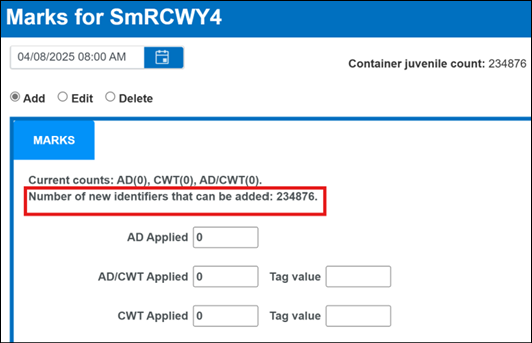
·
CWT Value is Required
·
The CWT Value is allowed in the following formats:
§
six contiguous digits: XXXXXX
§
or 3 pairs separated by dashes: XX-XX-XX
FINS will notify on input if the correct
format is not used by displaying the correct format options allowed, in red
text, as shown below:
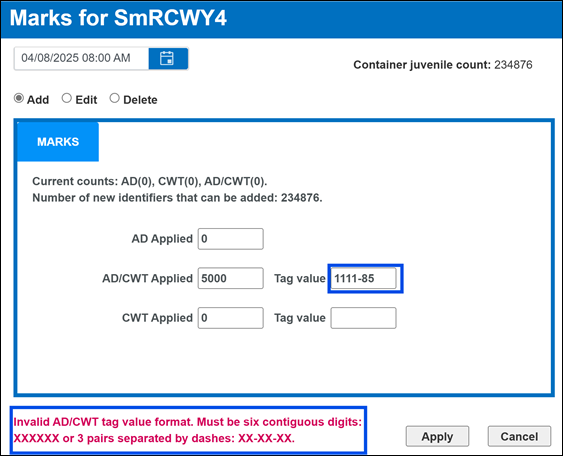
§
FINS will notify on input that the correct format has been used
by displaying it in green text, as shown below:

*Please
Note: If you don’t see the confirmation register at the bottom of
the form before you click on Apply, the changes will not take effect. To get
the form to recognize your input, you need to click or tab out of the input
field once filled.
Marking - Add
Identifiers to a Rearing Container –
Step by Step Instructions:
1. Select
the Container with the Juveniles that you wish to enter additional Marks to
a.
Right click to open the Rearing Context Menu
b.
Hover over “Identifiers” in the Context Menu
i. Select
‘Add/Edit Marking for rearing groups in…(the selected Container Name)’

2.
This will open up the Marking Form - with existing Identifiers
displayed as ‘Current counts’ if applicable
a. Ensure
the ‘Add’ radio button is selected when adding Marks
Note: FINS will provide you with the
following for quick reference -
§
Container Juvenile Count: Number of Juveniles that are
currently in the Container
§
Current Count: Number of AD, CWT and AD/CWT currently
applied on Juveniles in the Container
§
Number of new Identifiers that can be added: (total
juvenile count minus existing total identifier count)
3.
Enter the following Marking data, as always, in a top to bottom left
to right approach:
a. Date
Identifiers were Applied
b. Number
of AD applied to Juveniles in the Container, if applicable
To quickly apply Identifiers to all
Juveniles in the Container, type ‘f’ or ‘fill’ within the input field
c. Number
of AD/CWT applied to Juveniles in the Container, if applicable
To quickly apply Identifiers to all
Juveniles in the Container, type ‘f’ or ‘fill’ within the input field
i.
CWT Tag value is required. CWT values must be entered as either six
contiguous digits (XXXXXX) or 3 pairs separated by dashes (XX-XX-XX)
d. Number
of AD/CWT simultaneously applied by the Marking Trailer to Juveniles in the
Container, if applicable.
To quickly apply Identifiers to all
Juveniles in the Container, type ‘f’ or ‘fill’ within the input field
i.
CWT Tag value is required. CWT values must be entered as either six
contiguous digits (XXXXXX) or 3 pairs separated by dashes (XX-XX-XX)
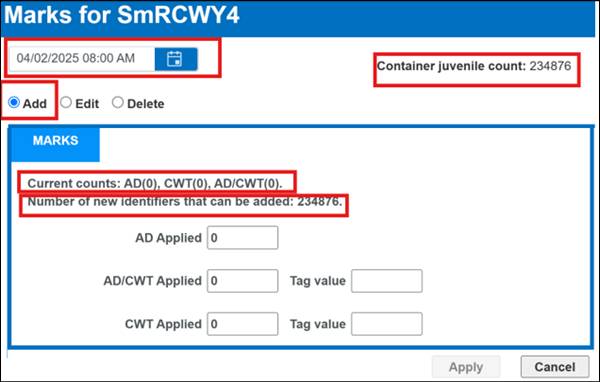
4.
Click Apply to Save; Cancel to cancel and close the form without
adding any Identifiers
*Please Note: If you
don’t see the confirmation register at the bottom of the form before you click
on Apply, the changes will not take effect. To get the form to recognize your
input, you need to click or tab out of the input field once filled.
Business Logic/Validation
·
Entering a Date is not required when editing Identifiers (IDs),
instead the Date field will automatically prefill to the original ‘Date
Applied’ after an Identifier is selected to Edit (from the Marking Form >
Edit grid)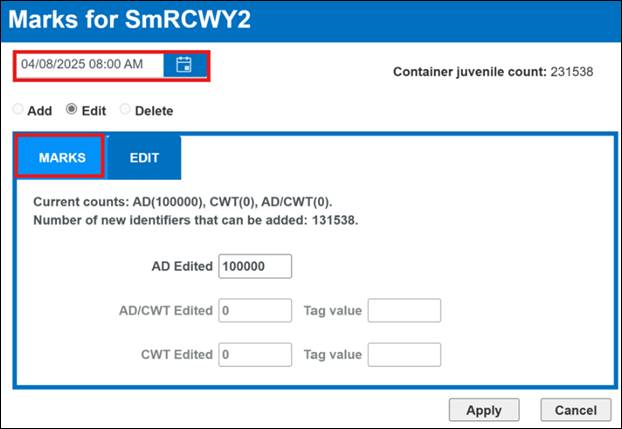
·
Select ‘Edit’ to view the Edit grid (‘Add’ is checked by default
when opening the Identifiers form)
·
Existing IDs can be exported to Excel before editing by clicking the
Export to Excel button outlined in red below
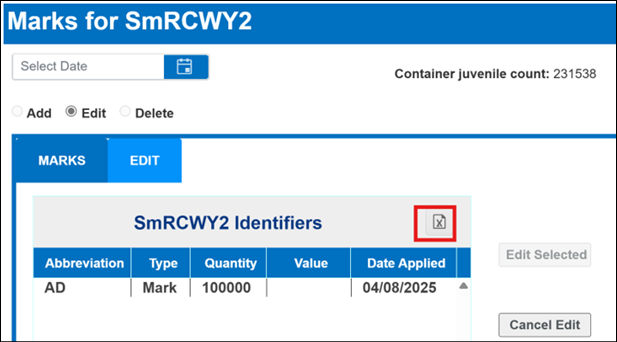
·
To Edit the quantity or value of an existing Identifier (ID), click
on it in the Edit grid to select
§
Clicking to select the Identifier enables the ‘Edit Selected’
radio button in the Marking Form
− Clicking
on the ‘Edit Selected’ button takes you to the ‘Marks’ tab where the ID you
selected will display with saved quantity and value for you to edit
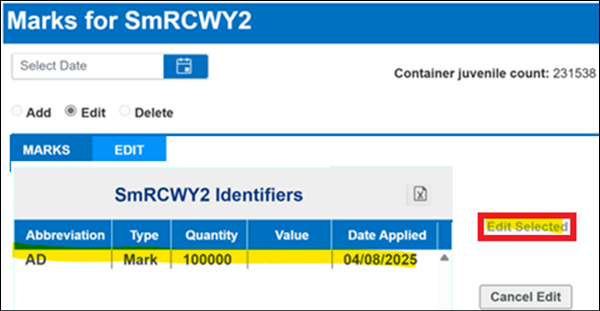
Marking
- Editing Identifiers in a Rearing Container –
Step by Step Instructions:
1. Select
the Container with the Juveniles and existing Identifiers that you wish to Edit
Marks for
a.
Right click to open the Rearing Context Menu
b.
Hover over “Identifiers” in the Context Menu
i.
Select ‘Add/Edit Marking for rearing groups in…(the selected
Container Name)’
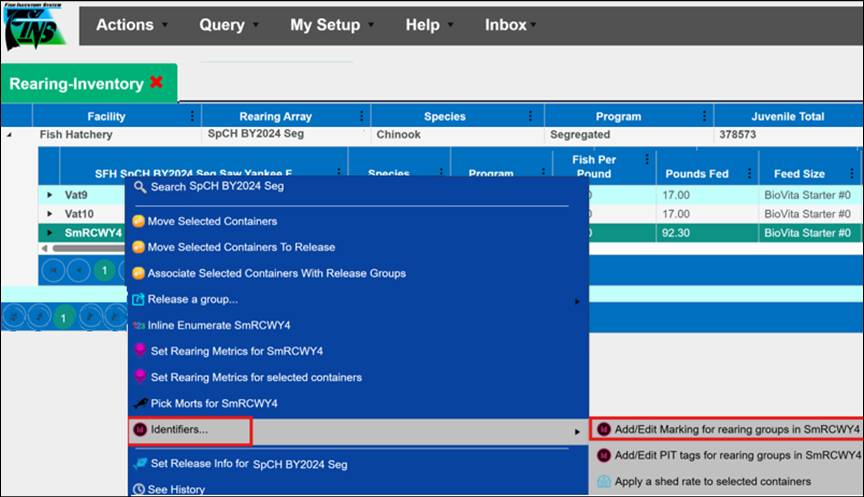
2. This
will open up the Marking Form - with existing Identifiers displayed as ‘Current
counts’ on the ‘Add’ Menu (selected by default on open)
3. Select
the ‘Edit’ radio button to Edit existing Marks (Quantities and/or Values)
The Marking Form Edit Tab will display the
existing Identifiers (Type/Quantity/Value/Date Applied) in the Edit grid
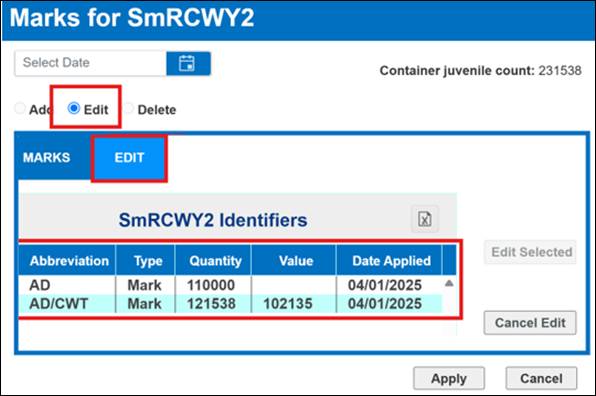
*Entering a Date is not required when editing Marks.
Instead, the Date will be auto populated after selecting an ID to Edit
a.
Select the Mark you wish to edit from the Grid.
Notice that when
you select the Mark, the Date will prefill with what the ‘Date Applied’ column
displayed in the grid for the Mark selected.
b.
Click ‘Edit Selected’ Button
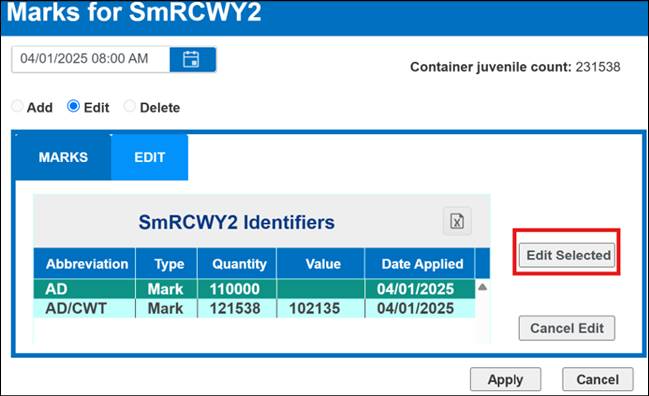
*If the incorrect Identifier was selected,
click ‘Cancel Edit’ Button and the form will allow the selection of a different
ID
c.
Edit Tab of Form displays the Current counts of each Mark type associated
with Juveniles in the Container for quick reference
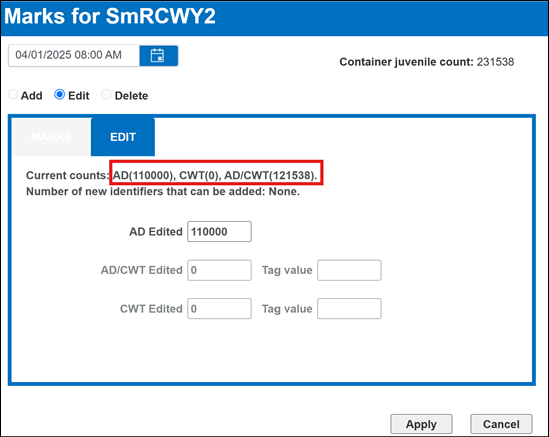
d.
Edit the number of Marks to be updated by typing an edited count in
the applicable field
e.
Click ‘Apply’ to apply the changes/Save the Edit; Click Cancel to
close the form without any Edits
Business Logic/Validation
·
Entering a Date is not required when deleting Identifiers
·
By default, the ‘Add’ button will be checked on open
·
To Delete, select the ‘Delete’ radio button instead
·
FINS displays the Current Counts that have been applied to
Juveniles in Container for Deletion
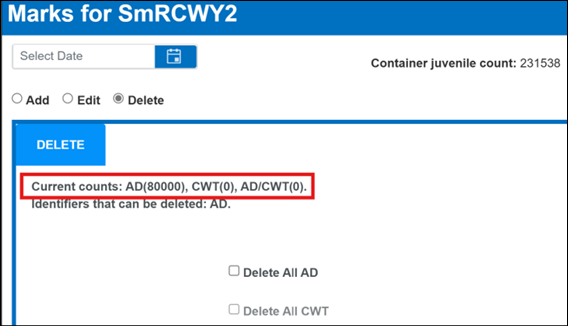
·
FINS will display the Identifiers that can be Deleted as ‘All’ AD
or ‘All’ CWT
§
Identifiers that can be deleted will be in black as shown below
§
Identifiers that cannot be deleted will be greyed out as shown
below
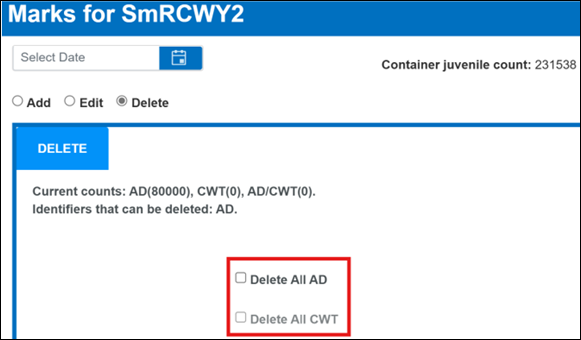
·
Users are required to click on the checkbox for the Identifier
they wish to Delete
Marking
– Deleting Identifiers from a Rearing Container –
Step by Step Instructions
1. Select
the Container with the Juveniles and existing Identifiers that you wish to Delete
Marks from
a.
Right click to open the Rearing Context Menu
b.
Hover over “Identifiers” in the Context Menu
i.
Select ‘Add/Edit Marking for rearing groups in…(the selected
Container Name)’
2. This
opens the Marking Form - with existing IDs displayed as ‘Current counts’ on the
‘Add’ Menu (selected by default on open)
3. Select
the ‘Delete’ radio button to Delete existing Marks
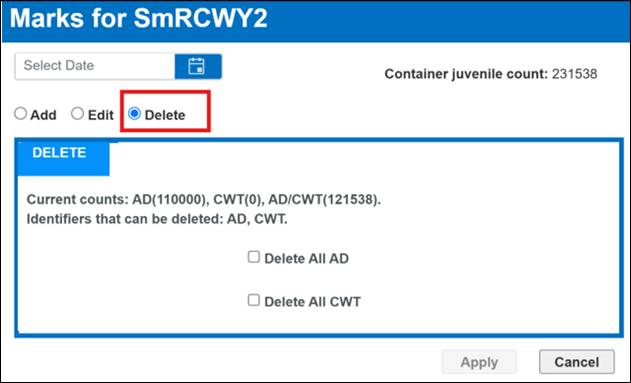
4. The
Marking Form Delete Tab will display existing Identifiers and allow Deletion of
‘All’ applicable
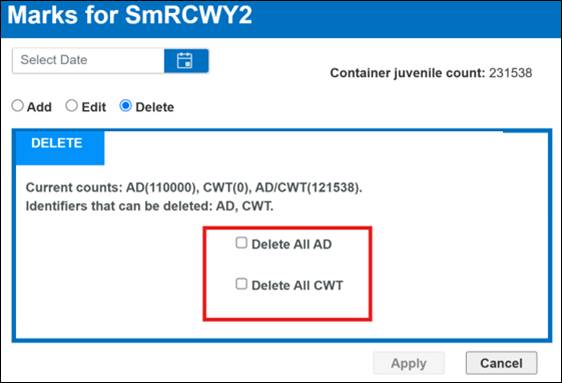
5. Click
on the checkbox for the Identifier(s) you wish to Delete all of and then click
‘Apply’ to Save the Deletion; Click Cancel to close the form without any
Deletions
Step by Step Instructions:
1. Select
the Container with the Juveniles that you wish to Add PIT Tags to
a.
Right click to open the Rearing Context Menu
b.
Hover over “Identifiers” in the Context Menu
i. Select
‘Add/Edit PIT tags for rearing groups in…(the selected Container Name)’
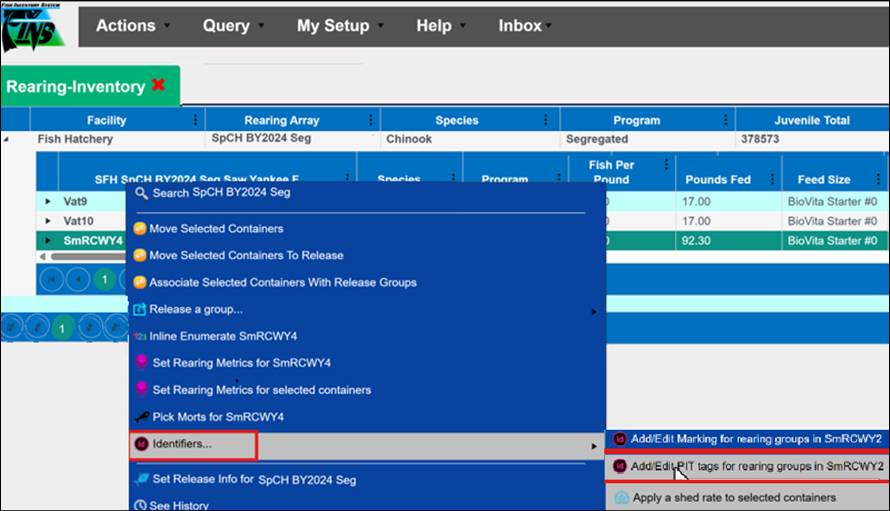
This will open up the PIT Tag Form - with existing PIT Tags
displayed as ‘Current counts’ if applicable
·
The form will open with ‘Add’ Menu/radio button selected by
default – for Adding PIT Tags
·
PIT Tag form displays the number of PIT Tags currently applied to
Juveniles in the Container
·
PIT Tag form also displays the number of new PIT Tags that can be
Added along with the total number of Juveniles currently in the selected Container
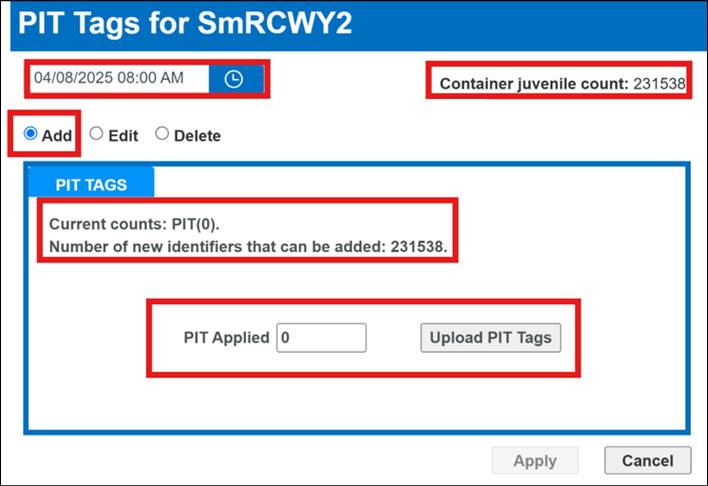
2. Enter
the following PIT Tag data, as always, in a top to bottom left to right
approach:
a.
Date PIT Tags were Applied
b.
Number of PIT Tags Applied to the Juveniles in the Container
i.
When Applying PIT tags to ALL Juveniles in a Container, type ‘f’
or ‘fill’ in the input field for all Juveniles to get PIT Tags – PIT Applied
count will be auto-populated to match the number of IDs that can be added
*Please Note: If
you don’t see the confirmation register at the bottom of the form before you
click on Apply, the changes will not take effect. To get the form to recognize
your input, you need to click or tab out of the input field once filled.
Use Case
In Rearing, some Facilities add PIT Tag(s) to their
Juveniles. When done, whether via the Marking Trailer or manually, the Text
File generated can be uploaded into FINS so that the applied PIT Tag values are
associated with the Juveniles in the FINS database.
Business
Logic
·
User is required to select a PIT Tag Text File from their
Computer or USB drive
·
Once the Text File is selected, FINS displays the amount of PIT
Tags extracted and a preview with the Tag values. Any data in the selected File
that is not in PIT Tag (three dot ten hexadecimal; XXX.XXXXXXXXXX all
hexadecimal digits) format is ignored.
·
Only one PIT Tag Text File can be uploaded at a time.
·
Clicking ‘OK’ will only close out the upload dialogue box and
will not upload the PIT Tags to FINS.
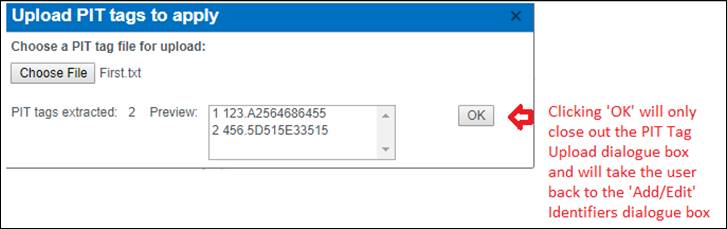
·
FINS will then display the Number of PIT Tag(s) ready to be
uploaded
Validation
Uploading
PIT Tags:
1. File
used is required to be in a Text format (e.g., Notepad or CSV file).
*Note – The
File generated by the Marking Trailer is already in Text format
2. You
are only allowed to upload one File at a time.
3. Any
data in the selected File that is not in expected/accepted PIT Tag (three dot
ten, three dot eleven, or three dot twelve hexadecimal; XXX.XXXXXXXXXXXXXX;
all hexadecimal digits) format will be ignored.
Step
by Step Instructions:
1. Within
the PIT Tag Form - If uploading the associated PIT Tag file for the
Juveniles, which is optional
2. Click
the ‘Upload PIT Tags’ button
a.
This will open the option to upload your .txt file
i. Choose the PIT Tag Text File from your computer/USB
that needs associated to this Juvenile group/Rearing Container. It is required
that the File selected/uploaded is a Text File. PIT Tag Files that are
generated by the Marking Trailer should be in Text format by default. Any other
File type will not be successfully uploaded.
b.
After successfully selecting a PIT Tag .txt file, the form will
display a preview of the PIT Tags
i. FINS displays a preview of all PIT Tag values present
in the uploaded File
ii. FINS will ignore everything else contained in the File
c.
The preview will display the number of PIT Tags extracted from your
file, along with their values
i. To
upload all PIT Tags from your file, double click within the PIT Tags preview
field, outlined below in Red, and FINS will select all PIT Tags to be uploaded
when you click save
ii.
To upload specific PIT Tags from your file, multi-select from the
PIT Tags preview field the desired PIT Tags, by holding down the ‘ctrl’ key and
selecting the PIT Tags that you want to Save
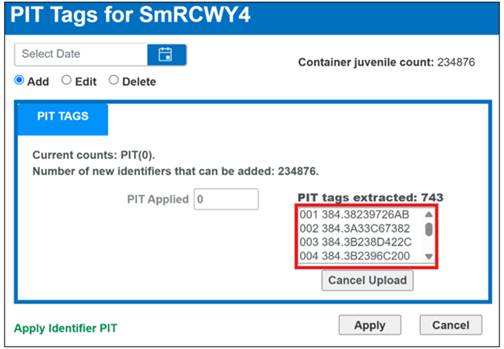
3. Click
‘Apply’ to finalize the PIT Tag Quantity and to be Upload PIT Tag Values and Save
to the Juveniles in the Container;
Click Cancel to close the PIT Tag form
without any PIT Tags/Values
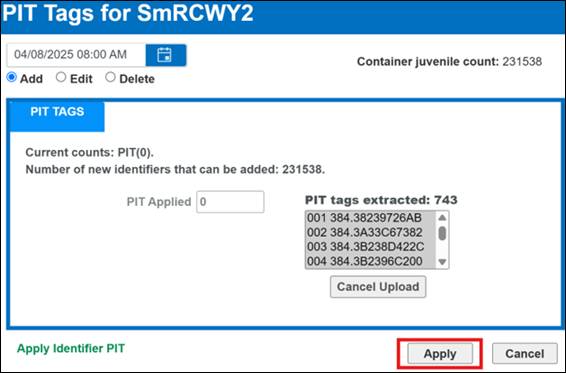
*Please Note: If
you don’t see the confirmation register at the bottom of the form before you
click on Apply, the changes will not take effect. To get the form to recognize
your input, you need to click or tab out of the input field once filled.
Step by Step Instructions:
1. Select
the Container with the Juveniles that you wish to Edit PIT Tags for
a.
Right click to open the Rearing Context Menu
b.
Hover over “Identifiers” in the Context Menu
i. Select
‘Add/Edit PIT tags for rearing groups in…(the selected Container Name)’
2. This
will open up the PIT Tag Form - with existing PIT Tags displayed as ‘Current
counts’ on the ‘Add’ Menu (selected by default on open)
3. Select
the ‘Edit’ radio button to Edit existing PIT Tags (Quantities and/or Values)
The PIT Tag Form Edit Tab
will display the existing PIT Tags (Type/Quantity/Value/Date Applied) in the
Edit grid
a.
You will notice that FINS allows you to export the existing PIT
Tags/Values before Editing by clicking the “Export to Excel’ button outlined in
red below
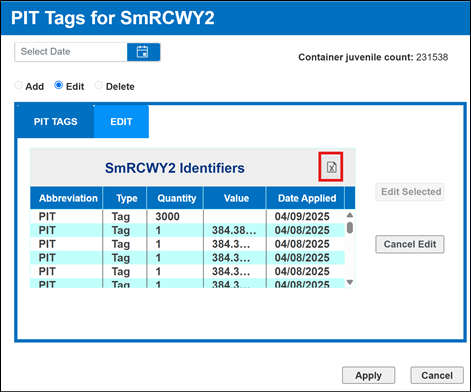
*Entering a Date is not required when editing PIT Tags.
Instead, the Date will be auto populated after selecting one to Edit
4. Select
the PIT Tag you wish to edit from the Grid
a.
Notice that when you select the PIT Tag, the Date will prefill with
what the ‘Date Applied’ column displayed in the grid for the PIT Tag selected.
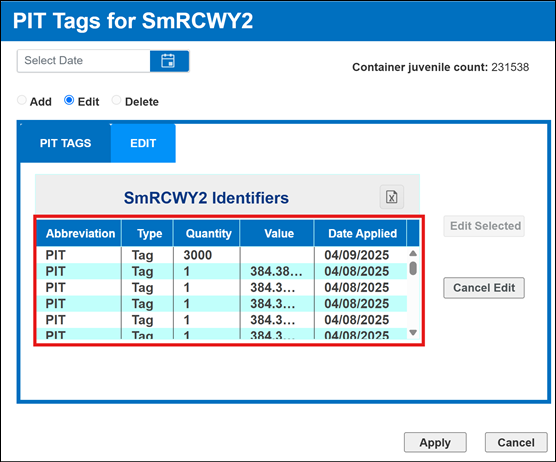
5. Click
‘Edit Selected’ Button
*If the incorrect PIT Tag was selected,
click ‘Cancel Edit’ Button and the form will allow selection of a different PIT
6. PIT
Tags Form > Tab will then display the Current count of selected PIT Tag that
can be edited
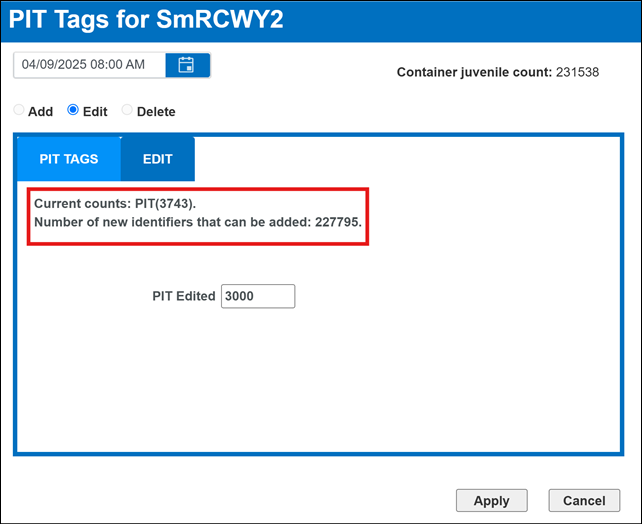
a.
Edit the number of PIT Tags with the correct count to be updated
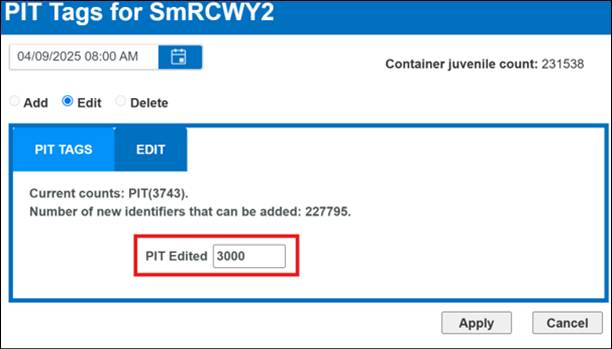
b.
Click ‘Apply’ to apply the changes/Save the Edit; Click Cancel to
close the form without any Edits to PIT
*Please Note: If
you don’t see the confirmation register at the bottom of the form before you
click on Apply, the changes will not take effect. To get the form to recognize
your input, you need to click or tab out of the input field once filled.
Step by Step Instructions:
1. Select
the Container with the Juveniles that you wish to Delete PIT Tags from
a.
Right click to open the Rearing Context Menu
b.
Hover over “Identifiers” in the Context Menu
i.
Select ‘Add/Edit PIT tags for rearing groups in…(the selected
Container Name)’
2. This
will open up the PIT Tag Form - with existing PIT Tags displayed as ‘Current
counts’ on the ‘Add’ Menu (selected by default on open)
3. Select
the ‘Delete’ radio button to Delete all existing PIT Tags (Quantities and
Values)
The PIT Tag Form Delete Tab
will display the existing PIT Tag Counts
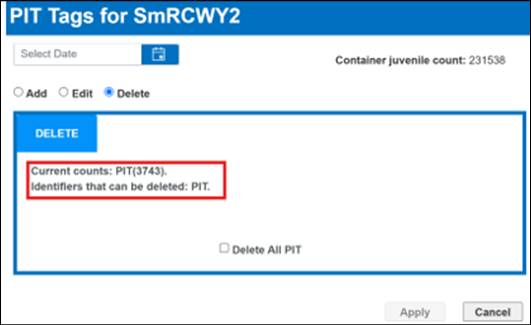
4. Delete
all PIT Tags by selecting the checkbox ‘Delete All PIT” and then click ‘Apply’
to Save the Deletion
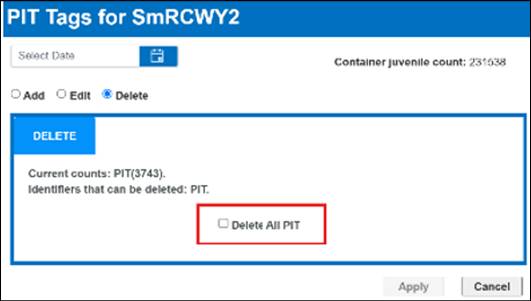
Click Cancel to close the form without any
PIT Tags being Deleted
As always, please contact FINS Support via
phone at 208.378.5279
or email Support@FINSNet.org
for more information or to setup a custom training session on how Marking
and/or PIT Tagging data should be entered in FINS for your Agency/Facility.
Use Case:
Facilities
that work with a large number of Juveniles will occasionally remove Identifiers
proportional to the number of Morts picked on a Container. The number of
Identifiers that get removed is based off the current Mark/Tag Rate of the
Container Morts are being picked from.
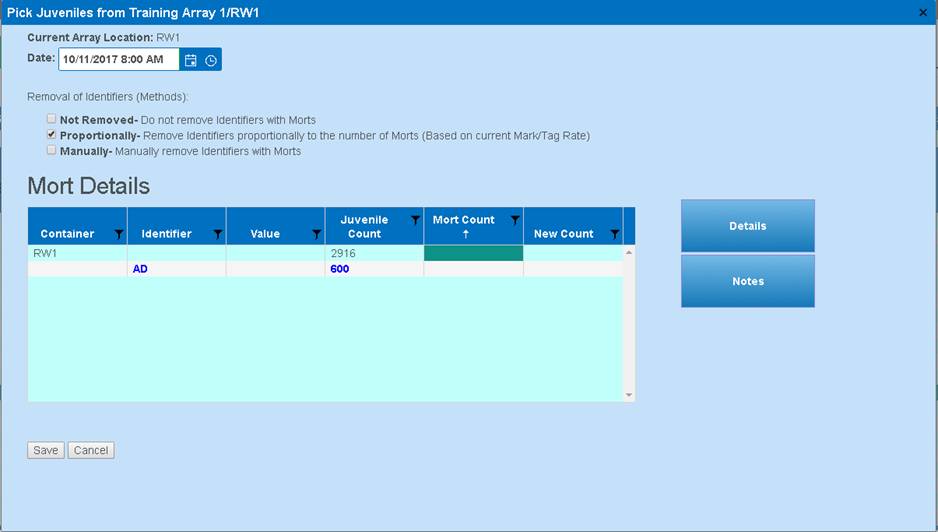
Definitions
Container-
The name of the Container that the Juveniles were picked on
Identifier-
Type of Identifier being removed
Value- Value
the Identifier has been given
Juvenile
Count- Number of Juveniles currently in the Container. This accounts for both
the total Juvenile Count and the Juvenile Count with Identifiers.
Mort Count-
Number of Morts picked in the Container. This accounts for both total Morts and
Morts with Identifiers.
New Count-
Number of Juveniles after Morts get picked. This accounts for both the total
Juvenile Count and the Juvenile Count with Identifiers. Formula below:
New Count=
Juvenile Count - Mort Count
Business Logic:
Details>Date/Time
·
Enter the Date/Time the Morts were Picked.
·
When entering a ‘Date/Time’, FINS will prevent you from entering
a ‘Date/Time’ prior to the last ‘Date/Time’ that the Container was enumerated
on.
·
When entering a ‘Date/Time’, Time will always default to 08:00
AM.
Details>Removal of Identifiers
(Methods)
·
Method will always default to ‘Not Removed’. Select
‘Proportionally’ as the Method, when removing Identifiers proportionally to the
number of Morts.
·
Depending on the total number of Morts being picked, FINS will
then auto calculate the number of Morts with Identifiers to be picked based off
the formula below:
‘Proportionally’
Method = Total Mort Count entered in Mort Form * (Mark or Tag Quantity/Juvenile
Count)
Validation
Details>Date/Time
·
Entering a ‘Date/Time’ is required.
·
When entering the ‘Date/Time’, the ‘Date/Time’ entered must be on
or after the ‘Date/Time’ the Juveniles in that Container were last enumerated.
Details>Removal
of Identifiers (Methods)>Proportionally
·
Juveniles in a container must have Identifiers.
Details>Save
·
If a ‘Date/Time’ is not set, FINS will not allow you to ‘Save’.
·
If the ‘Mort Count’ is left empty or a value of ‘0’ is entered,
FINS will not allow you to ‘Save’.
Notes
·
Entering notes is optional but suggested for Query purposes.
Steps
1. Right click on your mouse and
select the ‘Pick Morts for Container Name’ option in the context menu to open
up the ‘Pick Juveniles’ form.
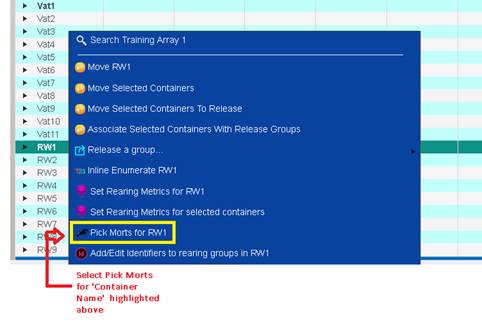
2. Enter the Date that
Morts were picked.
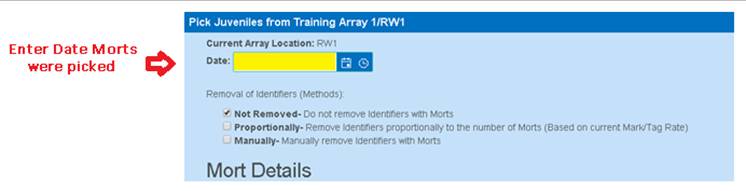
3. From the ‘Removal of
Identifiers (Methods) section, select the ‘Proportionally’ option to remove
Identifiers proportionally to the number of Morts (Based on current Mark/Tag
Rate).
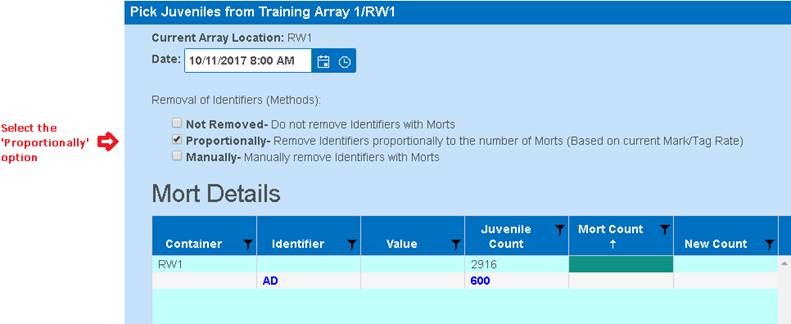
4. Enter the Mort Count for the
Container that you have selected.
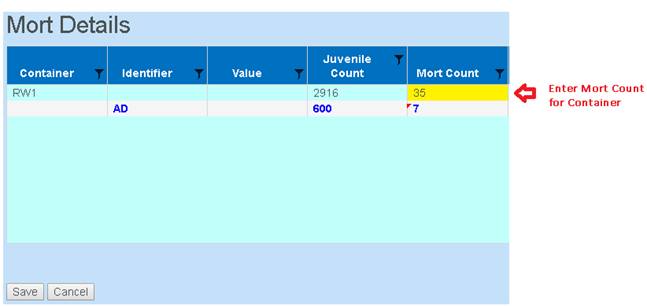
5. Notice how the Identifier Mort
Count gets automatically calculated by FINS based off the ‘Proportionally’
Method formula:
‘Proportionally’
Method = Total Mort Count entered in Mort Form * (Mark or Tag Quantity/Juvenile
Count)
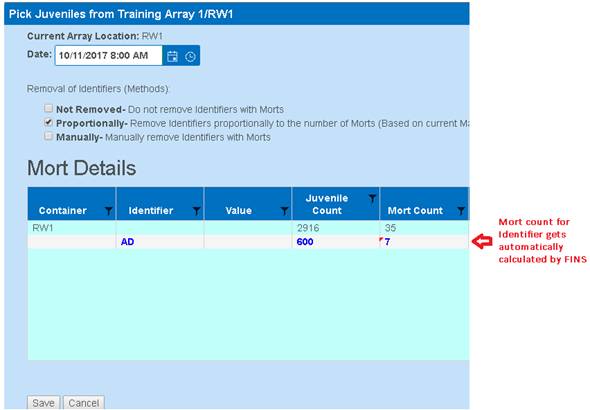
6. FINS will then display the ‘New
Count’ for the total amount of Juveniles in the Container, along with the ‘New
Count’ for Juveniles with an Identifier in the Container.
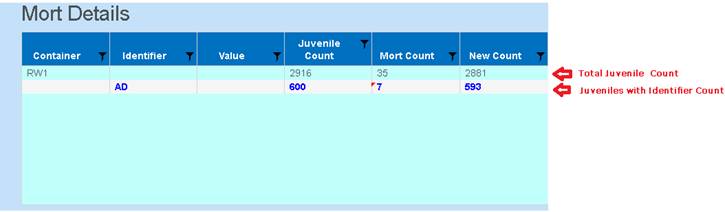
7. Enter any additional Notes in the
‘Notes’ section under the ‘Notes’ tab.
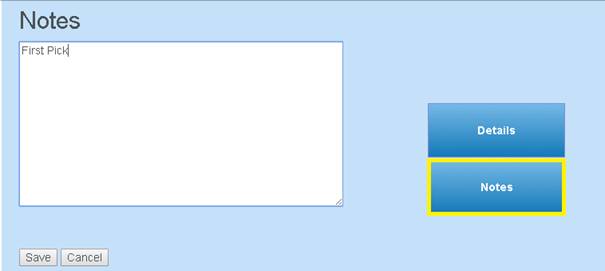
8. Click ‘Save’.
The Rearing
Pick Mort Form allows the user to override the number of Identifiers auto
calculated by FINS when using the Proportional Method. This means that a user
can pick morts proportionally for the CWTS in a Container but then override the
number of PIT Tags that will be manually removed in the same form.
*Note that manually
overriding Identifiers can create an event in which more identifiers are
removed than there are Juveniles or vice versa so it is important to confirm
total Pick Mort Form values before Saving. Also, when overriding the
calculated count provided by FINS, users are required to enter a note for the
Mort Pick Identifier Count changes to indicate why the FINS auto calculated
count of Identifiers were overridden - to help the data entry user and others that
query the data in the future.
Shed Rate
Use Case:
Shed Rate feature gives users the ability to enter the CWT
Shed Rate details to account for Juveniles that shed CWTs in Rearing, post the
Marking Trailer event. Users can enter their Shed Rate Data at Rearing, at
Release, or Post Release.
·
Creating a Shed Rate Workflow is required prior to entering a
Shed Rate in FINS.
§
Only a Facility Admin or FINS Domain Admin (PSMFC FINS Staff
Role) can create Shed Rate Workflows
·
Shed Rate Workflows can be applied:
§
In Rearing – Inventory in Rearing
§
On Release – while being Released in the Release Form
§ Post Release – after
Released via the FINS Online Release Query
*Since
individual containers cannot be selected within the Release Query Shed Rates input
post-release are saved to the Release (all applicable Containers within the
selected Release). Unique Shed Rates for a specific Container need to be input
before or on Release.
·
Shed Rate Workflow Options:
§
Species - applied to a specific Species or to all Species
§
Array - applied to one specific Array or to all Arrays
§ Apply
Shed Rate On Dialog Save –
-
Checking the checkbox will ensure that the CWT count is adjusted based
off the Shed Rate applied to a Container within a Rearing Array
-
Check the checkbox if Shed Rate is being applied in real time and if you
want the CWT count to be adjusted based off the Shed Rate entered on a Rearing
Container or on Release/Post Release
-
Leave the checkbox unchecked if you don’t want to apply the Shed Rate to
existing CWT count on a Container or Release. If a Shed Rate gets applied, the
Shed Rate will NOT impact existing CWT count (i.e. when applying a Shed Rate to
historical data).
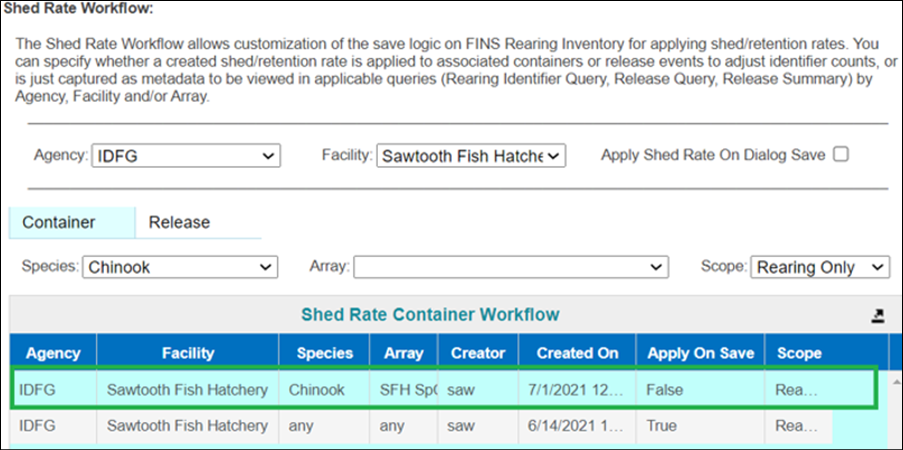
§
NOT Applied on Save –
In the example above,
when a Shed Rate is input, the CWT count of the inventory for the specified
Rearing Array will not be modified to reflect the Shed Rate, since the user
elected to NOT ‘Apply a Shed Rate on Dialog Save’. Instead, the Shed Rate
information input will only display for reference, in applicable Query >
Shed Rate Columns.
§
Apply on Save –
When Shed Rate Workflows
are created with the ‘Apply Shed Rate On Dialog Save’ checkbox checked, the CWT
count will be updated when Shed Rate data is input to reflect the actual Shed
of the CWT, not just displayed for reference in applicable Query > Shed Rate
Columns.
·
Saved Shed Rate Workflows will appear in the Shed Rate Container
Workflow Grid
Business Logic
·
Users can enter a Shed Rate from the following locations:
§
Rearing Inventory – on Rearing Container(s) while in FINS Online
Rearing Inventory
§
Release Form – on Release within the Release Form
§
Release Query – Post Release from FINS Online Release Query
·
‘Apply a shed rate to selected containers’ option will be grayed
out and disabled if:
§
A Shed Rate Workflow has not been created:
-
In Rearing-If attempting to apply Shed Rate from Rearing Inventory
o
User will be required to create a Workflow
-
On Release-If attempting to apply Shed Rate from the Release Form
o
User will be required to create a Workflow
-
Post Release-If attempting to apply Shed Rate from Release Query
o
User will be required to create a Workflow
§
A Shed Rate has already been entered for selected Rearing
Container(s)
§
The Rearing Container(s) selected contain Juveniles that were
applied a Shed Rate in a previous Rearing Container
§
The Rearing Container(s) selected have not been applied CWT
-
CWT must be present on a container to apply a Shed Rate
·
Shed Rate data input will automatically populate Retention Rate
and Sample Retention
§
Format xx.xx allowed; 80.25 for example
·
Retention Rate data input will automatically populate Shed Rate
and Sample Retention
§
Format xx.xx allowed; 80.25 for example
·
Sample Retention data input will automatically populate Shed and
Retention Rates
SHED
RATE FORM
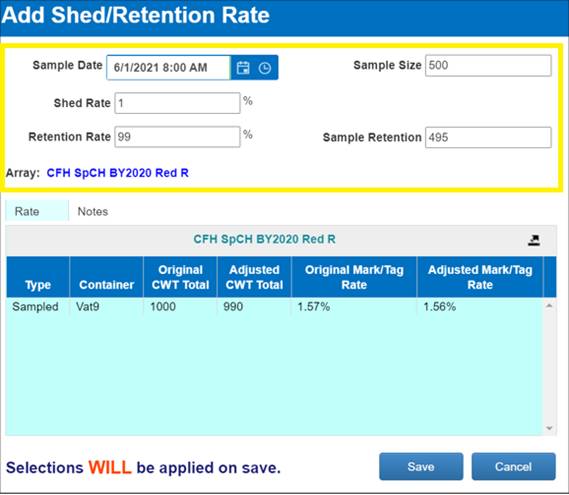
·
Sample Date
§
Enter the Date the Sample took place
·
Sample Size
§
Enter the number of Juveniles within the Container that were
sampled
·
Shed Rate %
§
Percentage of Juveniles that Shed a CWT in Sample
*Shed Rate data input will automatically
populate Retention Rate and Sample Retention
*Retention Rate data input will
automatically populate Shed Rate and Sample Retention
*Sample Retention data input will
automatically populate Shed and Retention Rates
·
Retention Rate %
§
Percentage of Juveniles that retained CWT in Sample
*Retention Rate data input will
automatically populate Shed Rate and Sample Retention
*Shed Rate data input will automatically
populate Retention Rate and Sample Retention
*Sample Retention data input will
automatically populate Shed and Retention Rates
·
Sample Retention
§
Sample Retention refers to the number of Juveniles that retained
their CWT
*Sample Retention data input will
automatically populate Shed and Retention Rates
*Shed Rate data input will automatically
populate Retention Rate and Sample Retention
*Retention Rate data input will
automatically populate Shed Rate and Sample Retention
·
Array
§
Name displays in Blue in the Shed Rate Form for Data Entry User
reference
SHED
RATE FORM > RATE GRID
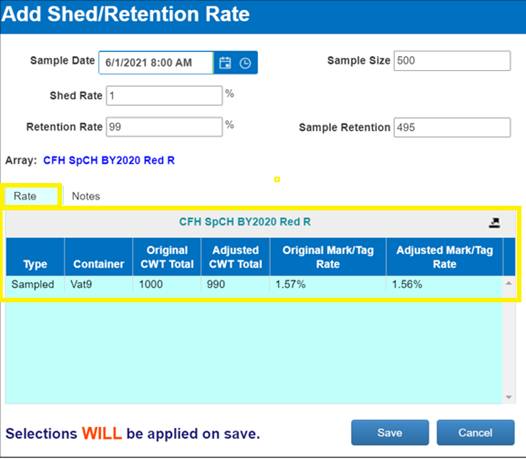
·
Type
§
Required field
§
Physically Sampled - If Container was physically sampled, mark
the selected container as ‘Sampled’
-
The record will be marked in black if type selection is ‘Sampled’
§
Derived - If Container was not physically sampled and the rate
applied was based off a Physically Sampled Container, mark the selected
container as ‘Derived’
-
The record will be marked in green if type selection is ‘Derived’
·
Container
§
Applicable Container(s) display in the ‘Rate’ grid of the Shed
Rate form
·
Original CWT Total
§
Original CWT Total applied at Marking will display in this column
of the Shed Rate form ‘Rate’ grid (value prior to Shed Rate being saved)
·
Adjusted CWT Total
§
Adjusted CWT Total after Shed Rate is applied to Juveniles in
selected Container(s) will display in this column of the Shed Rate form ‘Rate’
grid (modified value per the Shed Rate being saved)
·
Original Mark/Tag Rate
§
Marking Event Rate calculated based on the existing Marking data
(at time of/from Marking Event) for Juveniles of applicable Container(s) (value
prior to Shed Rate being saved)
·
Adjusted Mark/Tag Rate
§
Actual Rate calculated based on Shed Rate input (modified value
per the Shed Rate being saved)
SHED
RATE FORM > SAVE
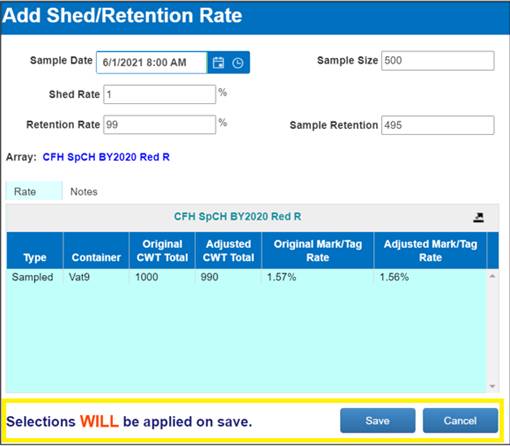
·
Selections WILL/ WILL NOT be applied on save
§
If ‘Apply Shed Rate On Dialogue Save’ was checked from the Admin
tab when Shed Rate Workflow was created, Shed Rate Form will display that the
Shed Rate entered will be applied on Save and CWT counts and Mark/Tag Rates
will be adjusted accordingly upon Save
§
If ‘Apply Shed Rate On Dialogue Save’ was not checked from the
Admin tab when Shed Rate Workflow was created, Shed Rate Form will display that
the Shed Rate entered will NOT apply and will not automatically adjust CWT counts and Mark/Tag Rates. *Even though
Shed Rate won’t be applied to the Inventory and/or Release CWT counts, the Shed
Rate data saved will be recorded in FINS and display in applicable Query >
Shed Rate columns for record/reference.
·
Save
§
User is required to click Save in order to save the Shed Rate
entered within the Shed Rate form
§
Save button will be grayed out if a required field has not been
entered
-
Hovering over the ‘Save’ button will display a tooltip that lists what
required field(s) are preventing the Save
The following steps assume that
a Rearing Shed Rate Workflow has already been created. For help on how to
create a Rearing Shed Rate Workflow, please contact FINS by calling us at
208.378.5279 or emailing support@finsnet.org.
The following steps also assume that the Containers selected have CWT
Identifiers that have been applied and that a Shed Rate has not been entered.
1. FINS
Online > Actions > Rearing > within a Rearing Array > Select the
Container(s) you wish to apply a Shed Rate to
2. Right
click to open the Rearing Inventory Context Menu, hover over ‘Identifiers’ and
select ‘Apply a shed rate to selected containers’
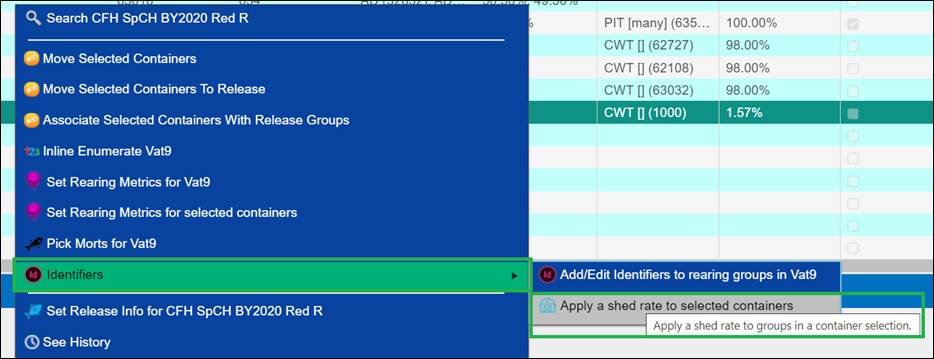
The following steps assume that
a Shed Rate Workflow has already been created for ‘On Release’. For help on how
to create an ‘On Release’ Shed Rate Workflow, please contact FINS by calling us
at 208.378.5279 or emailing support@finsnet.org.
The following steps also assume that the Containers selected have CWT
Identifiers that have been applied and that a Shed Rate has not been entered.
1. FINS
Online > Actions > Rearing > within a Release Form > Container
Details grid - Select the Container(s) you wish to apply a Shed Rate to
2. Right
click to open the Release Form Container Details grid Context Menu, select
‘Apply a shed rate to the selected containers’
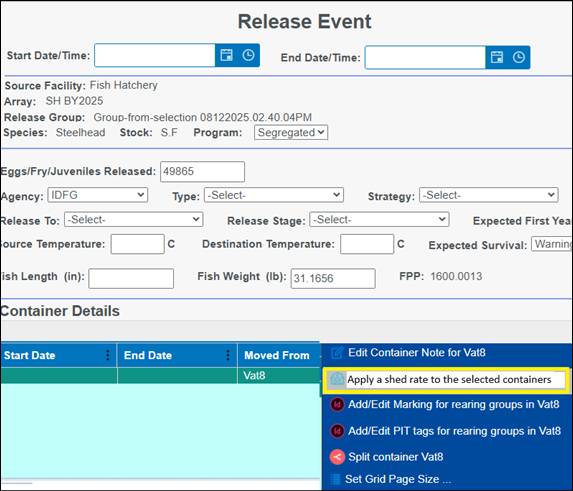
The following steps assume that
a Post Release Shed Rate Workflow has already been created. For help on how to
create a Post Release Shed Rate Workflow, please contact FINS by calling us at
208.378.5279 or emailing support@finsnet.org.
The following steps also assume that the Containers selected have CWT
Identifiers that have been applied and that a Shed Rate has not been entered.
1. FINS
Online > Query > Release > Juveniles - Select the Container(s) you
wish to apply a Shed Rate to
2. Right
click to open the Release Query Context Menu, and select ‘Apply a shed rate to this
release’
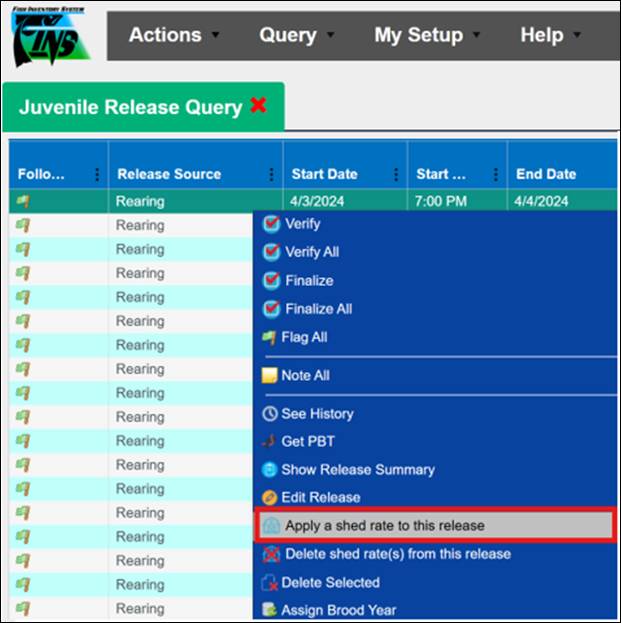
Steps
·
From within the Shed/Retention Rate form, either enter Sample and
Shed data or Sample and Retention data:
*Shed
Rate data input will automatically populate Retention Rate and Sample Retention
*Retention
Rate data input will automatically populate Shed Rate and Sample Retention
*Sample
Retention data input will automatically populate Shed and Retention Rates
§
Sample Date – Date the Sample of CWT Shed was done
§
Sample Size – Size of Sample to determine Shed/Retention
Rate
§
Shed Rate – Rate at which CWT was Shed
-
Format xx.xx allowed; 80.25 for example
§
Retention Rate – Rate at which CWT was Retained
-
Format xx.xx allowed; 80.25 for example
§
Sample Retention – Number of Fish in Sample that retained
CWT

·
From within the Grid, indicate which containers were sampled and
which ones have derived Shed Rate data by right clicking on the Container and
then selecting:
§
‘Mark selection as derived’ if Shed Rate was derived from a
Sampled Container, or
§
Selecting ‘Mark selection as physically sampled’ if Shed Rate was
applied based off a sampled container
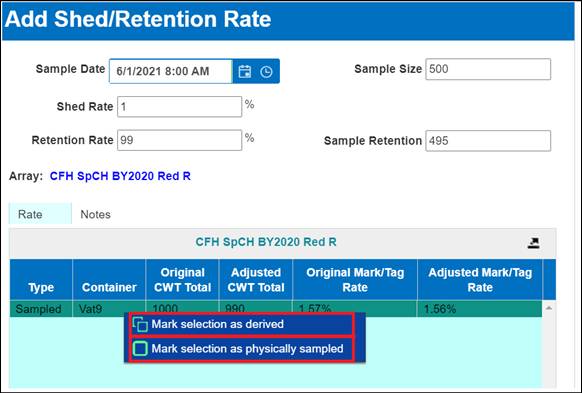
·
Click on the Notes Tab - to add optional Notes about the shed
rate, sample, retention, container
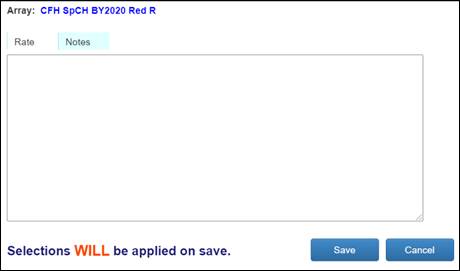
·
Clicking on the Export button will export data input to Excel
·
Click ‘Save’ to Save the Shed Rate input; Click Cancel to close
the form and cancel the Shed Rate from being Saved
Editing the AD/CWT or CWT Identifier Count will remove
any Shed Rate applied to the Containers whose Identifier Counts are being
Edited and will require users to re-enter an applicable Shed Rate
*If a Shed Rate is Deleted, Identifiers will need
modified. Deleting a Shed Rate does NOT revert Identifiers to pre-Shed Rate
counts
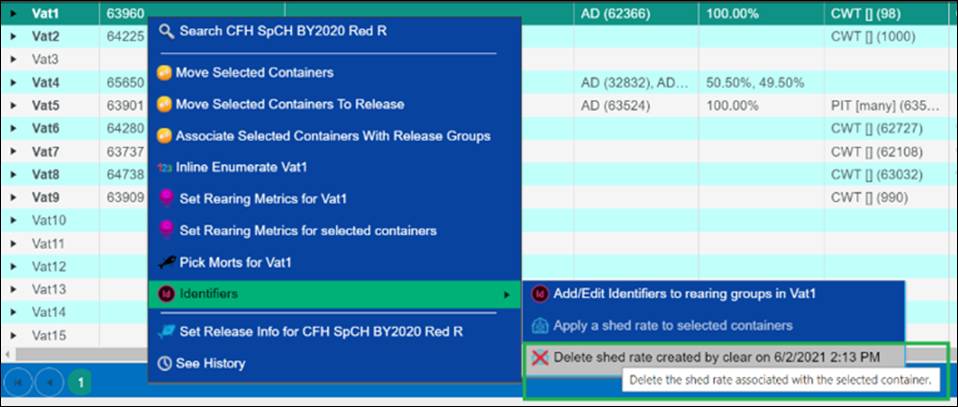
1. To
Delete a Shed Rate, select the Container/Release Group that you applied a Shed Rate
to
2. Right
click to open the Context Menu, hovering over Identifiers, select ‘Delete shed
rate created by…[username on date/time]’ as shown below
3. Shed
Rate saved for that Container/Release Group will be Deleted
Metrics input
will be summarized via the Monthly Rearing Production Summary excel file
download.
Metrics will be
used to view Facility in-season and/or post-season summarized rearing data
inventory and associated rearing container metrics by Month per Array
pre-Release for Hatchery Management Reporting and quality control.
*Rearing
Metrics only need to be entered once a month, which is typically done by
Facilities at the end for the month
Validation
·
Summary reporting is monthly and will always default to the 1st
day of the month
o Data as of the ‘beginning’
of the given month, and NOT the first data entry input of the month
o Data as of the
last day for the given month
·
Entering Pounds Fed for multiple Feed Sizes during the month – must
be done in multiple entries
As an example, say you fed a
Container, twice during the month with different Feed Sizes.
The entry would look something like
this:
o First
Entry- 40 Pounds Fed, size 0
o Second Entry-
30 Pounds Fed, size 1
If you look at the example below, you will
see Raceway 7 has two separate entries (for different dates), for Feed
(Size/Cost), instead of a combined entry.
Note: The
example screenshot provided has Feed Conversion as blank for both Training
Examples because no WEIGHT Rearing Metrics were input for either example Container;
Otherwise, that would be calculated
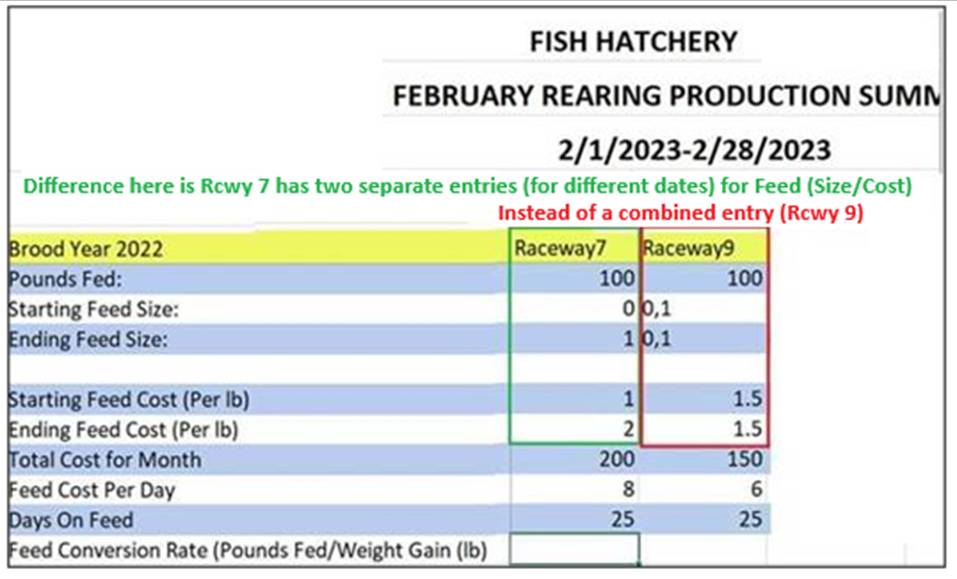
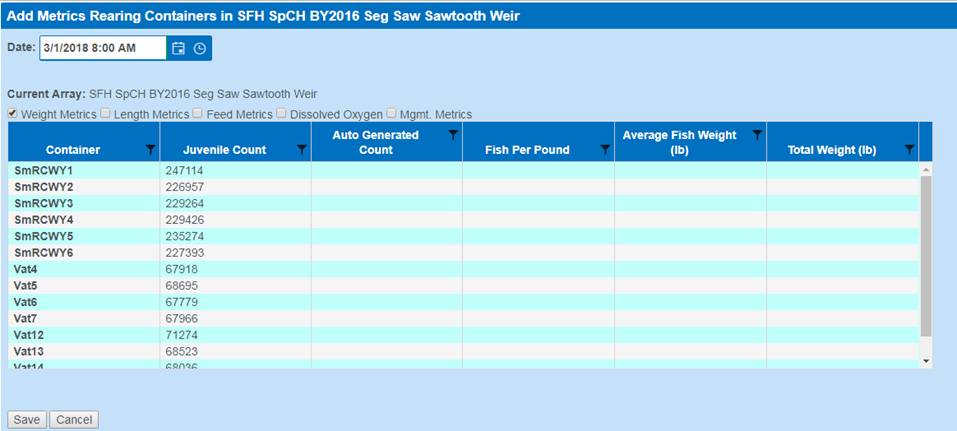
Above is an Example of the Rearing
Metrics Form, for all Containers in an Array
Use
Case
There are instances in which users will need to set
identical Rearing Metric values to multiple containers.
Examples include, but are not limited to the following:
·
Setting the same C-Factor value to multiple Containers
·
Setting the same Pounds Fed value to multiple Containers
·
Setting the same Feed Size value to multiple Containers
Instead of setting these values on each Container
individually, FINS allows users to select multiple Containers and set the same
value for these Containers, so that data can be entered efficiently
Business
Logic
When attempting to set Rearing Metrics to multiple
Containers:
·
Select a Rearing Container and enter the appropriate Rearing
Metrics for that Container

·
If you want to apply the same Rearing Metric value to other
Containers, select the Rearing Containers that you want to apply the value to
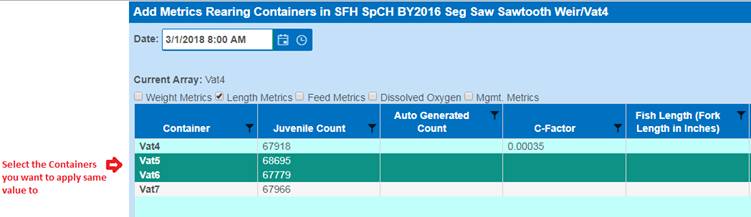
·
Once Containers are highlighted, to set the same value(s) to
other Containers, it is REQUIRED that you move your cursor to the
Container that has the value that you want to set for the other Containers to
Right Click on and then select [Set selected “metric” to “value”] from the
Context Menu
*NOTE: Cursor has to be on the actual value desired, as
highlighted below for the additional Containers selected to get the correct
value applied to them (See Below)
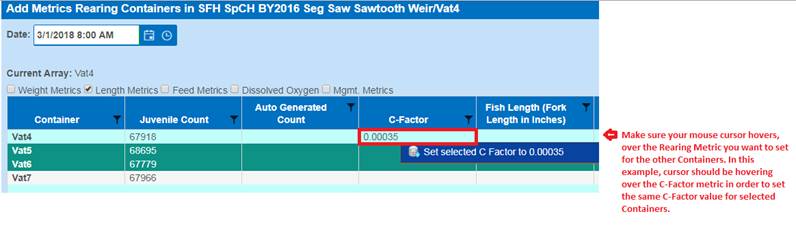
·
The following Rearing Metrics cannot be given the same values
since these values are unique and depend on the number of Juveniles that are in
a given Container:
o
Fish Per Pound
o
Average Fish Weight
o
Total Weight
Validation
·
Setting the same Fish Per Pound value for multiple Rearing
Containers is not permitted
·
Setting the same Average Fish Weight for multiple Rearing
Containers is not permitted
·
Setting the same Total Weight for multiple Rearing Containers is
not permitted
·
Hovering over the Container that holds the Rearing Metric value
that you want to set for other highlighted Containers is required
Steps
1)
From within the Rearing Inventory grid, select the Array from the grid
that contains the Rearing Locations/Containers that Rearing Metrics will be
applied to
2)
Right click to gain access to the context menu and select [Set Rearing
Metrics for ‘Name of Array’]
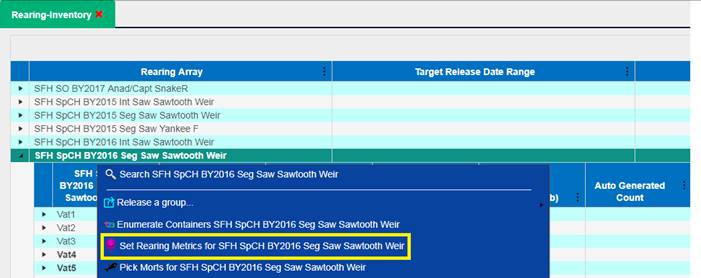
3)
Once in the Rearing Metrics form, select the Date that the Rearing
Metrics applied

4)
Select the first Container that you want to enter Rearing Metric(s) to
by clicking on the Container from within the Rearing Metric form grid
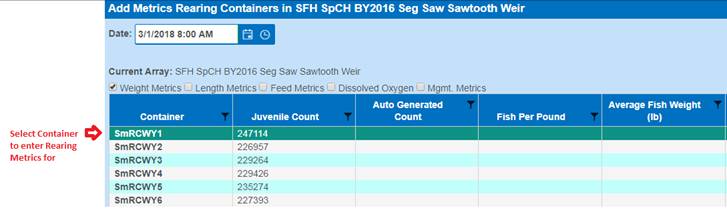
5)
Enter applicable Rearing Metrics that need to be recorded; Using the
Checkbox to Tab to different Metric Fields available for input
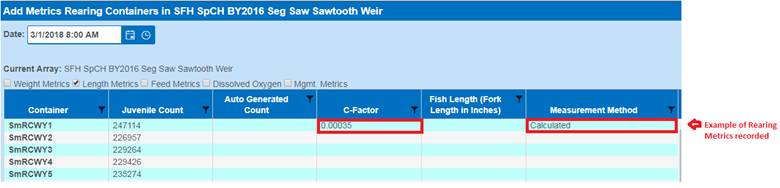
6)
To apply the same Rearing Metrics to Multiple Containers:
a. Select
the Containers by holding down the left cursor on your mouse and dragging the
cursor down until you have the desired Containers highlighted/selected
– or –
b. Hold
down the ‘Ctrl’ key and click on the desired Containers until they are each
highlighted/selected
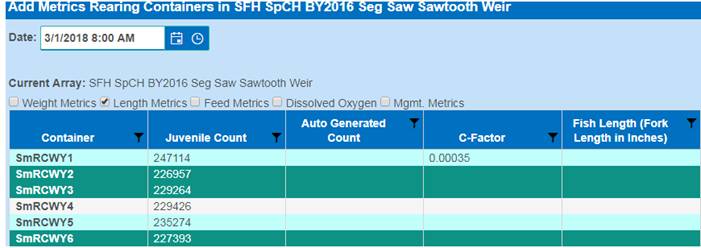
7)
Once all of the additional Containers are highlighted/selected, move
your cursor to the Container where the value that you want to set for all of
the other containers is and Right click on your mouse to open the Context Menu
8)
Select [Set selected ‘Rearing Metric’ to ‘Value’] as illustrated below
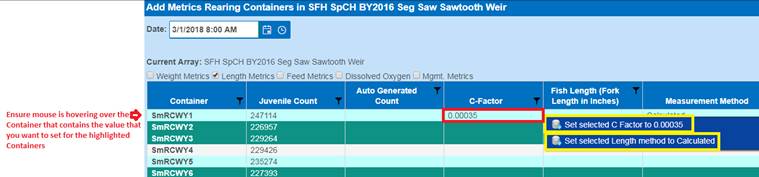
*NOTE: Cursor has to be on the actual value desired, as
highlighted below for the additional Containers selected to get the correct
value applied to them
9)
Once the applicable Rearing Metric has been set from the Context Menu,
that Rearing Metric value will be set for all the Containers that were
selected/highlighted; as shown below
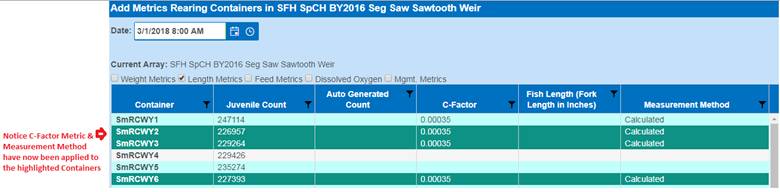
10) Click
‘Save’ to save the Rearing Metrics input as displayed in the Rearing Metric
form grid

Summary/Description:
The ‘Production Summary Export Options’ menu allows
users the ability to select what rearing metric information to include in the
output as well as the formatting of the Rearing Production Summary Excel file
download. Users can select the Date Range by Month, one or many Rearing Arrays,
different Rearing Inventory and Metric Input types and determine their
preferred Layout of the Excel spreadsheet for the selected Monthly Summary.
Use
Cases:
·
To view Facility in season
summarized rearing data inventory and associated rearing container metrics by
Month per Array pre-Release for Hatchery Management Reporting
·
To view Facility post season
summarized rearing data inventory and associated rearing container metrics by
Month per Array pre-Release for Management quality control
Validation:
·
Selecting a ‘Start Date’ Month is required. ‘Start Date’ will
always default to 1st day of the current Month selected
a.
Summary provides data as of the beginning of the given month, and
NOT the first data entry input of the month
b.
FPP for example is what you are starting the month with per the
last month’s ending FPP. *The last input before this month or the first
input of the month if no prior month has this input.
·
Selecting an ‘End Date’ Month is required. ‘End Date’ will always
default to the last day of the current Month selected
a.
Summary provides data as of the last day for the given month
·
Selecting at least one ‘Array’ is required. If no Arrays are
selected an error will display that reads ‘No Arrays selected’, preventing an
Export
·
Selecting an option from the ‘Field Options’ menu is required
·
‘Layout’ selection is required. If no option is selected,
‘Layout’ will default to ‘Containers Horizontal’
·
‘Export’ will succeed once all Export Options have been set:
§
Start Date – Defaults to current month
§
End Date – Defaults to current month
§
Arrays – Defaults as unselected or last selection
§
Field Options – Defaults to only Inventory
§
Layout – Defaults to ‘Containers Horizontal’ checked
Steps
7.
Select the ‘Start
Date’ MONTH for the First Month of Rearing Data that you would like
included
Validation:
‘Start Date’ is required, defaults to current Month or last selected and will
always start with 1st day of each Month selected (For Example:
March 1, even if it lands on a Sunday or Saturday)

8.
Select the ‘End Date’
MONTH for the Last Month of Rearing Data that you would like included
Validation: ‘End
Date’ is required, defaults to current Month or last selected and will always
end on the last day of the Month that is selected (For Example: The 31st
in March and the 30th in June…etc.)

9.
Select the Rearing ‘Array’
and/or Arrays that you want data to be exported for
Validation: One or many Arrays may be selected for output. Selecting an
Array is required. If no Array is checked a ‘No Array selected’ error will
display.
10.
Select the ‘Field
Options’ that need to be exported. Available options include:
Validation: Selecting at least one ‘Field Option’ is required and
defaults with ‘Inventory’ checked
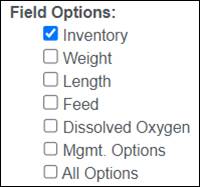
·
Inventory – Selecting will include Inventory Metrics (Starting/Ending
Inventory and Mortality Rate)
·
Weight – Selecting will include Weight Rearing Metrics (Start/End
Weight and Fish Per Pound)
·
Length – Selecting will include Length Rearing Metrics (Start/End
Length, Growth per Day and Condition Factor)
·
Feed – Selecting will include Feed Rearing Metrics (Pounds Fed,
Feed Size/Cost and Days on Feed)
·
Dissolved Oxygen – Selecting will include Dissolved O2 Rearing
Metrics (Parts per Million, Percent Saturation)
·
Mgmt. Options – Selecting will include Management Rearing Metrics
(Turnover, Density, Density Index, Flow Index, Temperature and Temperature
Units)
·
All Options – Selecting will include All available Inventory and Rearing
Metrics
11.
Select your preferred
‘Layout’ for the Summary export
Validation: Selecting a ‘Layout’ is required and defaults to ‘Containers
Horizontal’, which will display the Containers for an Array horizontally and
the Inventory/Metrics data vertically
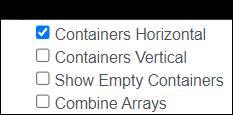
·
Containers Horizontal – Check to display Containers for Array horizontally
and the Inventory/Metrics data vertically

·
Containers Vertical – Check to display Containers for Array vertically and
the Inventory/Metrics data horizontally
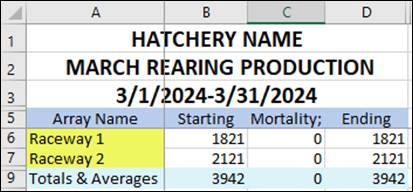
·
Show Empty Containers – Selecting, will include Rearing Containers that have no
data for the selected Date Range in the export. Defaults unselected –
preventing empty containers from being displayed in the download.
·
Combine Arrays – Selecting, will combine multiple Rearing Arrays, each
displayed with a different color, in each Monthly Sheet for viewing rather than
exporting each Rearing Array separately in their own Excel File download. Defaults
unselected.
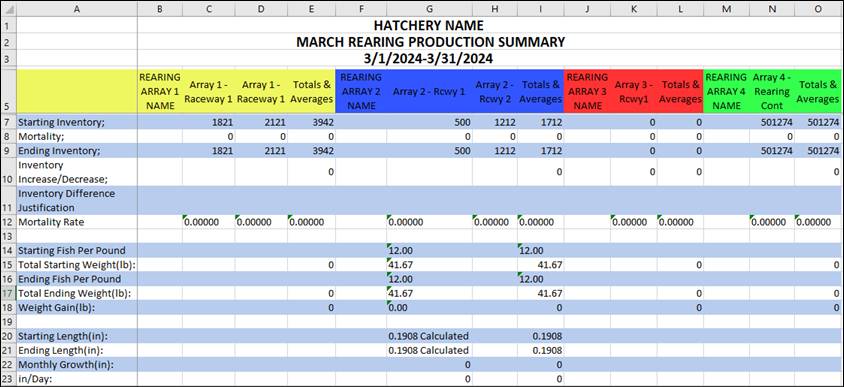
12.
Click on the ‘Export’
button to generate and download an Excel spreadsheet with the data per your
selections

Business Logic:
Depending on the options selected in the ‘Rearing
Production Summary Export Options’ menu, an Excel file will download with the
selected data as preferred. Below are a few examples of the multiple ways that
data can display in the Excel file depending on the ‘Field Options’ that
were checked.
·
Inventory – If Checked, ‘Inventory’ related information will be included in download to
Excel:
§ Starting Inventory
§ Mortality
§ Ending Inventory
§ Inventory Increase/Decrease
§ Inventory Difference Justification
§ Mortality Rate

·
Weight – If Checked, ‘Weight’ related information will be included in download to
Excel:
§ Starting Fish Per Pound - Based off the previous month’s ‘Ending’
Fish per (Weight) value that was entered in the ‘Fish per (Weight)’ Field for
the Rearing Container.
§ Total Starting Weight (lb)
§ Ending Fish Per Pound
§ Total Ending Weight (lb)
§ Weight Gain (lb)

*Note: Example above is displaying the Default Unit of
Measurement (Pounds). If you prefer to display a different Unit of Measurement,
this can be done in the ‘Set Display Options’ dialogue box located in the
‘Rearing-Inventory tab’ of FINS Online.
·
Length – If Checked, ‘Length’ related information will be included in download to
Excel:
§ Starting Length (in)
§ Ending Length (in)
§ Monthly Growth (in)
§ Inches/Day
§ Starting Condition Factor
§ Starting K Factor
§ Ending Condition Factor
§ Ending K Factor

*Note: Example above is displaying the Default Unit of
Measurement (Inches). If you prefer to display a different Unit of Measurement,
this can be done in the ‘Set Display Options’ dialogue box located in the
‘Rearing-Inventory tab’ of FINS Online.
·
Feed – If Checked, ‘Feed’ related information will be included in download to
Excel:
§ Pounds Fed
§ Starting Feed Size
§ Ending Feed Size
§ Starting Feed Cost (Per lb)
§ Ending Feed Cost (Per lb)
§ Total Cost for Month
§ Feed Cost Per Day
§ Days On Feed
§ Feed Conversion Rate (Pounds Fed/Weight
Gain) (lb)
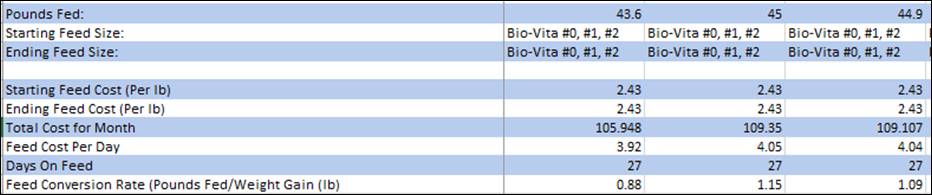
·
Dissolved Oxygen – If Checked, ‘Dissolved Oxygen’ related information will be
included in download to Excel:
§ Head (Max) Dissolved Oxygen PPM
§ Tail (Min) Dissolved Oxygen PPM
§ Average Dissolved Oxygen PPM
§ Head (Max) Dissolved Oxygen % Saturation
§ Tail (Min) Dissolved Oxygen % Saturation
§ Average Dissolved Oxygen % Saturation

·
Mgmt. Options – If Checked, Management Rearing Metrics
related information will be included in download to Excel:
§ Head (Max) Dissolved Oxygen PPM
§ Tail (Min) Dissolved Oxygen PPM
§ Average Dissolved Oxygen PPM
§ Head (Max) Dissolved Oxygen % Saturation
§ Tail (Min) Dissolved Oxygen % Saturation
§ Average Dissolved Oxygen % Saturation
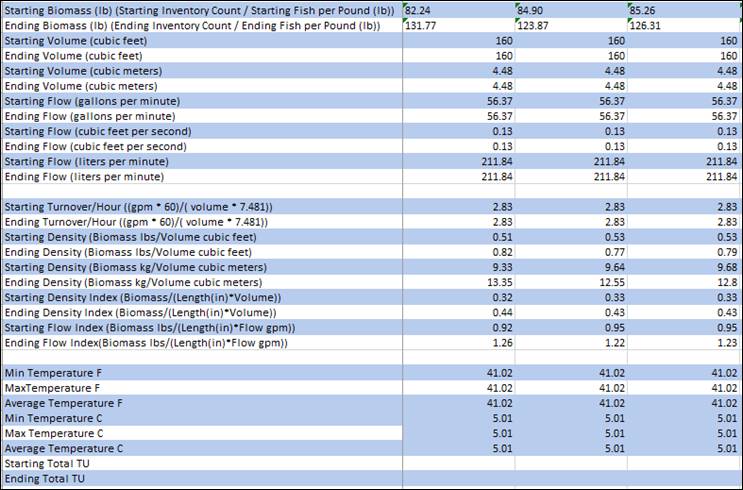
·
All Options- If Checked, all above
related rearing inventory and metric information will download to Excel:
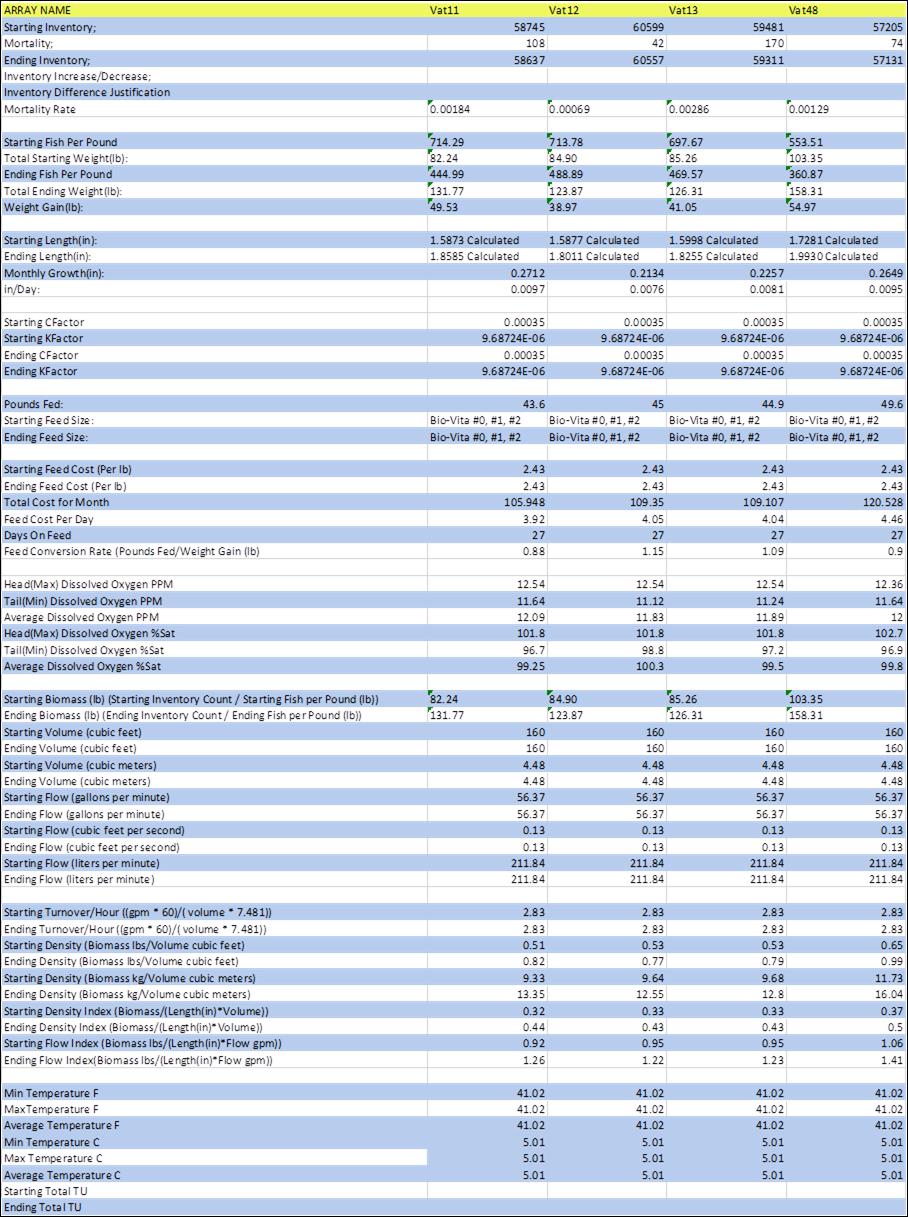
Summary/Description:
The
‘Rearing Production Summary Export File’ is derived from the ‘Rearing
Production Summary Export Options’ menu in FINS. Depending on the Dates,
Arrays, and Field Options that the user selects, a report is then created and
exported to Excel.
The
‘Rearing Production Summary Export File’ will display complete months ranging
from the 1st of the month to the end of the month. If multiple
months are selected, multiple sheets will be presented with each sheet
displaying a separate month. Just as if multiple Arrays are selected, multiple
files will be exported with each sheet displaying a different Array’s data.
The
‘Rearing Production Summary Export File’ can contain multiple months, with each
month being displayed in a different Excel sheet.
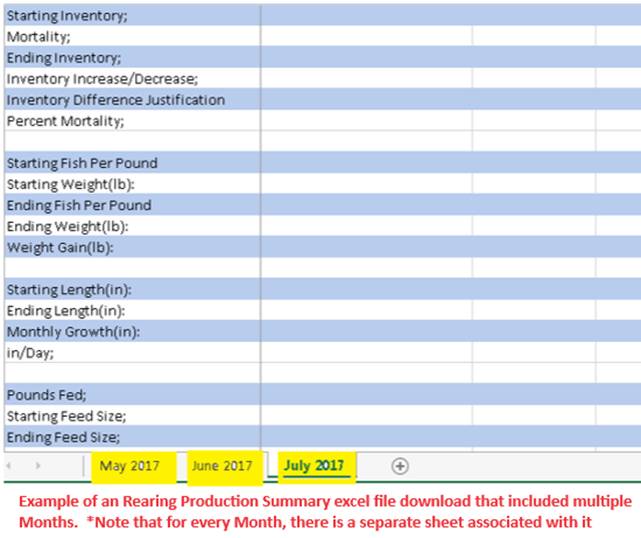
The
‘Rearing Production Summary Export File’ can contain multiple Arrays. For every
Array that you select, there will be a separate Excel FILE that downloads.
Business Logic
Inventory
Starting Inventory:
The
‘Starting Inventory’ number is based on the 1st Enumeration for the month(s) set for the sheet(s), as selected on
Export via the Export Filter.

If an Enumeration is NOT performed during the month,
consider the following scenarios:
· If the Rearing Container is NOT enumerated
during the month and has had no Juveniles moved into it during that month, then
the ‘Ending Inventory’ from the previous month is used as the ‘Starting
Inventory’.
· If the Rearing Container is NOT enumerated during the
month and ‘Ending Inventory’ from previous month is 0, then the ‘Starting
Inventory’ will be blank.
· If during the given month, Juveniles are moved to
another container before 1st Enumeration, the ‘Starting Inventory’
number will be:
Formula:
‘Starting Inventory’ for current Month=
Previous month ‘Ending Inventory’ +- Juveniles Moved
Totals
& Averages > Starting Inventory: The end of the ‘Starting Inventory’ row
will display the total number of Juveniles for all Rearing Containers during
the given month.

Formula:
Total Starting Inventory =
Rearing_Container1+ Rearing_Container2+…+ Rearing_Container4
Mortality:
The
‘Mortality’ number is based off the Total Morts picked from the Rearing
Container during the month set for the sheet, as selected on Export via the
Export Filter.
· If there are 0 ‘Morts’ for the given
Month, the ‘Mortality’ value will be 0.
· This field cannot be blank.
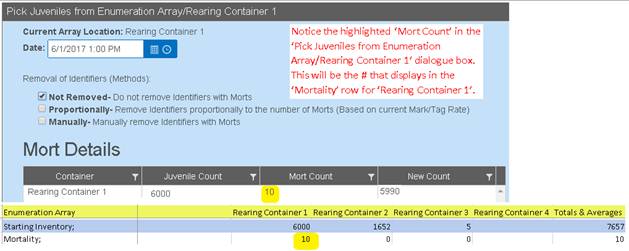
Totals
& Averages > Mortality: The end of the ‘Mortality’ row will display the
total number of Morts picked from all Rearing Containers from the 1st
of the month to the end of the month.

Formula:
Total Mortalities = Rearing_Container1+
Rearing_Container2+…+ Rearing_Container4
Ending Inventory:
The
‘Ending Inventory’ number is based off the number of Juveniles in the Rearing
Container at the end of the month set for the sheet, as selected on Export via
the Export Filter.
Formula:
Ending Inventory= Starting Inventory –
Mortality + Increase/-Decrease of Juveniles
If there are less than 2 Enumerations
during a given month, consider the following scenarios:
·
If there is only one
Enumeration during a given month, then the ‘Starting Inventory’ & ‘Ending
Inventory’ number will be the difference between the Morts picked.
·
If the Rearing
Container is emptied on or before the end of the month and no new Juveniles are
put in, then the ‘Ending Inventory’ will display as 0.
·
If the Rearing
Container is not enumerated during the current month, and there is no ‘Ending
Inventory’ from previous month, then the ‘Ending Inventory’ for current month
will be blank.
Totals
& Averages > Ending Inventory: The end of the ‘Ending Inventory’ row
will display the total number of Juveniles remaining at the end of the month
for all Rearing Containers.

Formula:
Total Ending Inventory =
Rearing_Container1+ Rearing_Container2+…+ Rearing_Container4
Inventory Increase / Decrease:
The
‘Inventory Increase/Decrease’ number is calculated by subtracting the ‘Starting
Inventory’ from the ‘Ending Inventory’ & ‘Mortality’ number.
Formula:
Inventory Increase/Decrease = Ending
Inventory + Mortality – Starting Inventory
The
number in the Inventory Increase/Decrease Row for each container will give you
the number of Juveniles that were moved in or out of the Rearing Container in
addition to any Mort’s that were picked for the given month:
·
If the value is
positive on a given container, then more Juveniles were moved in than moved out
for the given Month.
·
If the value is
negative on a given container, then more Juveniles were moved out that moved in
for the given Month.
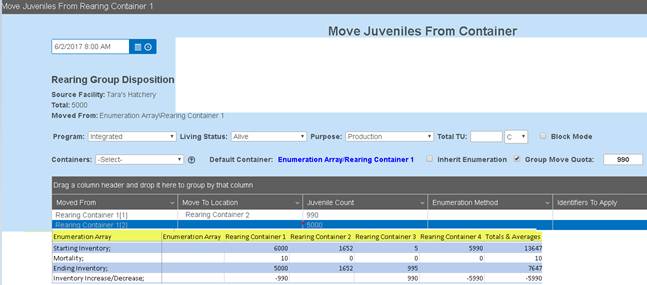
Inventory Increase/Decrease Justification:
Allows
a user to enter a reason for the adjustment of an Enumeration. There will be
times when as a user, you will want to edit the Enumeration of a container. The
reason will display in the Excel sheet in the ‘Inventory Difference
Justification’ row.
Mortality Rate:
Displays the Rate in which Mort’s have been taken from the
Inventory count of the Rearing Container, as a pure decimal value. To get the
value as a percentage simply use the following formula:
Formula:
Mortality Rate Percent= Mortality Rate
*100
Totals & Averages > Mortality Rate - The end of the
‘Mortality Rate’ row will display the Average Mortality Rate of Juveniles for
all Rearing Containers for that given month.
If no Juveniles have been moved out of the
container for the given month:
Formula:
Morts/(Ending Inventory + Morts)
If Juveniles have been moved out of the
container during the given month:
Formula:
Morts/Beginning Inventory
Weight
Starting Fish per (Weight):
Based off the previous month’s ‘Ending’ Fish per (Weight)
value that was entered in the ‘Fish per (Weight)’
Field for the Rearing Container.
Displays the number of Fish per set Measurement. i.e.
Starting Fish per Pound is the number of Fish per
Pound; The number of Fish that it takes to reach 1 pound.
· If no value was entered prior for ‘Fish
per (Weight)’, this field will be empty
Weight measurements available include:
· Pounds
· Ounces
· Grams
· Kilograms
Starting Weight (Weight Measurement):
Calculated by acquiring the ‘Starting Inventory’ and
dividing it by the ‘Starting Fish per (Weight
Measurement)’.
Formula:
Starting Weight = Starting
Inventory/Starting Fish per (Weight Measurement)
Totals
& Averages Starting Weight: The end of the ‘Starting Weight’ row displays
the Total Weight of all Rearing Containers at the end of the month(s) selected
on Export via the Export Filter.
Formula:
Total Starting Weight =
Rearing_Container1+ Rearing_Container2+…+ Rearing_Container4
Ending Fish per (Weight):
The
‘Ending Fish per (Weight)’ number is based off the number entered in the
Rearing Metrics dialogue set for the sheet, as selected on Export via the
Export Filter.
Ending
Fish per (Weight) displays the number of Fish per set Measurement. i.e. Ending
Fish per Pound is the number of Fish per Pound; The number of Fish that it
takes to reach 1 pound.
· If no value was entered prior for ‘Fish
per (Weight)’ field in the ‘Rearing Metrics per container’ dialogue box, this
field will be empty.
Weight measurements available include:
· Pounds
· Ounces
· Grams
· Kilograms
Ending Weight (Weight Measurement):
Calculated by acquiring the ‘Ending Inventory’ and dividing
it by the ‘Ending Fish per (Weight Measurement)’.
Formula:
Ending Weight = Ending Inventory/Ending
Fish per (Weight Measurement)
Totals & Averages Ending Weight: The end of the ‘Ending
Weight’ row displays the Total Weight of all Rearing Containers at the end of
the month(s) selected on Export via the Export Filter.
Formula:
Total Ending Weight = Rearing_Container1+
Rearing_Container2+…+ Rearing_Container4
Weight Gain (per Measurement):
The ‘Weight Gain’ number is based off the difference
between the ‘Starting Weight’ and the ‘Ending Weight’.
· If a ‘Starting Weight’ or ‘Ending Weight’
is not entered, the ‘Weight Gain’ field will be blank.
· If ‘Starting Weight’ is entered &
‘Ending Weight’ is not entered, the ‘Weight Gain’ will be 0.
· If Weight Gain is positive, then there was
a weight gain for the given Month.
· If Weight Gain is negative, then there was
a weight loss for the given Month.
Formula:
Weight Gain = Ending Weight – Starting
Weight
Length
Fish Length
can be determined either by manual Length inputs and/or using inputs from
Weight (1/Fish Per Pound) and Condition Factor (aka C-Factor and/or CFactor)
Length
determined by FPP and C-Factor:
When Length
is calculated in FINS using the Weight and Condition Factor inputs, the
following Formula applies: Formula: Length = (Weight/Condition Factor)^(1/3)
Length
determined by Length Inputs:
Starting Length:
The
‘Starting Length’ is based off the previous month’s ‘Ending Length’ value that
was entered in the ‘Fish Length’ field in the ‘Rearing Metrics per container’
dialogue box
·
If a ‘Fish Length’ value was not
entered, but a Weight and C-Factor were entered for a Container, FINS will
automatically calculate the Length based on the following formula:
§
Formula: L = (Weight/Condition
Factor)^(1/3)
·
If there is no data input (FPP and
CFactor) to calculate a ‘Fish Length’ value or ‘0’ was entered as a value in
the ‘Fish Length’ field, the ‘Starting Length’ will be blank
§
If a ‘Fish Length’ value was not
entered for the previous month, then the ‘Starting Length’ value will be based
off the first entered value for the given month
Total
& Averages > Starting Length: The end of the ‘Starting Length’ row will
display the ‘Starting Length’ average of all the raceways available.
·
The formula used for this
calculation is:
Formula:
Average Starting Length = Vat1+Vat2+…+Vat4/Number of Vats that are NOT blank
Ending
Length:
The ‘Ending
Length’ is based off the last value that was entered in the ‘Fish Length’ field
in the ‘Rearing Metrics per container’ dialogue box.
·
If a ‘Fish Length’ value was not
entered, but a Weight and C-Factor were entered for a Container, FINS will
automatically calculate the Length based on the following formula:
§
Formula: L = (Weight/Condition
Factor)^(1/3)
·
If there is no data input (FPP and
CFactor) to calculate a ‘Fish Length’ value or ‘0’ was entered as a value in
the ‘Fish Length’ field, the ‘Ending Length’ will be blank
§
If a ‘Fish Length’ value was not
entered for the previous month, then the ‘Ending Length’ value will be based
off the first entered value for the given month
·
If a ‘Fish Length’ is only entered
once in the ‘Fish Length’ field for the Month, then the ‘Ending Length’ number
will be the same as the ‘Starting Length’ number
Total
& Averages > Ending Length: The end of the ‘Ending Length’ row will
display the ‘Ending Length’ average of all the raceways available.
·
The formula used for this
calculation is:
Formula: Average Ending Length =
Vat1+Vat2+…+Vat4/Number of Vats that are NOT blank
Monthly Growth:
The
‘Monthly Growth’ number is based off the difference between the ‘Ending Length’
& ‘Starting Length’.
· If the ‘Starting Length’ and ‘Ending
Length’ values are the same, the ‘Monthly Growth’ field will display as 0.
· If the ‘Starting Length’ value is greater
than the ‘Ending Length’ value, the ‘Monthly Growth’ value will be negative.
· If the ‘Starting Length’ value is less
than the ‘Ending Length’ value, the ‘Monthly Growth’ value will be positive.
· If there are no values in both ‘Starting
Length’ and ‘Ending Length’, the ‘Monthly Growth’ field will be blank.
Formula:
Monthly Growth= Ending Length – Starting
Length
Total & Averages > Monthly Growth: The end of the
‘Monthly Growth’ row will display the ‘Monthly Growth’ average of all the
raceways available.
Formula:
Average Monthly Growth=
Vat1_Growth+Vat2_Growth+…+Vat4_Growth/Number of Vats that are NOT blank
Length/Day:
The ‘Length/Day’ is based off the ‘Monthly Growth’ number
divided by the number of days in a month.
· If ‘Monthly Growth’ is empty on a specific
Rearing Container, then ‘Length/Day’ will be empty for that Rearing Container.
· If ‘Monthly Growth’ is 0 on a specific
Rearing Container, then ‘Length/Day’ will be 0 for that Rearing Container.
Formula
Average Length/Day= Monthly Growth / # of
days in Month
Total & Averages Length/Day: The end of the
‘Length/Day’ row will display the ‘Length/Day’ average of all the raceways
available.
Formula:
Average Length Day Growth=
Vat1_LD_Growth+Vat2_LD_Growth+…+Vat4_LD_Growth/Number of Vats that are NOT
empty
Weight Fed:
The ‘Weight Fed’ figure is based off the value that was
entered in the ‘Measurement Fed’ field.
· If no value was entered, this field will
be empty.
Starting Feed Size:
The ‘Starting Feed Size’ is based off the size of the food
that fish get fed.
Ending Feed Size:
The ‘Ending Feed Size’ is based off the size of the food
that fish were last fed for the given month.
Days on Feed
‘Days on
Feed’ is the number of days that fish were on feed for the given month. When entering ‘Days on Feed’:
·
As a Monthly Input –
Ensure
that the number of days entered does NOT exceed the number of days in the
selected month.
·
In the Current Month –
Ensure
that the number of days entered is NOT greater than the current date of the
month (i.e., Entering a value of 30 on January 10th).
·
Multiple Entries for a Month –
Ensure
that when making multiple entries for the same month, those entries do NOT sum
to a value greater than the number of days available in that month.
Use Case:
In instances where a Move was mistakenly made, or
bad data was input by error, Deleting the Move made within Rearing may need to
occur, to correct the data. To Delete a Move made within Rearing, the Deletion
must be made from the ‘Rearing Move’ Query.
Business Logic:
When a Delete occurs, the Juveniles will be moved
back to their original Container. Deleting a transaction from the ‘Rearing
Move’ Query will affect the ‘Rearing Enumeration’ Query in various ways
depending on which Container gets deleted.
Deleted
Moves - Rearing Enumeration Query Business Logic
Depending on
which Move gets Deleted, determines how the Deletion affects the Enumerations
in the ‘Rearing Enumeration’ Query that affect the original Moved To Container
(Vat38 in this example) ‘Current Inventory’ Count/Enumeration value –

If the ‘Moved
From’ Container deleted action represents the 1st Container moved in,
then:
·
Record gets deleted
from the ‘Rearing Enumeration’ Query.
·
New record gets added
to the ‘Rearing Enumeration’ Query.
·
In this case, there
will still be the same amount of records in the ‘Rearing Enumeration’ Query.
If the ‘Moved
From’ Container deleted action doesn’t represent the 1st Container
moved in, then:
·
NO records get deleted
from the ‘Rearing Enumeration’ Query.
·
New record gets added
to the ‘Rearing Enumeration’ Query.
·
In this case, there
will be 1 more record added to the ‘Rearing Enumeration’ Query and 0 records
are deleted.
If all ‘Moved
From’ Containers get deleted:
·
All records get deleted
from the ‘Rearing Enumeration’ Query since all moves have been deleted and all
Juveniles have been sent back to their original Containers.
Example
1)
The highlighted moves
of containers (Vat32, Vat33, Vat34) below were moved into container ‘Vat38’.
The ‘Rearing Move’ Query will display a total of 3 move transactions.
Move
records are selected/highlighted below - 
The
‘Rearing Enumeration’ Query will also have 3 transactions to account for each
Enumeration of the Move To Container (Vat 38) because combining containers
triggers an Auto Enumeration on the Destination Rearing Container, in this
instance (Vat 38). See below both the initial Enumeration (8/1-Machine) and
the subsequent Enumeration transactions due to moves into an already
Enumerated/Non-empty container (8/2-‘Auto Enumeration’ by FINS; 8/3-‘Auto
Enumeration’ by FINS).
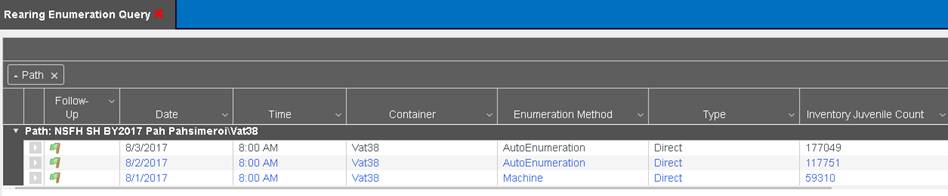
2)
Assume Vat32 of the
above Moves/Auto Enumerations into Vat38 was in error and needs to be deleted.
Steps
To Delete a Move:
1)
Open up the ‘Rearing
Move’ Query
2)
Select the Move you
want to Delete

3)
Right click to access
the context menu and click ‘Delete’
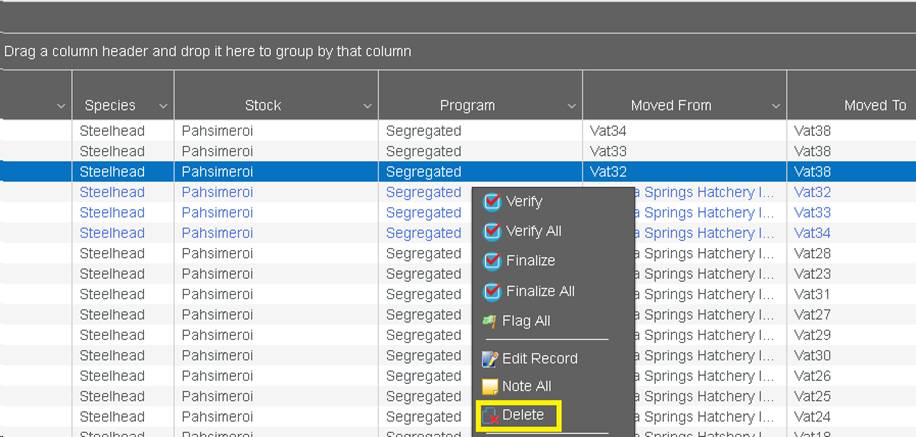
4)
A dialogue box will pop
up and ask you to confirm that you want to Delete the selected ‘Move’.
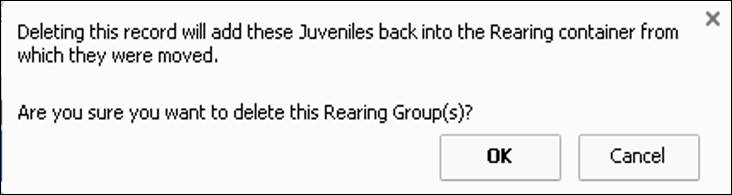
5)
If intended, select
‘OK’ and the Deleted Move of Juveniles will be moved back into the Rearing
Container from which they were moved out of (From Vat38 back into Vat32 in this
example).
Business Logic
Date
Calendar Control
Eggs/Juveniles
that are Released from an Incubation/Rearing location on a certain date, cannot
be Released with a date previous to the date entered when the Eggs/Juveniles
were last moved from Incubation/Rearing. (i.e. Eggs/Juveniles moved from
Incubation/Rearing on 2/1 at 8:00 am need to be Released after 2/1 at 8:01 am)
Count Method
Count method is
determined based off the actions performed in the Release Form.
Use Case
The ‘Count
Method’ column allows users to see what Enumeration Method was used for the
released Eggs/Juveniles.
Validation
There will be
instances when the ‘Count Method’ will show on some Releases as ‘Inherited’.
This is intentional since multiple containers with different enumeration
methods can be released together, in which the Enumeration Methods may vary by
container and would not display effectively in the Query.
If containers
are not enumerated at the time of Release, please reference the instructions
below under ‘Inherited’, to find out the enumeration method for each container.
Count
Methods include:
Inherited:
If
this method displays under the ‘Count Method’ column, no enumeration was
performed in the ‘Total Juveniles’ field located in the ‘Release Form’ for
Release. ‘Total Juveniles’ count was inherited from the enumeration performed
on the Incubation/ Rearing container(s).
·
Inherit Enumeration - is used when the Juvenile Count will
not be changed on the Move/No Enumeration is occurring
To
find the enumeration method used:
1)
Make sure the ‘Array/Hierarchy’
and ‘Moved From’ checkboxes are checked in the columns menu.
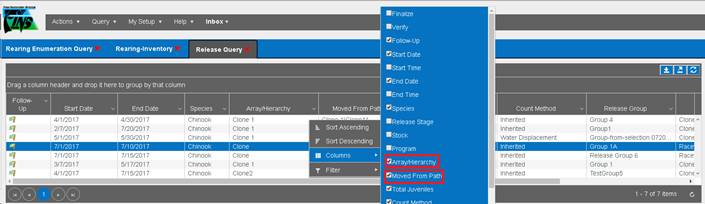
2)
Next, the ‘Array/Hierarchy’ and
‘Moved From’ columns will show the Array and Location that the Juveniles
originated from.

3)
Take note of the Location and then
go to either
a)
Query > New Query >
Incubation >Group Enumeration>Season
b)
Query > New Query > Rearing
>Enumerations>Season
The
user should know if they are dealing with an Incubation or Rearing release.
4)
For this example, option (b) will
be used.
5)
The ‘Rearing Enumeration Query’
will allow users to see the enumeration history of a Rearing Container. The
‘Path’ refers to the Array and location for that specific container. The ‘Path’
column in the ‘Rearing Enumeration Query’ follows the following format:
Array Name\Rearing Container
In the example below, Clone \Raceway A2 is the
container of interest.

6)
The ‘Enumeration Method’ used on
‘Raceway A2’ was the ‘Machine’ method. This is what the ‘Inherited’ enumeration
method is referring to in the ‘Release Query’ tab.
7)
Some containers may have multiple
enumerations. To find the enumeration method for a container associated with
the Release Group:
·
Go to the ‘Date’ column in the
‘Rearing Enumeration Query’ tab and view the date.
·
Refer back to the ‘Start Date’ of
the ‘Release Group’ in the ‘Release Query’ tab.
·
The row with the Enumeration
‘Date’ closest to the ‘Start Date’ for the ‘Release Group’ of interest will
show the enumeration method that was used.
Machine/Manual/Water
Displacement/Marking Trailer:
If any of
these methods are displayed under the ‘Count Method’ Column, then the ‘Total
Juveniles’ field was adjusted in the ‘Release Event’ form. Example below:
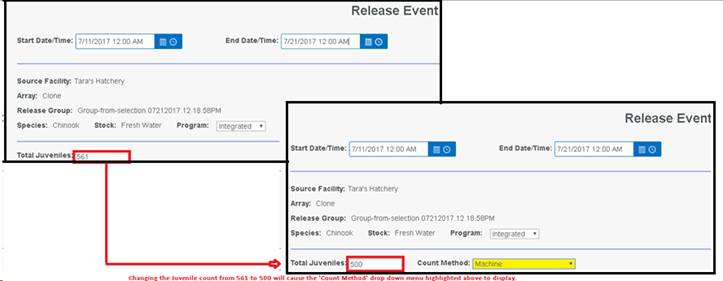
Depending on the
‘Count Method’ that was selected on this form, this is the method that will
appear in the ‘Count Method’ Column.
Use Case
This enhancement allows Agencies/Facilities to input a
separate Release Event for each Stock and then capture the unique Dates for
each Container within the Release Event rather than entering a different
Release Event for each Container by actual Release Date. Containers that
are part of a single Release Event can then be tracked in the Release Summary
by Dates specific to individual container for timing purposes (i.e.… estimating
the juvenile travel timing to Lower Granite Dam) *Specifically this is a known
IDFG Use Case
Business Logic
- Container
Note is a default hidden column labeled ‘Container Note’ accessible via
the Release Event form grid context menu
- Container
Note default displays in the Release Summary as ‘blank’ if not ‘Edited’ on
Release
- When Edited
on or post Release, the Container Note will display in the Release Summary
as input
- If an
individual containers actual Release Date is different, then the span of
the Release Event date range, the Release Event Data Entry user can input
a Date or Date Range for the actual release date of an individual
container (accommodating the existing known use case: for IDFG to capture
individual Release Dates for each Container that is included in the
Release Event, instead of making individual Releases for each Container
with their associated actual Release Date)
Below is an example of what the Release Form will look like
if a Data Entry User chooses to ‘Show’ the New Default Hidden Column ‘Container
Note’ in the Form and enters individual Release Date information for the
Containers included in the Release Event.
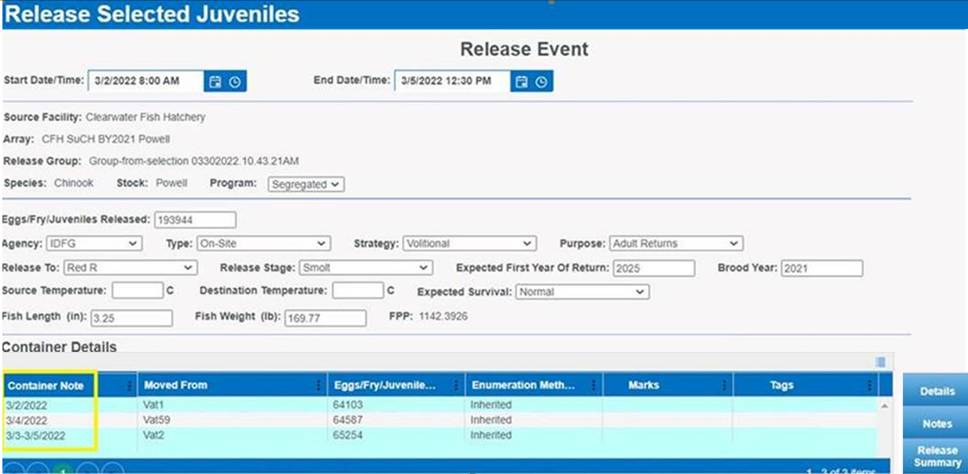
Here is an example of what the actual input screen displays
on open – for the Data Entry user to ‘Edit’ the Default Release Event Start/End
Dates with individual/actual Release Dates that differ from but fall within the
Release Event Date Range.
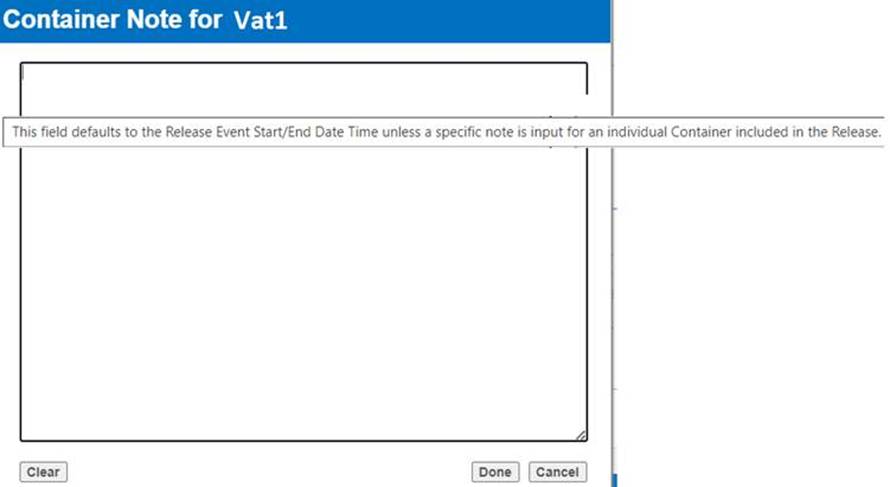
Here is an example of my custom data input (overwriting the
default note) for Vat1
*If the Container Note is not ‘Edited’ then it will be
‘Empty’ in the Release Summary (indicating that it is exactly what the Release
Event Start/End Date indicates and not different per individual container)
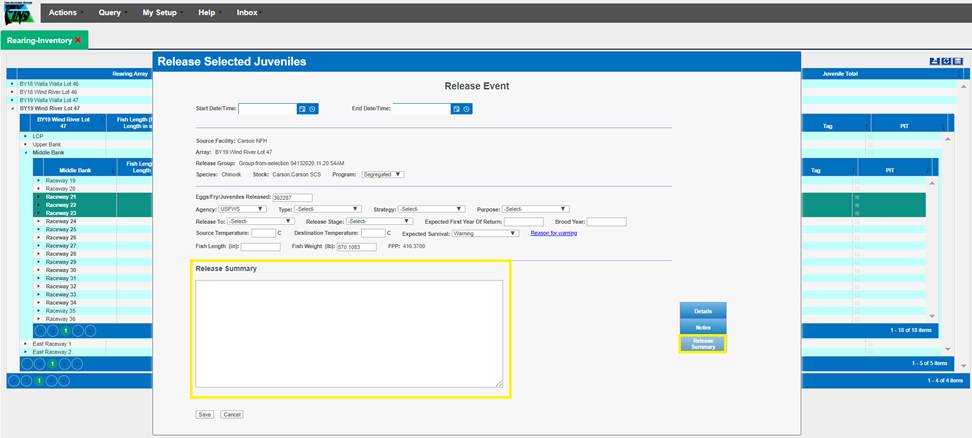
Use Case
The Release Summary tab in the Release Event form provides the
ability to capture additional information about a Release Event and/or about
the Eggs/Fry/Juveniles Released. Up to 4 MB of additional data can be entered
and associated with a Release Event.
For example, Agency Annual Operations Plan (AOP) details
related to the Brood Year, or other Hatchery specific Release information
considered important to the Release Event to be stored, backed up and available
for future querying capability. The data entered in the Release Summary tab is
available for Query from the FINS Online Release Query and/or the FINSNet.org
Data tab Query Tool by Release Event.
1.
Click
on the Release Summary tab from within the Release Event form
2.
Type
and/or Copy-Paste up to 4 MB data directly into the Release Summary window
within the Release Event form
3.
Confirm
all data input is accurate and Click Save on Release Event form to Save Release
with associated Release Summary data
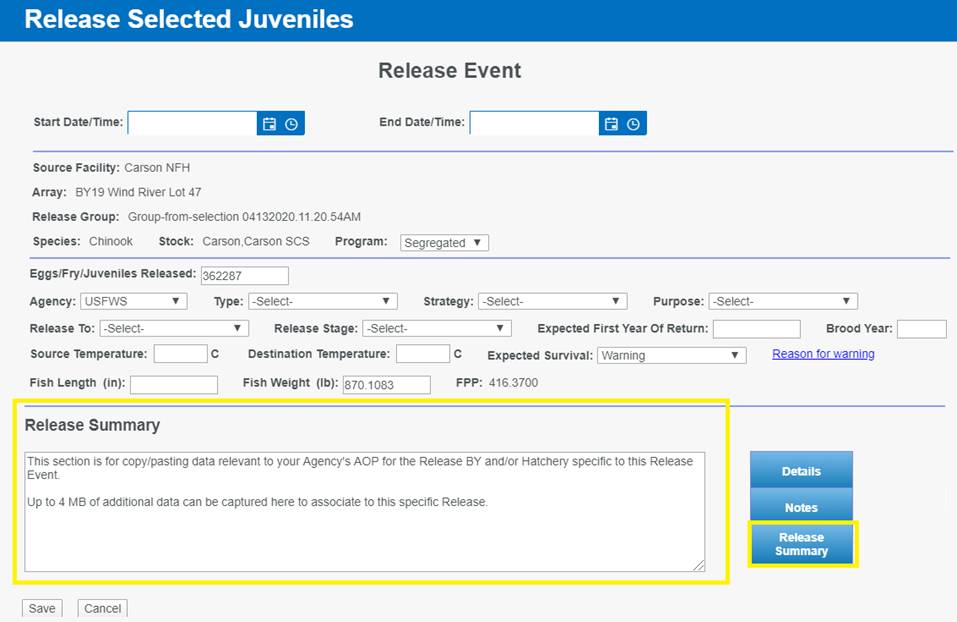
View Release Summary
data – in FINS Online
FINS Online > Release Query
Data input in the Release Summary
tab is displayed in the FINS Online Release Query via a context menu.
To view the Release Summary data
from FINS Online Release Query, follow the steps below:
a) For Releases made from Incubation and/or Egg Inbox
1.
Go
to Query > Release> ‘Egg/Fry’ and select relevant Query Season.

2.
Right
click on a single Egg/Fry Release to view the specific Release Summary data
associated to it.
3.
Select
‘Show Release Summary’ from the context menu.
a. This will
open the Release Summary data entered at Release in a pop-up window for
display.
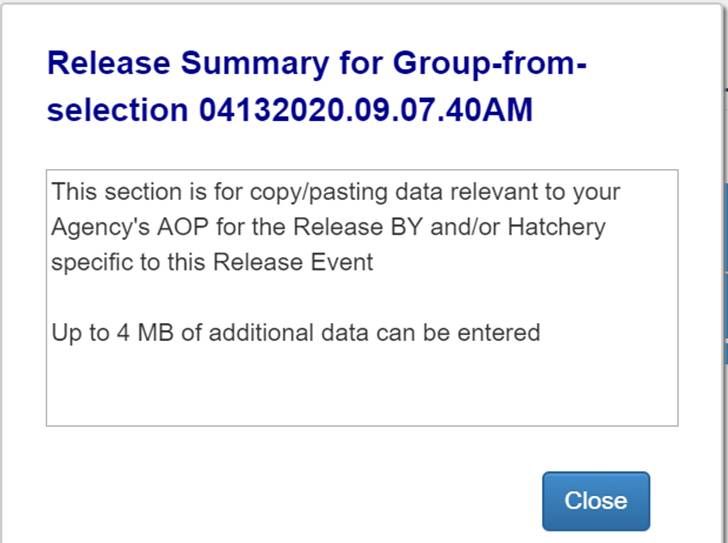
b. If there
is no Release Summary data to display, because there was no data input on the
Egg/Fry Release, the pop up will display with text ‘(No Summary Available)’.

4.
Clicking
‘Close’ will close the Release Summary display pop up.
b) For Releases made from Rearing
and/or Juvenile Inbox
1.
Go
to Query > Release > ‘Juveniles’ and click on relevant Season.
2.
Summary
for, right click and select ‘Show Release Summary’.

3.
Right
click on a single Juvenile Release to view the specific Release Summary data
associated to it
4.
Select
‘Show Release Summary’ from the context menu
a. This will
open the Release Summary data entered at Release in a pop-up window for
display.
b. If there
is no Release Summary data to display, because there was no data input on the
Juvenile Release, the pop up will display with text ‘(No Summary Available)’

5.
Clicking
‘Close’ will close the Release Summary display pop up.
FINSNet.org Data tab > Query Tool > Release
Query
Data input in the Release Summary tab is also displayed in the
FINSNet.org Data tab Query Tool Release Query in the ‘Release Summary’ Column.
Click here to view
the Release Summary data from the FINSNet.org Data tab Query Tool Release Query
1) From the
Release Query, select the Release(s) that you want to delete.
a. To select
multiple releases, hold down on the ‘Ctrl’ key and select the releases to
delete.
2)
Right
click on your mouse to access the Context Menu and select ‘Delete Selected’ as
shown below.
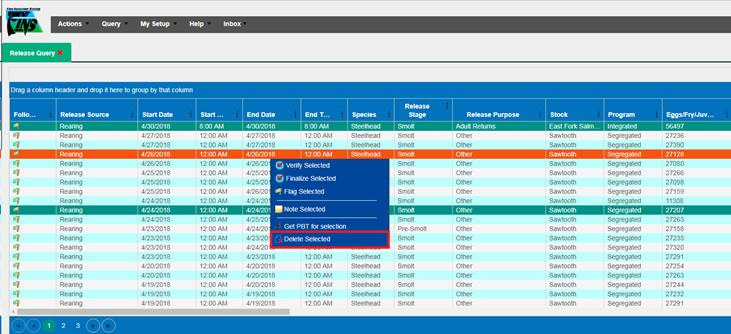
3)
Clicking
the ‘Delete Selected’ option will present the user with the message shown
below.
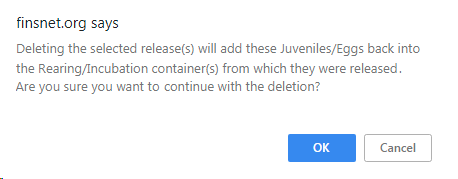
Click ‘OK’ to delete the selected releases or ‘Cancel’ to go
back.
Use
Case:
The Shed Rate Feature gives users the ability to enter the
CWT Shed Rate to account for Juveniles that shed CWTs in Rearing, post the
Marking Trailer event. Users can enter their Shed Rate Data at Rearing, at
Release, or Post Release.
Business
Logic/Validation
Creating a Shed Rate Workflow
- Creating a Shed Rate Workflow is required prior to
entering a Shed Rate in FINS.
o Only
Facility Administrators/Data Officials can create a Shed Rate Workflow.
- Creating a Shed Rate Workflow can only be done from
the Admin tab.
- Creating a Shed Rate can be created for:
o Rearing
o Release
o Post
Release- A Shed Rate can only be entered for the Juveniles part of the Release
Group. If there is a specific Container that you need to apply a Shed Rate to
and that Container is part of a group of other Containers that make that
Release Group, then you will be unable to enter a Shed Rate at the individual
Container level.
- Shed Rate Workflow can be created by:
o Species-
Can be applied to a specific Species or to all Species.
o Array-
Can be applied to one specific Array or to all Arrays.
o If
multiple Shed Rate Workflows are created, the more detailed Workflow will take
precedence over the less detailed Workflow. In the example below, the Workflow
highlighted in Green will take precedence over the more generic Workflow since
the Workflow highlighted in green is specific to a Species and an Array. In the
example below, when a User applies a Shed Rate, the CWT count applied to the
Rearing Array will not be affected since the user elected to NOT Apply a Shed
Rate on Save.

- The Shed Rate Workflow will appear in the Shed Rate
Container Workflow Grid if saved successfully.
- Apply Shed Rate on Dialog Save-
o Checking
the checkbox will ensure that the CWT count is adjusted based off the Shed Rate
applied to a Container within a Rearing Array.
o Check
the checkbox if Shed Rate is being applied in real time and if you want the CWT
count to be adjusted based off the Shed Rate entered on a Rearing Container or
At Release/Post Release.
o Leave
the checkbox unchecked if you don’t want to apply the Shed Rate to existing CWT
count on a Container or Release. If a Shed Rate gets applied, the Shed Rate
will NOT impact existing CWT count (i.e. when applying a Shed Rate to
historical data).
Entering a Shed Rate
- Users can enter a Shed Rate from the following
locations:
o Rearing
Inventory
o Release
Form
o Release
Query (Post Release)
§ If
entering a Shed Rate on historical data post Release, users can enter Shed Rate
from Release Query.
- The ‘Apply a shed rate to selected containers’
option will be grayed out and disabled if:
o A
Shed Rate Workflow has not been created for:
§ Rearing-
If attempting to apply Shed Rate from Rearing Inventory.
·
User will be required to create a Workflow.
§ Release-
If attempting to apply Shed Rate from the Release Form.
·
User will be required to create a Workflow.
§ Post
Release- If attempting to apply Shed Rate from Release Query.
·
User will be required to create a Workflow.
o A
Shed Rate has already been entered for selected Rearing Container(s).
o The
Rearing Container(s) selected contain Juveniles that were applied a Shed Rate
in a previous Rearing Container.
o The
Rearing Container(s) selected have not been applied CWT’s.
§ Apply
CWT’s prior to entering a Shed Rate.
Shed Rate Form
o Required
field
o Enter
the Date the Sample took place
o Entering
a Sample Size is required.
o Enter
the number of Juveniles within the Container that were sampled.
o Entering
the percent of Juveniles that Shed a CWT is required if Retention Rate is
manually entered.
o If
Retention Rate is manually entered, Shed Rate will automatically populate based
off the following formula: 100-Retention Rate % = Shed Rate %.
o Entering
the percent of Juveniles that did NOT shed a CWT is required if Shed Rate is
manually entered.
o If
Shed Rate is manually entered, Retention Rate will automatically populate based
off the following formula: 100-Shed Rate % = Retention Rate %.
o Sample
Retention refers to the number of Juveniles that retained their CWTs
o Entering
the Sample Retention is required if Shed Rate and Retention Rate are NOT
manually entered.
o If
Sample Retention is not manually entered, it will be calculated based off the
following formula: Sample Size* Retention Rate % = Sample Retention.
o Selecting
sample type is required.
o Physically
Sampled- If a Container was physically sampled, mark the selected container as
‘Sampled’
§ The
record will be marked in black if selected type is ‘Sampled’.
o Derived-
If the Container selected was not physically sampled and the rate applied was
based off a Physically Sampled Container, mark the selected container as
‘Derived’.
§ The
record will be marked in green if selected type is ‘Derived’.
o FINS
will display the Container(s) that will be receiving a Shed Rate.
o FINS
will present the Original CWT Total applied at Marking, prior to Shed Rate
being applied.
o FINS
will present the Adjusted CWT Total after Shed Rate is applied to Juveniles in
selected Container(s).
o FINS
will display the Original Mark/Tag Rate applied at Marking Event for Juveniles
for Container(s) selected.
o FINS
will display the newly Adjusted Mark/Tag Rate based off the Shed Rate
percentage entered.
- Selections WILL/ WILL NOT be applied on save
o If
Apply Shed Rate on Dialogue Save was checked from the Admin tab when creating
the Shed Rate Workflow, FINS will notify user that the Shed Rate entered will
be applied on Save and CWT counts and Mark/Tag Rates will be adjusted
accordingly.
o If
Apply Shed Rate on Dialogue Save was not checked from the Admin tab when
creating the Shed Rate Workflow, FINS will notify user that the Shed Rate
entered will NOT apply and will not automatically adjust
CWT counts and Mark/Tag Rates. However, the entry will be recorded in FINS and
will display in Shed Rate Query.
o User
is required to click Save in order to save the Shed Rate entered within the
Shed Rate form.
o Save
button will be grayed out if a required field has not been entered.
o Users
can hover over the ‘Save’ button to check what field is required before user
can save the Shed Rate entered.
o Editing
the Identifier Count will remove any shed rate applied to the Containers whose
Identifier Counts are being edited and will require users to re-enter a shed
rate.
o Users
can delete a shed rate by highlighting the container where the shed rate was
applied, hovering over Identifiers and selecting ‘Delete shed rate created by
…’.

Steps
*The following steps assume that a Shed Rate Workflow has
already been created. For help on how to create a Shed Rate Workflow, please
contact FINS by calling us or emailing at support@finsnet.org . The
following steps also assume that the Containers selected have CWT Identifiers
that have been applied and that a Shed Rate has not been entered.
From Release Form:
1.
After Release Form information is entered, select the Container(s)
within the Release Grid that you wish to apply a shed rate to, right click and
select ‘Apply a shed rate to the selected containers’.
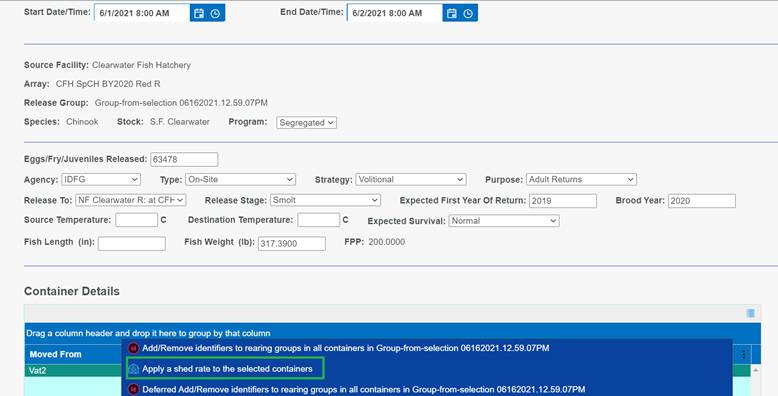
2.
From within the Shed/Retention Rate form, enter the:
·
Sample Date
·
Sample Size
·
Shed Rate
·
Retention Rate
·
Sample Retention
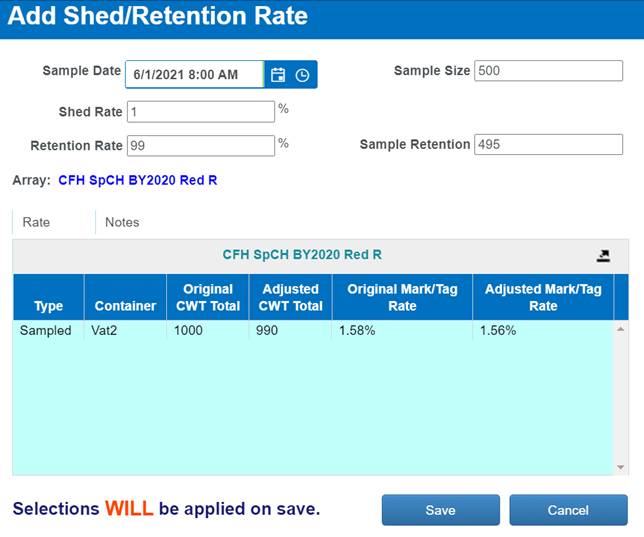
3.
From within the Grid, indicate which containers were sampled and which
ones were derived by right clicking on the Container and then selecting:
·
‘Mark selection as derived’ if shed rate was derived from a
Sampled Container, or
·
Selecting ‘Mark selection as physically sampled’ if shed rate was
applied based off sampled container.
·
Click on Export button to export data to Excel. Users can compare
this paper copy data to Non- Fins records.
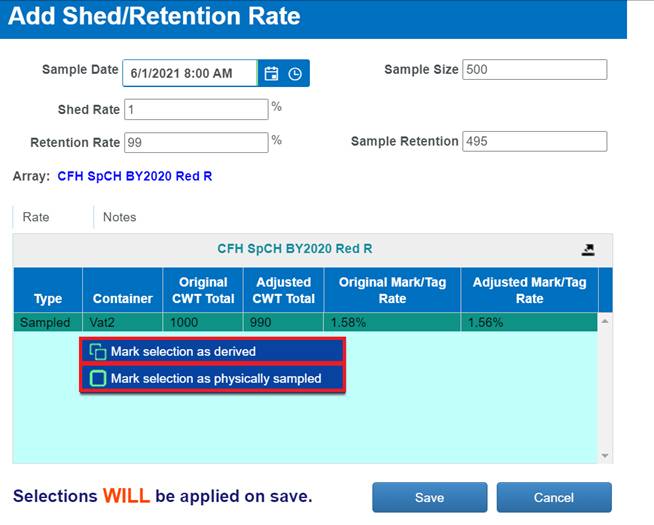
·
Click on the Notes Tab if you wish to add optional Notes.
4.
Click ‘Save’ to Save the Shed Rate applied.
All FINS facilities have an Inbox that is auto-generated
by the system at the time the Facility is created in the database. The purpose
of an Inbox is so that a FINS Facility can account for Fish and or Egg
inventory that was transferred to them from another FINS Facility. If your Facility
receives fish and eggs, your Inbox will have two components. The fish you have
been sent will be displayed first, and in a separate grid below your fish, you
will see eggs that have been sent to you.
If you have received items into your Inbox, you will see a
green button as shown below:
If you do not receive fish or egg transfers from other
FINS facilities, you will not see your inbox highlighted.
*If you see the Inbox button highlighted, you need to
manage a Transfer of Inventory that has been Transferred to your Facility.
The Fish Inbox Grid has two layers; Collapsed and
Expanded.
·
From the Collapsed view you will see:
o
Inbox Locations: The name of your Inbox
o
Current Count: The total number of Fish in your Inbox
o
Sex: The Sex of the Fish in your Inbox
o
Species: The Species of the Fish in your Inbox
o Count
Correction ICON/BUTTON: This option is available if you need to adjust the
Current Count of Fish in your Inbox for Receipt
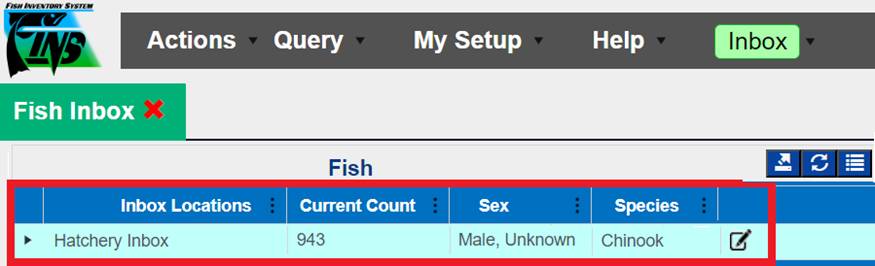
·
From the Expanded view you will see:
o
Source Facility: The name of the Facility that Transferred
fish to your Inbox
o
Species: The Species of fish in each Transfer
o
Sex: The Sex of fish in each Transfer
o
Count: The Count of fish in each Transfer
o Move
Fish ICON/BUTTON: Click this option to receive Transferred fish into your
inventory. Step by Step Instructions are provided for your reference below.
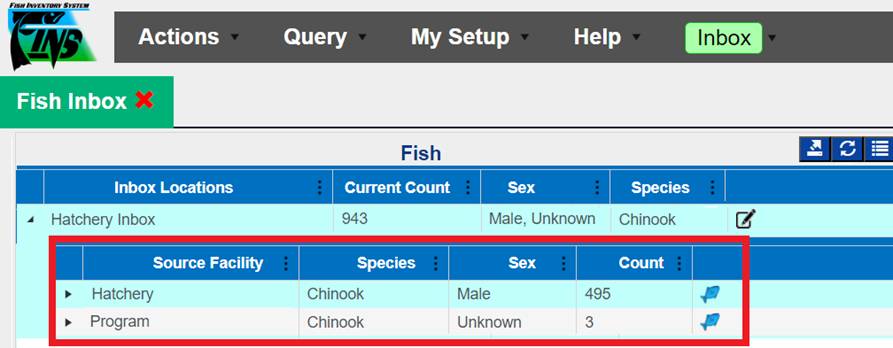
To ‘Receive’ fish into your Inventory, or move them from
your Inbox to another one of your locations:
1. Open
your Inbox by clicking on the green Inbox button. Select the ‘Fish’ option to
open your Adult Fish Inbox . For
Move Fish form instructions, click here.
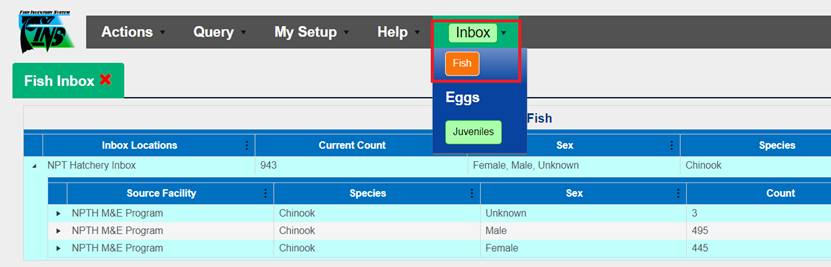
2.
If there is a discrepancy between the number of fish that
is displayed in your Inbox and the amount of fish you actually received you
will need to do a Count Correction by clicking on the Count Correction button  . For Count Correction
form instructions, click here.
. For Count Correction
form instructions, click here.
3.
From
within your Fish Inbox, select the Source Facility that you wish to move your
Fish from by clicking the triangle highlighted below. This will expand the
Source Facility and display Identifier Group Counts
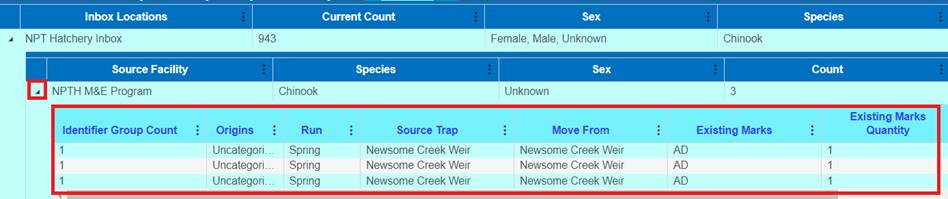
4. Select
the Fish that you wish to Move by right clicking and selecting the ‘Move Fish’
option. Moving Fish from the Identifier Group Level will ensure that the Fish
along with the associated Identifiers get automatically populated in the Move
Fish Form.
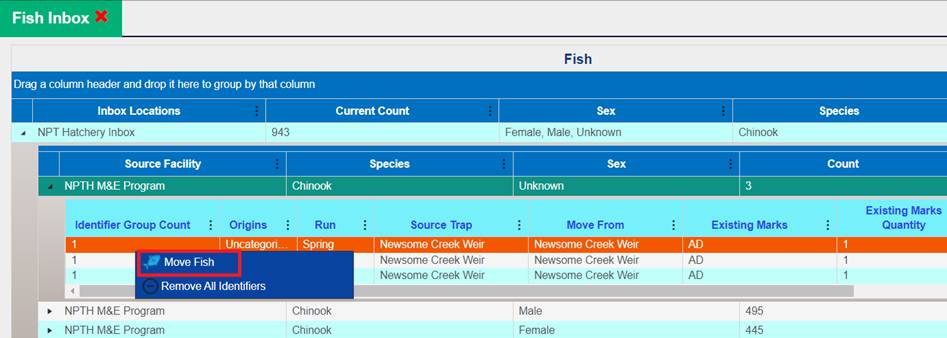
5. This
will open the Move Fish Form which will allow you to then move the Fish to the
destination location of your choice.

Steps
1.
From the Fish Inbox, open the Move Fish Form by clicking on
the Identifier Level of the grid, right click and select ‘Move Fish’
2.
The Move Fish form opens up and the AD and CWT Identifiers
display automatically (pre-filled for Receipt)
3.
Move the Total to Receive (example of 2 Fish being Received
into a Pond Below)
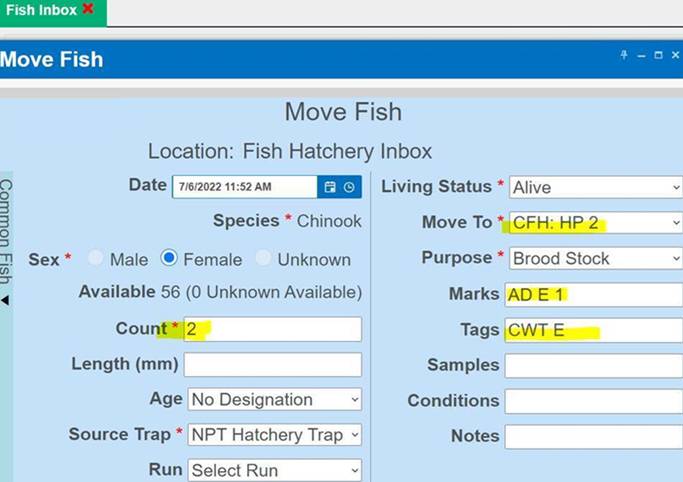
The Holding Pond received (moved) into will then display the
Fish and their respective Identifiers.
(Example below of 2 Female Fish
received (moved) their respective Identifiers in the destination Holding
Location (CFH: HP 2)
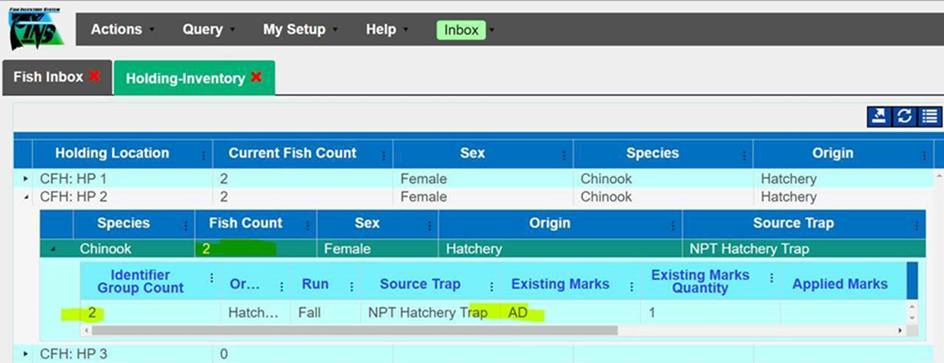
To ‘Receive’ fish into your
Inventory, or move them from your Inbox to another one of your locations:
6. Open
your Inbox by clicking on the green Inbox button. Right click or use the Move
Fish button  to open the Move Fish form.
 For Move Fish form instructions, click here.
7.
If there is a discrepancy between the amount of
fish that is displayed in your Inbox and the amount of fish you actually
received you will need to do a Count Correction by clicking on the Count
Correction button . For Count
Correction form instructions, click here.


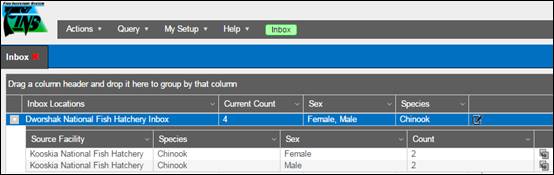
8. Once
you have moved fish from your Inbox to another one of your locations, those
records will display in the Receipt Query under Holding.
The Egg Inbox Grid has two layers; Collapsed and Expanded.
·
From the Collapsed view you will see:
o
Inbox Locations: The name of your Inbox
o
Estimated Egg Count: The total number of eggs in your
Inbox
o
Live Count Total: Number of Eggs in Inbox
o
Programs: The Program associated with Egg Groups that have
been Transferred to your Inbox
o
Species: The Species of the Egg Groups in your Inbox

·
From the Expanded view you will see:
o
Transfer Date: This field displays the Date entered into
the Move Egg form by the Sender
o
Transfer Time: This field displays the Time entered into
the Move Egg form by the Sender
o
Source Facility: This is a default field that displays the
Facility that Transferred the Eggs to an Inbox
o
Moved From Path (H): This is a default field that displays
the name of the Facility the Eggs were Moved From.
o
Transfer Container Name: This field displays the Transfer
Container Name entered into the Move Egg form by the Sender
o
Total Temperature Units (H): This field displays the TU’s
entered into the Move Egg form by the Sender
o
Species: This is a default field that displays the Species
of the Eggs in the Transfer
o
Stock: This is a default field that displays the Stock
assigned to Spawn Session the Eggs in this Transfer came from
o
Program: This field displays the Program entered into the
Move Egg form by the Sender
o
Stage: This field displays the Stage entered into the Move
Egg form by the Sender
o
Lot #: This is a default field that displays the Spawn Lot
# these Eggs came from
o
Cross/Group ID: This is a default field that displays the
database assigned Cross or Group ID of the Eggs in the Transfer
o
Female ID: This is a default field that displays the
Female ID assigned to the Female associated with the Eggs in the Transfer
o
Estimated Egg Count: This is a default field that displays
the Estimated Egg Count assigned to the Spawn Lot the Eggs in the Transfer came
from
o
Live Count: This is a default field displaying the most
current Viable count at the time these Eggs were Transferred
o
Egg Weight: This field displays the Egg Weight associated
with each Egg Group
o
Samples: This is a default field that displays the Samples
associated with the Female record of the Eggs in the Transfer

Business Logic
Date Calendar Control
Eggs/Juveniles that are
transferred from another Facility into an Inbox on a certain date, cannot be
moved from an Inbox to an Incubation/Rearing location with a date previous to
the date entered when the Eggs were Transferred into an Inbox. (i.e. Eggs Transferred
from Kooskia to Dworshak on 2/1 at 8:00 am need to be moved from Dworshak’s
Inbox after 2/1 at 8:01 am)
You can move one egg group or
multiple egg groups at a time.
1. To
move one egg group into Incubation, select the egg group, right click and
select ‘Receive Selected Eggs’ as shown below. You will see a (1), this shows
you the number of egg groups you are moving.
2. If
you want to move multiple Egg Groups, drag your cursor over the groups you want
to move, or hold down on your Ctrl button and manually select multiple groups;
then right click and select ‘Receive Selected Eggs’. You will see a (#), this
shows you the number of egg groups you are moving. *When moving multiple egg
groups at a time, all egg groups must be of the same Species, and Stage.
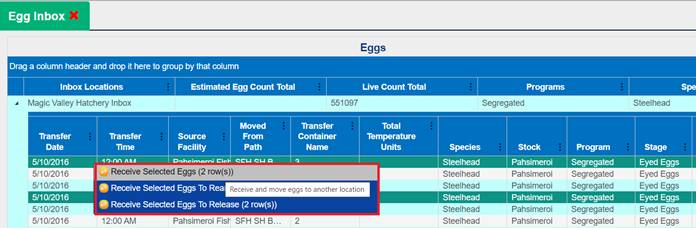
3. Once
you have selected ‘Receive Selected Eggs’, the Receive Eggs form will open.
Ensure that:
a. Stage
b. Living
Status
c. Purpose
d. Incubation
Container get selected.
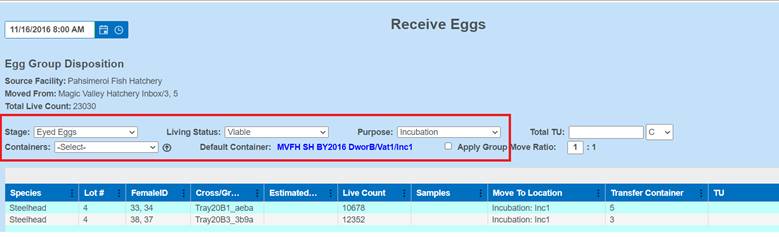
Click on ‘Save’ within the form so that eggs get
moved to their Incubation destination Container
·
Group Move form:
·
Date: Set
the Date for the date and time the Eggs were moved
Date
Calendar Control - Eggs/Juveniles
that are transferred from another Facility into an Inbox on a certain date,
cannot be moved from an Inbox to an Incubation/Rearing location with a date
previous to the date entered when the Eggs were Transferred into an Inbox.
(i.e. Eggs Transferred from Kooskia to Dworshak on 2/1 at 8:00 am need to be
moved from Dworshak’s Inbox after 2/1 at 8:01 am)
Egg Group Disposition:
·
Source Facility: This field defaults to the name of the
Facility that Spawned the Eggs. This field cannot be changed.
·
Moved From: This field defaults to the name of the
location the Eggs are being moved from. This field cannot be changed.
·
Stage: This field defaults to the current egg
stage
·
Living Status: Select the Living Status of the Eggs being
moved; Viable, Culled, Loss
·
Purpose: Select from the options, which are based on
the Living Status.
o
If you are moving these
Egg Groups to any location besides an Incubation container, the Move To
Location in the grid will default after the Purpose is selected. It will
default to the first location type for the intended disposition. Changes to the
default location will be done in the Move To Location column of the grid, see
below.
·
Total TU: An optional user defined field provided to
capture the Total Temperature Units applied to the Egg Group being Moved
(Shipped/Transferred). The temperature value can be entered in Celsius or
Fahrenheit by selecting the unit of measurement C or F, after entering the
Temperature value.
o
If you are doing a
Group Move from your Inbox, the Total TU’s applied by the sender will default
in the Group Move grid. If you want to change the Total TU’s, enter a new value
in the Total TU field and it will overwrite the default value of the sender.
·
Containers: The options in this dropdown field will be
based on the Living Status and the Purpose that you entered.
o
For Incubation: In the dropdown, select through the path
down to the container the first cross in this group move was placed in. This
will cause all of the Move To Location containers in the grid below to default
to that container. From here, changes will be made in the grid column, see
below.
·
Default Containers: Displays your Move To path.
·
Apply Group Move
Ratio: If you want to
apply the egg groups in the open Receive Egg form to Trays in a particular
ratio, check the box and enter the ratio in the blank field. The blank field
will be the number of egg groups that are placed in a single tray. When using
this option, set your container level at the height of one container (i.e.
Stack).
·
Grid:
o
Species: Displays the Species of the Egg Groups
being Moved
o
Lot #: Displays the Spawning Lot # that the Eggs
in this move were taken from
o
Female ID: Displays the Female ID associated with the
Egg Group
o
Immediate Container:
Displays the Immediate
Container associated with each Egg Group
o
Cross/Group ID: Displays the Cross ID associated with this
Egg Group
o
Egg Count: Displays the Live Count (if enumerated)
associated with each Egg Group
o
Egg Weight (H): Displays the Egg Weight associated with
each Egg Group (defaults as hidden)
o
Samples: Displays the Samples associated with each
Egg Group
o
Move To Location: Displays the location each Egg Group is
going to be Moved To. For Release, Transfer, Shipping, or Disposal Move To
locations, this field will default after the Purpose is selected. If the Move
To Location is going to be an Incubation container, the Move To Location filed
of all records will default after the ‘Containers’ field is selected. If the
Move To Location of the top record is changed in this field, all other records
in this group will change as well. If you want to change the Move To of other
Egg Groups, click in this field to select a new Move To Location. All Records
in a Group Move must be being moved to the same location type. For Example: If
tray one is being moved to Oxbow Inbox, all of the other trays in the Group
Move have to be moved to a transfer location, but it doesn’t have to be the
same transfer location.
·
Transfer Container: This field displays the Transfer Container
name associated with each Egg Group.
·
TU: This field will default to display the TU’s
that were on the egg group when sent your Inbox. If the TU’s are changed in the
Receive Egg form, this field will display the new value.
·
Notes Tab: A user defined field for capturing
information not otherwise captured in the form
*Click
Cancel to abandon the Group Move, or Click Save to Save the Group Move Egg
record. After a Group Move Egg record is saved, each cross that was moved will
display as a separate record in the Move Egg Query.
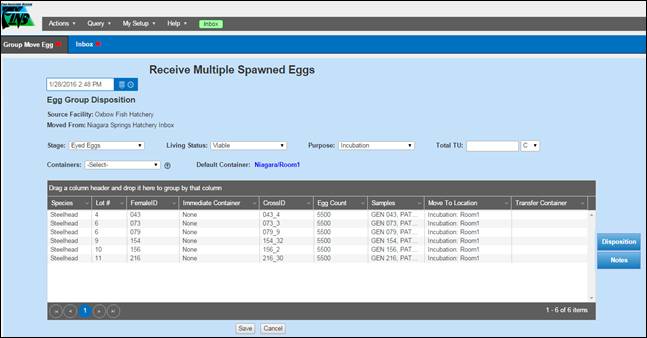
1)
From the Egg
Inbox, expand the Inbox Location that you will Release Eggs from by clicking on
the icon highlighted below.
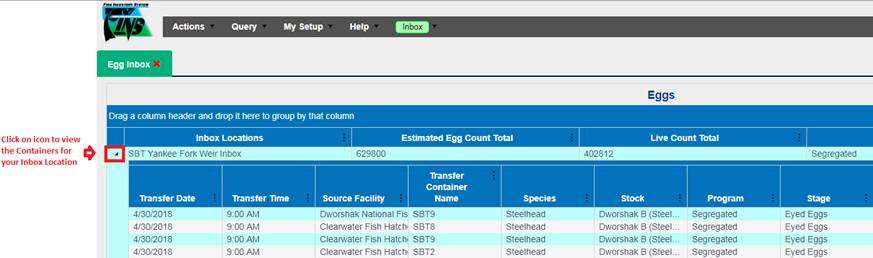
2) Select the Container(s) that you want
to Release Eggs from. Hold down on the ‘Ctrl’ key and click on the Containers
if you need to Release Eggs from more than one Container.
3) Right click to open up the Context
Menu and select ‘Receive Selected Eggs to Release…’

4) This will open up the Release Event
form. Enter the following information:
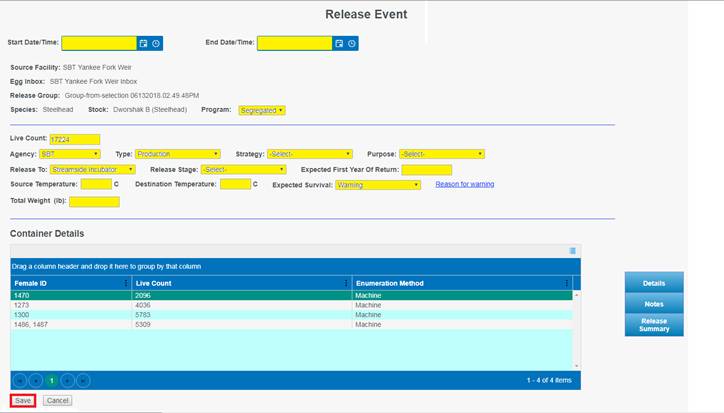
Fields highlighted in
Yellow or Red are required
a.
Select Start
Date/Time
b.
Select End
Date/Time
c.
Select Program
d.
Live Count (This
number generally remains the same, unless you re enumerated on Release)
e.
Select Agency
f.
Select Type (The drop-down menu populates with the Release Types created
in the Admin tab.)
g.
Select Strategy (The drop-down menu populates with the Release Strategies
created in the Admin tab.)
h.
Select Purpose
i.
Select Release To
Location
j.
Select Release
Stage
k.
Enter Expected
First Year of Return
l.
Enter Source
Temperature (Optional)
i. To change from Celsius to Fahrenheit,
click on the ‘C’ and change it to ‘F’
m.
Enter Destination
Temperature (Optional)
i. To change from Celsius to Fahrenheit,
click on the ‘C’ and change it to ‘F’
n.
Select Expected
Survival
i. If you select ‘Warning’, you are
required to indicate a reason as to why ‘Warning’ was selected.
o.
Enter Total
Weight
p.
Enter any
relevant notes in the ‘Notes’ tab
q.
Enter any
additional Release Summary Data in the ‘Release Summary’ tab
r.
Click ‘Save’
If inventory is Transferred from Facility A to Facility B
and Facility B are the ones that do the release, then FINS supports that
functionality and encourages that method of operation so that data input
matches the reality.
* An
example of an existing real-life use case would be Fall Chinook WDFW > Lyons
Ferry Fish Hatchery transfer to Nez Perce Tribe (NPT) for acclimation that NPT
then Releases in FINS
Doing this, FINS Release Queries/Summaries would show the
Juveniles as Released by/from Facility B (or in the real-life example, by NPT)
instead of Agency>Facility A (or in the real-life example, by WDFW >
Lyons Ferry Fish Hatchery).
Eggs/Fry from an Egg Inbox can be:
·
Received into Incubation Inventory
·
Transferred to another Facility
·
Shipped (to a non-Facility)
·
Received into Rearing Inventory – as Juveniles
·
Released – as Eggs/Fry
·
Moved into a Disposal Location as a Loss or Cull
Steps:
1. From
within the Egg Inbox, select the Rearing Groups that you wish to accept into
your Rearing Inventory
a. To
multi-select multiple Egg Groups at the same time, hold down on the ‘Ctrl’ key
and select each Egg Group you wish to Receive
2. Right
click and select ‘Receive Selected Eggs To Rearing (x row(s))’
a. The
number of Rearing Groups selected to Receive will be displayed in the Context
Menu as the number of ‘rows’ for your quick confirmation that the intended
number of Rearing Groups are being selected for Receipt
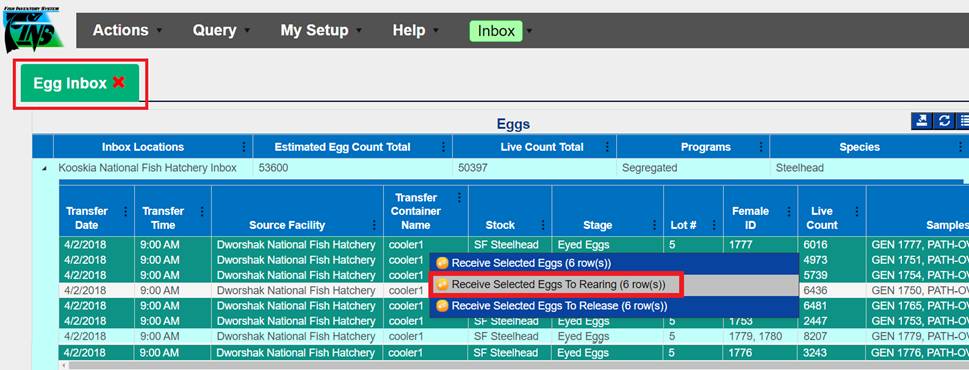
3. This
will open up the move form – allowing the move of selected Rearing Groups from
the Egg Inbox to Rearing Inventory in a Rearing Array Container
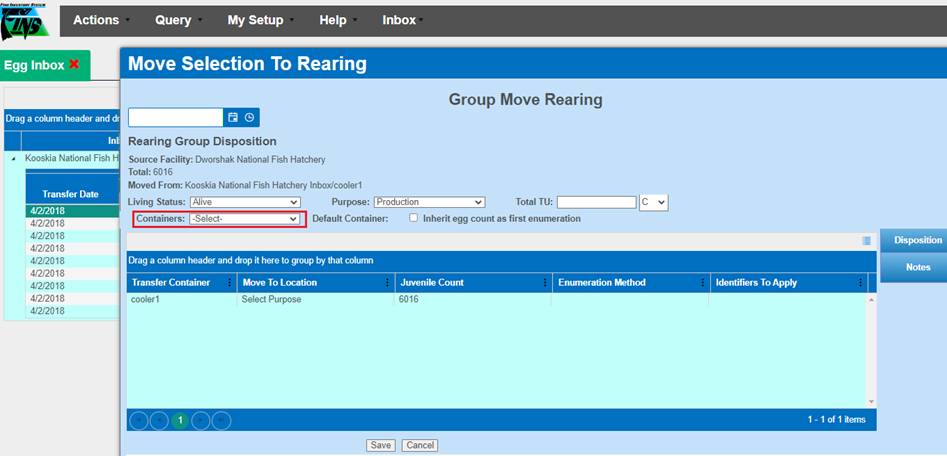
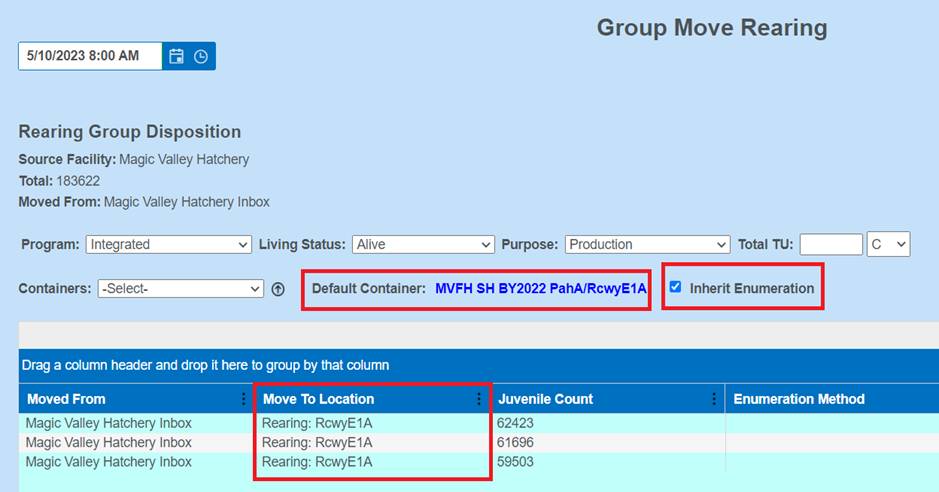
4. From
the Containers dropdown menu - Select the Rearing Array > Containers to Receive
the Egg Groups into, as Juveniles
5. Check
‘Inherit egg count as first enumeration’ box if the Sent Egg Count (that
displays in the form as ‘Total’ and in the grid as ‘Juvenile Count’) is the
value you want to Receive into Rearing, as the first Enumeration for the
Juvenile Rearing Groups being Received
a. Inherit
Enumeration - is used when the Juvenile Count will not be changed on the
Move/No Enumeration is occurring
i. *If
the Rearing Container you are receiving into is already populated, ‘Inherit egg
count as first enumeration’ checkbox is not allowed, since moving Juveniles
into a Rearing Container that already contains Juveniles will require a
re-enumeration in Rearing of the Container after combining the Juveniles via
the receipt/move
6. Click
‘Save’ to complete the receipt into Rearing
a.
If receiving into a Container that is already populated, be sure to
Enumerate the Rearing Container via the Rearing Inventory grid so that the new Juvenile
Count is confirmed/updated from the ‘Auto Generated Count’ Column to the intended
‘Juvenile Count’ Column
i. Auto
Generated Count Column – Automatic Enumeration performed by FINS when current
Juveniles have yet to be Enumerated, or when a non-empty container has
Juveniles added
ii. Juvenile
Count Column – Number of Juveniles currently in the Container
If inventory is Transferred from Facility A to Facility B
and Facility B are the ones that do the release, then FINS supports that
functionality and encourages that method of operation so that data input
matches the reality.
* An
example of an existing real-life use case would be Fall Chinook WDFW > Lyons
Ferry Fish Hatchery transfer to Nez Perce Tribe (NPT) for acclimation that NPT
then Releases in FINS
Doing this, FINS Release Queries/Summaries would show the
Juveniles as Released by/from Facility B (or in the real-life example, by NPT)
instead of Agency>Facility A (or in the real-life example, by WDFW >
Lyons Ferry Fish Hatchery).
*Release from Juvenile Inbox - Business Logic
Users must receive the Juveniles into Rearing Inventory
(into a Rearing Container) before Release is available of the received
Juveniles
Steps:
1. From
within the Juvenile Inbox, select the Rearing Groups that you wish to accept
into your Rearing Inventory
a. To
multi-select multiple Rearing Groups at the same time, hold down on the ‘Ctrl’
key and select each Rearing Group you wish to Receive
2. Right
click and select ‘Receive Selected Juveniles to Rearing (x rows)’
a. The
number of Rearing Groups selected to Receive will be displayed in the Context
Menu as the number of ‘rows’ for your quick confirmation that the intended
number of Rearing Groups are being selected for Receipt
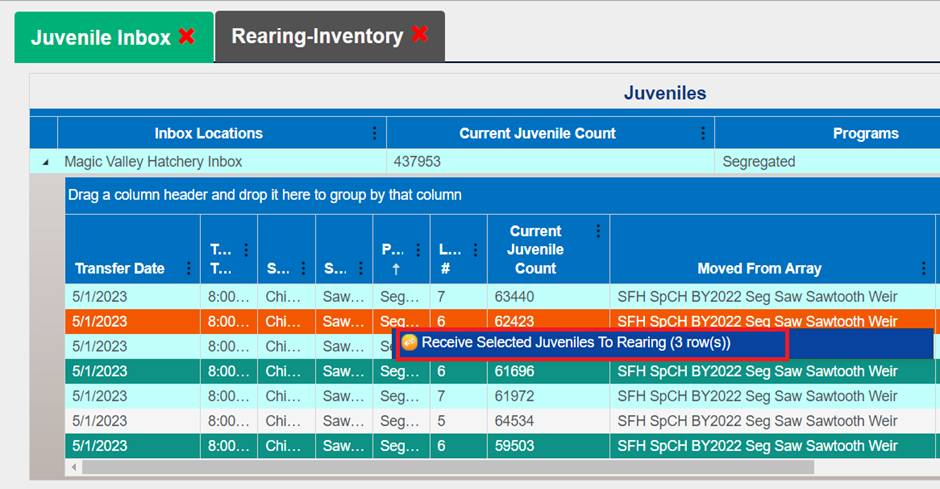
3. This
will open up the move form – allowing the move of selected Rearing Groups from
the Juvenile Inbox to Rearing Inventory in a Rearing Array Container
All Queries in FINS Online have Export functionality and a
Context Menu. If you want to Edit or Delete records, you will do that from the
Queries available under the Query tab of the FINS Online menu.
Save Query Layout – Tool
Use Case:
To see the preferred Columns and in
the preferred order/format desired, without having to reformat every time a
particular Query is opened to view. With the Save Query Layout tool, you will
see the columns you want to and arranged in the way you need them to be each
time you view a specific Query in FINS Online.
Business Logic:
The Saved Queries are stored locally,
to your machine, to your login so –
·
They can be
erased by clearing your machine cache or history.
·
They are limited
by your machine’s temp storage.
Steps:
1. Once you have opened up the specific
FINS Online Query/Inventory Grid that you want to Create a Saved Layout for set
the Columns that you want to View, and how you want them to be arranged
(ordered).
2. Click on the ‘Save Query’ Icon,
outlined in red below.

3.
Clicking on the Save
Layout Icon will display the Query Layout dialogue box.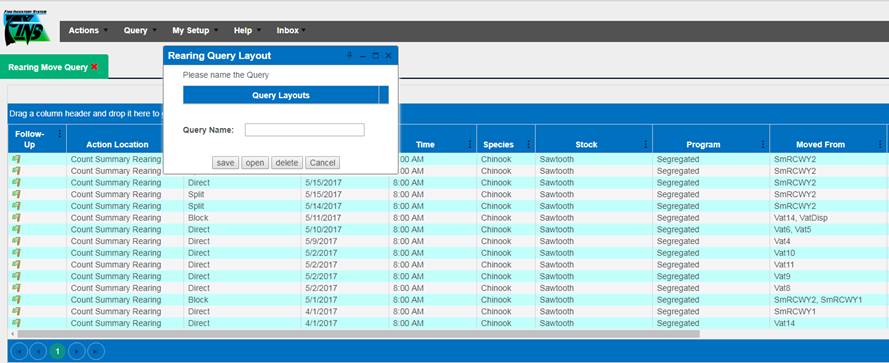
4. Give your Layout a ‘Query Name’ by
entering a relevant name in the highlighted box shown below and then click
‘save’.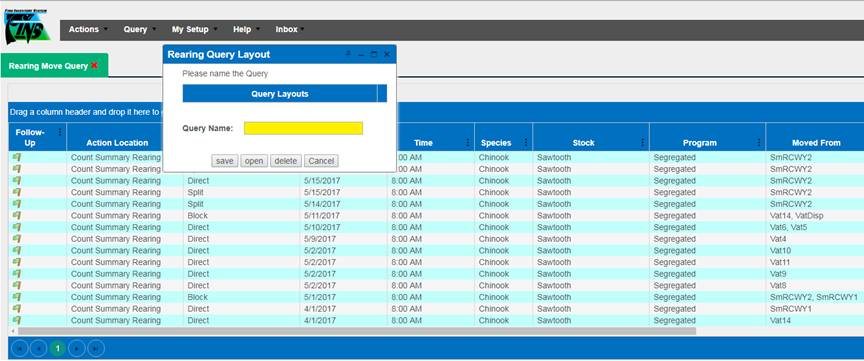
5. Clicking ‘save’ will close out the
Query Layout dialogue box and save it to your machine, locally, for your user
login.
6. To open up a saved Query Layout, go
back to the ‘Save Query’ Icon, outlined in red below

7. FINS will provide you with a list of
the Saved Query Layouts that have been stored to this machine, locally, for
your user login, for the specific Query that you are viewing.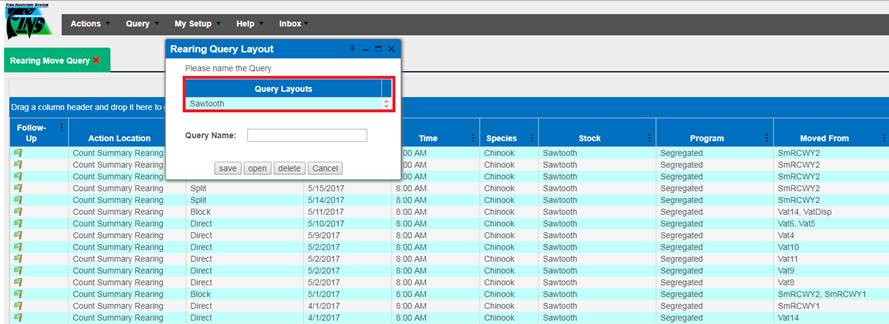
8. Select the Saved Query Layout that
you want to display and then click ‘open’.
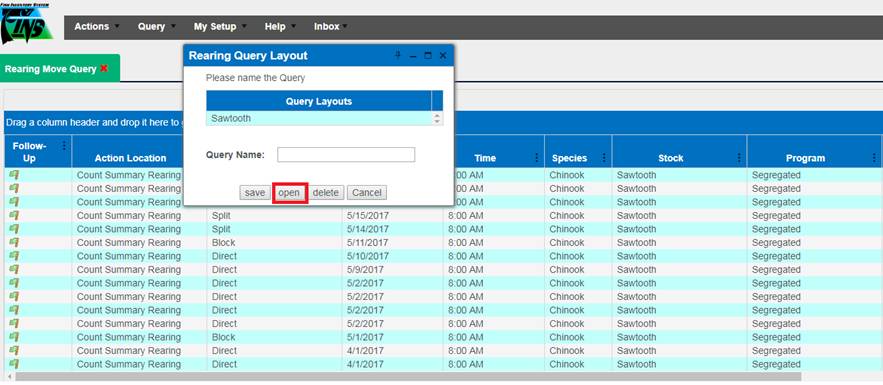
9. FINS will then display the Columns as
Saved in the selected Layout, that you are interested in seeing and in the
order in which were set when the Query Layout was Saved.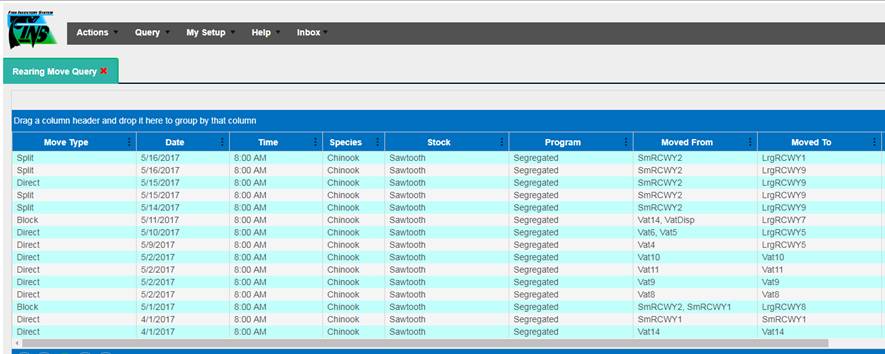
This query displays all
records that have been entered into a Trapping Session via a Trap Fish form.
Each saved Trap Fish form results in one record in the Trapping Query. From the
Online Trapping Query, you can customize (using built in grouping, sorting,
filtering, and column selection tools), save, open custom queries, and export
the grid to Excel.
*
Context Menu: If an option you are looking for isn’t
available in the Context menu, you have selected a record that does not meet
the requirements for that option.
§
Verify: Will Mark Selected Record as Verified
§
Verify All: Will Mark All Records in Query as Verified
§
Finalize: Will Mark Selected Record as Finalized.
§
Finalize All: Will Mark all Records in Query as Finalized
§
Flag All: Will change the Status of the Flag of all
Records on the page displayed in the Query grid.
§
Note All: Will Add the same Note to all records in
the current display
§
Edit: Will open the form used to create this
record. If this option is not ‘Active’ it is because the record you have
selected is not the latest version of a record created for that Egg Group.
§
Delete: Will prevent the record from displaying in
the Trapping Query, or the Existing Trapping Session.
*
You can select multiple
records in the Trapping Query and perform a group action to all selected
records using the Context Menu. Group Actions available in the Trapping Query
are: Verify/Finalize, Flag, Delete or Note. To select multiple records, hold your
Ctrl button down and click on the records you want to select or click and drag
over the records you want to apply the group action to.
Columns in the Trapping Query:
|
Finalize
|
Living Status
|
Applied Tags
|
|
Verify
|
Length
|
Existing CWT
|
|
Follow-Up
|
Age Designation
|
Existing CWT Value
|
|
Trapped Date
|
Age Calculated
|
Applied CWT
|
|
Trap
|
Age Criteria Start Length (H)
|
Applied CWT Value
|
|
Facility (H)
|
Age Criteria End Length (H)
|
Applied Tags
|
|
Trap
|
Age Criteria Start Date (H)
|
Existing PIT
|
|
Trapping Session Name
|
Age Criteria End Date (H)
|
Applied PIT
|
|
Target Species
|
Moved To Facility
|
Samples
|
|
Target Run
|
Moved To
|
Conditions
|
|
Trapping Session Comments
|
Disposition
|
Recap
|
|
Fish Id
|
Purpose
|
Injected
|
|
Count
|
Existing Marks
|
Weight
|
|
Species
|
Existing Marks Quantity
|
Notes
|
|
Run
|
Applied Marks
|
Group Notes
|
|
Sex
|
Applied Marks Quantity
|
|
|
Origin
|
Existing Tags
|
|
To Export a
‘Trapping Query’ to an Excel file you can do so by following the steps below.
Steps
1) Click on the ‘Export to Excel’ button
located to the right side of the ‘Trapping Query’. Button is highlighted below.
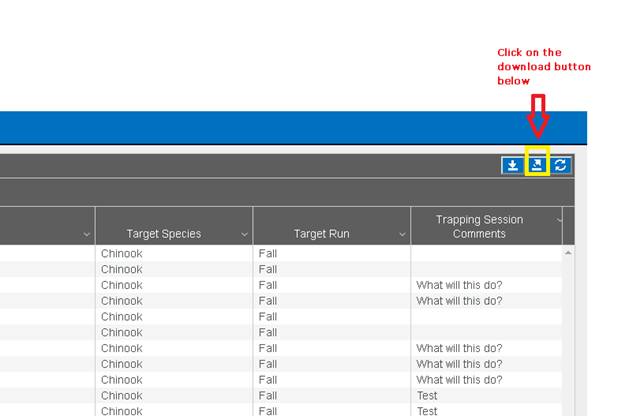
2) An Excel file will download. When it
finishes downloading, click on the Excel file to open it.

3) Trapping Query file will open as
shown below.
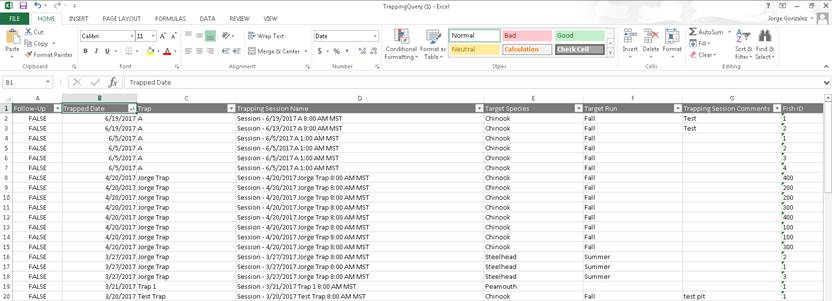
Editing
a Trapping Record
Validation
Origins
**FINS has Origin Validation that is enforced by Origins
created by either Facility or Agency Data Officials from the Admin>Origin
Workflow. Origins are specific to Species, Run, Facility, and Agency.
By default, FINS does not enforce any business logic
regarding Identifiers, as the process may differ between Agencies/Facilities
and is instead managed via a custom validation workflow by designated users
with the correct permissions for an Agency/Facility.
Specifically, the following Data Entry inputs are allowed
if Origin Validations have not been created to explicitly prevent them:
·
Adding Clipped and Unclipped Marks to a Fish
·
NOT Saving a Mark or Tag unless it is required by an Origin
Expression and Validation is set at ‘Required’ in the form
Use Case
Facilities regularly Trap Fish that have existing Tags or
Marks at the time of Trapping. Users then register any Tags or Marks that they
observe on the Fish. However, there are instances in which users need to make
corrections to the data that they entered.
An example of this would be editing an incorrect CWT value
that was originally entered or deleting a Mark or Tag that was incorrectly
entered. Because of this, FINS gives users the ability to Add, Edit, or Delete
Marks/Tags directly from the Trapping Query. Any changes that are made
Business Logic
Any Add/Delete changes that are applied, will be applied to
ALL records that are selected, with the exception of the Edit tab where you can
differentiate between each.
Selecting a Record:
·
User is required to:
1. Select
a record from the Trapping Query.
2. Multiple
Records can be selected at one time.
3. Right
click to get access to the Context Menu and select ‘Edit Identifiers’ from the
Context Menu.
4. Once
‘Edit Identifiers’ is selected, the ‘Edit Trapping Records’ dialogue box will
display.
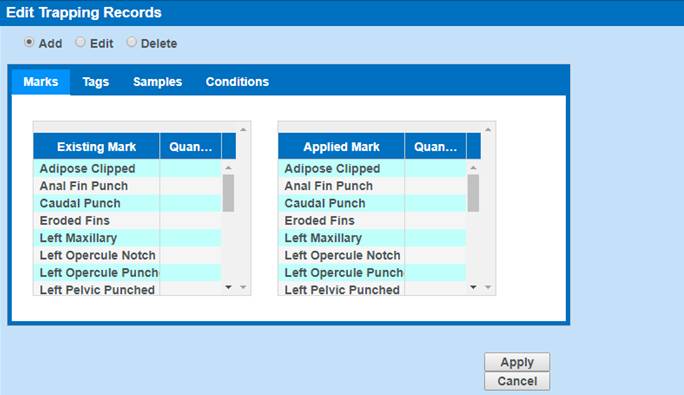
Adding/Editing/Deleting Identifiers
·
Adding Identifiers:
1. To
Add Marks/Tags/Samples/Conditions, click on the ‘Add’ radio button.

2. Any
time a specific Mark/Tag/Sample/Condition is selected, FINS will notify user of
the specific Identifiers selected.
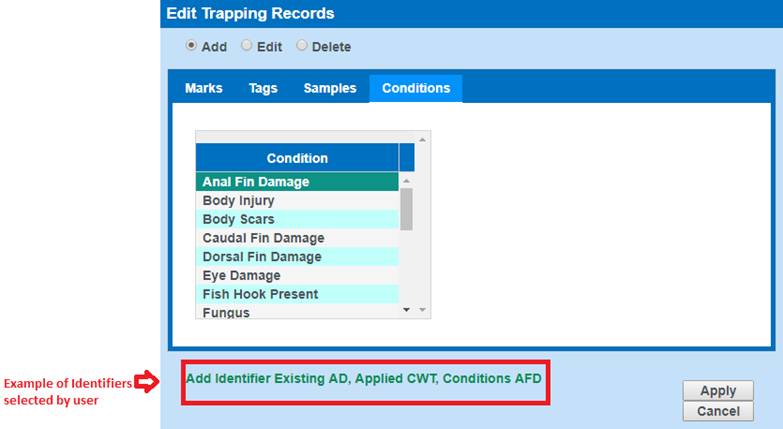
3. If a
‘Quantity’ is not entered when adding a Mark from the ‘Marks’ tab, FINS will
automatically generate a quantity of 1.
4. Clicking
on the ‘Apply’ button will add the selected Identifiers to the Trap record.
5. Clicking
on the ‘Cancel’ button will close out the dialogue box and take the user back
to the Trapping Query grid.
Editing Identifiers
6. When
selecting the ‘Edit’ radio button, FINS will display the current
Marks/Tags/Samples applied to the current Trapped Record.
7. The
Conditions tab will not appear when clicking the ‘Edit’ button since Conditions
are not eligible for edits.
8. If a
record has Marks/Tags/Samples that need to be edited, then these will display
in the grid shown below. Otherwise, the grid will be empty.

9. Value
is the only field that is eligible for edits in the Tags and Samples tab.

o
Quantity is the only field eligible for edits in the Marks tab.
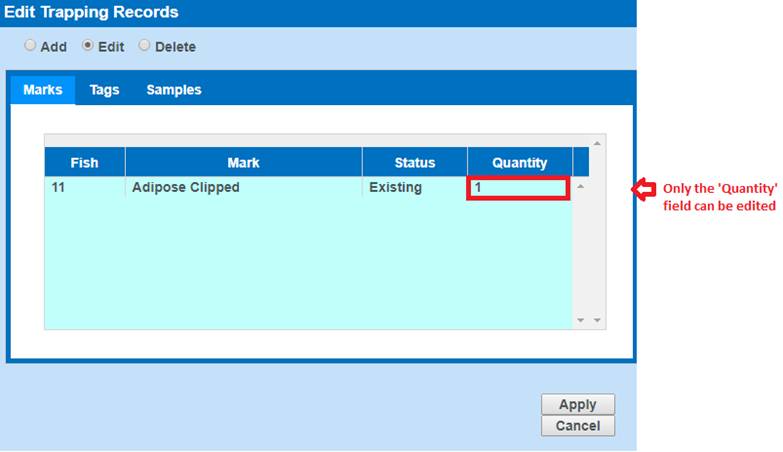
10. Clicking on the
‘Apply’ button will apply the edits to the selected Identifiers and update the
Trap record.
11. Clicking on the
‘Cancel’ button will close out the dialogue box and take the user back to the
Trapping Query grid.
Deleting Identifiers
1. When
selecting the ‘Delete’ radio button, FINS will display the
Marks/Tags/Samples/Conditions Tabs.
2. When
selecting Marks/Tags/Samples/Conditions that you want to delete, FINS will
notify you of the Marks/Tags/Samples/Conditions selected for deletion and
whether the selected Identifiers are Existing or Applied.

·
If the Marks/Tags/Samples/Conditions being deleted are not on the
Trap record, FINS will notify you that the record does not contain the selected
Identifiers.

Validation
Marks
·
Adding a Mark from the Marks tab is optional.
·
Adding a quantity for any of the Marks in the Marks tab is
required. If no quantity is entered, FINS will automatically generate a
quantity of 1 for the user.
·
Quantity entered must be greater than 1.
Tags
·
Adding a Tag from the Tags tab is optional.
·
Adding a value for any of the Tags in the Tags tab is optional.
·
Values entered can be numbers or letters or a combination of
both.
·
Adding a Sample from the Samples tab is optional.
·
Adding a value for any of the Samples in the Sample tab is
optional.
Samples
·
Adding a Sample from the Samples tab is optional.
·
Adding a value for any of the Samples in the Sample tab is
optional.
·
Values entered can be numbers or letter or a combination of both.
Conditions
·
Adding a Condition from the Conditions tab is optional.
Steps
1)
From within the Trapping Query, select the record(s) that you want to
Add/Edit/Delete Identifiers on.
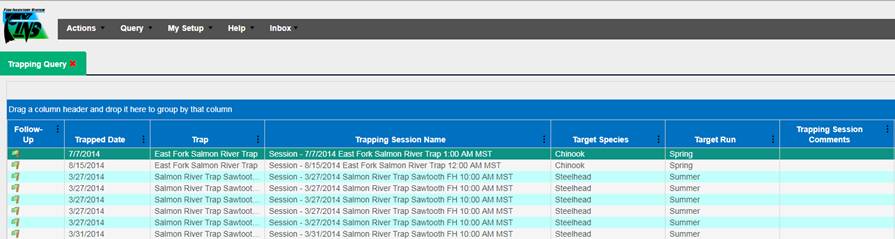
2)
Right click on your mouse to get access to the Context Menu.
3)
Select ‘Edit Identifiers’ from the Context Menu.
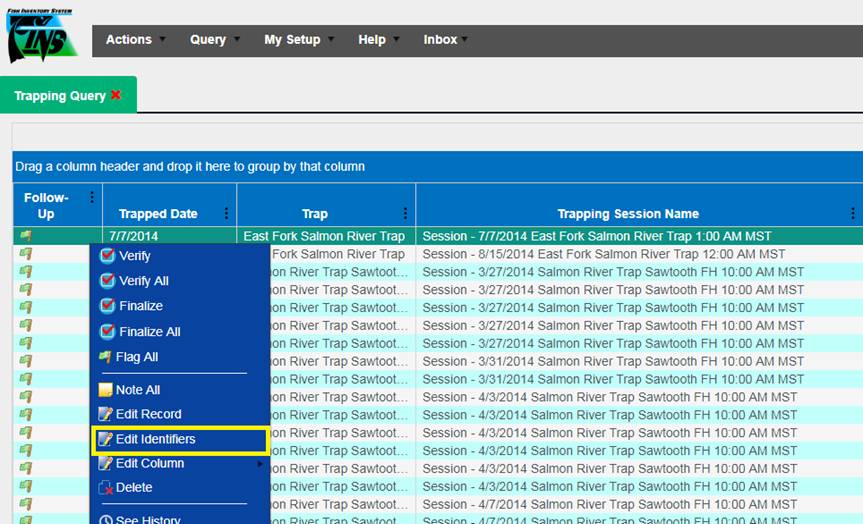
To ‘Add’ Identifiers:
1) Click on
the ‘Add’ radio button highlighted below.

2) Select the
Identifier(s) that you want to add.
3) As you
select Identifier(s) that you want to add, FINS will provide you with a preview
of the Identifier(s) selected.
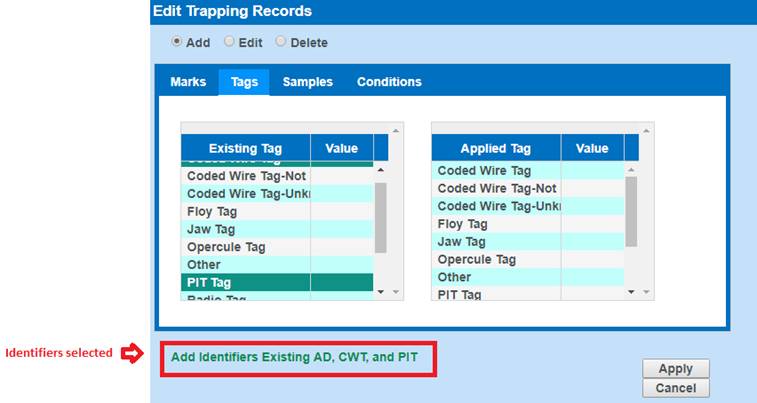
4) Click
‘Apply’ to apply the Identifier(s) to the selected record.
To ‘Edit’ Identifiers:
1) Click on
the ‘Edit’ radio button highlighted below.
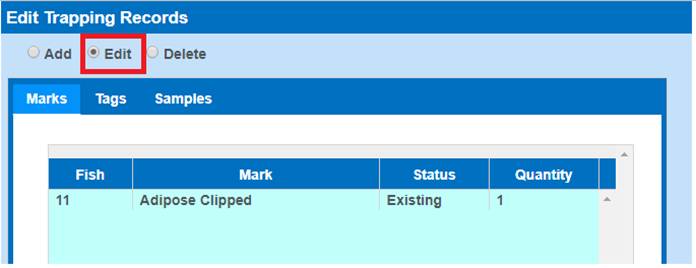
2) Select the
Identifier(s) that you want to edit. You can only edit the Quantity in the
Marks tab and the Value in the Tags/Samples tab.
3) Enter the
following:
a. If
in the Marks tab, enter the quantity for the specific Mark that you are
editing.
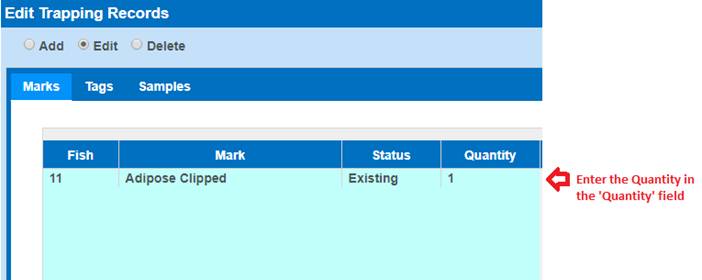
b. If
in the Tags or Samples tab, enter the value for the specific Mark/Sample that
you are editing.
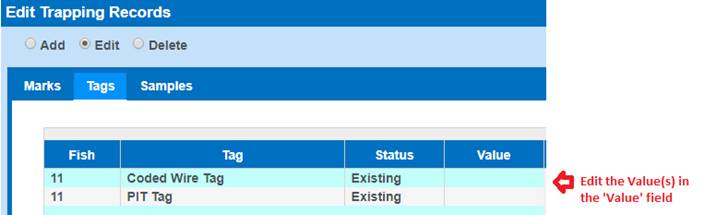
4) Click
‘Apply’ to apply the changes to the selected Identifiers for the record
selected.
To ‘Delete’ Identifiers:
1) Click on
the ‘Delete’ radio button highlighted below.

2) Select the
Identifier(s) that you want to delete.
3) As you
select Identifier(s) that you want to delete, FINS will provide you with a
preview of the Identifier(s) selected.
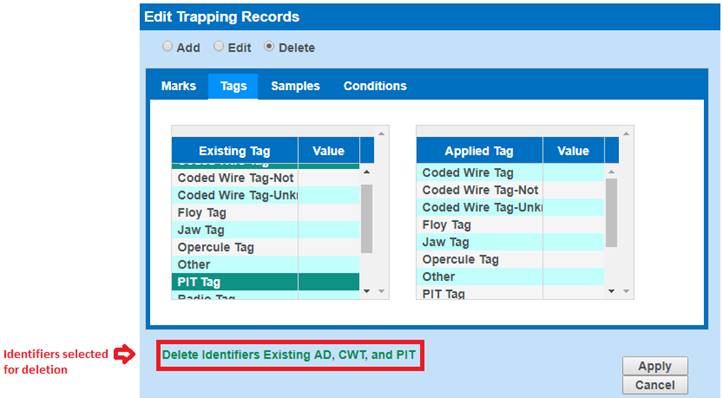
4) Click
‘Apply’ to delete the Identifier(s) selected.
5) If the
selected Identifier(s) are not currently on the selected record, FINS will
notify you that the selected Identifier(s) cannot be deleted.
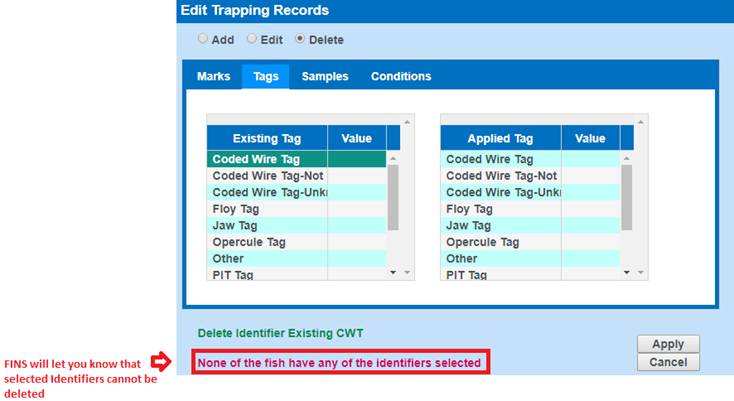
Exporting
To Export a ‘Trapping Query’ to an Excel file you can do so
by following the steps below.
Steps
1) Click on the ‘Export to Excel’ button
located to the right side of the ‘Trapping Query’. Button is highlighted below.
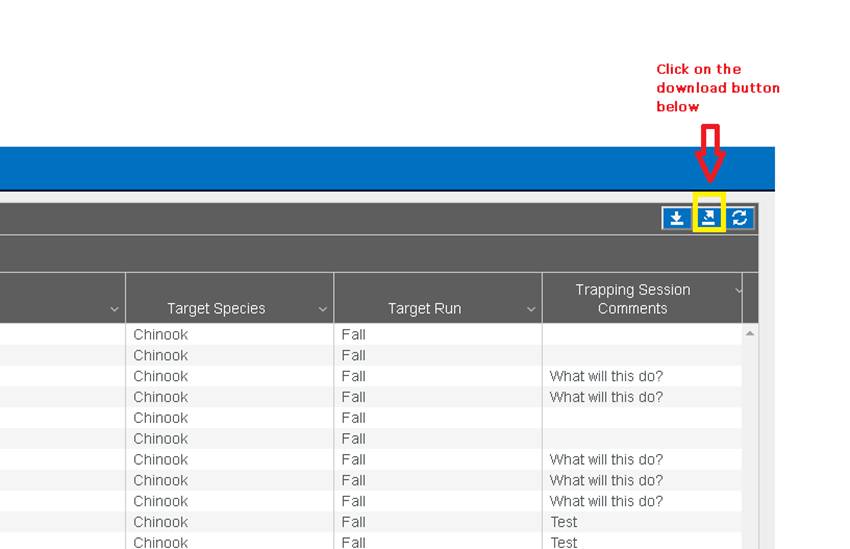
2) An Excel file will download. When it
finishes downloading, click on the Excel file to open it.
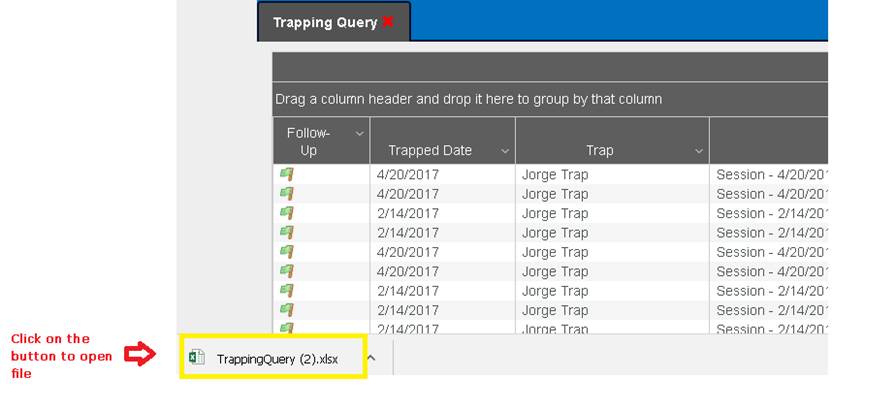
3) Trapping Query file will open as
shown below.
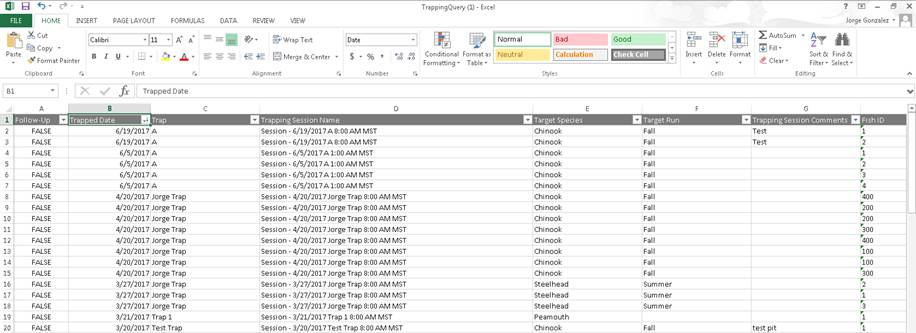
Sorting and Filtering
Sorting & Filtering by Date
By default, when the Trapping Query downloads, the format for the
‘Trapped Date’ column will be set as ‘General’. To change the ‘Trapped Date’
format from ‘General’ to ‘Date’ follow the steps below.
1)
Highlight the
‘Trapped Date’ column in the Export file from FINS.
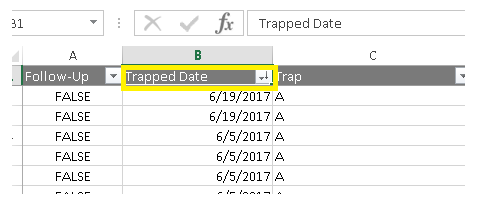
2)
Click on the
‘Data’ Tab located in the Excel Menu Ribbon.
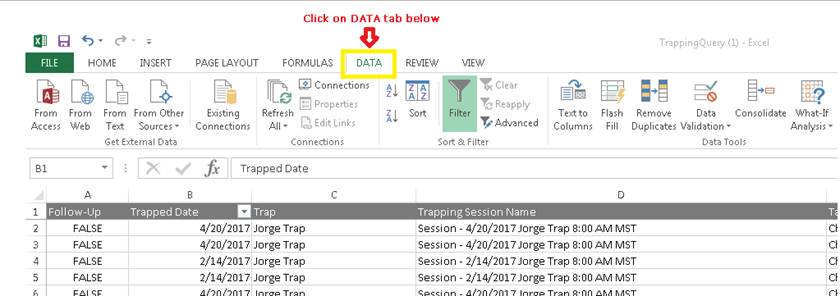
3)
Select ‘Text to
Columns’. This will open the ‘Convert Text to Columns Wizard’ dialog box.
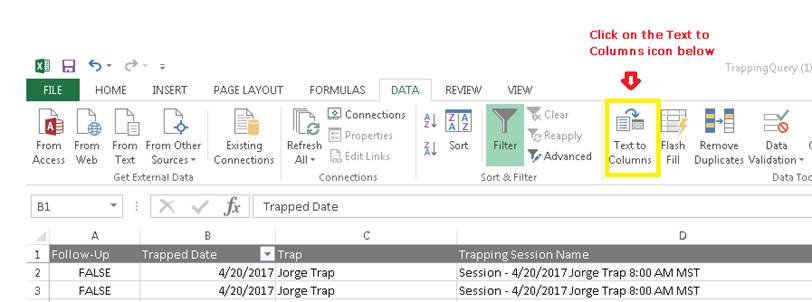
4)
In the ‘Text to
Columns’ dialog box click ‘Next’ twice to advance to ‘Step 3’. This will bring
you to the dialog box below.
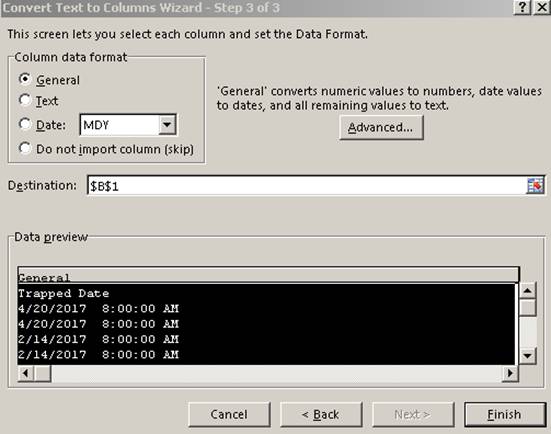
5)
Change the
‘Column data format’ from ‘General’ to ‘Date’ and then click ‘Finish’.
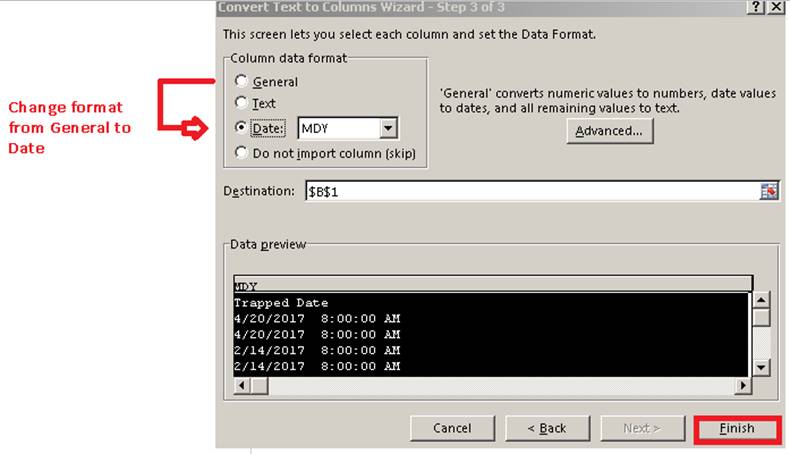
6)
Now, when the
‘Trapped Date’ column gets filtered, Excel converts the text strings to numbers
formatted to look like dates. Dates get grouped by Year/Month/Day.
Ø
Holding
·
Move Fish: Record Type created when a fish is moved from a
Holding Location to any other Location Type, including another Holding
Location.
*
If you ever get the following error displayed below, consider
doing the following:
o
Apply a season to filter ONLY the data that is of interest.
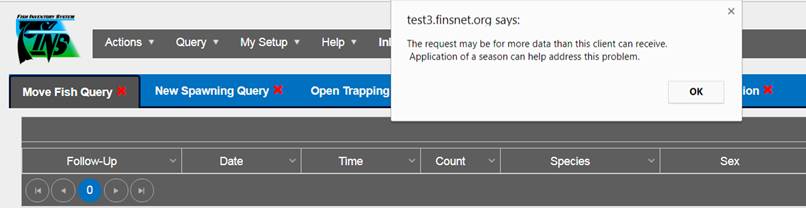
* Context Menu: If an option you are looking for isn’t
available in the Context menu, you have selected a record that does not meet
the requirements for that option.
§
Flag All: Will change the Status of the Flag of all
Records on the page displayed in the Query grid.
§
Edit: Will open the original Move Fish form that
was saved for that record. You can make edits to any field in the form.
§
Delete: Will delete the record from being displayed
in the Move Fish Query. Deleting a Move Fish record will not put the fish in
the record back in a holding pond. A count correction will have to be completed
to add fish back into your inventory.
* You can select multiple records in the Move
Fish and Receipt Queries and perform a group action using the
Context Menu to all selected records. Group Actions available in the Move Fish
and Receipt Queries are: Verify/Finalize, Flag, Delete or Note. To select
multiple records, hold your Ctrl button down and click on the records you want
to select or click and drag over the records you want to apply the group action
to. *Delete is
only available on Move Fish records with the Disposition of Released, Shipped,
or Disposed
The Columns in the Move Fish Query
are:
|
Follow-Up
|
Age Criteria End Length (H)
|
Existing Tags
|
|
|
Date
|
Age Criteria Start Date (H)
|
Applied Tags
|
|
|
Time
|
Age Criteria End Date (H)
|
Existing CWT
|
|
|
Count
|
Age Designation
|
Existing CWT Value
|
|
|
Species
|
Moved To Facility
|
Applied CWT
|
|
|
Sex
|
Moved To
|
Applied CWT Value
|
|
Moved From Facility (H)
|
Living Status
|
Existing PIT
|
|
Moved From
|
Disposition
|
Applied PIT
|
|
Source Trap Facility (H)
|
Purpose
|
Samples
|
|
Source Trap
|
Existing Marks
|
Conditions
|
|
Length
|
Existing Marks Quantity
|
Notes
|
|
Age Calculated
|
Applied Marks
|
|
|
Age Criteria Start Length (H)
|
Applied Marks Quantity
|
|
|
|
|
|
|
|
|
|
|
|
|
|
|
|
|
|
• Count
Correction: Record Type created when a Data Entry user manually adds or
subtracts fish to or from a group of fish via the Count Correction Tool;
either in a Holding Location or Inbox. When the Current Count is increased, the
number will display as a positive (6), if the Current Count is decreased, the
number will display as a negative (-6). Data Entry users are required to add a
‘Note’ to each Count Correction form (Notes were made a requirement in 6/2016).
The columns
in the Count Correction Query are:
|
Follow-Up
|
Location
|
Sex
|
|
Date
|
Count
|
Notes
|
|
Time
|
Species
|
|
·
Receipt: Record Type created when fish are moved from a
Facility’s Inbox to another Location Type, including another Facility’s Inbox
The columns in
the Receipt Query are:
|
Follow-Up
|
Age Criteria End Length (H)
|
Applied Marks Quantity
|
|
Date
|
Age Criteria Start Date (H)
|
Existing Tags
|
|
Time
|
Age Criteria End Date (H)
|
Applied Tags
|
|
Count
|
Age Designation
|
Existing CWT
|
|
Species
|
Moved To Facility
|
Existing CWT Value
|
|
Sex
|
Moved To
|
Applied CWT
|
|
Moved From
|
Disposition
|
Applied CWT Value
|
|
Source Trap Facility (H)
|
Purpose
|
Existing PIT
|
|
Source Trap
|
Living Status
|
Applied PIT
|
|
Length
|
Existing Marks
|
Samples
|
|
Age Calculated
|
Existing Marks Quantity
|
Conditions
|
|
Age Criteria Start Length (H)
|
Applied Marks
|
Notes
|
|
|
|
|
|
|
|
|
|
|
|
|
The Spawning Query displays
records of fish entered in a Spawning Session. ‘Spawned’ (Living State) and
‘Not Spawned’ (Living State) fish are displayed in this Query. Fish that were
‘Spawned’ display in their own record. Spawn Crosses may have multiple records,
depending on the Spawn Ratio. Fish that were ‘Not Spawned’ for various reasons
are displayed in their own record with a Living State of ‘Not Spawned’ and do
not have a Cross ID associated with them. Use the Filter Tools below to limit
your Query results to a specific data set. The Start and End Date default to a one-year
time span, but are editable to any range you prefer. The Spawning Query can be
filtered, using the Filter Tool, by the Facility or Snake Basin Domain (which
includes all Facilities), Age Designation, Sex and/or Species.
*
Context Menu: If an option you are looking for isn’t
available in the Context menu, you have selected a record that does not meet
the requirements for that option.
§
Verify: Will Mark Selected Record as Verified
§
Verify All: Will Mark All Records in Query as Verified
§
Finalize: Will Mark Selected Record as Finalized.
§
Finalize All: Will Mark all Records in Query as Finalized
§
Flag All: Will change the Status of the Flag of all
Records on the page displayed in the Query grid.
§
Edit Record: Will open the form used to create this
record. If this option is not ‘Active’ it is because the record you have
selected is not the latest version of a record created for that Egg Group.
§
Delete Spawn Cross: Will prevent the record from displaying in
the Trapping Query, or the Existing Trapping Session.
The columns in the Spawning Query are:
|
Finalize (H)
|
Edit Spawn Cross Notes
|
Purpose
|
|
Verify (H)
|
Immediate Container
|
Existing Marks
|
|
Follow-Up
|
Spawn ID
|
Existing Marks Quantity
|
|
Spawning Session Date
|
Times Used
|
Applied Marks
|
|
Moved From Facility (H)
|
Length
|
Applied Marks Quantity
|
|
Spawning Location (H)
|
Age Calculated
|
Existing Tags
|
|
Spawning Session Name
|
Age Criteria Start Length (H)
|
Applied Tags
|
|
Spawning Ratio
|
Age Criteria End Length (H)
|
Existing CWT
|
|
Spawning Session Lot #
|
Age Criteria Start Date (H)
|
Existing CWT Value
|
|
Stock
|
Age Criteria End Date (H)
|
Applied CWT
|
|
Session Progeny
|
Age Designation
|
Applied CWT Value
|
|
Spawning Session Comments
|
Spawn Status
|
Existing PIT
|
|
Species
|
Living State
|
Applied PIT
|
|
Sex
|
Why Not Spawned
|
Samples
|
|
Cross ID
*Note: ‘Orphan’ defined Spawn ID’s are intentionally displayed in the
Spawning Query on historical Spawn Cross Males that have had their (Split)
Female Deleted and the Male of the Cross that the Female was automatically
removed from hasn’t been manually deleted to indicate that the Cross never
occurred. Previously when a Split Female/Cross was Deleted in one instance
but was also used in another Cross; all instances of that Split Female were
Deleted by FINS, leaving the Male of a Deleted Split Female Cross ‘Orphaned’
in the database; Deleting a Split Female used in multiple crosses has
previously been prevented in FINS)
|
Moved From
|
Conditions
|
|
Egg Weight
|
Moved To
|
Notes
|
|
|
Estimated Egg Count
|
Disposition
|
|
|
|
|
|
|
|
|
|
Source Trap
The ‘Source Trap’ column will display the
source trap that the Fish originally came from. If the ‘Source Trap’ field is
blank on an existing session, a Source Trap was not available at the time of
creation.
Validation
Origins
**FINS has Origin Validation that is enforced by Origins
created by either Facility or Agency Data Officials from the Admin>Origin
Workflow. Origins are specific to Species, Run, Facility, and Agency.
By default, FINS does not enforce any business logic
regarding Identifiers, as the process may differ between Agencies/Facilities
and is instead managed via a custom validation workflow by designated users
with the correct permissions for an Agency/Facility.
Specifically, the following Data Entry inputs are allowed
if Origin Validations have not been created to explicitly prevent them:
·
Adding Clipped and Unclipped Marks to a Fish
·
NOT Saving a Mark or Tag unless it is required by an Origin
Expression and Validation is set at ‘Required’ in the form
Steps
- Open a Spawning Query by going to
Query>Spawning>Select your Season.
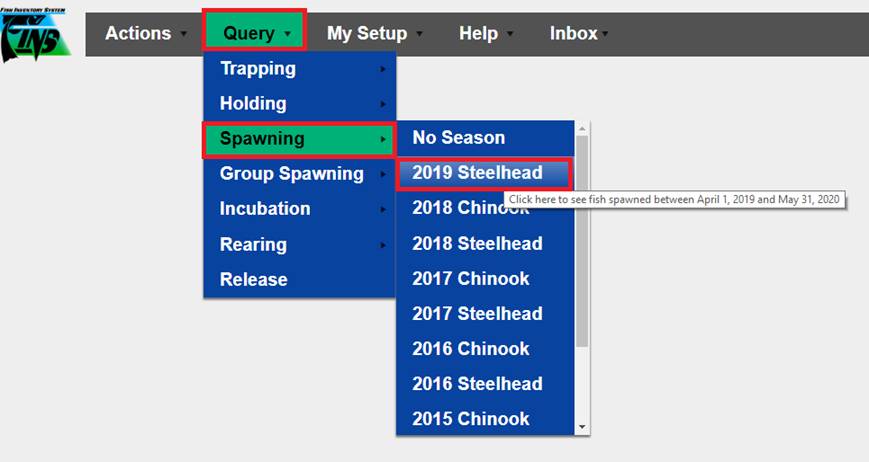
- Click on the record that needs to be edited, right click
and select ‘Edit’.
- Editing can be made on any of the Summary fields or
Identifiers shown below. Edits made, will turn the label from black to
blue to notify you of the changes that are being made.
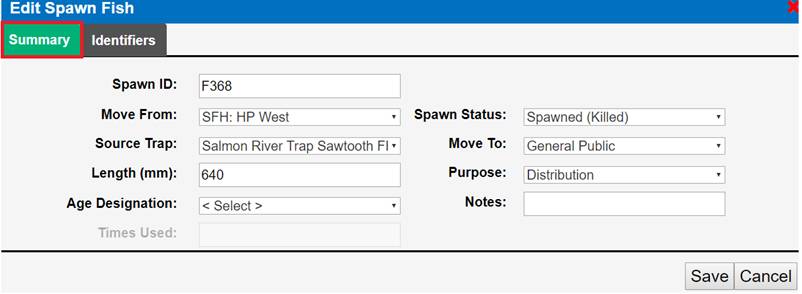
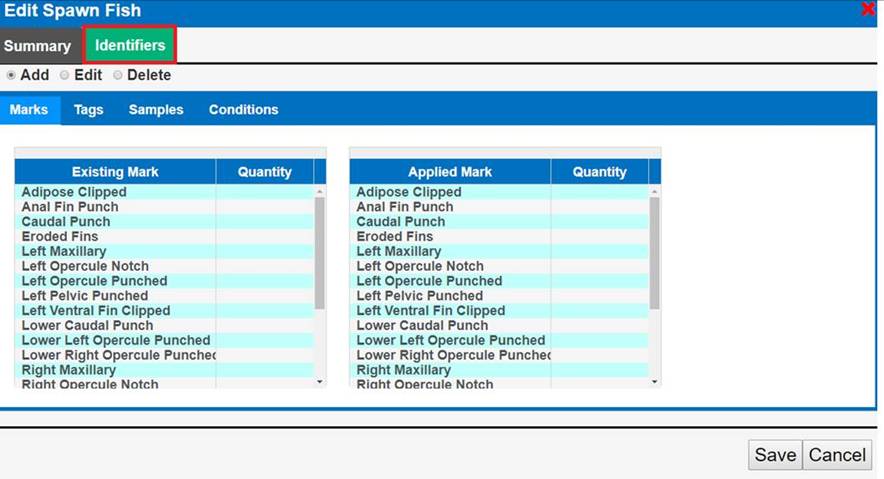
- If Adding/Editing/Deleting Identifiers, click on the
Identifier Tab and select the Identifier you want to Add/Edit/Delete.
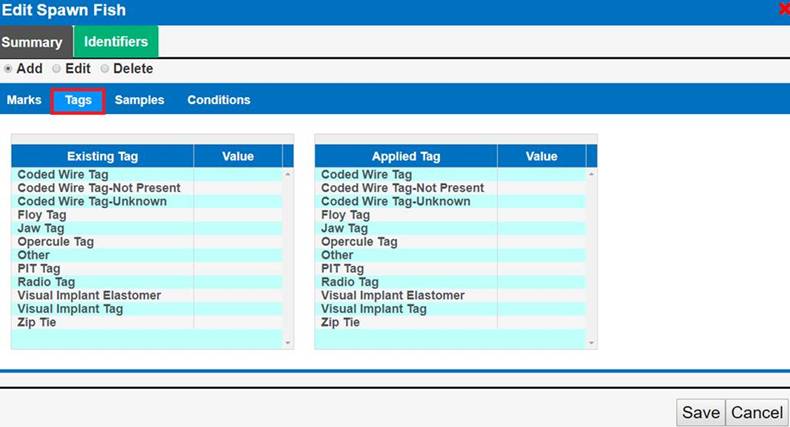
- Click ‘Save’ to save the edits.
Use Case:
Spawning Sessions may have ancillary data available from
sources other than the Spawning Hatchery staff that include information
captured about the fish Spawned. To attach this supplementary data to a
Spawning and/or BETA Group Spawning Session, users may ‘Upload Supplemental
Data’ in PDF and/or Excel format, so that data associated to the Spawning
and/or BETA Group Spawning Session can be captured, linked to the Session,
centrally stored, backed up and Queryable. In addition, Supplemental Data
files uploaded may be viewed and/or downloaded by any FINS Online Query user
that has permissions to the Spawning Location Facility of the Session, enabling
that separate data collected on the Spawned fish group to be shared.
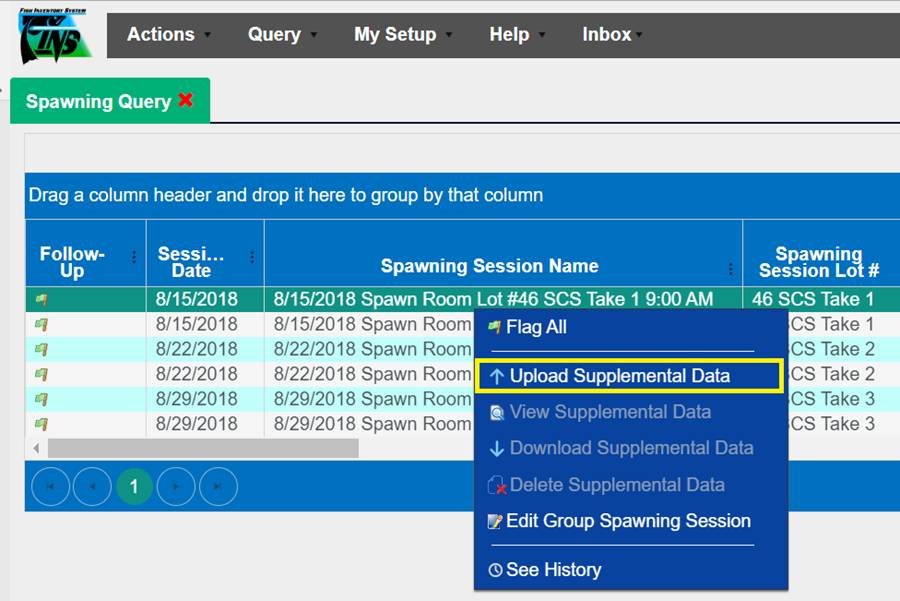
Business Logic:
FINS gives Data Entry users the ability
to Upload, View, Download and/or Delete Supplemental Data files for Spawning
and/or BETA Group Spawning Sessions by using the ‘Upload Supplemental Data’
feature. The data can be uploaded anytime to a saved Session via the Existing
Spawning Session grid, Spawned Inventory grid and/or FINS Online Spawning
and/or BETA Group Spawning Queries. After Supplemental Data has been uploaded,
users are not only able to view the data but also download it to save/view.
Validation:
- Uploading
Supplemental Data to a Session is optional
- Uploaded
Supplemental Data file formats supported are:
Steps:
- From the Spawning Query, click on the Session that
you want to upload Supplemental Data for, right click and select ‘Upload
Supplemental Data’.
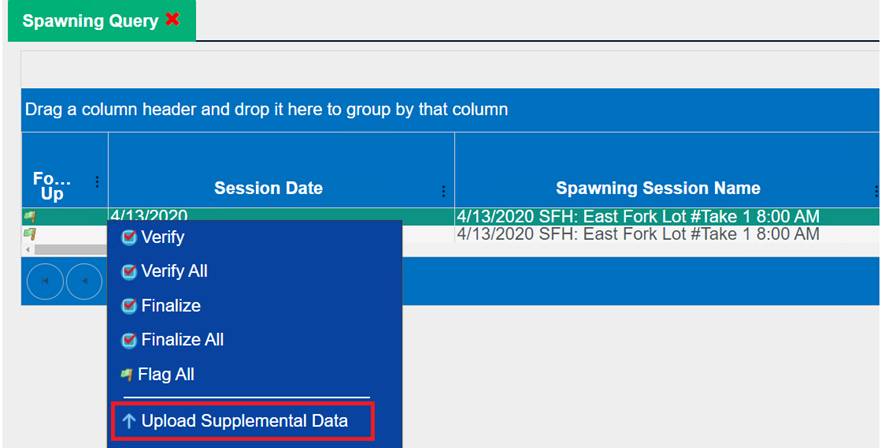
- Click on the ‘Choose File’ button and select the file that will be
uploaded. File needs to be in PDF or Spreadsheet format (FINS will notify
you if upload was successful or not).
a. If
Successful, click OK.
b. If
Unsuccessful FINS will notify you that the uploaded file is either not an Excel
spreadsheet or pdf or was corrupt. When this message appears, the File did not
save and you will need to click ‘Cancel’ and repeat steps 1-2 again with an
uncorrupt File in the accepted Format (PDF/Excel).
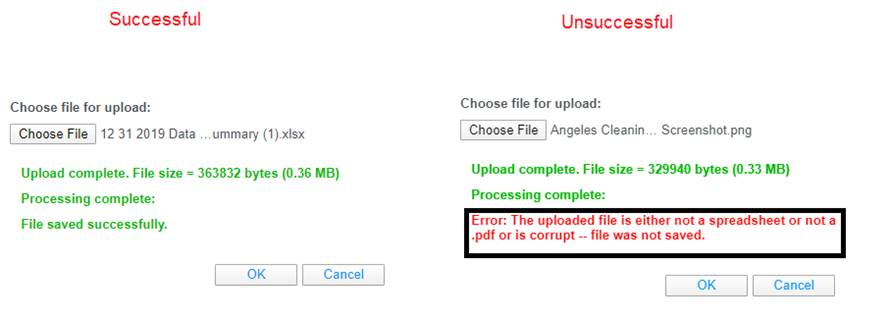
3.
If upload is successful, FINS will allow you to View or Download the
Supplemental Data by giving you the option after selecting the Session and
opening the context menu via a right click.
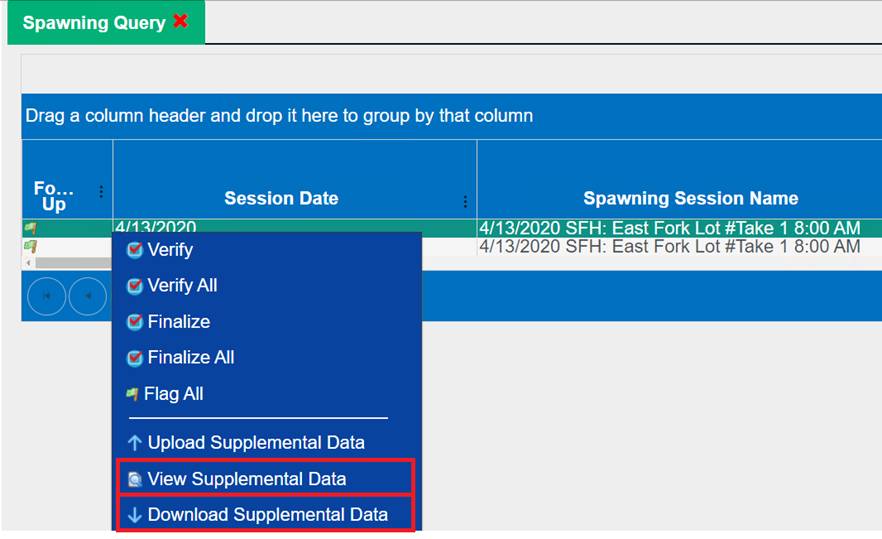
Use Case
There
are instances in which users will want to delete one or more Spawn Crosses.
For
Example:
·
Users may mistakenly move a Spawn
Cross Egg Take to the wrong Incubation Location.
·
Users may inadvertently create
duplicate Spawn Crosses.
FINS allows the deletion of
Spawn Crosses from either the Spawning Session via the All Spawned Crosses grid
or via the Spawning Query.
Business
Logic
When attempting to delete a Spawn Cross, users are able to
delete from either the Spawning Session via the ‘All Spawned Crosses’ grid or
via the Spawning Query.
When deleting a Spawn Cross from the Spawning Query tab:
·
A Multi-Select option is available so that multiple Spawn Crosses
can be deleted at one time.
·
Spawn Crosses can only be deleted from the Spawning Query tab if
and only if:
o
All Group Enumerations associated with that Cross have been
deleted in the ‘Group Enumeration’ query. To delete Group Enumerations, refer
to ‘Deleting Group Enumerations’ in the
‘Group Enumerations’ section of the User Manual for step by step instructions.
o
All Moves to and within Incubation associated with that Cross
have been deleted in the ‘Move Egg’ query.
·
If the user deletes a Move from the ‘Move Egg Query’ in
Incubation, and those eggs were moved directly into an Incubation Container and
were never placed in a temporary container, then users can delete the Cross
from the Spawning Query tab. Deleting a Cross from this grid will notify the
user that:
o
If a Cross deleted is the result of a Male or Female being
‘Split’, then all other Crosses which resulted from that ‘Split’ will also be
deleted.
o
A Count Correction must be completed to add the fish deleted back
into your Ponded Inventory.
§
Validation:
·
Date entry is required.
·
Add Species is optional.
§
Validation:
·
Entering a number greater than 0
is required.
·
*Note: ‘Orphan’ defined
Spawn ID’s are intentionally displayed in the Spawning Query on historical
Spawn Cross Males that have had their (Split) Female Deleted and the Male of
the Cross that the Female was automatically removed from hasn’t been manually deleted
to indicate that the Cross never occurred. Previously when a Split
Female/Cross was Deleted in one instance but was also used in another Cross;
all instances of that Split Female were Deleted by FINS, leaving the Male of a
Deleted Split Female Cross ‘Orphaned’ in the database; Deleting a Split Female
used in multiple crosses has previously been prevented in FINS)
When deleting a Spawn Cross from the Spawning Session via
the ‘All Spawned Crosses’ grid:
·
A Multi-Select option is NOT available and Spawn Crosses can only
be deleted individually.
·
If the user deletes a Move from Spawning in the ‘Move Egg Query’
of an Egg Take, the Spawn Cross will show as available in the ‘All Spawned
Crosses’ grid and the user can Edit/Move/Delete the Spawn Cross.
·
Spawn Crosses can only be deleted from the ‘All Spawned Crosses’
grid if and only if:
o
All Group Enumerations associated with that Cross have been
deleted in the ‘Group Enumeration’ query. To delete Group Enumerations, refer
to ‘Deleting Group Enumerations’ in the
‘Group Enumerations’ section of the User Manual for step by step instructions.
o
All moves to and within Incubation associated with that Cross
have been deleted from the ‘Move Egg’ query.
·
Deleting a Cross from the ‘All Spawned Crosses’ grid will notify
the user that:
o
If a Cross deleted is the result of a Male or Female being
‘Split’, then all other Crosses which resulted from that ‘Split’ will also be
deleted.
o
A Count Correction must be completed to add the fish deleted back
into your Ponded Inventory
§
Validation:
·
Date entry is Required.
·
Add Species is Optional.
§
Validation:
·
Entering a number greater than 0
is Required.
Validation
·
Deleting all Group Enumerations associated with the selected
Cross from the ‘Group Enumeration’ query is required.
·
Deleting all Moves associated with the selected Cross from the
‘Move Egg’ query is required.
·
Selecting ‘Delete Spawn Cross’ from the Context Menu is required
to delete selected Spawn Crosses.
Steps
Deleting
Cross from the Spawning Query grid
Once all the Group
Enumerations and Moves for a Spawn Cross ID have been deleted, to delete a
Spawn Cross from the Spawning Query, follow the steps below:
1.
In the Spawning Query, select the
Cross ID(s) that you want to delete. If you want to delete multiple Cross
ID(s), hold down on the ‘CTRL’ key or hold down your mouse and drag to select
the records you want to delete.
2.
Right click on your mouse and
select ‘Delete Spawn Cross’ from the Context Menu.
Business
Logic
·
The ‘Delete Spawn Cross’ option in
the Context Menu will only be made available if the eggs associated with the
Cross ID you are trying to delete, have been deleted from:
o
The Group Enumeration Query in
Incubation.
o
The Move Egg Query in Incubation.

3.
A notification will display
alerting the user of two things:
c) If
a Cross deleted is the result of a Male or Female being ‘Split’, then all other
Crosses which resulted from that ‘Split’ will also be deleted.
d) A
Count Correction must be completed in order to add the fish deleted back into
your Ponded Inventory.
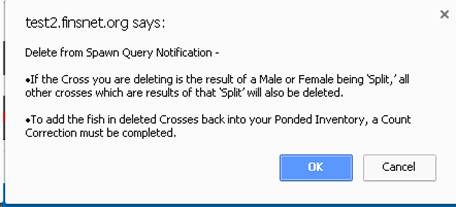
4.
Select ‘Ok’ to proceed and delete
the Spawn Cross or ‘Cancel’ to cancel the deletion of the Spawn Cross.
5.
After Deleting the Cross from the
Spawning Query, make sure to close and re-open the Spawning Session so that
changes are updated and the Cross no longer appears in the ‘All Spawned
Crosses’ grid.
6.
Deleting the Spawn Cross from the
Spawning Query will completely delete the Cross from FINS.
7.
After Deletion make sure to make
a Count Correction in order to add the fish deleted back into your Ponded
Inventory. To make a Count Correction in FINS follow the steps below:
a)
Select the Holding Location that
the Count Correction will be performed on by clicking on the ‘Apply Count
Correction to Spawning Inventory’ icon.

b)
The Count Correction form will
open.

c)
Enter the Date and Species.
d)
To add the fish back into the
pond, go to the ‘Add’ column and enter the number of Males or Females that are
being added back to the pond.
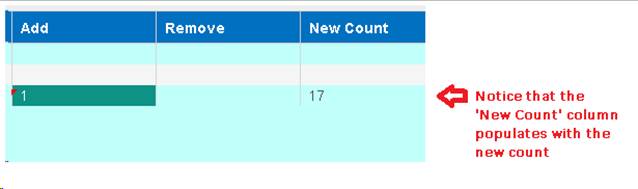
e)
Entering Notes is highly
recommended so that users know why a Count Correction was applied.
f)
Click ‘Save’ to save the changes.
*Group Spawning is a BETA Feature released for further
testing and scope determination.
Use Case
BETA Group
Spawning, by definition, indicates that only grouped data is entered for the
fish in a Spawning Session. Some Group Spawn Sessions may have ancillary
data available that include sub sample data and/or other unique information
captured about the Group Spawned. To attach this supplementary data to a
Group Spawning Session, user may ‘Upload Supplemental Data’ via PDF and/or
Excel, so that data associated to that Group Spawn Session can be captured,
linked to the Group Spawn Session, centrally stored, backed up and
Queryable. In addition, Supplemental Data files uploaded may be viewed
and/or downloaded by any FINS Online Query user that has permissions to the
Spawning Location Facility of the Group Spawning Session, enabling that
separate data collected on the fish group Spawned to be shared. *Specifically,
Columbia - Pacific NW Region FWCO Adult Bio Sampling Data Collected on
sub samples of fish in Group Spawn Sessions can be associated to applicable
Group Spawning Sessions that are saved by NFH Staff in FINS using this
Supplemental File functionality

Business Logic
FINS gives Data
Entry users the ability to Upload, View, Download and/or Delete Supplemental
Data files to a Group of Fish Spawned by using the ‘Upload Supplemental Data’
feature. The data can be uploaded anytime to a Group Spawning Session; During
the Group Spawning Session via the ‘Upload Supplemental Data’ Button; After
saving the Group Spawning Session, via the Existing Spawning Session grid,
Spawned Inventory grid and/or Group Spawning Query. After Supplemental Data has
been uploaded, users are not only able to view the data but also download it to
save/view.
Validation
- Uploading
Supplemental Data to a Group Spawning Session is optional
- Uploaded
Supplemental Data file formats supported are:
Steps
- From the Group Spawning Query, click on the Session
that you want to upload Supplemental Data for, right click and select
‘Upload Supplemental Data’.
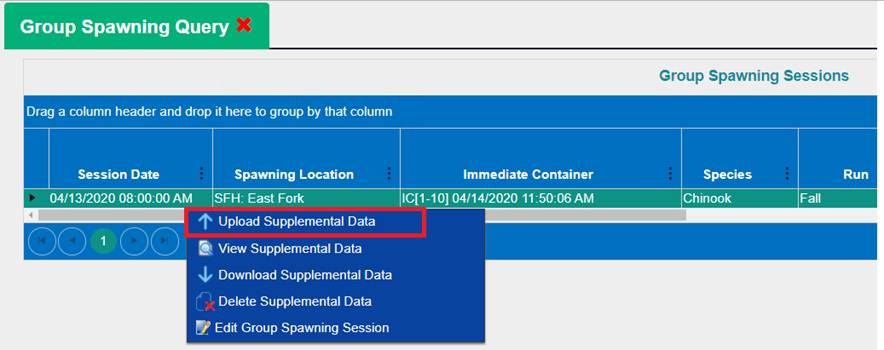
- Click on the ‘Choose File’ button and select the
file that will be uploaded. File needs to be in PDF or Spreadsheet format
(FINS will notify you if upload was successful or not).
- If Successful, click OK.
- If Unsuccessful FINS will notify you that the
uploaded file is either not an Excel spreadsheet or pdf or was corrupt.
When this message appears, the File did not save and you will need to
click ‘Cancel’ and repeat steps 1-2 again with an uncorrupt File in the
accepted Format (PDF/Excel).
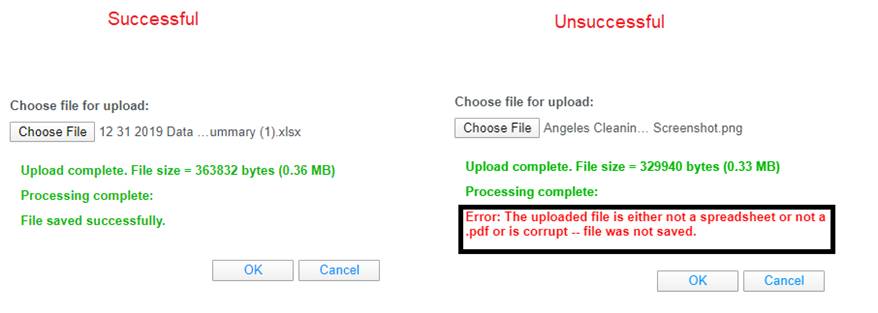
3.
If upload is successful, FINS will allow you to View or Download the
Supplemental Data by giving you the option after selecting the Session and
opening the context menu via a right click.
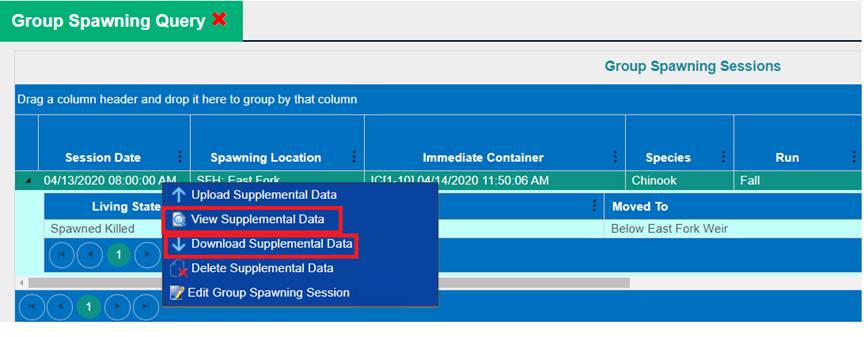
The Move Egg Incubation
Query displays the transactions that have been done to Egg Takes by Female
Spawn Cross/Egg Group of multiple Crosses (Females). Once in Incubation, Egg
Takes from Spawned Crosses, can be tied back to Spawned Adults using the Female
ID, Cross ID, Sample Value, Spawn Session Lot#, Spawning Session Date etc. Use
the Season filter tool to limit your Move Egg Query results to a specific data
set. The Move Egg Incubation Query columns can all be filtered/sorted/searched,
using the grid column filter tools.
·
This Query displays all records for egg groups moved from a
Spawning Session, Spawned Eggs, an Egg Inbox, or from an Incubation Container.
Records in this query are either ‘past’ or ‘current’. ‘Past’ records are
transactions that led up to the ‘current’ version of the record (the Egg Group
now). Past records are in Blue text and Current records are in Black. You can
filter the records by clicking on the grid menu  button located at the
top, right corner of the grid. Select ‘Show only Current Records’ and ‘Save
Choices as the Default’ if you want to save your customized display to be the
new default for your login on your machine.
button located at the
top, right corner of the grid. Select ‘Show only Current Records’ and ‘Save
Choices as the Default’ if you want to save your customized display to be the
new default for your login on your machine.
o
Users can use this query to see the Good Number of Eggs at
Incubation vs the Number of Eggs that were moved into a Rearing
Container.Incubation Live Count that was moved into Rearing.
§
Incubation Live Count is different from Inventory Count (Good
Eggs at Enumeration) since Live Count takes morts into account and deducts from
Inventory as shown below.
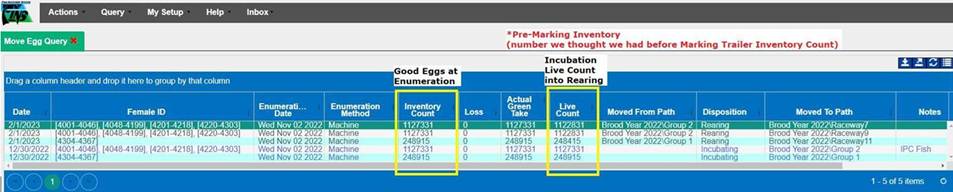
·
Context Menu: If an option you are looking for isn’t
available in the Context menu, you have selected a record that does not meet
the requirements for that option.
o
Verify: Will Mark Selected Record as Verified
o
Verify All: Will Mark All Records in Query as Verified
o
Finalize: Will Mark Selected Record as Finalized.
o
Finalize All: Will Mark all Records in Query as Finalized
o
Flag All: Will change the Status of the Flag on all
Records of the page displayed in the Query grid.
o
Note All: Will Add the same Note to all records in
the current display
o
Edit Record: Will open the form used to create this
record. If this option is not ‘Active’ it is because the record you have
selected is not the latest version of a record created for that Egg Group.
Moves From Spawning
Business
Logic:
· Moving Eggs from Spawning will
generate a record in the Move Egg Query.
· Enumerating Eggs in an Incubation
Container will update the current record in the Move Egg Query and will NOT
create a new one
· If Eggs are moved from Container A to
Container B and then get Enumerated in Container B, Container B gets updated
with the Enumeration while Container A remains unchanged
· Spawning more than one Female in a
Spawn Cross will generate one Cross ID, regardless of the number of Females
that are part of that Cross. The CrossID will begin with the first Female that
was spawned; any additional Females associated with that Cross will NOT show in
the Move Egg Query.
To Edit an
Enumeration, follow these steps:
1.
Find the
column that you are interested in. In this example, ‘Female ID’ was used.
2.
Click on the drop-down arrow
of the column.
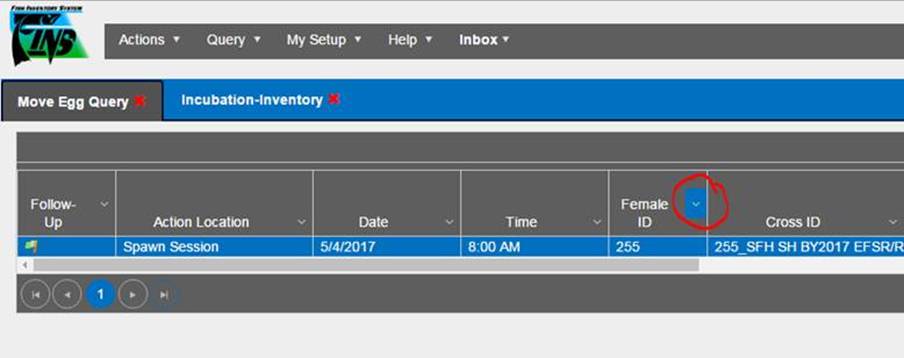
3.
Scroll down to the ‘Filter’
field.
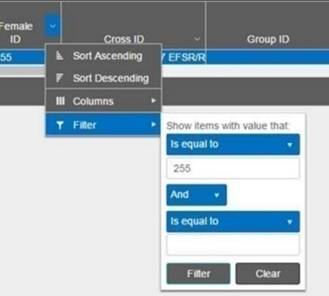
4.
Use this tool to filter. In
this example, ‘Female ID’ is filtered to display ID #255
5.
After filtering, there will be
a list of records showing what was filtered

6.
It is important to select the
right ‘Cross ID’, ‘Female ID’, & ‘Moved To’ Location.
7.
Select the record that is of
interest and right click on it. In this case, the selected record is
highlighted in blue below
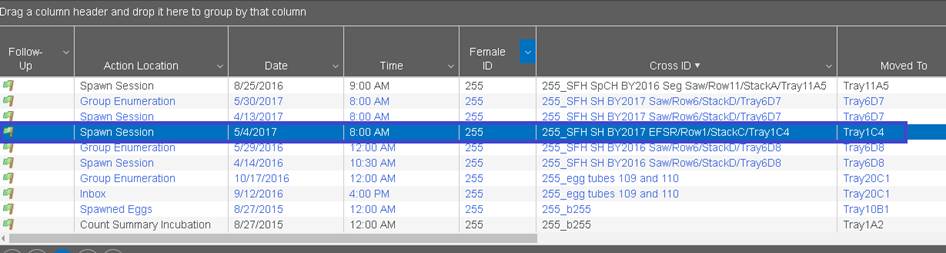
8.
Click on ‘Edit Enumeration’.
9.
This will take the user to the
‘Enumeration Edit’ form.
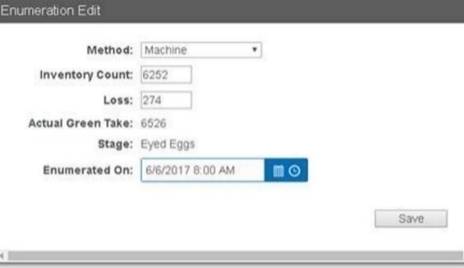
10.
Make the necessary changes and
click ‘Save’ when finished.
§
Delete Record: If you Delete a record, the Egg Group in this record
will be returned to the Moved From location of this record. If this option is
not ‘Active’ it is because the record you have selected was either
Transferred/Shipped, or is not the latest version of a record created for that
Egg Group
§
History: History displays information about the creation of the
record